This month, we tame a strange space, record a sitar and dispense a little wisdom on EQ, compression and reverb, as we sort out Dominik Johnson's home studio.
 Dominik Johnson plays his sitar, as Paul White searches for a good mic position.
Dominik Johnson studies world music at Leeds University, and plays all manner of plucked stringed instruments to a very high standard. His compact Manchester apartment is crammed with classical guitars, banjos, bouzoukis, mandolins, a renaissance lute, a tenor mandola, and even a sitar. However, his attempts to record these instruments at home had been compromised by the rather odd acoustics of his living space, and by the layout of his budget recording setup, which comprises Logic Pro running on a small Macbook laptop computer, an Edirol UA25EX interface and a pair of tiny Alesis M1 active USB desktop speakers. He'd made a good choice of microphones (a pair of Rode NT55s, to allow for stereo recording), but at the time of our visit the lack of acoustic treatment was working against him.
Starting Setup
 Dominik's flat is a nice, large space with high ceilings, but it was completely untreated when the team arrived.
We arrived to find that Dominik had enlisted the help of his friend Joel Davis, who is at the University of Huddersfield studying Music Technology. This turned out to be useful, as Joel is very tall and Dominik didn't have anything rigid to climb on when we were fixing things up!
The studio apartment is a rectangular room, around four metres wide and 10 metres long, with an enclosed 'island' in the centre serving as kitchen, bathroom and storage. This stops around 80cm short of the main room's unusually high ceiling (3.2 metres), leaving some storage space on top, which is accessible by means of a ladder but also allows sound to pass over the top. Essentially, this island divides the apartment into two roughly square spaces, separated by two short corridors on either side (flanking the island) — which unfortunately means that any sound created in one space sets off resonances in the other.
Dominik had his system set up on a small computer desk backed right up against a side wall. Playing some known test material revealed that he had a huge room-mode resonance set off by the bottom 'A' of his guitar.
Speakers Corner
 An unusual open‑plan layout with an 'island' in the middle caused problem resonances.
Because this was a rented apartment, we couldn't do anything non‑reversible, and there was no budget for bulky bass traps (although there was space on top of the island that could be used), so our first step was to try moving the desk, to find a place where the bass end would be more even to start with. Dominik's little Alesis monitors have rear ports, and his initial setup placed them very close to the wall. That being far from ideal, we experimented by moving the desk away from the wall, and then over to the corner of the room nearest the glass windows and doors leading to the balcony. By arranging the desk at an angle, we got the speakers further from the walls, and helped reduce side‑wall reflections reaching the listening position. We also placed Auralex MoPad foam pads under the speakers (Dominik had already bought some but wasn't actually using them!). Because the speakers were so small, only one half‑width pad was used under each speaker, set up 'reversed' — so that the speaker was angled up slightly, towards the listening position, and the foam that extended in front of it would help a little to reduce reflections from the desk surface. Using both foam pads would increase the area of foam and reduce reflections even more, but the desk was quite small and the best working compromise, leaving enough space for the laptop, was to use a single pad.
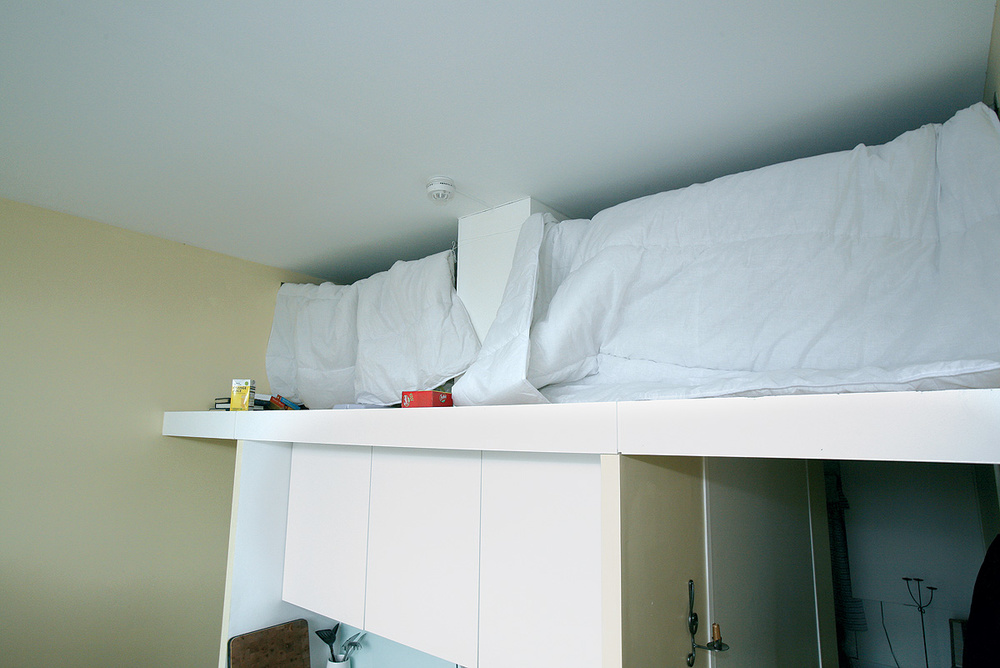
 Packing duvets into the storage area above the central 'island' room tackled the unwanted resonances, as well as providing some useful bass trapping.Further listening with test recordings and a 'staircase' of sine‑wave semitones (from Logic's EXS24) showed a noticeable improvement, although the room mode was still there. Examining the speakers showed that Dominik had engaged the bass‑boost switch: flipping this back to the normal setting cleaned up the low end further, as did pulling the speakers forward on the desk so that they were further from the walls, and closer to the listening position.
As an experiment, we improvised some foam plugs to put in the bass ports, which further tightened the low end, both with and without the bass-boost switch engaged. My preference was to leave the bass-boost off and insert the foam plugs halfway, which felt like a good compromise between a clean bass and having enough low end: tiny monitors like these are never going to be great at deep bass frequencies, but as Dominik was recording non‑bass instruments, the arrangement was workable. Even so, we did recommend he buy some good-quality headphones to use as a secondary reference.
All Of A Flutter
With plastered concrete walls, the apartment exhibited very obvious and distinct reverb, and produced some of the most dramatic flutter echoes we'd heard to date, so our priority was to dry this up as much as possible. We'd brought half a dozen sheets of two‑inch Auralex foam with us, but this wasn't going to stop sound leaking around and over the centre island, and exciting the bedroom space at the other end.
After considering the problem over coffee and chocolate biscuits, we set out for the nearest DIY store to buy self‑adhesive plastic hooks, nylon cord, impact adhesive and two king‑size polyester duvets. The plan was to glue wooden strips to the top rear edge of the foam panels using contact adhesive, and then hang these, picture‑style, on a self‑adhesive plastic hook stuck directly to the wall. We'd use the duvets to screen off the space over the centre island by hanging them over a nylon line fixed to plastic hooks and going all the way between the side‑walls, via a convenient centre support where we could put more hooks.
In most respects this worked well, although the hot weather made all the plastic hooks gradually peel off the walls under the very modest weight of the foam panels, so we had to provide a helping hand using some of our contact adhesive. We ended up with one foam panel each side of the listening position (one on the wall and the other fixed to the metal door/window frame), three on the wall behind the sofa, which was roughly behind the mixing position, and one more set horizontally, as high as we could place it to damp down some of the flutter echo that developed high up in the ceiling space.
With the panels and duvets in place, the liveness of the space was significantly reduced but was still enough to flatter acoustic instruments, especially if recorded with the floor rugs lifted to reveal the nice parquet floor. Test recordings sounded cleaner, with better imaging, and although the 'bottom A' bass hump was still present to some degree, it was far more benign now than it had been at the outset.
Recording System
 When we arrived, Dominik had his small monitor speakers placed directly on the surface of the desk...
Having addressed the acoustics issues as best we could, we turned our attention to the recording system. Dominik had been plagued by high latency, and couldn't get the direct monitoring on his Edirol interface to work. We were initially concerned that as the monitors and interface were both connected via USB, the setup might require an aggregate device driver to allow both to work at once (this approach can cause increased latency), so we wired the speakers into the analogue outs of the interface, using a couple of jack cables, so that the interface could use its own drivers.
A quick look at Logic's Audio Preferences showed that Dominik had it set to a 1024‑sample buffer size, and we reduced this to 128 to cut down the latency. Most players can live with this tiny delay even if they don't have zero‑latency hardware source monitoring, although we were determined to find out what had been going awry with the Edirol. As it happened, nothing was wrong, but Dominik hadn't realised that you need to turn down the track monitor level in Logic as you record. If you don't do this, you hear both the direct monitor signal and a slightly delayed version coming back from the computer — and his initial 1024-sample buffer size would have created a very distinct slapback echo.
We went back to the Audio Preferences, ticked the Independent Monitor Levels box, and showed Dominik that he could now turn down the fader level while in record mode, and it would automatically spring back to its playback level when he left record. Keeping the channel fader down while recording prevents the current performance from being monitored in the DAW output while tracking, so that only the direct source and existing DAW tracks are heard. We made some test recordings in this way after selecting source monitoring on the interface, and confirmed that all was now well, with no unwanted echo.
Mic Technique
 ...so we isolated the speakers from the desk surface, before putting foam in the ports to get the most appropriate sound for Dominik's music and room.
For recording vocals, we took along a Reflexion Filter kindly provided by Sonic Distribution. This would also be useful for placing behind an omnidirectional mic when recording Dominik's instruments. As usual, we rejigged the mounting hardware to make it sit closer to the centre of gravity of a typical mic stand. We also stressed that for the best recorded vocal result, some absorbing material should be placed behind the singer to intercept reflections that would otherwise bounce back over their shoulders, into the microphone, from hard surfaces behind them. Here, Dominik could use one of the foam panels or an additional duvet. He asked what was the best place in the room to stand for vocal recording, and we explained that as long as he avoided the exact centre of the room, or positions too close to the walls, the results should be OK more or less anywhere.
Dominik was also keen to see how we'd mic the various instruments that he plays, so we did some test recordings to see what worked best, using the Rode NT55 with its omni-pattern capsule fitted. Acoustic instruments always seem to sound more natural when recorded with an omni mic and, as explained above, if the room is intruding too much you can screen off the sides and rear of the mic using a Reflexion Filter or improvised screens. Because omni mics have a much better-balanced off‑axis response than cardioids, positioning also seems less critical.
 Above right: To the rear of the mix position, we decided to hang three Auralex acoustic foam panels to cut down on unwanted reflections. Right: we also placed foam panels at the mirror points to create a tighter stereo image from the monitoring setup.We explained a simple 'universal' miking rule that often yields good results when you're recording an instrument for the first time: you measure the longest part of the instrument that creates the bulk of the sound (such as a banjo body diameter), and then place the mic no closer than this distance, so that it has a chance to pick up sound from all parts of the instrument rather than from just one spot. Then you need to find the placement that gives the most natural sound, which is best done by wearing headphones as you move the microphone (or move the instrument relative to the mic). Most recording textbooks give you typical mic placements, but every situation (instrument, player and room) is different, and it always pays to search for that sweet spot.
When recording the sitar, I tried a mic position very close to the floor, to make use of the boundary effect and boost the low end slightly. The Sitar is an unusual instrument in which some sound is also produced by the (hollow) neck and, where attached, by a secondary resonator gourd at the back of the neck. We found that placing the mic close to the floor and aimed at the bridge from around 18 inches away produced a well‑balanced sound with the required degree of warmth. The banjo was altogether simpler, as it seemed to produce a consistent tonal balance over quite a wide angle, so the distance between the mic and instrument was actually more important than the mic position. We also experimented by having the mic look over the player's shoulder, working on the principle that if it sounds OK to the performer, it will also sound good to the mic. This can yield excellent results, but as we found here, the mic picks up more of the player's breathing (or humming, in Dominik's case).
EQ, Compression & Reverb

As Dominik was a relative newcomer to Logic, Paul created a 'starting' song template that included screensets for the Arrange and Mixer pages, as well as a reverb set up on a post‑fade send. This lets you get up and running without having to set up a project from scratch every time. He also gave a crash course on compression, the most important lesson being that if you choose a preset compressor plug‑in setting, you still need to adjust the threshold controls so that the gain‑reduction meter is showing activity on the loudest peaks: if the gain‑reduction meter isn't showing anything, then you're getting no compression. For gentle instrument compression, a peak gain‑reduction of 4‑6dB is probably fine, although more aggressive sound sources may need larger amounts of gain reduction. Ultimately, of course, your ear has to be the judge.
This led to the question of the best order in which to place insert plug‑ins. On one very transient‑rich, percussive part that required very assertive level control, Dominik had placed a reverb plug‑in before the compressor, creating a splashy, unpleasant sound that got in the way of the instrument. Normally, you'd use reverbs via post-fade sends, but on small projects there's no problem using them as inserts. In this case, we reversed the order, so that the compressor controlled the peaks before the sound hit the reverb, and the result was less 'splashy'.
EQ, on the other hand, can go before or after compression, depending on the effect you're after: for natural‑sounding tonal tweaking, I tend to favour filters first (to remove unwanted out‑of‑band noises such as rumbles), then the compressor, then creative, tonal‑shaping EQ if it's required. Placed the other way around, the compressor will react more strongly to any frequencies boosted by the EQ, and tend not to control frequencies you've cut. We also demonstrated the way in which quite severe narrow EQ cuts can deal with resonances, but narrow EQ boosts rarely sound natural. For natural results, use as little EQ as you can, and boost with fairly wide (low) 'Q' settings.
Our final venture was to explore some Logic Space Designer reverbs to see what was best for acoustic instruments. While the temptation is always to go for a concert hall — or something equally familiar sounding — you can get great results from less obvious spaces, such as tiled rooms, parking garages, or even woodland and other outdoor spaces. Impulse responses with complex early reflections and low-level tails often sound interesting, but don't over‑use them: a 20 percent mix level is usually a good starting point. About 60‑90ms of pre‑delay can add to the sense of space, while rolling off some low end below 200Hz can clean up an otherwise messy reverb.
As rush hour was approaching, we decided to make our getaway before any more of those B&Q hooks peeled off the walls — but we left Dominik with the contact adhesive just in case!
Reader Reaction
Dominik: "The visit was educational and inspirational. With the nature of the instruments I work with, and the acoustics of my studio apartment, I knew I had to call the professionals! They were incredibly helpful and articulate in explaining all the subtle changes and variations they made to my setup, whether it was to do with the reflections, vibrations or reverberation. The few secrets they gave me on Logic will also go a long way!
"The projects and work I get are professional, and I needed my own studio to do the job. The natural ambience of my studio is now more controlled, and the frequencies (generated from monitors or instruments) at all levels sound much more balanced. With all these subtle, yet sweet changes, my studio has evolved from a basic setup to an advanced one within a day. I'm indebted to the SOS team for their help.”