
The SOS team help a reader in Nottingham to polish his vocal sounds and improve his mixes.
Tony Global's background is in the dance music/DJ scene, releasing records under various guises for the Tummy Touch and Breakdown labels, but since doing production work for singer-songwriter Matthew Jay a few years ago (a collection of his early material entitled Too Soon has just been made available on www.matthewjay.com) he has increasingly been working on guitar-based music. His current project is producing an album of what might loosely be described as electric/acoustic melodic folk/pop, which features some excellent vocals from talented vocalist and songwriter B Kristiansen — they intend to release this on their newly-formed label Urban Folk. His studio is in a converted loft space above his Nottingham home, where he has a Mac G4 running Logic, PMC TB1 and Yamaha NS10 monitors, and a wonderful private collection of classic recording gear. He also seems to have most of the old hardware synths of which Paul now has the plug-in versions! A MOTU 828 is used as the audio interface to the Mac, while a Mackie 1604VLZ Pro mixer is used as a routing and monitoring station. Acoustic guitar parts are recorded on two tracks using an AKG C414 and the guitar's built-in pickup via a Drawmer 1960 preamp and compressor. Most electric parts were input via an early '60s Binson Echorec valve delay unit (used as a preamp for warmth and tone) and the Drawmer 1960.
Like many people with computer-based studios, Tony has found that he's relying more and more on software and less on hardware, and since upgrading to Logic Pro, its Space Designer plug-in is being used in place of a hardware reverb. Tony called us in because he felt that he could improve both his recording technique and his mixes, and he also wanted to check out his monitoring environment. The bait was a selection of chocolate comestibles and real coffee!
Stereo Image & Phase Problems
Although his studio is small and loft-shaped, with an apex roof, the combination of a soft sofa at the rear of the room and lots of stored equipment seemed to tame the acoustics pretty well, and the bass end proved to be reasonably even when we played our test CD over the PMC nearfield monitors. However, the stereo imaging from the PMCs was not up to the high standards that Hugh knew them to be capable of, probably because they were placed relatively close together on an intriguing pair of concrete speaker stands. So after loosening the cables from the cable clips behind the desk, we swapped the PMCs and NS10s over, putting the PMCs on the outside of the monitor pairs. This delivered the expected improvement in imaging, and we felt the system provided a good, reliable monitoring environment.
 Tony's PMC monitors were moved wider apart to improve their stereo imaging, and the driver mounting bolts of his NS10s were tightened to reduce the potential for rattling and detrimental air leaks.
The PMCs were powered by a Bryston 3B amplifier, via a switch box that allowed the speaker signal to be routed to either the TB1s or a pair of NS10s. So having checked out the PMCs, we switched to the Yamaha monitors and realised instantly that they were wired out of phase. Tony had just undertaken some major rewiring and hadn't really used the NS10s, as the PMCs are his main monitors, which was why he hadn't yet noticed. The signs were unmistakable though — it was like having your ears slowly sucked out by a large sink plunger! After tracing the wiring it became clear that the error was in one of the NS10 connections at the back of the speaker switching box, so Hugh clambered underneath the bench with a screwdriver and remedied the fault.
Tony had also reported distortion from the NS10 speakers when they were turned up loud, but this couldn't be reproduced after Hugh had fixed the wiring so it may have been down to a poor contact, or even the way Tony perceived the effect of the phase reversal. However, another common source of rattles, air leaks, or other distortion-like noises can be if the bolts that hold the drivers into the loudspeaker cabinets work loose, as they tend to with age and use. To be sure that this wasn't a problem, Hugh and Tony set to with screwdrivers and Allen keys to make sure everything was tight and secure.
 The Yamaha NS10 monitors were out of phase, so Hugh set about finding the cause of the problem. In the end the fault was traced to the monitor switcher mounted under the desk — the NS10s had been incorrectly connected.
Fine-tuning The Acoustics
Tony initially phoned us for advice on setting up his studio a few months ago and had implemented many of our suggestions before we arrived, so at least everything was in the right place and the monitors were standing on thick concrete slabs atop sturdy concrete stands. The only change we made was to position his PMC speakers on the outside and the NS10s on the inside to produce the best stereo imaging from the best pair of monitors. Both sets of monitors were fixed with blobs of Blu-Tac to the concrete slabs and were angled inwards towards the listening position. We re-checked the sound by playing a selection of test tracks we take around with us for exactly this purpose and, considering how small the room was, we were pretty happy with the results.
In fact the only improvements we felt we could make were to put some acoustic foam behind the monitors, a further patch on the ceiling near the apex to kill ceiling reflections, and additional foam at either side of the monitoring position to kill side-to-side reflections at mid-range and high frequencies. This is desirable as it helps to tighten up the stereo imaging, and as we had some spare Auralex panels with us we propped these in place temporarily to prove the point, then left them with Tony to fix more permanently later.
 Tony and B helped Paul temporarily place some acoustic foam on the ceiling to see whether ceiling reflections were compromising the monitoring sound.
Because the Auralex panels we had available clashed pretty violently with the room's colour scheme, we suggested that Tony build them into a simple wooden frame which he could then fix to the wall, and cover the whole thing with a light-weave fabric of an acceptable colour. The panels would be just as effective acoustically, but aesthetically more pleasing and much easier to remove (when the time came to move house) than if the foam was glued directly to the walls in the conventional way.
Vocal Recording & Processing
We then turned our attention to some tracks that Tony had been working on, and it has to be said at the outset that the general standard of recording and mixing was very good, and there were some great performances and musical arrangements. However, Tony was not quite happy with the way B's vocals sat in the mix, and as he'd found most reverb treatments to be too wet-sounding, he'd opted on the side of keeping them pretty dry, which had the result of making them sound slightly displaced from the rest of the mix.
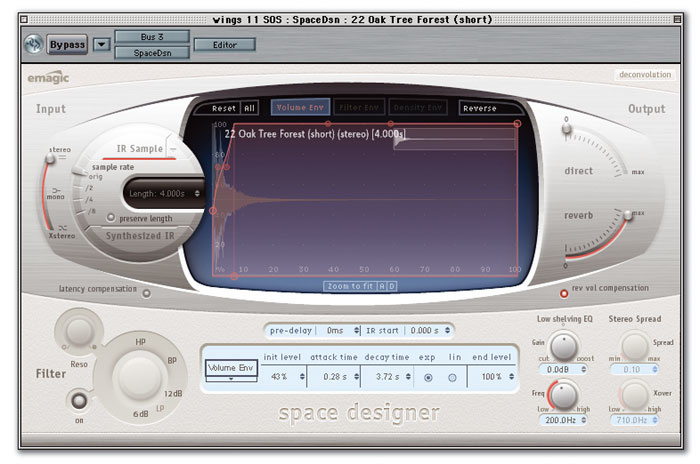

 Here you can see the settings used to process the lead vocal. The Oak Forest reverb patch was adapted to get the vocal to sit in the mix, while the compressor made the sound more even and intimate. EQ was then dialled in to emphasise breathiness and reduce an undesirable mid-range coloration.He had been recording B with her facing a corner of the studio which had been festooned with blankets to make it sound less lively. However, this arrangement has the mic facing out into the room, and so it captures the room ambience. We suggested making future recordings with her standing with her back to the corner and singing outwards. That way, the cardioid pattern on the AKG C414B ULS mic Tony was using would inherently reject most of the unwanted room ambience, and anything bouncing off the wall behind the singer would be soaked up by the blankets, and so be prevented from getting into the front of the mic. What pickup was occurring from behind the mic could be further suppressed by using a small foam screen (around a foot square), or even a pillow, suspended directly behind the mic. Tony had been using a pop shield, so popping wasn't evident on any of his recordings.
Getting back to his existing recordings, Paul suggested that we try some different reverb settings to see if we could achieve a sense of space and air without the reverb getting in the way of the performance. One of the first things Paul has learned about Logic's Space Designer convolution reverb is to try even the unlikely sounding presets, as many of then sound quite different to way you expect them to. After a few trials, we eventually settled on Oak Tree Forest Short, a preset based on an impulse response recorded in a real forest, and we found that this gave the vocal a lovely sense of air, without the splash and mess of a typical artificial reverb. The vocal now sat much better in the mix, but we still needed to use compression to keep it even and make it sound more intimate.
Tony had been using a time-limited evaluation copy of the Waves Renaissance Compressor to treat the vocals, so Paul tried to set up Logic's own channel compressor to keep the same character, but at the same time to apply more assertive control. The settings we arrived at were not atypical, and comprised setting the side-chain to RMS sensing (Peak is better from drums and other percussive sounds), with a ratio of 5:1 and a fairly hard knee. The threshold was then turned down until the gain reduction meter showed around 6-8dB of gain reduction on the signal peaks, but the exact degree of compression had to be set by ear. A fast attack time and medium release time seemed to work well, and Tony was very happy with the character of the sound. This is the vocal recording setup Tony had been using. Paul & Hugh recommended that he face the mic back into the padded corner, rather than into the room, in order to reduce the amount of room sound captured.
The final step was to use gentle EQ to polish the sound, with the now-familiar broad-band boost applied at 10-12kHz to emphasise the breathiness and intimacy of the voice, while a narrow cut at 640Hz took out a slight hint of honkiness which could have been due to the room acoustics influencing the recorded sound. After re-balancing the vocals in the mix, we all felt they sounded more 'produced' and better integrated, without seeming over-processed.
Bass & Drum Tweaks
A bass-guitar part had been treated using a rotary-speaker plug-in, but we felt this diluted the impact of the sound and prevented the bass from doing its job of driving the track along. The solution we tried was to remove the rotary effect and compress at a ratio of 5.4:1 using a hard-knee setting coupled with just enough compressor attack to let the start of the note come through cleanly. Again the threshold was adjusted so that quieter notes only just tickled the gain-reduction meter, while louder notes were subjected to a maximum gain reduction of about 6dB.
Finally, we used EQ to boost the 'character' part of the bass guitar spectrum, which in this case required a peak at around 230Hz and another at 500Hz. The normal instinct when treating a bass sound is to boost the bass, but this can be counterproductive, as most deep bass is inaudible on a small music system or car radio. By boosting the level in the 200-250Hz range, the bass sounds louder on small systems, and the emphasised harmonic frequencies help the bass remain audible when the other tracks are added to the mix.
A brushed drum part was processed to thin it out, so that it would remain plainly audible in the mix but not take up too much space. This was achieved mainly through the use of EQ, where a low-shelving filter was used to remove the bass and lower-mid-range frequencies, after which a 4kHz boost helped bring out the detail of the sound. The Logic Exciter plug-in is also very effective in this role if the original sound is inherently lacking in brightness.
Another track featured a nylon-strung classical guitar playing a rhythm part which Tony had then tried to EQ to make it sound much brighter, almost like a steel-strung guitar. The obvious approach here would be to try recording the track again using a steel-strung acoustic guitar, as far less processing would then be needed to make it sound the way Tony wanted it to sound in the mix. Having pointed this out, Tony agreed at once that maybe a steel-strung guitar would work better in the song.
Tony then went on to say that he'd had noise problems when recording the acoustic guitar with a microphone, and had resorted to using a denoising plug-in to fix the track before mixing. Tony had been using a fairly high-sensitivity capacitor mic to record the guitar and vocals (AKG C414B ULS) in conjunction with a Drawmer 1960 tube preamp/compressor. There shouldn't have been any problem with equipment of this quality, so we asked him to demonstrate his recording technique with B playing a nylon-strung guitar. Sure enough, there was far more background hiss than there should have been. In checking the signal path it turned out that Tony was routing his 1960 into his Mackie mixer before sending it to the MOTU 828. The disparity in levels at various points along the way meant the overall gain structure was far from optimum — hence the noise.
Since all of the outboard gear was accessible via a small patchbay, it was very easy to patch the output of the 1960 directly into one of the MOTU 828 line inputs, and when we repeated the recording, the noise problem vanished completely. These little observations were appreciated by Tony as, no matter how much experience you have, bringing in a new set of ears (and eyes) always picks up something you hadn't thought of or had overlooked.
As a new pot of coffee was brought up, Tony asked whether we thought recording the guitars downstairs in a room with wooden floors would be better. The downstairs room sounded ideal for this, as the acoustics were nicely live (wooden floor, plain walls, and a very high ceiling), without being overbearing. An alternative solution would be to put a sheet of MDF or hardboard over the carpet upstairs. Recording instruments in another room two floors below Tony's studio would mean running long cables, but that's not really a problem. Arranging communications and headphone monitoring would be more of a headache, but it would be perfectly possible.
Home Mastering
Inevitably the conversation turned to mastering and Tony mentioned that he had resurrected his Tascam TSR8 half-inch eight-track recorder by having it fully serviced and the heads re-lapped. He'd originally thought of using this to record drum tracks to 'warm up' the sound, and also to use for location recording. However, it also occurred to him that he could use it while mastering to warm up tracks by recording the stereo mix to analogue tape, then playing it back into the computer. A number of engineers do this routinely, but Tony wasn't sure whether he should use just two tracks, or record the left channel onto the first four tracks and the right channel onto the other four tracks — he'd heard that doing this produced a quieter recording. While that is perfectly true — as the more tape area per second you can record onto, the lower the tape noise will be — even the smallest azimuth error in the mechanical head alignment would compromise the frequency response, so it's probably not a good idea to do this in practice.

 The impact of a bass sound was increased using compression, the attack time being adjusted to let the start of each note come through cleanly. Some EQ was also used to increase the sense of body and character.The other point to keep in mind is the effect of the built-in Dbx noise reduction used in these machines. The Dbx noise reduction system only works well if you don't drive the recording levels into the red, since it relies on a clean recording to decode accurately. However, most people want to drive analogue tape fairly hard to get the soft-saturation warmth. If you're using the tape to create warmth, then running the machine at its highest speed and recording hot without the noise reduction switched on is the best bet. Because the recording levels are high, tape noise should not be an issue unless your music includes lots of very quiet passages, but of course the ultimate quality of your end result when working this way also depends on how good the converters are in your system, as you have to convert from digital to analogue and then back to digital again for the final mastering. Using a tape machine as a processor is certainly worth trying, but you should also compare the results with tape- or tube-emulation plug-ins, as the best of these probably sound better than an indifferent tape machine, and you won't be at the mercy of your converters. The level of noise is also likely to be much better using plug-ins.
However — and this is very important — you really shouldn't be applying any overall processing at all to your mixes if you intend to have them professionally mastered, and for this album project Tony was planning to use the services of a professional mastering house. The safest way to proceed is to mix your tracks as 24-bit audio files and then burn these to CD-R as data (WAV or AIFF files), not as audio CD tracks. Don't do fade-ins or fade-outs while mixing, as the mastering house can do them better and at the right point in the process, and don't top and tail the tracks, as the mastering engineer may need to derive a noise fingerprint from just before the start or just after the end of the recording if noise removal processing is deemed necessary at the mastering stage.
Of course if you are doing your own mastering, then you'll need at the very minimum a good compressor (either multi-band or full-band), a very nice-sounding equaliser, and a fast limiter. These can be hardware or software, but working in Logic there are good results to be had using the built-in compressors and channel EQ, although Paul has never really been impressed by the limiter — he normally uses Waves L1 or L2 limiter plug-ins. Mastering at home requires good ears and good monitors, as well as a knowledge of gain structure, the implications of the various digital recording sample rates and bit depths, and dithering. However, for privately produced records where professional mastering can't be justified, it can be done. What's more, you can learn a lot doing it!
By the end of the afternoon, we'd come up with some strategies for improving Tony's already good mixes and we'd also made some practical suggestions regarding recording techniques. But what we really wanted to know was where he'd got the wonderful sign: Hippies use side door!
Tony's Comments
 "By the time of the visit, I was already enjoying much-improved monitoring having implemented some of Paul and Hugh's prior emailed suggestions. Moving the speakers a couple of feet away from the roof perling to their rear, and positioning them on solid concrete paving slabs (as opposed to a wooden shelf) atop concrete speaker stands had tightened things up considerably. The vast improvement in stereo imaging on the PMC TB1s (my main monitors) achieved by swapping their position with the NS10s was a revelation, as was the result of (ahem!) wiring the latter in phase.
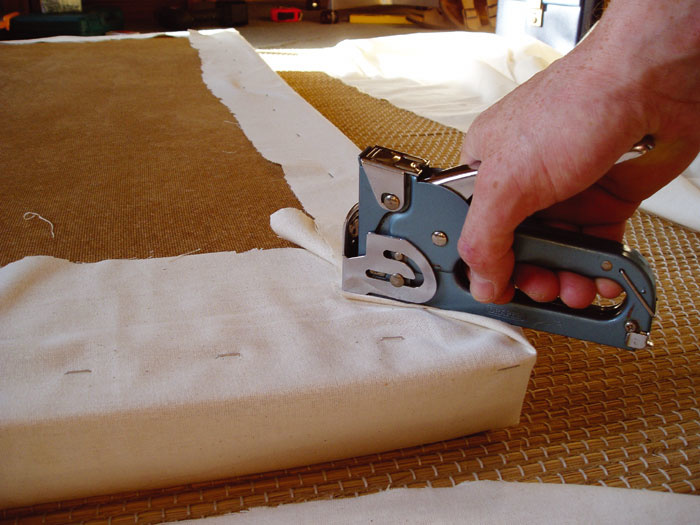
"Paul had suggested making a wooden fabric-covered frame to house the Auralex panels, but as the roof of my studio is clad in 30mm-thick insulated plasterboard, I decided on a lightweight option which would have the desired effect, as well as making the panels easy to reposition if required. First I attached the foam to thin hardboard using spray adhesive, and then used a staple gun to cover the whole panel in light-coloured fabric. By cutting small strips of fabric away at the corners of the panels, I was able to drill screw-holes to fix the panels in place, which could then be covered up by tucking the fabric strips back under the edge of the panel.
"With the Auralex panels in place and bags of clothes and duvets behind the sofa to enhance its function as a bass-trap, the only further improvement to be made is the fitting of venetian blinds to the large Velux windows to further reduce reflections — and maybe I'll also upgrade to TB2s!
"I always enjoy learning from someone else's approach to a mix, and gleaned many useful hints and tips from watching Paul attack one of our tracks — particularly when it came to thinking 'outside the box' with regard to reverb selection. The decision to produce and release B's debut album without the assistance of a record label has many potential pitfalls, and we'd like to thank Paul and Hugh for helping to steer us in the right direction (their mastering advice has probably saved us a major headache). Over the course of the visit I found myself furiously making notes in a bid to remember as much as possible — the amount of information imparted in such a short space of time was a more than generous return for the coffee and Hobnobs!"