We continue our investigation into Reason’s ReGroove Mixer.
In last month’s Reason column we took a look at the relatively little-known and often-overlooked ReGroove Mixer, which in Reason 8 is opened with the transport bar’s GROOVE button.
ReGroove is probably unique amongst DAWs in presenting controls for rhythmic manipulation as what appears to be some kind of mixer. As unusual as it looks, though, the thinking behind it is sound, and the design quite clever. To get your head around it, it helps to think first about the way most DAWs and other sequencer apps work with quantise.
In many, quantise is available as a destructive process: notes are made to play in time by snapping them into new positions in the sequencer. This is what Reason’s normal Quantise command does, although as we discovered last month the effect can at least be softened or humanised a bit using options in the Tool window’s Sequencer Tools page.
Many DAWs also offer a non-destructive quantise. With this, the original timing of your performance, recorded into the sequencer, remains untouched. But it’ll get quantised during playback, in real time. You get the advantage of improved timing, but with the possibility to change the setting, or do away with quantise completely, at any point down the line.
ReGroove is, essentially, a specific kind of non-destructive quantise feature. Its ‘channels’ each host one kind of rhythmic alteration or ‘groove’, the strength of which is controlled by the fader, and with additional options provided in the Tool window’s Groove Settings page. And the way you actually apply grooves to tracks is by using the Select Groove pop-up menus in the Sequencer; there’s one for every note lane of an instrument track.
 The combo of the ReGroove mixer and the Tool window’s Groove Settings page can carry out powerful, exciting rhythmic shaping. You can use Reason’s bundled groove patches, or create grooves yourself from various sources.
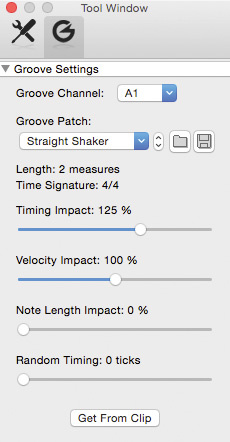
 The combination of bouncing a sliced audio clip to a REX loop, and then writing the notes that trigger it in a Dr OctoRex device, allows grooves to be extracted from audio tracks.To see it in action, try recording a typical MIDI performance to a click — perhaps a busy synth or piano riff. Open ReGroove if it’s not already, and in the first channel, A1, select a groove by clicking on the Browse button. The bundled grooves can be found in the Factory Sounds refill, in the ReGroove patches folder. Choose and load up anything you like the sound of for now. Then, in the sequencer, apply the groove channel to the track you recorded by choosing A1 in the Select Groove pop-up menu. You should even see the name of the groove you chose as confirmation.
Now, during playback you should hear the effect of the real-time groove alteration. Try tweaking that ReGroove channel slider; pulling it down softens the effect, while the Slide and Shuffle knobs time-shift and unbalance the groove, respectively. Also click the channel’s EDIT button: that’s a shortcut to those extra Tool window options, where you can soften or intensify the three components of a groove — timing, velocity and note length — individually. And of course, you’re quite at liberty to have lots of different grooves running concurrently, using more ReGroove channels, or to apply any single groove to as many tracks (or note lanes) as you wish.
Beyond The Presets
First experiments with ReGroove can often be a lot of fun, and addictive, and the potential is there to really transform the feel of your MIDI tracks. However, your next step might be to create your own grooves. Let’s say you recorded a piano riff that had a great feel. It’s easy to capture that and apply it to other tracks. Here’s how:
1. Select the piano riff clip in the sequencer. Ideally, adjust the clip boundaries first so that it occupies a whole number of complete bars. The SNAP features, set to a value of Bar, helps with that.
 Rob Papen’s Quad synth.2. Right-click the clip and choose Get Groove from Clip. The groove is extracted, so to speak, and is loaded into whichever ReGroove channel currently has its EDIT button lit.
3. For quick and dirty use, just assign that same ReGroove channel to any other sequencer note lanes you need to (like bass and drums, perhaps), and you’re done. But if you felt it might be useful to keep it for future use
4. Click the ReGroove channel EDIT button to call up the Tool window. Click the little ‘floppy disk’ Save button, name your groove more descriptively, and save it to a location of your choice.
Grooves & Audio
ReGroove became a part of Reason long before audio tracks did, and sadly it has never been updated to offer groove quantise of audio, even for Reason’s more recent audio slicing implementation. There is a work-around though, even if only for short loop-style audio clips. The idea is you get it into a Dr OctoRex loop player, trigger the resulting slices from notes in the sequencer, and use ReGroove to manipulate those. Let’s look at the steps involved:
1. Trim the audio clip so that it occupies a whole number of complete bars.
 Softube’s Tube-Tech Classic Channel processor.2. Double-click it to reveal its audio slices, then type Command-A (OS X) or Control-A (Windows) to select them all.
3. Right-click the clip and choose Bounce / Bounce Clip to REX Loop
4. The resulting REX loop goes into the Reason song’s Self-contained Samples folder. In Reason 8 it’ll be revealed automatically in the Browser, while in previous versions you may need to seek it out in the Song Samples pane of the Tool window.
5. In Reason 8 drag the REX loop into an empty part of the sequencer or rack — a Dr OctoRex is created and the loop loaded. In previous versions just double-click the loop in the Tools window to achieve the same thing.
6. Now, viewing the Dr OctoRex in the rack, right-click the device and choose Copy Loop to Track, which writes the trigger notes into a region between the L and R markers in the sequencer. Also turn off the Enable Loop Playback option, so that only the notes are triggering the loop.
7. Finally, viewing the Dr OctoRex track in the sequencer, assign a ReGroove channel to the track’s note lane. The result, all being equal, should be grooved audio.
Extracting Grooves
Dr OctoRex’s Copy Loop to Track feature is, as you may already have guessed, the precursor to being able to extract new ReGroove grooves from REX loops. Load the loop in Dr OctoRex, Copy Loop to Track, select the resulting note clip in the sequencer, right-click it and Get Groove from Clip.
One scenario in which this works really well is when you’ve based your song around a REX drum percussion loop, and you want to get all your programmed Kong or ReDrum parts meshing beautifully with it. Extract the REX groove, assign it to the programmed tracks, and hopefully you’re laughing.
RE Roundup
While the flow of new Rack Extensions into the Propellerhead shop still has more than its fair share of bamboozling CV devices, major new instruments and effects are still appearing. Here’s a quick look at one of each, which happen to be a couple of real whoppers!
Rob Papen’s €99 Quad is a serious synth that, for the first time, isn’t just a port of something already available in a conventional plug-in format — this baby is a Reason pure-blood. And despite the formidable user interface, it’s still pretty easy to understand, being at its heart a two-oscillator, two-filter subtractive design. Its unique qualities, however, are provided by the four fully automatable X-Y pads, which apply various types of distortion and shaping to each oscillator’s waveforms. The oscillators can radically modify each other too, via the innocuous little OSC > OSC MOD section to the bottom right of the X-Y pads. The result is one of the deepest, most unstable and potent synths to come to the Reason platform. It naturally tends towards edgy, snarling, harmonically complex tones, but repays real understanding and programming talent too, and can turn its hand to many styles and approaches. Much recommended.
Softube’s Tube-Tech Classic Channel (price TBA) is a port of one of their existing plug-ins, itself a model of hardware apparently worth more than $8000! The three virtual rack units are, respectively, a two-band (low and high) EQ, a mid EQ, and a compressor. Mix duties include broad, subtle master fader and bus shaping, but also more obvious treatments of vocals and guitars, where the particular flexibility of the mid-band EQ can come in very handy.


