This month we look at a Combinator building project that allows you to mix and manipulate loops on the fly.
In the last two Reason workshops we've explored ways of using Reason on stage, first as a replacement keyboard rig, and then as a kind of instrument in its own right. This month we're building a tool in Combinator that's specifically designed for live use, providing a fast and fun way of controlling REX loops. In a free-form live set or jam, this Device lets you layer and play with new beats very quickly. In other live situations, you can use this Combinator as a back-up: if something goes wrong with the planned set, you can still keep some music playing.
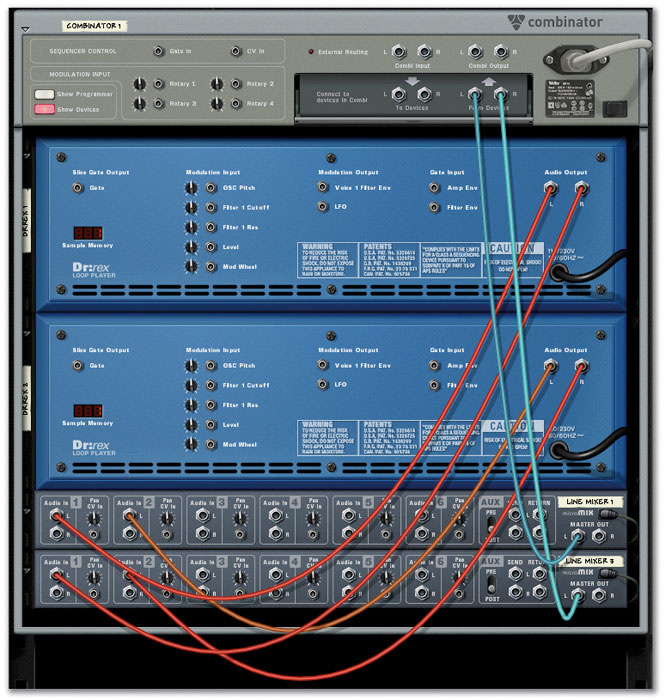
 The finished Combinator patch should look something like this.
The main picture shows the finished Combinator setup to give you an idea where we're headed. It's based around two Dr:Rex loop players, which will be your two sound sources. The Combinator 's control panel has a crossfader knob which allows you to mix and fade between the two loop players. Various other devices and control assignments give you access to effects commonly seen on DJ mixers, such as EQ band kills. Let's get stuck in...
Two Decks & A Crossfader
To get started, create a new Combinator and add two Dr:Rex players. The first Dr:Rex will cable itself to the Combinator 's outputs, but we'll change that in a moment. Next we need a way of crossfading between the two devices, and this requires a small detour because we're going to use quite a sophisticated technique for achieving this. The simplest way to crossfade between two devices in a Combinator is to map a knob to the main level controls of both devices, or to the channel levels of a line mixer that they are connected to. This knob would be assigned to control the level of each device in opposite directions. In other words, for Dr:Rex one, you would assign the level to be 127 when the knob is fully anticlockwise, and 0 when fully clockwise. Dr:Rex two would have a reversed polarity assignment on the same knob, with maximum volume at the clockwise position. The knob will then adjust the balance of the two devices.
 It's possible to build a realistic crossfader in Reason by using this cunning patching system.While this scheme is quite simple, if you try it you will hear a problem. There is a significant level drop when you mix both loops by placing the knob near the 12 o'clock position. This is because the volume faders of the loop players (or mixer channels) adjust the volume in a linear fashion, resulting in a linear crossfade. What we need is an 'equal power' crossfader, as you would tend to find on a DJ mixer. After coming up with some rather ugly workarounds for this, I was very happy to discover that Kurt Kurasaki, the author of the excellent Power Tools For Reason book, had found an ingenious solution. Kurt, better known as 'Peff' in the Reason community, realised that the pan pots on Reason 's mixer devices follow an equal power law, rather than a linear one. The workaround is quite hard to grasp, as it requires the use of two line mixers instead of one, but it works perfectly.
The screen to the right, top shows the correct connections for the equal power crossfade scheme. Note that only the left channel inputs and outputs are used on the mixers, and each Dr:Rex connects to both mixers. The screen below that shows the Combi Programmer assignments for Line Mixer 1. Rotary one is assigned to Channel one pan with a range of -64 to +63. Rotary one is then also assigned to Channel two pan, with reversed polarity (+63 to -64). You will need to use one of the two spare slots at the bottom of the Modulation Routing table to make the second assignment. The assignments for Line Mixer 2 (not shown) are exactly the same.
Synchronised Playback
 This Matrix sequencer has been configured to trigger loops automatically. Dr:Rex playback is normally either started by pressing the Preview button, or playing the slices back via MIDI. Whole loops are played back with MIDI by using the To Track button to create MIDI events in the sequencer for the current loop. Neither of these is practical for our purposes, because we want to be able to change loops on the fly without interrupting playback or fiddling with individual devices.
Luckily, there is a little-known feature of Dr:Rex that lets you trigger loop playback by sending a MIDI note message with pitch value D0. Easy then, you might think: we can just trigger the loops with a Matrix step sequencer. However, Matrix only produces notes down as low as C1. The cunning workaround is to use Matrix 's Curve output to produce a CV signal that the Dr:Rex players think is a D0 note. Create a Matrix, and cable the Gate output to the Combinator 's master Gate input, and the Curve output to the Combi's CV input. Now switch the Matrix to Curve mode on its front panel. Next comes the tricky part: you need to enter a Curve value into the first step of the Matrix that equates to a D0 note value. Set the Matrix to play a short loop of four steps and start it running. The screen below shows a Matrix with the value you need in for this, but you may need to experiment to find the exact setting to trigger playback. Once you've got it, the Matrix will trigger both loops every time the sequence starts, freeing you from having to start loops playing back manually. This means that both loops will also retrigger at the same time, even if their loop lengths are different. I've set up several different loop lengths in the Matrix (one beat, two beats, one bar, and two bars) and saved them in the pattern selector.
Cue Mixing In Reason
 This screen shows the mixer after cue mixing has been set up. As the Combinator we're building this month lets you mix and crossfade between looped beats and sequences, the subject of cue mixing arises. The need for cue mixing in this situation is not as urgent as for a DJ spinning vinyl, as Reason makes sure that everything is beat matched, and if you know your loop collection you should have a good idea what to expect. However, if you are randomly jamming with a pile of unknown loops, you may want to set up a cue mix so that you can preview them before you bring them into the main mix. The same goes for bringing in any element in a live situation such as the one we discussed in the last instalment of Reason Technique.
Unlike Ableton Live, for example, Reason does not have specific built-in cue-mixing functionality, but this doesn't mean you can't knock together a configuration that does the job. You will need an audio interface with at least four outputs, as you will use outputs three and four for the cue mix. This assumes that you don't have a DJ mixer at your disposal: if so, you can simply output your loops to separate channels and use the mixer's cue system.
 The cabling scheme for the cue mixing configuration. There are two options here: you can build a cueing system into the Combi itself, or you can set up a cue mix in the main song mixer. Let's have a look at the latter, approach as this allows you to check any mixer channel before bringing it into the main mix. First, you will need to open the Audio Preferences, and check that you have more than two output channels enabled. The four aux sends on the main mixer will then be used to send any channel you wish to check to outputs 3/4. The aux buss can be switched pre-fader (by clicking the small 'P' buttons on each channel), so you can leave any channel's main fader down (not going to the main mix) but still hear that channel in your headphone mix.
Loop A from the Combi appears on channel 12, with Loop B on channel 13. The mix from the Combi is on channel 1. Channel 14 has a feed from the main mix so you can hear the main mix in your headphones if you wish (this fader must stay down or it's serious feedback time). You can listen to the A or B loop in headphones by turning up the aux send for that channel. The same goes for any other instrument plugged into the mixer. The only difference is that you'll use the crossfader on your loop Combi to bring elements in, whereas you'd use faders on the mixer for other instruments.
The aux output from the mixer is going to outputs 3/4 on the Hardware Interface module. The main mix is being split in a Spider Audio Splitter, and sent to both the main (1/2) outputs, and channel 14. Note that the feed to channel 14 is mono. This is because there is some kind of bug that messes with the phase of the mix if you make this connections stereo. Because we want to be able to preview the loops in the Combi individually there are direct connections from each Dr:Rex player to channels 12 and 13. Again, Spider Audio Splitters have been used in the Combi to tap off these signals.
Filter & Envelope Control
Now that we have the fundamental parts of our Combi working, we can starting adding some extra controls. First, we'll set the Combinator 's second rotary knob to control the filters on the loop players. Select Dr:Rex 1 in the Programmer panel, and assign Filter Freq to Rotary 2 with full range. Repeat for Dr:Rex 2. You can turn the resonance sliders up a bit on both devices to make the effect more dramatic. Next, assign Combinator 's Button 2 to switch between low-pass and band-pass filters on both Dr:Rex s. To do this, assign Button 2 to filter mode, with a minimum value of 4 and maximum value of 2.
An useful control assignment is to use a knob to adjust the Amp Envelope Decay stage on each loop player. This, in effect, controls the length of each hit or slice in the loop. Using the same method as before, select each Dr:Rex in turn in the Programmer, and assign Rotary 3 to the Amp Env Decay parameter with full value range.
Four-band EQ
DJ mixers commonly have three-band or four-band EQ sections or 'kill' switches which can completely cut bands, allowing you to blend, say, the high frequencies of one source with the low frequencies of another. Reason doesn't have such a device, but it's pretty easy to make one. Select the first Dr:Rex, and create a BV512 Vocoder device. This will cable itself correctly between the loop player and the line mixers. Switch the vocoder into Equalizer mode, and turn the number of bands down to four. You can now adjust individual frequency bands between +10 and -(infinity) dB by clicking in the central display area. Repeat for the second loop player.
Effects & Finishing Touches
 The cable arrangement for the finished Dr:Rex looping machine.There's still a spare knob and some switches on the Combinator 's front panel, so let's add some effects to play with. We'll add a phaser and delay unit, just after the line mixers. Select the second line mixer, hold down Shift (to disable auto-cabling) and create a PH90 Phaser and then a DDL1 Delay unit. Now you can manually cable the output from the line mixers (currently going to the main Combi outs) into the left/right Phaser inputs. Now cable the phaser's outputs to the inputs of the delay unit, and finally connect the delay to the Combinator 's 'From Devices' ports.
Next we need to add some simple control over the effects. Two buttons will switch the effects in and out, and the remaining knob will control the intensity or depth of both effects. Select the Phaser in the Programmer, and assign Button 3 to the enabled parameter. Set the minimum value to 2, and the maximum value to 1. These settings mean that the effect is on when the buttons is lit, and bypassed when unlit (as opposed to off, which mutes the sound). Repeat these steps for Button 4 with the delay unit. To implement the depth control, start by assigning Rotary 4 to the Phaser 's feedback parameter with full range. The delay control needs to be a bit more subtle, or it will limit the range over which you can adjust the phaser without creating crazy echoes. Try mapping the knob to the DDL1 's Dry/Wet balance with a range of 0-43.
All that remains now is to add some compression or limiting to the end of the signal chain to avoid clipping and to even out the levels of different loops. I've achieved this by putting a Maximizer between the delay unit and the Combi outs. The final cabling for the Combinator is show in the screen to the right.
Loop Pool
Not only a palindromic sub-heading, but also my final tip for live loop mashing with Reason. Prepare one or two folders on your drive with all the loops that you want to use during a session with your loop player Combi. Once you point each Dr:Rex player to a file in a folder, all the other loops can be accessed very quickly by clicking in the loop browser, or using the Next/Previous buttons.
Variations
There are many variations on this Combinator that you could try. The main limitation is the number of knobs on the Combi front panel, meaning that you can't implement all the things you might like to on the panel in one patch. In some versions of this Combinator, I have assigned two of the Combi knobs to the Transpose controls on the Dr:Rex players, allowing you to match the pitches of two loops. I've also made patches where panel buttons are used for bass and treble kill switches (by controlling the vocoders). If you have fun building the Combinator in this article, you might try designing a companion multi-effects Combinator, freeing up more controls and allowing for independent processing of each loop. For more on building effects units with Combinator, see the Reason workshop from the July 2005 issue of SOS.


