In last month's overview of the new features in Pro Tools 7.3, we saw that some of them deserve a more in-depth look. Here's what you can do with Key Signatures, the new Dynamic Transport Mode, and enhanced editing and video functions.
As promised last issue, in this month's Pro Tools column we will take a more detailed look at four of the major features introduced in version 7.3: Key Signatures, Dynamic Transport Mode, enhanced editing of fades, and improvements to the Video track.
Key Signatures

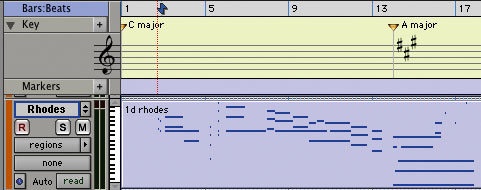
 Pro Tools 7.3 includes a new Key Signature ruler (below) for adding key signatures to Pro Tools Sessions. Key signatures can be imported and exported with MIDI data. This is especially useful when exporting MIDI sequences for use in notation programs like Sibelius. The default key signature setting is C major. The new Key Signature ruler lets you add, edit and delete key signature markers, and you can use these to indicate key and key changes in your Pro Tools Sessions. Key signatures can also be used for transposing in key or constraining pitches to the specified key, and to this end you can select whether MIDI and Instrument tracks are Pitched (the default setting) or not. To make an individual track unpitched, click the track's Playlist selector and deselect the Pitched option (see screen, bottom left).
To turn on the Key Signature mode, go to the View menu and select Key Signature from the Rulers sub-menu or, alternatively, from the View selector in the Edit window. The Key Signatures ruler will then be added to the rulers at the top of the track section of the Edit window. You can choose to show or hide the stave part of the Key Signatures ruler using the show/hide triangle in the header section of the Key Signature ruler.
To add a key signature marker, place the cursor in the Timeline at the correct point, and either choose Add Key Change from the Event menu, or click the Plus (+) button in the Key Signature ruler. In the Key Change dialogue box (below), select the mode (major or minor), the key, its location and range, and how you want it to affect the Pitched tracks in your Session. There's also an option to specify for how long you want the key change to take effect: to the next Key Signature marker, to a selection, or to the end of the Session. Snap To Bar snaps the Key Signature marker to the bar line.
Edit Pitched Tracks
Enabling the Edit Pitched Tracks option lets you make existing MIDI notes follow key changes in various 'intelligent' ways. Note that this only affects MIDI notes on MIDI or Instrument tracks; audio tracks are not affected by the Key Signature.
Transpose lets you transpose existing MIDI notes on Pitched tracks up or down, diatonically or chromatically. For example, if the Session is in C major and you are adding a key change to D minor, select Edit Pitched Tracks, Transpose, Up and Diatonically to transpose notes on Pitched tracks up a whole tone as well as lowering the third, sixth and seventh notes in the scale by a semitone. The sequence C, D, E is thus transposed to D, E, F (natural, rather than F sharp, which you would get if transposing chromatically).
 Constrain Pitches To Key means that any diatonic pitches of the old key on Pitched tracks that are not in the new key are individually transposed to the nearest diatonic pitch of the new key. For example, when changing from C major to D major, the sequence C, D, E, F, G changes to C#, D, E, F#, G. This offers a very powerful range of transposition options to Pro Tools, but of course a straight transposition across all MIDI and Instrument tracks would wreak havoc with drum and sampler tracks, so you'll want to make these unpitched.
You can edit a key signature marker by double-clicking it in the Key Signature ruler, which will bring up the Key Change dialogue box to enable you to make your changes, before clicking OK to confirm them. To delete a key signature marker, Alt-click (Windows) or Option-click (Mac) it in the Key Signature ruler.
The new diatonic transposition options have also been added to the MIDI Operations window and Real-Time MIDI Properties, so you don't have to activate the Key Signature ruler to make use of them. The Transpose MIDI Operation window now adds the option to transpose in key up or down by scale steps (below): select the notes you want to transpose, then choose Transpose from the MIDI sub-menu of the Event menu. Select Transpose in Key then adjust the slider (or type a number) for the number of notes by which you want to transpose the selection, and click Apply.
Both track-based Real-Time Properties and the Real-Time Properties window now have the option to transpose in key up or down by notes. For example, if you have a passage that you want to transpose in key up by thirds, enable Transpose in Key by +2 (scale steps) in Real-Time Properties.
Dynamic Transport Mode
Dynamic Transport mode enables you to start playback from anywhere on the Timeline without losing your Timeline or Edit selections. When Dynamic Transport mode is enabled, the main Timebase ruler expands to double-height and reveals the new Play Start Marker. This Play Start Marker, visible as the blue triangle at bar 12 in the screenshot below, determines where playback will start from when the Play button is pressed. Its position is completely independent of the Timeline selection and can be anywhere in the Session — so if, for instance, you want to see how well a loop works, you could set the Play Start Marker a bar before the end of the loop and hit Play. Then you won't have to wait for the whole loop to play before you can hear how well it loops back.
You can enable or disable Dynamic Transport Mode from the Options menu or using the keyboard shortcut Ctrl+Start+P (Windows) or Command+Ctrl+P (Mac). Enabling Dynamic Transport Mode automatically disables Link Timeline and Edit Selection, and automatically enables Loop Playback mode. You can now modify the Start, End and Play Start Markers during playback and Pro Tools will update automatically — no need now to stop and start playback to get Pro Tools to play a new loop selection. To move the Play Start Marker, double-click anywhere in the Play Start Marker strip in the main Timebase ruler.
It's also now possible to click and drag to move a selection in the Timeline, and when the Link Timeline and Edit Selection option is disabled, you can Alt-click (Windows) or Option-click (Mac) and drag the Timeline selection to snap the Edit selection to the Timeline selection and move both in tandem.
When you move a Timeline Selection you will notice that the Play Start Marker automatically snaps to the start of the timeline selection. You can turn this feature off by going into Preferences / Operations and de-selecting Play Start Marker Follows Timeline Selection. I would like to see a third option where the Playback Start Marker would move with the Timeline Selection but stay in its relative position, so that if I moved the selection up with the Marker one bar before the end, the Marker would still be one bar before the end in the new location.
There are a number of keyboard shortcuts for relocating the Play Start Marker:
- To move the Play Start Marker to the Timeline Selection Start, press '.' on the numeric keypad and then the Left Arrow.
- To move the Play Start Marker to the Timeline Selection End, press '.' on the numeric keypad and then the Right Arrow.
- To move the Play Start Marker to the Edit Selection Start, press '.' on the numeric keypad and then the Down Arrow.
- To move the Play Start Marker to a specific bar, with Bars:Beats selected as the main Timebase ruler, Press Asterisk (*) on the numeric keypad, then type the bar number and press Enter. The Marker will jump to that bar number.
Separate Play & Stop Keys
There is now an option in the Numeric Keypad section of the Preferences / Operations tab to Separate Play and Stop Keys. This option lets you start playback with the Enter key and stop playback with the '0' key on the numeric keypad. This comes into its own when you want to audition loops from the Workspace without losing your place on the timeline.
To do this you also need to make sure that Spacebar Toggles File Preview is enabled from the Workspace 'toolbox' menu. Now when you hit the space bar it will play the selected file in your Workspace browser, and if you hit Enter on the numeric pad it will play the Timeline Selection in the Edit window. Once you have the right loop, just drag it into the Edit window and you have it!
Pro Tools 7.3 LE now also features edit selection options that were previously only available to HD users, in the Selection sub-menu of the Edit menu. These commands let you play the Edit or Timeline selection without repositioning the Play Start Marker.
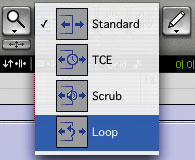
In Pro Tools 7.3 Digidesign have introduced a new Loop Trim tool, which makes the creation of Region Loops even easier (see July 2006's Pro Tools workshop article for details on working with Region Loops). You can use the new Loop Trim tool to create or trim looped Regions. To select the Loop Trim tool, click the Trim tool icon in the Edit window to access the Trim Tool Selector pop-up menu and select the Loop Trim tool (below). Now here is a really neat touch: if you position the cursor over the bottom half of the region you can still use the Standard Trim tool.

 or the length of the Region making up the loop (below).") Depending on where in the Region Loop you click, the Loop Trim tool will either trim the number of iterations of a looped Region (above) or the length of the Region making up the loop (below).
Depending on where in the Region Loop you click, the Loop Trim tool will either trim the number of iterations of a looped Region (above) or the length of the Region making up the loop (below).Having selected the Loop Trim tool, position the cursor over the top half of an un-looped audio or MIDI Region, or Region Group. The cursor will change to indicate that you can Loop Trim the Region. Then click and drag out from the Region start or end and the Loop Trim Tool will create loops from the Region.

 You can trim looped Regions in two ways. You can extend or reduce the length of the entire looped Region by using the Loop Trim tool in the loop half of the track. If you do this, the loop itself will stay the same length and the number of loops (iterations) will increase or decrease as you drag the cursor. Alternatively, if you place the Loop Trim tool over the Loop icon in a loop then you can change the length of each loop within the Region, but the length of the Region overall will remain the same.
Put the Dynamic Transport Mode and separate Play and Stop buttons with loop audition in the Workspace together with the Loop Trim tool and you have a very smooth way of creating, building and editing looped sections.
Enhanced Editing Of Fades
In v7.2 for HD systems, Digidesign changed the way Pro Tools handles fades, and how they change when you edit the host Regions. With Pro Tools 7.3 they have included these features in the LE version too. Fades can be moved or nudged in tracks, independently of their contributing Regions. So now, moving or nudging fade-ins or fade-outs will reveal or hide audio as the fade is moved from the edge of a contributing Region (see screens, right). Likewise, moving or nudging crossfades changes the overlap point of the contributing Regions.


 Fades can now be dragged or nudged without moving their contributing Regions.To move or nudge a fade or crossfade within its contributing Regions, you select the fade or crossfade and use the Grabber tool, or nudge with the '+' and '-' keys. When you nudge a Region selection adjacent to a fade-in or fade-out, but do not select the fade, the adjacent fade will stretch to maintain the fade start or end point, so the start of the fade remains in the same place on the timeline and the top of the fade stays at the same point in the audio, the Region is moved, and the fade stretches to accommodate.
Normally, when you select a Region, associated fades are included. To select a Region without its fades, use the Tab key. Place the cursor before the top of the fade and then press the Tab key so that the cursor is now at the top of the fade; then hold Shift down and press Tab again and now the whole region will be highlighted without the fade. Now you can move the Region with the nudge keys to the desired point (above).
You can now also choose to preserve the fades when you move either Region that contributes to a crossfade. This is set up in the Fades section of the Editing Tab in Preferences. With this setting ticked, when you move a contributing Region, the fades are preserved (below). With the setting unticked, moving a contributing Region will cause the fades to be deleted, as always used to be the case. When you nudge either of the Regions that contribute to a crossfade, the fade stretches to preserve the relative position of the crossfade start and end points.

 You can now move a Region independently of its fades, which will be recalculated to fit.
 When you Separate a Region at a point covered by a fade, new fades are calculated to suit.
 Optionally, fades can be preserved when a Region is moved.
 Trimming a Region with a fade now retains the fade.You can now Separate a Region when the selection includes a fade or crossfade, whereupon the fade will be modified accordingly (below), and you can trim Regions that are adjacent to fade boundaries. Using the Trim tool, drag to trim the Region. Notice how the fade remains constant and follows the new Region boundary (below).
You can also now trim Regions to selections even if fades or crossfades are involved. If you make a selection that includes a crossfade completely, and parts of a fade-in or fade-out, when it is Trimmed with the Trim To Selection option (Command+T on the Mac, Ctrl+T on Windows) the fade-in and fade-out are modified to suit the new selection. However, the crossfade is left unmodified, as it was completely within the selection.
Video Track Improvements
Digidesign made major improvements to the Video track features in the upgrade to Pro Tools 7.2 HD. Now they have added some of those features to 7.3 LE, and all of them to 7.3 LE users who buy the DV Toolkit 2 option. In Pro Tools 7.3, the Video track lets you add or import Quicktime video to the Timeline. Pro Tools LE and Pro Tools M-Powered users can add or import one Video track per Session, with a limit of one video Playlist and one Quicktime movie on that track. Pro Tools LE users with DV Toolkit 2 can add multiple Video tracks to the Timeline, with multiple video Playlists and multiple Quicktime movies per track. You now create a new Video track from the New option in the Tracks menu: simply select Video Track from the Track Type pop-up menu.
A number of enhanced Video track options are available to users of DV Toolkit and HD only. You can now have multiple Video tracks on the Timeline, but only one Video track can be played back at a time. To set and indicate which Video track is active, there is now a Video On-line button in the Video track title section. This button lets you select the main Video track, and see at a glance by colour whether a Video track is off-line, when the button will be grey, or on-line, when it will be blue (see screenshot below right).
DV Toolkit 2 and HD users can have multiple Playlists on Video tracks too — the procedure to create, duplicate and select them is exactly the same as it is for audio tracks — and add multiple Quicktime movies to any individual Video track. You can create video Regions that function in much the same way as audio Regions. A video Region is a segment of video data, and can be a portion of video or an entire video file. Video Regions are created from Quicktime files, and can be arranged in corresponding Video track Playlists. Video Regions can also be grouped, looped and colour-coded. When using Pro Tools LE with DV Toolkit 2, you can add, edit and change the view option for video Regions in the same way as for audio Regions, and of course edits to video Regions are non-destructive. LE users who don't have DV Toolkit 2 can only have one Quicktime movie on their Video track, but they can still edit video Regions.
A single Video track can contain video Regions compressed with different video codecs. However, all the video Regions in a Session must have the same frame rate. This frame rate is described as the Video Engine Rate. The video frame rate is displayed for each video file in the Digibase browsers, and the current Video Engine Rate is displayed in the main Video track (see screenshot above). The Video Engine Rate indicator is normally black, but turns red if either the Video Engine Rate does not match the Session's current Time Code Rate setting or a pull-up has been applied to the video, causing the Video Engine Rate to differ from the Session Time Code Rate.
There are a few caveats that affect the new video-editing functions: MPEG-2 video in the Timeline cannot be edited, and if you create and enable a Track Group containing audio and Video tracks, and any audio track has Region boundaries that do not line up with video frame boundaries, you cannot tab through those Region boundaries. The following editing operations are applicable to audio Regions, but do not work with video Regions:

- Renaming disk files in the Region List or Timeline
- Fades
- Mute/unmute Regions
- Audiosuite plug-ins
- Waveform repair with the Pencil tool
- Strip Silence
- Consolidate Regions
You can lock one or more Video tracks to prevent any video Regions on those tracks from being edited. When a Video track is locked, Pro Tools restricts all editing operations involving the track, except for locking and unlocking video Regions. To lock a Video track, either Start-click (Windows), Ctrl-click (Mac) or right-click (both) the name of any selected Video track, and select Locked. A small lock appears in the Video track, indicating that it has been locked and thus cannot be edited.
More Than Just A Point One
There's so much new stuff in the '.1' change from Pro Tools 7.2 to 7.3 that it's more like a '1.0' upgrade. My favourite features so far are the Open Recent Menu item and all the contextual menu options. When you want to do anything, just try right-clicking and see if a contextual menu pops up. It probably will, and it will probably have the function you wanted on it! I can't imagine what Pro Tools 8 will bring — but will we need a super-computer to run it?


