
Working to moving images in Logic is now easier than ever, given its improved editing tools and Global Track functionality. We explore how these features can enhance workflow and offer some tips for making the most of your audio-visual experience.
Since their introduction in Logic 7, Global Track Components have provided alternative yet much more efficient ways of dealing with pre-existing functionality, be it tempo-related or otherwise. And this is definitely the case when working with picture. It's fair to say that most composers and sound designers nowadays deal with video clips rather than external media, so the addition of a Video track to Logic's Global Track Components creates a direct bridge to accurate audio production for most current video practices. And with the Marker and Beat-mapping tracks combined alongside it, simultaneous composition and spotting can be effectively carried out within the very same project. Add to these the Arrange window Drag Modes, flexible Movie window display options and powerful editing features, and most scoring tasks can be handled with ease. But before we delve any deeper into the exciting functionality that Logic provides, let's look at the necessary preparation for dealing with picture.
Prepare, Sync, Score!
Despite the fact that working with a local video file is a much simpler affair than keeping your sequencer in check with some old video deck, there are still some important considerations to keep in mind before embarking on a trouble-free creative experience. These can generally be divided into two categories: file compatibility and synchronisation. At this stage, communication with the video editor or director of the project is crucial. It's important to find out as much as you can about the clip you'll be working to, including the following:
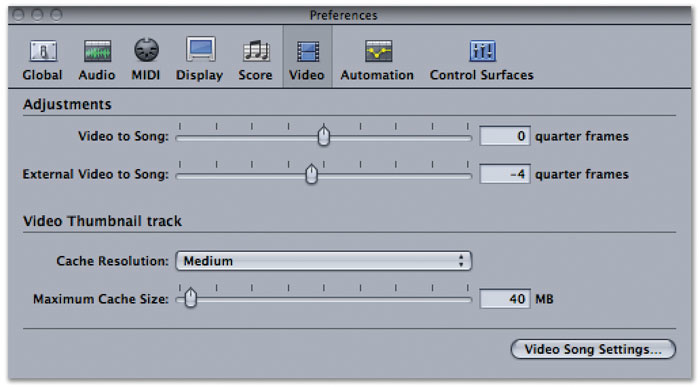
Instead of monitoring video using the on-screen Movie window, you can output it to an external monitor via Firewire (as shown above), provided you are connected to an external Firewire video device. To do this, go to File / Song Settings and choose Firewire from the Video pane's Video Output drop-down menu. You will have to compensate for any Firewire latency by visiting the Logic Preferences Video pane and gradually adjusting the 'External Video to Song' slider, until the video display synchronises to Logic, as shown on the right.
- Is the movie Quicktime-compatible?
- Have you been supplied a 'proxy' movie?
- Should there be a SMPTE offset?
- What is the movie's frame rate?
The good news is that Apple's Quicktime format is widely used, and any file that Quicktime plays, will play in Logic too; so chances are the video crew have already provided you with a compatible file. If not, they should be able to convert it pretty easily. However, if the movie is large in dimensions and high in definition, using it in it's uncompressed format will drain computer resources. A 'proxy' movie is a highly compressed, low-resolution version of the original file, created to take some strain off the CPU. In some cases it even makes sense to halve its dimensions to reduce size further. Again, this should already have been provided, but if all else fails, you can create your own 'proxy' version using Quicktime Pro and choosing a low-bandwidth compression codec before exporting (such as MPEG 4 or Sorenson 3).
Before any synchronisation, it also makes sense to display SMPTE timecode in Logic 's Bar Ruler, which is easily set by selecting View / SMPTE Time Ruler from the Arrange window's local menu. Additionally, you can choose to view the Giant SMPTE Display from the pop-up menu available when clicking the Transport window's small bottom right-hand triangle button. Although a compatible movie will synchronise by default to Logic 's playback, there are a few more settings to look out for towards frame-accurate sync and correct timecode display. These can be found and altered in the Synchronisation pane, found under File / Song Settings / Synchronisation, namely the Frame Rate pop-up menu and the Bar Position and Plays At SMPTE entries. For a commonly used timecode default, choose SMPTE 1:0:0:0.0 for bar position 1 1 1 1. This synchronisation pane is also where a Separate SMPTE View Offset can be enabled, but it's probably easier to set that on the Movie window Parameter display, which we'll explore later. One useful tip to keep in mind if you are unsure of the clip's frame rate, is to open the movie in a Quicktime Player window and select Window / Show Movie Info to view its settings. You can then manually transfer these setting to Logic.
Relative Sync
The SMPTE acronym stands for Society of Motion Picture and Television Engineers, who decided on a synchronisation format based on dividing time into hours, minutes, seconds, frames and subframes. The last two entries tell us why a movie's frame rate has direct effect on correct synchronisation, so make sure you set the right frame rate in Logic, before embarking on a SMPTE-locked project. Here are the internationally recognised SMPTE frame rate standards:
- 24fps: Standard cinema film frame rate.
- 25fps: PAL frame rate for 625-line colour television.
- 29.97fps: NTSC frame rate for 525-line colour television (Drop Frame).
- 30fps: NTSC black & white 525-line television frame rate (non-drop frame).
Global Issues
The aforementioned Video, Marker and Beat-mapping tracks can all be found under View / Global Track Components from the Arrange window's local menu. Clicking on the Video track's Open Movie button renders the movie visible in both a floating Movie window and as thumbnail images on the video track. Closing the Movie window doesn't close the file itself, just the floating window, while the movie can be re-opened either by clicking again on the Open Movie button or by selecting one of the alternatives from the Options / Movie menu. More interestingly, clicking the Detect Cuts button of the Video track enables a function that analyses the movie for hard cuts (ie. major scene changes), then places special Movie markers all across the Marker track, one for each identified SMPTE position. Movie markers stay locked to these specific timecode positions and are easily differentiated from conventional markers by their film symbol. When creating a conventional marker (Options / Marker / Create), the marker's location will get rounded to the closest bar, while Movie markers will only ever correspond to musical downbeats by accident.
 Clicking and holding on the Movie window gives a variety of options, including display size, and a shortcut to the Video Song Settings. The Find Scene Cuts option automatically scans the video file for hard changes, before setting markers to the cuts.This highlights a problem composers often face when needing to initiate musical sequences at exact frame locations, and it's where Beat-mapping comes to the rescue! Beat-mapping allows for tempo adjustments by matching markers to specific bar and beat locations. By creating a marker without rounding at the identified frame (Options / Marker / Create Without Rounding) and disclosing the Beat-mapping track, you can tie the closest measure's bar line to that very frame. This is possible because the selected marker automatically registers a Beat-mapping line on the Beat-mapping track, so dragging the bar line to it simply connects the two. Of course the tempo will change, but the result will be a perfectly aligned frame to the downbeat of the nearest measure, as a marker created without rounding will reflect an exact SMPTE position.
Of course, a tempo change would be alarming at this stage, especially if a spotting session has already taken place and carefully chosen regions are already accentuating visual cues. Luckily though, regions' timecode positions can be locked prior to any Beat-mapping (select Region / Lock SMPTE Position from the Arrange window's local menu), so that no tempo changes will ever affect the position of SMPTE-locked regions, thus allowing for peaceful co-existence between sound design and composition (or sound designer and composer for that matter).
This co-existence can, at times, be cluttered by large Movie windows taking over much-needed Arrange window space, so it's important to be able to work around it, especially as combined scoring and spotting can build up to a very intricate arrangement layout. At other times, it's best to avoid looking at Arrange window information altogether, focusing instead exclusively on how visuals work with sound. Apart from the usual Screenset trickery, there are a few more Movie window-specific tips that can help with space management: clicking and holding on the Movie window pops up a list of handy display alternatives, while double-clicking on it calls up a presentation mode, which expands the movie to fit the screen and hides the Parameter display at the bottom; double-clicking a second time collapses the Movie window back to its original size. The Parameter display mentioned above is also where a SMPTE offset can be enabled, by typing a new timecode value for the Movie Start entry (usually an addition of the agreed offset time plus the SMPTE start time that corresponds to bar one).
Depending on specific sonic needs and the picture's stage of production, the movie file might also contain dialogue, sound effects or even music, which you may or may not want to hear. The movie's sound will playback by default, so it's probably best to mute it and import any audio from it straight into Logic. This has the added benefit of individual access to the movie's audio tracks, as a Quicktime file may contain several of them within it. To mute the movie's sound, click-hold on the Movie window, then choose Video/Movie Settings and select Mute from the Video pane's Sound Output menu. To import a movie's audio tracks into Logic choose Options / Movies / Extract Audio from Movie, then select the tracks needed from the Choose Tracks To Export dialogue box. The files will be converted and automatically added to the Audio window, so it's simply a case of dragging them onto the Arrange window for further manipulation.
Somewhere Under A Menu... The 'Other' Reverbs
 Logic's non-convolution reverbs, such as Averb, are often overlooked, when compared to the mighty Space Designer. But they offer their own quirky traits that can help you to add different 'flavours' to your sound. I suspect that these days, most people reach for Space Designer when they want to use a reverb in Logic. Platinumverb probably gets some use when monitoring vocals or on less-important tracks when CPU power gets tight, but the other plug-ins in the Reverb menu often go unnoticed or unused, and I've even seen it suggested that old stalwarts such as Goldverb and ' Gritverb' (sorry, Silververb) should actually be dropped from future versions of Logic. Personally, I'm glad that Apple keep these old reverbs around. Each of them has its own individual sound, and I've found a use for most of them over the years. Goldverb in particular can be particularly effective on snares and, Averb punches well over its weight as a backing vocal reverb. I'd use neither on lead vocals or critical instrumentation, but they both go some way to help avoid that ' Logic sound' I'm starting to hear on some records, where everyone uses the exactly same plug-ins. The early reflections section of both Goldverb and Platinumverb is excellent at recreating small acoustic spaces for drums and percussion in conjunction with very short reverb times.
Enverb is a particularly lonely beast, always languishing at the back of the kitchen at the effects party, mainly because it's described in the manual as a 'gated reverb', which tends to bring back scary memories of mullets and Phil Collins. However, this reverb has more up its virtual sleeve than you may imagine. Because you have complete control over the volume envelope of the plug-in, it's easy to create a simulated reverse reverb effect particularly when using the Original Delay parameter to place the dry sound after the effect's attack phase. Playing around with the reverb envelope on drum loops can create an instant post-rock vibe, and matching the envelope to the natural one of the sound you're processing can help create that 'dry yet wet' effect that's popular right now. Enverb is quite a nice-sounding reverb by itself as well: the Density and Spread controls have quite a large impact on the sound, and it's very easy to see what you're doing with the envelope's visual display. There are high- and low-cut filters with a variable crossover, which is really useful in helping tailor the reverb's tone to that of the sound being processed. Of course, Enverb also does the classic gated reverb as well, but don't dismiss that instantly either — it can still be a useful effect on snares and toms, allowing you to add size and weight to a sound without creating the distancing effect you can sometimes get with traditional reverb. And besides, isn't it time for a revival of the 'Phil Collins drum sound'? Perhaps not.
Stephen Bennett
Pickup & Drag
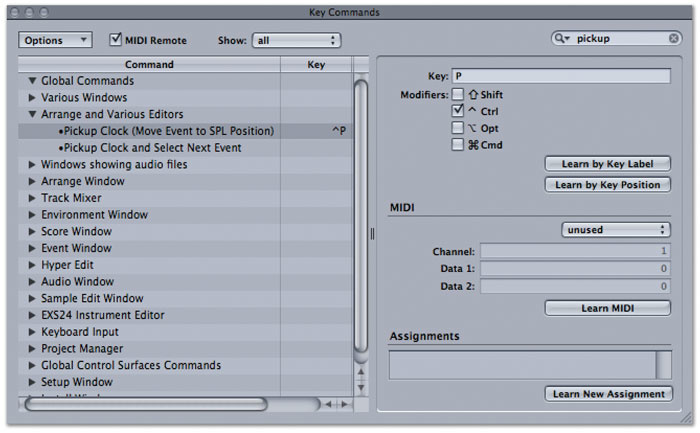 A quick search for 'pickup' in Logic's Key Commands pane finds the Pickup Clock function. This is only available as a keyboard shortcut, so you'll have to assign a key to it, or learn its current assignment.
Anyone who's ever scored to picture would agree that being able to accurately and quickly spot regions to specific frame locations is of utmost importance. This is best achieved by using Logic 's Song Position Line (SPL) together with a hidden editing function, called Pickup Clock. This is only available as a key command, so you need to visit the Key Commands window to locate it; or assign a new combination of keys to it. Once the function has been assigned, you can either drag the SPL to a specific timecode location or enter the correct SMPTE value in the Movie window timecode display, before selecting a region in the Arrange window and using the respective key command to snap it to that frame. Of course, this can be done for any type of Logic region, allowing for very tight synchronisation of all kinds of sonic material to visual content. Alternatively, you can use the Event Float window available from the Options menu, to perform a similar action. Click on the Event Float's film icon to switch its display to SMPTE timecode — instead of the default bars and beats read-out — and then double-click on the SMPTE position display to type in a new start entry for the region. The region will snap again to the specified location.
And finally, highly under-used, but equally worth mentioning here, are Logic 's Drag Modes, which can be found in the top right corner of the Arrange window. In the process of moving and spotting regions while working to video, the need for alternative modes of editing becomes apparent. This is something that Pro Tools users are most familiar with, constantly switching between 'Shuffle', 'Spot', 'Slip' and 'Grid' modes of editing; yet it's alarming how few Logic users have been taking advantage of their existence since they first appeared in version 7. In fact, there are more options available here, such as Overlap, No Overlap, X-Fade, Shuffle R (right) and Shuffle L (left), which become very effective when combined with the available Snap Modes. The Shuffle modes are great for filling up ambience before or after a spotted region, while there is no reason why most modes couldn't find their way into composition or arrangement work as well.
The Final Score
As with most new techniques, the ones mentioned in this article can take some time to master, but the benefits reaped from experimenting with them will become obvious both in terms of time management and quality of results. When working with the visual principle, we cannot assume the same use of terminology or file formats, which is why preparation is key to successful collaboration. It is hoped that, in the near future, we'll be able to enjoy an even better collaborative multimedia experience, as manufacturers work against file compatibility issues, creating formats such as XML and Broadcast WAV. Let's hope they keep at it.
External Files
Broadcast WAV files have timecode information embedded into their header, and Logic provides a function to recall their absolute time positions, by selecting Audio / Move Region to Original Record Position from the Arrange window's local menu. You can also create Broadcast WAV files in Logic by choosing them as a recording option in the Recording File Type menu under Logic 's Preferences. For file interchange between Final Cut Pro and Logic, it makes a lot of sense to use the XML format, which enables audio file import from a Final Cut project straight into Logic 's Arrange window, including all timecode and automation data. Just remember to convert Final Cut keyframe information into Logic track automation data, by choosing Options / Track Automation / Move All Region Control Data To Track Automation.


