Understanding Pro Tools’ automation is the key to unlocking its mixing power.
Recently I was chatting with some friends, and we realised that although automation is something we use a lot, it is rarely explained fully, and that as a result, many people lack the confidence to use it to full effect. Within Pro Tools it is possible to automate not just the obvious mix settings such as volume, pan and mute, but every parameter in every plug–in. But why would you want to do this?
Wavy Lines
On a basic level, automation lets us take static parameters in a mix and change them dynamically — and repeatably — over the course of a session’s timeline. For example, you may find that while a particular volume level for a lead vocal works well during the verse, the same level doesn’t work as well during the chorus, where it needs to be louder. Automation lets us record data that move the fader automatically at the right points whenever the project is played back.
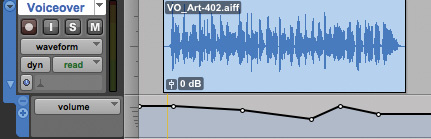
Let’s start with the simple stuff. By default, audio tracks in Pro Tools appear in Waveform view. Click on the Waveform button on a track header and choose Volume from the pop–up menu. You’ll still see the waveform of the clips on the track, but they will be greyed out, and over the top, you will see a horizontal line that represents the position of the fader. (Alternatively, you can display the automation on a separate lane beneath the waveform display, by clicking on the small triangle icon on the left–hand side of the track header. Multiple lanes for different parameters can be added, by clicking on the + button.)
Using the Smart Tool or the Grabber, you can click on the automation line and create what are variously called anchors, breakpoints and nodes. These set a fixed value for the parameter being automated (in this case, the volume fader) at a particular point on the timeline, and they can be picked up and moved by clicking and dragging. When you create multiple nodes and set them to different values, you will see the line joining them change shape, and if you watch the fader during playback, you’ll see it move up and down as it follows this line.
La Mode
There are a number of ways to create automation. You can create and drag breakpoints directly, as described above, but you can also record parameter changes made using a mouse or control surface. Depending on what you want to achieve and how, Pro Tools tracks can be placed into one of several different automation modes:
- Auto Off mode ignores all automation written to the track. This can be useful if you would like to try a different setting or mix without modifying or destroying your existing automation data. When you change the setting back to, say, Auto Read, Pro Tools will pick up the automation again.
- Auto Read mode will simply play back any automation that was recorded or drawn on that track. This is the default automation mode.
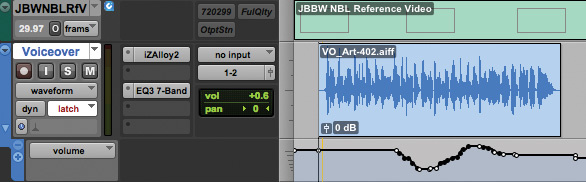
- Auto Touch mode will play any automation you have already created, until you touch the assigned fader or control on your control surface, or click the relevant parameter with the mouse. Once you do so, new automation is recorded, overwriting any existing automation for that parameter, until you ‘let go’ of the control again. At the point where you release it, the automation will revert back to any previously written automation. In Screen 2A I used Touch mode to write automation up to where the cursor is, when I ‘let go’ of the fader; as you can see, the fader then ramps back to the previous automation. You can control how fast it reverts to the original automation with the AutoMatch setting in the Mixing tab of Pro Tools Preferences.
 or in a separate lane (above).") Screen 1: Automation in Pro Tools can be displayed either over the top of the waveform view (top) or in a separate lane (above).
Screen 1: Automation in Pro Tools can be displayed either over the top of the waveform view (top) or in a separate lane (above).
 overwrites existing automation for as long as playback is enabled — as you can see, existing automation at the start of the section has been wiped out even though I haven’t yet touched the fader.") Screens 2A–2C: Here you can see how the automation written by Pro Tools varies depending on which mode was used. In the top screen, I’ve recorded some fader moves in Touch mode. As you can see, after the dense forest of automation notes this creates, the fader position has reverted immediately to the pre–existing automation at the cursor position, where I released the fader. In the centre screen, Latch mode has been used to write the same move. You can see that the last fader position has been retained until the transport was stopped towards the right–hand side. Only then has the automation jumped to its previously stored value. Automation written in Write mode (lower screen) overwrites existing automation for as long as playback is enabled — as you can see, existing automation at the start of the section has been wiped out even though I haven’t yet touched the fader.
Screens 2A–2C: Here you can see how the automation written by Pro Tools varies depending on which mode was used. In the top screen, I’ve recorded some fader moves in Touch mode. As you can see, after the dense forest of automation notes this creates, the fader position has reverted immediately to the pre–existing automation at the cursor position, where I released the fader. In the centre screen, Latch mode has been used to write the same move. You can see that the last fader position has been retained until the transport was stopped towards the right–hand side. Only then has the automation jumped to its previously stored value. Automation written in Write mode (lower screen) overwrites existing automation for as long as playback is enabled — as you can see, existing automation at the start of the section has been wiped out even though I haven’t yet touched the fader. - Auto Latch mode behaves just like Auto Touch except that, instead of reverting to the previous automation curve when you ‘let go’ of the fader or control, it will stay where you last set it. You can see how this differs from Auto Touch mode in the Screen 2B.
- Auto Write mode is an ‘absolute write’ mode: it records the position of all write–enabled controllers on the track, from when playback starts to when it stops. It doesn’t depend on you ‘touching’ a fader or control, but will write automation data all the time Pro Tools is playing, and will erase previously recorded automation on that track for the duration of the automation pass. You can see this in Screen 2C: even though I didn’t move the fader for a while, its position was recorded, hence the straight line. Likewise, once I stopped moving the fader, Pro Tools still carried on writing its position until I pressed Stop. Write mode is most useful for recording a first automation pass. Once you have created this first pass, you can edit it by recording additional passes using Touch mode. Notice that in the screenshot my track is actually in Latch mode. This is because you can configure what mode Pro Tools goes into when you Stop after a Write pass. In my case, the After Write Pass, Switch To mode was set to Latch, although it would usually make more sense to set it to Touch, so that the automation data is only overwritten when a fader or plug–in control is touched.
 or in a separate lane (above).")
 overwrites existing automation for as long as playback is enabled — as you can see, existing automation at the start of the section has been wiped out even though I haven’t yet touched the fader.")
Playback To Record
Something that is sometimes misunderstood is that, unlike audio or MIDI data, automation data can be recorded during normal playback. You don’t need to put Pro Tools into Record — and if you do so, you will record over the audio or MIDI that is already on that track, not the automation. Nor does the track need to be record–enabled. To record automation, set the appropriate tracks to one of the record automation modes described above and put Pro Tools into Play, not Record. Pro Tools will record the automation accordingly.
Another thing that people don’t always realise is that, though you can have multiple playlists for different takes of the audio or MIDI, all playlists share one set of automation data. You can’t use them to store alternate automation settings.
Go Further
I hope this article will give you the confidence to tackle automation in Pro Tools, if you’ve previously been put off. If you want to get into more advanced automation, the Pro Tools workshop in the February 2010 issue of SOS explained how to automate plug–in parameters — a technique which can be extremely powerful in the right hands. Surf to www.soundonsound.com/sos/feb10/articles/pt_0210.htm to read that article.
Smoothing & Thinning
When you record fader or control moves in Write, Latch or Touch modes, Pro Tools writes breakpoints continuously to the automation lane. The more breakpoints or anchors it creates, the smoother the ‘curves’ on the automation, and the more accurately it will recreate your fader moves. Smoothing is the term used to describe the way in which this series of individual ‘samples’ of the parameter is intelligently converted into a single, smooth curve on playback. If you turn smoothing off, the fader will simply jump to the position recorded at each breakpoint as it reaches it.
 The down side of having too many anchors or breakpoints is that replaying a lot of dense automation across many tracks all at once can be a limiting factor for slower computers. It can also make the automation confusing to look at and edit. Consequently, there is a feature whereby automation data can be thinned to remove surplus breakpoints. This can be done automatically, with the Smooth and Thin Data After Pass option, and manually with the Thin Automation commands.
When Smooth and Thin Data After Pass is selected in the Mixing Preferences tab, Pro Tools automatically thins the automation breakpoint data after each automation pass. The default setting has the Degree of Thinning setting set to Some. In most cases, this doesn’t take away too much data and so leaves a reasonably accurate reproduction of your automation moves using fewer breakpoints.
The Thin Automation and the Thin All Automation commands let you manually thin specific areas where automation data has got too dense. You can also use the Undo command to review the results of thinning if you think you might have gone too far. To manually thin automation, first use the Selector tool to highlight the automation data you want to thin. If you only want to thin the currently displayed type of automation, choose Edit / Automation / Thin, while if you want to thin all types of automation, choose Edit / Automation / Thin All. (To thin automation for the entire track, click in the track with the Selector tool and choose Edit / Select All.)


