The range of specialist restoration tools available for Pro Tools continues to grow. We find out if the latest are really the greatest...
Back in August 2005 we took a look at three audio restoration plug–in packages for Pro Tools: the Restoration Bundle from Waves, Sound Soap Pro from BIAS and the Restoration Tools package from Sony Oxford. Since then, a number of manufacturers have brought out new restoration products, so we thought it was high time to take a look at the newer kids on the block. The plug–ins we are going to look at are NoNoise from Sonic Solutions, Z–Noise from Waves and the Master Restoration Suite from Wave Arts. To see how the original contenders fared, and for more detail on the tests that were used, dig out your August 2005 issue or surf to www.soundonsound.com/sos/aug05/articles/ptrestoration.htm.
The Contenders
Sonic Solutions have been in the restoration field for as long as I can remember and so have amassed phenomenal experience in producing good–quality audio restoration products. For the last few years, their algorithms have been available for the Pro Tools platform. Like most restoration software, NoNoise comes as a number of separate plug–ins to make up the package, each with their specific task. Some are in TDM and some in Audiosuite format, but unusually, these are not different versions of the same plug–ins. With NoNoise the TDM plug–ins undertake a range of functions only available in real time, and so it is not possible to set up and refine a plug–in using the TDM version, copy the settings across to the Audiosuite version, render the file and move on.
Waves’ Z–Noise plug–in has a number of additional features over the original X–Noise which was included in their Restoration Bundle. Waves have added a number of different ways to obtain a noise profile, as well as an Adaptive option that makes it possible to ‘learn’ a noise print on the fly. You can also use a five–band EQ to modify the noise profile, to make Z–Noise more or less sensitive to various frequency bands.
Wave Arts’ Master Restoration Suite is a suite of plug–ins which all come in both RTAS and Audiosuite formats. MR Hum, MR Click, MR Noise and MR Gate do as their names suggest, while MR Restoration combines all the individual processes into a single plug–in.
Test Procedures
I tested these plug–ins using the same sample files I used in my first shootout back in August 2005, with the addition of a new file to test the ability of decrackle plug–ins to remove peak distortion, and have marked the results in the same way, giving a score out of 10. This way you can make valid comparisons with the performance of the plug–ins from both shootouts. All files were treated in one pass using one plug–in, taken to the point where artifacts just became audible. A high ‘ease of use’ score means it was quick and easy to get to a good result with a plug-in. I have included the results from the first shootout in the Test Results table on page 196.
To recap briefly, the four original test files were as follows:
- No Earth: a recording where mains hum is nearly as loud as the wanted content.
- Tape Motor: an old recording made on a Grundig open–reel quarter–inch tape recorder at 3.75ips.
- Vinyl Record: a typical scratched vinyl record with surface noise.
- Hiss: a Minidisc recording made with the wrong lead.
The new ‘Peak Distortion’ example came from a client who had done a video shoot in New York. When it came to editing, it was realised that a sequence had suffered from peak distortion, so they came to me to see if it could be cleaned up. For completeness I scored the plug–ins from the first shootout as well, except for the BIAS plug–in, which wouldn’t function on my current system for some reason.
Click And The Noise Is Gone!
Declicking is often necessary when restoring recordings from vinyl, and should be performed first so that clicks don’t interfere with subsequent processes. The next process is usually decrackle, which is designed for correcting dense, impulsive noise, like the low–level surface noise you get on a vinyl record.
 Sonic Solutions’ bundle caters for these with the Audiosuite–only NoNoise Production Declicking and Production Decrackling plug–ins. Production Declicking lets you analyse and declick audio files, regions and audio selections. As with any Audiosuite plug–in, you first select the Region you want to process and then select the plug–in from the Audiosuite menu. You then adjust the controls in the bottom half of the window, before clicking the Analyze button. The functions and recommended settings of these controls are not intuitive, and a trip to the manual is essential to get anything useful out of this plug–in. Be aware, too, that a lot of the controls interact with each other.
The controls on the left–hand side of the window relate to click detection, and the most important of these seem to be Initial Threshold and Center Width. When the detection algorithm identifies a potential click, it measures and assigns a value for total energy of the click. This is compared against the Initial Threshold and the energy in the Wings (the audio both sides of the click) to determine if the site is a click. Initial Threshold sets the lowest value that is recognised as a click, so you can avoid false positives. Strangely, the range of this control is 1 to 5000 but the recommended range is 5 to 10, and settings in excess of 100 are considered to be extreme.
Center Width is the length of the frame that the detector analyses, representing the duration of a typical click. If a click is longer than the Center Width, the plug–in will probably still detect it, but the site will be listed as shorter than the actual click. Typical clicks range from about 0.5 to 2.5 milliseconds in length, but for special cases the value might be set as high as 5 milliseconds.
On the right-hand side of the window are the controls that determine how the detected clicks will be replaced. The most important one of these is Replacement Width, which determines the number of samples that will be replaced when removing the click, with a range of 0.09 to 92 milliseconds at a 48kHz sample rate. A good rule is to examine the source material to determine the length of the average click, then add approximately 20 percent. It wasn’t until I increased this Replacement Width to 10 milliseconds that I successfully de–clicked my vinyl record sample in one go; prior to changing this setting it took two passes. If the Replacement Width is set too low, partial clicks can be left in the audio, while if it is set too high, the chances of generating low–frequency artifacts increase.
In the Waveform display section, NoNoise shows two types of bars above the audio. Blue bars show the audio that will be replaced. Orange bars show the context that will be used for the interpolation to fill the gap where the click was.
If you make any adjustment to any of the settings, it is critical you re–analyse the file. This took me a while to find out, and in general it took me a couple of hours to get to grips with this plug–in, with the manual in one hand and the mouse in the other. Once I had got through that pain barrier I could predict what sort of settings would produce a particular result.
It is a shame, though, that the time–related controls are not designated in milliseconds. For example, the manual refers to the recommended settings for Center Width as 0.05 to 0.24 milliseconds, but the display is in seconds and goes from 0.00 to 0.05 seconds (50 milliseconds) in 0.01 second (10 millisecond) steps, so I found I couldn’t reliably set this control to the recommended settings.
Once I had got beyond these confusions and learnt to re–analyse after changing the settings, I found this plug–in to be very good at declicking the test file, leaving only some very low–level crackle for the Decrackle plug–in to remove.
Declicking By Hand
Sonic also include an Audiosuite–format manual declicking plug–in called NoNoise Manual Declicking. This is helpful in a situation where you can isolate a single click by ear, or you don’t want to process the whole file. It offers five different interpolation algorithms that are capable of correcting a range of audio defects. After the wide range of controls of the Production Declicking plug–in, this has only one pull-down menu to select which type of algorithm to use. The default algorithm is Type B, which works well on complex musical waveforms. Two useful variations of Type B force the algorithm to use only audio before or after the click in the reconstruction, which is useful when clicks occur just before or after a sudden change. Algorithms A and C are designed to be used in dealing with waveforms with significant pitch content, while D and E are very specialised versions designed to handle very difficult problems. Type D can only handle selections less than 2 milliseconds long — and when I tried a longer selection, it crashed Pro Tools. Type E has been optimised for decrackling rather than declicking.
I found Type B very effective at handling a wide range of different sorts of defects. When I tried Types A and C on the Vinyl Record test file, the plug–in reported that it couldn’t find a pitch, but this turned out to only a problem on one leg of the stereo file; the other was processed successfully.
Cracking The Crackle
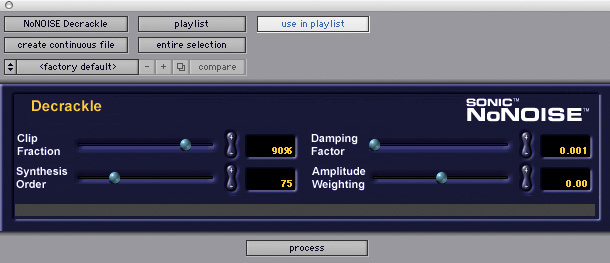 The NoNoise Decrackle window has no graphical section, just four processing parameters. Sonic say the best results are obtained by experimenting with different settings on short portions of a file, to gain a good sense of each parameter’s effect.
Clip Fraction, which ranges from 50 to 100 percent, affects the detection part of the algorithm; the higher the Clip Fraction, the less aggressive the decrackling will be. Synthesis Order determines the precision of the Decrackler’s resynthesis. In general, the larger this number, the cleaner and more artifact–free the output will be. The default value of 75 is suitable for the majority of source materials.
Damping Factor affects how the Decrackle algorithm tracks high–level transient information. The higher the Damping Factor, the more the process will tend to smooth transients in the source material. The default value of 0.001 is meant to be just enough to prevent artifacts without adversely affecting transient response. If Damping Factor is set too high, there can be a loss of transient response and, in extreme cases, loss of overall dynamic range, so this control should be used with care. The recommended setting is very close to the bottom of the range, which, for most purposes, makes this control very difficult to adjust. Maybe Sonic should consider having some form of range switch that varies the range, so that the normal range is a lot smaller for routine work, and for the odd occasion when a wider range is needed, it is available.
While Clip Fraction determines the overall percentage of samples retained unaltered in the processed output, Amplitude Weighting determines how these are distributed between high– and low–amplitude sections of the source. At the default value of 0.0, all portions of the source file are processed equally. With positive values of Amplitude Weighting, the processing becomes concentrated in higher amplitude sections. Negative values will cause processing to be concentrated in the sections of lower amplitude.
For routine operations the key controls are Clip Fraction and Synthesis Order; the other two will only need visiting for more demanding restoration work.
My Declicked test file still had a range of low–level clicks and crackles in it. I processed this with the Decrackle plug–in at its initial settings and the results were nothing short of stunning. After the complexities of Production Declicker, it was refreshing to come to a plug–in where the default settings do the job.
Say Hello To MR Click
 Wave Arts’ MR Click has declick and decrackle built into one plug–in. The window is very simple: a large graphical display shows detected clicks with a red line and detected crackles with a yellow line. The display can show up to the last four seconds of audio, with ‘now’ at the right–hand end of the graphical display. With stereo files you can also see both channels separately, to make sure the plug–in is picking up clicks on both channels.
There are only two controls in the click section. A lower Threshold setting will detect more potential clicks, while a higher setting will detect only the very loudest. The Duration control defaults to a millisecond but Wave Arts recommend increasing this if a residual thump sound remains after the click has been removed.
The Crackle section has a single Threshold. If this is set too low, MR Click will treat transient edges as crackles and the brightness of the sound will be affected. Wave Arts recommend monitoring the ‘noise only’ signal to check there isn’t too much HF content being removed.
The last control is another Threshold control for what Wave Arts call ‘onset events’. If the material you are trying to process is percussive, the crackle section can potentially treat the starts of percussive events as crackle and attenuate them. The ‘Onset Event’ section enables the plug–in to ignore the transient starts to percussive events; you adjust the Onset Event Threshold until you get a series of white lines in the display to show that MR Click has detected them.
As soon as I started playing the vinyl record test file, coloured lines appeared and clicks were being treated. A quick look at the manual told me what the different colours meant, but as hard as I tried, I couldn’t completely get rid of the big clicks. Even with a longer Duration setting I was still getting a dull thump where the clicks were, and multiple passes didn’t make a major improvement. According to the manual, the plug–in takes the audio 0.5 milliseconds before the click and inserts that instead of the click. However, if the click is too long there won’t be enough ‘good’ audio to fill the hole. Maybe Wave Arts need to use audio further back or from both sides to improve the click removal performance.
Denoising
To eliminate hiss and other noises, it is necessary to first analyse noise content and then apply the denoising process to the material. Broadband denoising operates by means of analysis and resynthesis. A Fast Fourier Transform (FFT) frequency analysis is performed on a sample of noise from the material to be processed, by determining the level of noise in each of the individual frequency bands. This is why most plug–ins require some form of analysis or ‘learning’ feature; you need to be able to isolate a section of the audio that only contains noise so that they can get a good ‘footprint’ of the noise, to know what to remove.
In processing, the source material is also subjected to another FFT analysis. The level of signal in each frequency band is compared against a threshold level taken from the noise sample. The processing algorithm determines whether a given band at that instant contains audio signal or only noise. If a frequency band is found to include elements of the desired signal, it is left untouched. However, if the signal in that band is only noise, the level of that band is reduced. Because the denoising plug–in operates over hundreds or even thousands of bands, the overall improvement can be very significant without affecting the quality of the wanted audio.
 With Sonic’s NoNoise Broadband Denoising, the analysis process is undertaken with a separate Audiosuite plug–in. The Noise Estimate is saved as a plug–in settings file. You then use the TDM Broadband Denoising plug–in as an insert on the appropriate track and take the settings file as the basis for processing the material in real time. Unlike other denoising plug–ins, you cannot analyse the noise from within the same plug–in that is processing it.
Within the Pro Tools Edit Window, you select a section of noise, open the NoNoise Broadband Analysis plug–in from the Audiosuite menu and click on the Analyze button. If the sample is not just noise, you can edit the green line so that the Sonic plug–in will ignore the elements of wanted audio. Once you are satisfied, you then save the noise estimate as a plug–in setting file in the normal way. There are zoom buttons, so you can take a look in detail at the noise–estimate curve, should you need to edit it. (The window has a Process button but it doesn’t seem to serve any useful purpose, as you cannot use the analysis plug–in to process a file, and there is no mention of it in the manual.)
 You now put the NoNoise Broadband Denoising plug–in into an insert point and load up the settings file in the normal way. By carefully adjusting the parameters, especially the Threshold and Attenuation controls, you can then optimise the broadband denoising to remove the greatest amount of objectionable noise while avoiding undesirable artifacts. The Attenuation value sets the maximum attenuation to be applied in any frequency band. The higher this value, the greater the reduction in noise, but with increasing danger of producing audible artifacts in the audio signal.
The Threshold parameter allows the curve as a whole to be moved up or down. As the Threshold value is raised, more and more of the signal is processed. At extremely high settings, the distinctive watery sound will be heard on the audio signal. If the Threshold is set too low, little or no noise reduction will be obtained.
The denoising process is like a sophisticated multi–band downward expander, but with over 2000 bands. As signal level in a particular band drops, the process reduces the gain in that band even further, using an internal attenuation curve. The Sharpness control is therefore more like the ratio control in a compressor or expander. The higher the value, the steeper the slope of the expander around the threshold point.
Denoising with each band adjusted separately produces an unnatural–sounding result, but sharing information across the bands produces a more natural sound. The Bandwidth control governs the amount of ‘sharing’, and the optimum setting depends entirely on the program material. It should be high enough to retain high–frequency response but low enough to avoid pumping or distortion caused by noise being modulated by the high harmonics of a signal.
Finally, the High and Low Cutoff parameters set frequency limits above and below which signal is passed through the plug–in unprocessed.
In practice, there is a fair amount of interactivity between the Threshold and Attenuation controls, and both of them will reduce the noise. Having adjusted them to get the best noise reduction without side–effects, I noticed that the wanted audio level had also dropped by about 4dB. I needed to adjust the Sharpness control away from the default setting of 1 to a setting of 1.5, to get that last ounce of noise reduction, but again the extra effort and time was rewarded by excellent noise reduction without side effects. However, with no Audiosuite version, if you don’t want to leave the plug–in in working in real time for the full duration of the project, you need to bounce the file or use the buses to re–record it, which is a pain.
Z Is For Noise
 Unlike their earlier X–Noise, Waves’ Z–Noise is available only as a native RTAS plug–in, which comes with an off–line Audiosuite version and also supports Audio Units and VST formats. To use it, you first highlight a section containing just noise, then click on the Learn button and hit Play. When you are happy that Z–Noise has ‘learnt’ the noise profile, you hit the Learn button again and you will see the profile represented by the white line on the graphical display.
When a pure sample of noise isn’t available, Z–Noise can also Extract a noise profile from a section of programme audio. For this to work well, Waves recommend this sample should be as long as possible, and the programme content be quiet and smooth. Another alternative is to use the Adaptive feature, which learns the noise profile ‘on the fly’ and is especially useful if the noise profile changes. The down side is that it takes several seconds before it has enough information to start reducing the noise, but Adaptive mode can be given a good head start by using it in conjunction with the Learn or Extract modes.
The two main controls are Threshold and Reduction, and they interact just as in other broadband denoising plug–ins. Again, the higher the Threshold, the more of the signal is processed, and the higher the Reduction setting, the more noise is removed from the signal below the Threshold. There are also conventional Knee, Attack and Release controls, which do exactly what they do in any dynamics processor, and a Transient control, which is designed to preserve transients by enhancing them before the noise reduction process takes place. This enables you to increase the Threshold without compromising transients. When noise reduction is completed, the transients are de–enhanced.
The Noise Profile EQ section lets you manipulate the noise profile using a five–band paragraphic equaliser, in effect varying the Threshold across different frequency ranges. For example, you can make Z–Noise more sensitive to high frequencies, and so reduce the subjective effect of the HF end of tape hiss, to achieve a greater perceived degree of noise reduction. Equally, you can make Z–Noise less sensitive in the mid bands where greater degrees of noise reduction would produce unacceptable side effects.
Broadband noise reduction is a balancing act between resolution in the time domain and resolution in the frequency domain. There’s no one perfect solution, as different material and various noise problems each require a different set of compromises. Z–Noise offers the option to choose between higher frequency resolution or higher time resolution, or a compromise between the two, thus optimising resolution to best suit your programme material. In the Smooth mode, Z–Noise provides the smoothest and finest overall noise reduction but with impaired transient quality. Waves advise that this mode is best used for voice and other sources without sharp attacks. Punch mode is recommended for materials that have significant attacks and transients, such as percussive sounds or plucked strings, while Norm offers a happy medium.
You can monitor just the noise signal that the current settings are removing. This can be helpful but should not be solely relied upon. You should always constantly check between audio bypass and noise only to establish the optimum settings.
In practice, I found it surprisingly difficult to get a good level of noise reduction without side–effects. I succeeded in the end, but it took a lot longer than with the older X–Noise plug–in.
Bring The MR Noise
 At first glance, Wave Arts’ MR Noise looks like most of the others but, as with a lot of Wave Arts plug–ins, there is a load of extra stuff hidden under the hood. Their Learn section is different to the norm and, again, helps to make things easy. You can set the duration it will monitor the noise sample for, so you can be sure it doesn’t pick up any stray audio. It can create a noise profile from a noise sample as short as 50 milliseconds, although the longer you can give it, the better the results will be.
However, there are no adaptive or extraction options for situations where no noise–only signal can be found.
As the interface is so intuitive, I actually used the MR Noise plug–in without referring to the manual at all. I got it to Learn the noise profile of the test file and then suddenly the hiss was gone — so much so that I thought something had gone wrong, but when the audio came along, there it was, without hiss. I had made no changes to any of the settings: the default settings had been just right. This plug–in wipes the floor with all the others, even the Sony Oxford Denoising plug–in. MR Noise is simply stunning.
There are, should you ever need them a whole range of features hiding under the hood. These are accessed from the row of buttons labelled ‘Edit’, in the bottom right–hand corner of the plug–in window. When any of the buttons is pressed, a line with a series of anchors on it appears in the graphical section and enables you to edit the appropriate curve for each of the 31 bands that MR Noise has. This gives you the option to change the sensitivity of the plug–in for the different frequencies in a very detailed way. When you are done, you simply click the Floor button again and hide this detail away.
The Amount, Threshold, Attack and Release controls can all be made frequency–dependent and, what is more, all the parameters can be automated, which could be useful if your audio or noise changes through an audio Region. A Gain control enables you to compensate for any drop in the wanted signal level, and there is the option to monitor the noise-only signal too. Finally, there is a range of useful presets that set up MR Noise optimally for a variety of applications.
You Hum It, I’ll Eliminate It
Hum usually originates with mains electricity, and is best removed by using a set of sharp notch filters to eliminate the hum’s fundamental and harmonic frequencies. Sharp notch filters work well because the frequency of line power is very stable, so the filters can be narrowly tuned.
 Wave Arts’ MR Hum uses up to 10 notch filters to eliminate hum through to the 10th harmonic, though it is best to use no more than you need. By default, the filters have a very tight Q of 1Hz, though this can be widened, and there’s a helpful spectrum analyser display that shows the filter notches. There are presets for 50 and 60 Hz mains hum, and you can fine–tune the fundamental to suit.
MR Hum also has a De–buzz section, which has only Frequency and Width controls and is designed to deal with noise such as lighting dimmer interference, which has more high–frequency content than mains hum. The Buzz section has a different algorithm and can be used in conjunction or separately from the hum filters. There are also adjustable high–pass and low–pass brick–wall filters.
I selected the 50Hz hum preset and played my ‘no earth’ test file through it, and was surprised that there was still some buzz left over. So I then tried the 50Hz buzz preset and it all disappeared. I adjusted the width down to a minimum and the audio sounded great. Yet again, this plug–in just works straight out of the box. For my ‘tape motor’ sample I ended up with a combination of both the Hum and Buzz settings; I only ended up needing four harmonics on the Hum section and I opened the width out a little to make up for the slight variation in hum and buzz pitch due to the tape machine’s speed variation. That gave me a result that was every bit as good as the Sony Oxford plug–in.
Overall, the Buzz section on this plug–in is spectacular, and very easy to use for standard mains frequencies. It doesn’t have the ability to ‘track’ variations in hum frequency, like the Sony plug–in does, but the results are just as good, and you can use it without having to bury your head in a manual for hours.
Sonic’s NoNoise bundle doesn’t have a dedicated hum or buzz–removal plug–in, but includes a set of filters designed to tackle these and other frequency–specific noise sources. The filters include parametric, low and high shelving, low–pass and high–pass, band–pass, stop and notch shapes, as well as some more unusual algorithms that can apply or remove RIAA and pre–emphasis, and a DC rejection filter for tackling DC offset.
I tried the notch filters on the ‘no earth’ test file. They worked, but it was a real pain to set up a line of them to remove each of the harmonics one by one, and I was still left with the high–frequency buzz. I used the broadband denoising plug–in to clean this up, as I had with the Waves bundle when I processed this file.
Pearly Gate?
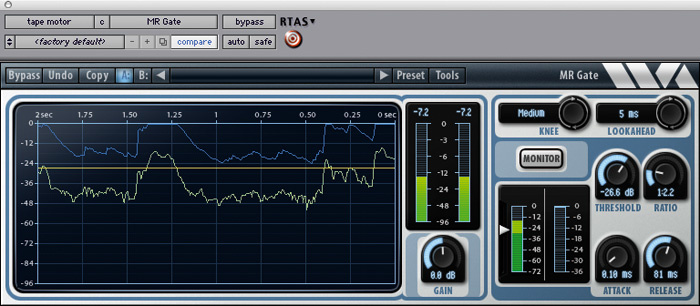 The Wave Arts Restoration Suite also includes a plug–in called MR Gate, which is really a downward expander that can be a gate when you set the ratio to maximum. The manual explains that this should be used if the other, problem–specific plug–ins are unable to remove all low–level noise. However, the only Wave Arts plug–in that didn’t get rid of everything for me was MR Click, and a gate wouldn’t help with that!
MR Gate has a familiar graphical display with three coloured lines: the blue one shows the gate gain, the green is the input signal and the yellow is the threshold. A Lookahead option can be raised up to 5 milliseconds to make sure all the transients get through the gate unaffected, and doesn’t appear to affect the latency of the plug–in. There’s also a Monitor feature, which is surprisingly useful to let you see what MR Gate is taking away.
I tried MR Gate on the ‘tape motor’ test file after the MR Hum plug–in and was able to clean up the remaining bits of muck. I found the Lookahead helped not to eat into the audio as much, and with a soft expansion ratio of just over 1:2, it worked remarkably well. I have always been a little sceptical of using gates in the restoration process, but this one will be a useful addition to the toolbox.
MR Restoration
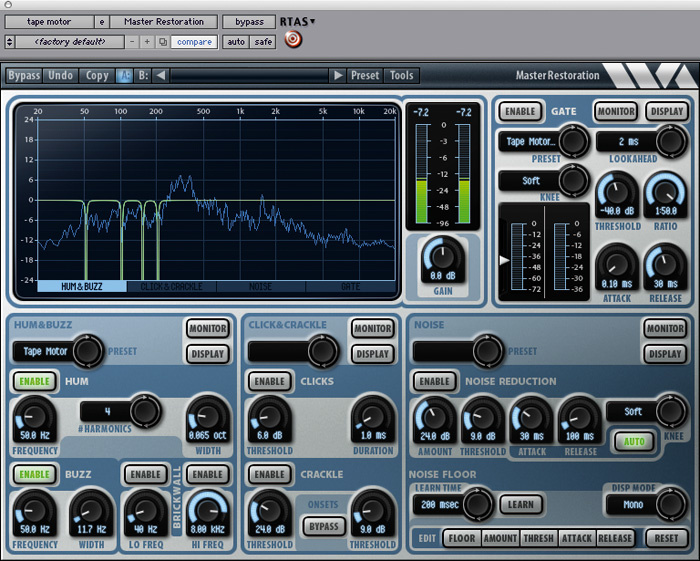 Wave Arts seem to have thought of most things, and have included a fifth plug–in that combines all the separate modules into one, which can really help when you’re running out of track insert points. The display section can be switched to show what is going on in each of the sections, either by using the Display button or just clicking somewhere in the appropriate section. As long as you save the presets using the Wave Arts Save menu rather than the Digidesign plug–in setting route, you can swap presets between the individual modules and the combined MR Restoration.
Overall Conclusions
- Sonic NoNoise
This not an intuitive set of tools to use. You need to spend a considerable amount of time with the plug–ins in this package to get to grips with how each of them works and how each control can affect the final result. You can see by the design and the detailed descriptions and guidance in the manual that Sonic have been doing audio restoration for a long time and know a thing or two about this area! All this helps to make NoNoise a very powerful suite of tools in the hands of a professional who has taken time to get to grips with its inner workings. This isn’t the tool to pull out in the middle of a busy session to work some magic on a bit of dodgy audio in a hurry. It is a tool to use when the client requires excellent results, even if it takes a while.
One major problem with it is that all the Audiosuite plug–ins in the NoNoise package only work in mono. This is a significant shortcoming and, worse still, they do not warn you when you process a stereo track; I only noticed it when I came to compare the results of the NoNoise Declicker and Decrackle with the other plug–ins and realised the results weren’t stereo any more. I would have expected, at the least, that a warning would come up when you try to process a stereo file, or that when selecting a stereo file the plug–ins wouldn’t appear in the Audiosuite menu as an option. I worked around it by dragging the stereo audio onto two mono tracks and then processing each leg of the stereo separately. That said, the results from these plug–ins are excellent, but they are tools for experts that have spent the time working through the learning curve required to use them well.
- Waves Z–Noise
Compared with the original, and now ageing, X–Noise, I did find the additional features of the Z-Noise useful, especially the Noise Profile EQ and, to a lesser degree, the Resolution Optimisation Controls, but I found the Threshold control very sensitive. Small amounts of adjustment make large differences, and it’s hard to find a happy medium between hearing too much noise and creating too many artifacts. Overall, I had hoped that Z–Noise would be a significant improvement over X–Noise, but it would be fairer to say it is different rather than better.
- Wave Arts Master Restoration Suite
This may be the newest kid on the block but it is a mature and efficient suite of plug–ins. Many other software developers could learn from Wave Arts’ design techniques. They produce interfaces that work well from a mouse, don’t take up too much screen space and are very intuitive to use. Together with their excellent signal processing, the design means it is very easy to get great results out of them. All of the plug–ins in the package work. Only MR Click was slightly disappointing next to the excellent results I achieved with the Sonic NoNoise plug–in, but even then, when I came to compare it with the results of the first shootout, it was just as good as Waves’ X–Click. The combination plug–in doesn’t seem to have lost any of the features that are in the individual ones, and having them all together makes it much easier to use.
At the price, the Wave Arts MR Suite is amazing value, and as far as I’m concerned is top of the pile if you need a general–purpose restoration package. For top–class vinyl restoration work, Sonic’s NoNoise package gives the best results, but it may take some getting used to!
Using Decrackle Tools To Remove Peak Distortion
 A trick that is becoming better known is using a decrackling plug–in on a file that has suffered from peak distortion, usually from clipping. Sonic Solutions have even included a section in their manual giving advice on how best to use their Decrackle plug–in to reduce the side effects of peak distortion. They recommend setting the Amplitude Weighting fairly high, at around 0.7 or 0.8, and reducing the Clip Fraction to around 80 to 85 percent.
I tried Production Decrackle on a test file with peak distortion. The results improved it and a second pass improved it more, but zooming in showed that although it had treated some peaks it had left others untreated. In the screen below you can see that the peak at the beginning of the highlighted section has been processed but the peak at the end is still clipped.
I also tried Wave Arts’ MR Click on my peak-distorted test file. I monitored what was being removed, while watching the display, and eventually ended up with the Threshold at its lowest setting, which did improve the sound of the file.
Test Results
| No Earth | Ease Of Use | Quality Of Processing | Comments |
| Sony Oxford Restoration | 9 | 8 | |
| Waves Restoration Bundle | 7 | 7 | |
| Bias Sound Soap Pro | 6 | 7 | |
| Sonic NoNoise | 4 | 5 | Only able to use the filters |
| Wave Arts MR Hum | 9 | 8.5 | |
| Tape Motor | Ease Of Use | Quality Of Processing | Comments |
| Sony Oxford Restoration | 9 | 9 | |
| Waves Restoration Bundle | 7 | 7 | |
| Bias Sound Soap Pro | 6 | 6.5 | |
| Sonic NoNoise | 4 | 4.5 | Only able to use the filters |
| Wave Arts MR Hum | 9 | 8 | Would score a 9 for quality in combination with MR Noise and MR Gate in the Master Restoration plug–in |
| Vinyl Record | Ease Of Use | Quality Of Processing | Comments |
| Sony Oxford Restoration | 8 | 9 | |
| Waves Restoration Bundle | 7 | 7 | |
| Bias Sound Soap Pro | 6 | 8 | |
| Sonic NoNoise | 5 | 9.5 | Using Production Declick & Decrackle |
| Wave Arts MR Click | 8 | 7 | |
| Hiss | Ease Of Use | Quality Of Processing | Comments |
| Sony Oxford Restoration | 7 | 8 | |
| Waves Restoration Bundle | 8 | 8 | |
| Bias Sound Soap Pro | 7 | 8 | |
| Sonic NoNoise | 6 | 8.5 | |
| Wave Arts MR Noise | 8 | 9 | |
| Waves Z–Noise | 6 | 7.5 | |
| Peak Distortion | Ease Of Use | Quality Of Processing | Comments |
| Sony Oxford Restoration | 8 | 8 | |
| Waves Restoration Bundle | 8 | 7 | |
| Bias Sound Soap Pro | Couldn’t test | ||
| Sonic NoNoise | 8 | 8 | |
| Wave Arts MR Click | 8 | 7 |