This month we look at ways to manipulate transients and make use of those all‑important send effects, as we take on Jay Menon's ballad, 'Through My Eyes'.
 The lead vocal was well enough recorded that there was very little need for corrective EQ, but Mike nonetheless experimented with some emulated vintage EQ plug‑ins in search of some subjective enhancement of the tone. In the end he combined two UAD2 plug‑ins, the Harrison 32C providing some low cut and a little high‑end contouring; and the Helios 69 just adding its circuit character without actually EQ'ing at all.
When SOS reader Jay Menon sent in his track, 'Through My Eyes', he said he was finding it difficult to maintain the clarity of the lead vocal as the arrangement built up, while at the same time achieving a suitably rich, reverberant sound for the mix as a whole. In addition, the melodic elements of the bass line weren't coming through enough for him unless that track was pushed too loud for the overall balance.
Listening to his mix, I was impressed by the sensitivity of the arrangement (often a problem in Mix Rescue submissions), and although the drums came courtesy of Toontrack's EZ Drummer virtual instrument, and the acoustic guitars had been recorded via a Fishman Aura DI system, the sounds mostly seemed pretty respectable too. That said, Jay's use of reverb seemed to be responsible for some of the clarity problems, and I also felt that the EZ Drummer parts were a little too up‑front and might benefit from better blending. Let's look at how I dealt with these specific issues in coming up with my remix.
Starting From Scratch

One of the best ways to ensure that your lead vocal sound remains clear is to build the mix starting with the lead vocal track on its own, and processing each new part with EQ to avoid it compromising the vocal's prime position. Jay had done a good job of the vocal recording, creating a heavily deadened acoustic space in his home studio, and then performing into an omnidirectional mic. This way of working can give excellent results, especially if the singer is moving around while singing, because omni mics have no proximity‑effect problems and capture off‑axis sound with a more consistent tone. (But it only works well if you get the room sound right!)
The main thing I did with this vocal was moderately compress it using Universal Audio's LA3A emulation, which usually gives fairly transparent gain‑reduction. (I tried the same company's very similar LA2A too, but this clouded the sound a little on this occasion.) As I sometimes do, I also mixed in another more speedily compressed version of the vocal signal, to bring up the intimacy of the low‑level details. The LA3A isn't a fast compressor, so I tried an 1176 instead for this; it worked much better for this application, as well as adding in some processing side‑effects that seemed to flatter Jay's voice.
In search of further fairy dust, I tried adding a decibel of extreme high‑end with a few different UAD plug‑ins, before plumping for the Harrison 32C. However, in the process I found that the Helios 69 EQ added something pleasant without my even having to touch the controls, and I chose to leave it in the processing chain for that reason alone. Based on discussions with Jay about the kinds of vocal sounds he liked, I ended up dialling in 4dB of low mid-range cut (shelving from around 450Hz) on the Harrison, to lighten the overall tone.
 These three screens show the settings for Mike's three main reverb send‑effects, each of which serves a different purpose in the mix.After this, I left the vocal processing pretty much untouched until much later in the mix, when I found that the fuller‑textured sections of the arrangement had begun to mask a bit too much of the vocal's high end, at which time I turned to some automation of the Harrison's high‑band gain control to provide a remedy. It was only a question of a 1dB ride, but it made enough difference to be worth the effort. A vanishingly small amount of the UAD Precision Enhancer assisted with maintaining the vocal brightness too.
The other key instrument Jay had been concerned about was the bass guitar, but the raw track had been well played and it didn't require much in the way of processing, beyond a few decibels of compression from the UAD LA2A and a moderate lift (a setting of three on the Boost control) at 100Hz with the low shelf of the same platform's Pultec EQP1A. Nevertheless, later on I spent some time lifting the more interesting melodic bass phrases with fader automation, to give them a little more limelight.
EZ Drummer & Transients
 is the usual detailed level automation that keeps the vocal's position in the mix stable and aids intelligibility of the lyrics. The next five envelopes (red) show how the reverb and delay send levels are ridden to match changes in the arrangement. The final two envelopes (lilac and blue) are controlling the upper bands of the vocal's Harrison 32C EQ plug‑in, to compensate for increased high‑frequency vocal masking as the song's texture thickens.") In this screen you can see the extent of the vocal automation used for the remix. The top automation envelope (purple) is the usual detailed level automation that keeps the vocal's position in the mix stable and aids intelligibility of the lyrics. The next five envelopes (red) show how the reverb and delay send levels are ridden to match changes in the arrangement. The final two envelopes (lilac and blue) are controlling the upper bands of the vocal's Harrison 32C EQ plug‑in, to compensate for increased high‑frequency vocal masking as the song's texture thickens.
In this screen you can see the extent of the vocal automation used for the remix. The top automation envelope (purple) is the usual detailed level automation that keeps the vocal's position in the mix stable and aids intelligibility of the lyrics. The next five envelopes (red) show how the reverb and delay send levels are ridden to match changes in the arrangement. The final two envelopes (lilac and blue) are controlling the upper bands of the vocal's Harrison 32C EQ plug‑in, to compensate for increased high‑frequency vocal masking as the song's texture thickens.
Happy with the initial vocal/bass balance, I moved on to the drums: stereo overheads; kick, snare, and hi‑hat close mics; and a mix of tambourine and finger cymbals. The Nashville kit Jay had chosen worked pretty well, but there were aspects of the sound that bothered me. The kick, snare, and hat sounds all had a very prominent attack and not a great deal of sustain (a common feature of the samples in virtual drum instruments, in my experience). This might be fine if you've got an uptempo track with a fairly tight arrangement, but for a ballad like 'Through My Eyes', the drums could afford to take on a supportive background role with more body and less cut‑through.
There are a lot of ways to reduce the apparent attack of drums, and EQ is certainly a first port of call. In this instance, the kick drum was lightweight and clicky in a way that didn't really sit properly, but rolling off 7dB with a ReaEQ high‑shelf filter above 1.5kHz reduced the aggressiveness of the beater, while a 4dB peaking boost at 78Hz added a bit more gravitas. I wanted to keep the extreme low end under control, however, so combined the peak with a high‑pass filter set to 38Hz.
Even in the overheads, the snare sound was biting too much, but EQ wasn't really the way forward, because it would also affect the cymbal and hat sounds. Instead, I chose to use Reaper's built‑in Jesusonic Transient Controller plug‑in (which works a bit like SPL's Transient Designer), reducing the Attack slider to ‑23 percent, and gently rounding the sound while avoiding obvious processing side‑effects.
![]() A combination of two different freeware plug‑ins was used to soften the transient of the EZ Drummer snare close‑mic signal: Jeroen Breebaart's Ferox tape emulator and GVST's GClip soft‑clipper.Recording drums to analogue tape can often make them easier to mix. One reason for this is that the tape itself will round off some of the transient, both through high‑level tape saturation and because of the high‑frequency dulling effects of playback self‑erasure and mechanical wear. The rounded transient gives the mixed sound more body, and it has become part and parcel of many of the classic drum sounds that home recordists aspire to. So if you're struggling with mixing sampled drums of any kind, it can make a lot of sense to try putting the spikier ones through a tape‑saturation emulator of some kind.
A combination of two different freeware plug‑ins was used to soften the transient of the EZ Drummer snare close‑mic signal: Jeroen Breebaart's Ferox tape emulator and GVST's GClip soft‑clipper.Recording drums to analogue tape can often make them easier to mix. One reason for this is that the tape itself will round off some of the transient, both through high‑level tape saturation and because of the high‑frequency dulling effects of playback self‑erasure and mechanical wear. The rounded transient gives the mixed sound more body, and it has become part and parcel of many of the classic drum sounds that home recordists aspire to. So if you're struggling with mixing sampled drums of any kind, it can make a lot of sense to try putting the spikier ones through a tape‑saturation emulator of some kind.
For PC‑based VST‑compatible hosts, Jeroen Breebaart's freeware Ferox makes it easy to try this out, and I inserted it practically as a reflex action when I heard EZ Drummer's snare close‑mic in isolation. The pretty subtle 'High Quality Tape' preset already reduced some of the less pleasant edginess, but when I tried driving it harder to see whether it evened things off more, I didn't like the way the tone changed, so contented myself with the initial improvement and sought further help from GVST's GClip plug‑in. I use this simple little clipper all the time, especially when mixing digitally recorded productions, because it allows me to vary the hard/soft characteristic of the clipping curve. A high Softness setting of 75 percent gave another useful rounding of the snare's attack, and I used the plug‑in's visual display to clip mostly just the initial level spike of each hit.
Achieving the final snare sound was then simply a case of EQ'ing the snare close mic to add fullness to the already bright overheads component, and I used the UAD Neve 1073 plug‑in for this, as Neve EQ always seems to have a slightly warming effect, to my ears. A cut of 4dB with the high shelf and a further 2.5dB of peaking cut at 7.2kHz took out some of the excess brightness, while 3dB of low shelving boost at 220Hz added body.
Gluing The Kit Together
![]() You can see the result of Mike's snare processing here. The upper screen shows the raw snare track, while the lower screen shows how the transient has been smoothed off by the tape emulation and soft‑clipping plug‑ins.
You can see the result of Mike's snare processing here. The upper screen shows the raw snare track, while the lower screen shows how the transient has been smoothed off by the tape emulation and soft‑clipping plug‑ins.
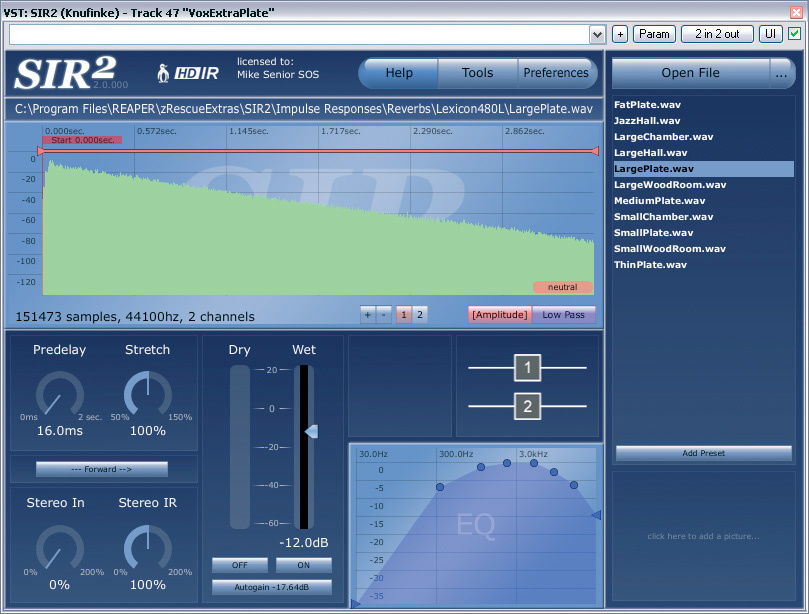
Excessive transient was also a problem with EZ Drummer's hi‑hat close mic — but only because I had to rely on it more than I might normally to adjust the hi‑hat balance, which seemed way too low in the overheads. However, the close mic was very dry‑sounding, which meant that fading it up also brought the hi‑hat much too far forward in the mix, such that it didn't blend with the kit at all. My approach to both difficulties was to send the hi‑hat through a shortened stereo drum chamber reverb, running in Christian Knufinke's SIR2 convolution engine. By using only 0.2s of reverb, but fading it up louder than the dry signal, I was able to blur the close‑mic signal's transient, while at the same time pushing it backward in the mix.
Because of the high level of reverb and short 3ms pre‑delay time, the effect also inevitably altered the tone of the hat considerably, so I had to try a few different impulse responses before discovering a suitable one. In most cases, I recommend setting up reverbs as send effects, but in this kind of scenario, where you're carefully matching a short reverb to one specific sound, you might as well use the reverb as an insert effect to reduce track clutter, given that other instruments are unlikely to want to share it. This setup also means that you can easily apply further processing to the dry and wet sounds together, as I did using a 7dB ReaEQ shelving cut at 3.3kHz.
This hi‑hat reverb was the first step towards overcoming the other main challenge that arises when mixing software drum instruments: getting the sounds to glue together. With real drum recordings, all the mics catch a bit of everything, and although some view this spill as a nuisance, it's often the secret ingredient that really helps gel the sound of the kit. Some software drum instruments can simulate this effect, but the more affordable ones don't do it tremendously well, so the drums feel a bit too much like the samples they are, irrespective of the musicality of the programming.
Both compression and reverb can be useful in combatting this 'digital drums' malaise, and I used them both here. However, rather than using a compressor over the drums bus, I decided to send a drums mix to a compressor running in parallel. The reason for this was that I wanted to achieve a good dose of extra sustain, but at the same time didn't want obviously squashed transients or compressor pumping, and I find it much easier to achieve this balance using a parallel setup. The compressor I chose for the task was Universal Audio's Neve 33609, another warm‑sounding emulated analogue processor, which provides a lot of control over transients via the built‑in limiter. I used its Snare Compressor preset (a combination of heavy 4:1 compression and fast limiting) to focus the parallel channel clearly on the sustain portion of the sound, and then mixed the signal in with the uncompressed drums until the sound began to fill out and cohere better.
Many of the styles of music that are sent in to Mix Rescue don't really tolerate much in the way of long reverb, so it was a nice change to be able to fire up some longer patches for this song, starting with the dedicated large hall ambience I used to put all the drums together into their own space. Once I'd found a promising‑sounding impulse response, I spent some time adjusting it for best results in context. A bit of added stereo width and 36ms of pre-delay helped increase the subjective sense of size of the room, and the kit's position within it, while gentle roll‑offs in the reverb's frequency response below 180Hz and above 1.7kHz kept the effect from making a nuisance of itself at the low end or drawing too much attention to the cymbals.
When To Add Reverb
![]()
In most commercial styles, I find that it makes sense to avoid using any send effects like reverb and delay until I've already got a balance of all the tracks working pretty well together. This tends to leave you with a clearer final mix, because it's easy to fill up too much space that's needed for other instruments if you start adding reverb to an incomplete arrangement. There's also the issue that reverb can veil mix trouble-spots, flattering you into thinking the mix is working better than it is, so you're likely to work less hard on critical, vital, channel‑by‑channel processing.
However, my main exception to this general rule of thumb is that where the effect in question is an inherent part of the sound (and is possibly even more important in the mix than the dry track it's fed from) you'll want to design your mix around that effect to give it room to shine. The hi‑hat reverb is probably the best example of that exception in this mix — although the drum hall ambience treatment also falls into this category to some extent, as its purpose was to alter the size of the kit sound alone. The majority of the send effects on Jay's song, though, were set up only once most of the channel processing and balancing had been finished, although before any serious level automation was undertaken.
When your mix is going to have a fairly reverberant sound like this, it's tempting to think that you can be fairly relaxed about how you use your reverbs and delays, but in fact the opposite is true — because it's really easy to come a cropper if you're not careful. One mistake is to try to achieve too much with too few effects, and this was certainly part of the problem with Jay's original mix. In particular, different reverbs will suit some sounds much more than others, and Jay's reverb sound felt much less suitable for the lead vocal than for, say, the guitars. However, another equally common pitfall is applying too many different effects without refining each to serve its intended purpose efficiently: a sure‑fire route to a muddy‑sounding mess!
Long Reverbs
![]()
To demonstrate how you can manage this balancing act, let's look at how I ended up with the selection of reverb and delay effects in Jay's finished mix (a total of nine), why I chose them all, and how each was tweaked to suit its intended role.
Probably the most extrovert was the snare reverb, a 2.3s bright‑hall impulse response running in SIR2, the point of which was to give snare, side‑stick and tambourine a clear and luxurious high‑frequency reverb tail. Finding the right impulse response took a little while, but I eventually unearthed something suitably smooth in a collection from Lexicon's 960L processor. The difficulty was that the percussion revealed graininess (insufficient diffusion) or metallic‑sounding resonances in a lot of impulses, especially those with longer decay times. Even then, though, the Lexicon impulse still required some lengthening (which you can do with SIR's Stretch facility) and fairly aggressive high‑pass filtering above 1kHz to really work as I wanted.
I used two other long reverbs, but these were a little more general‑purpose. The first was a long, soft hall patch, again from a 960L impulse, the aim of which was to surround the mix as a whole with a flattering large acoustic. I managed to find a 3.5s file with an understated, concert‑hall‑style tone, and rolled the low end off only from about 200Hz, leaving most of the low mid‑range of the effect intact while still avoiding low‑end smudging. To keep such a long reverb from drawing everything back into the mix, I set a 50ms pre-delay and also used SIR2's envelope controls to soften the first 300ms of the reverb onset. I widened the reverb to 120 percent as well, so that the reverb painted out to the edges of the stereo field, and also made slightly less impact in mono. The result: lots of warmth, tail, and wide acoustic space, but without much distancing or blending of individual tracks. Most of the tracks other than the kick and bass went to this reverb, but the instruments that used it most were the snare and lead vocal, both of which benefited from a good dose of its rich sustain.
The last long reverb was a plate impulse from Lexicon's 480L. Plates tend to be good at lengthening sounds without adding too much spaciousness, and that's what I was looking to this reverb for, particularly with a view to filling out the upper mid‑range of the vocals, guitars, and piano, for which the long hall didn't really provide much support. As such, I restricted this reverb fairly stringently to a 1‑5kHz range and then set a 16ms pre-delay to avoid too much in the way of distancing or tonal change, even with quite high reverb levels. As is often the case with long reverbs, transients and sibilance in the feed signals were echoing around messily in the tail, drawing attention to the effects processing well before it was high enough in the mix to do its job properly, so I used the common trick of firmly de‑essing the reverb send to smooth away the worst of those edges.
Specialised Send Effects
A second plate reverb from Universal Audio's splendid Plate 140 plug‑in had its decay time turned down to minimum, so that it could be used to add fullness to the piano sound without adding too much tail or width, delivering its most important contribution in the 200Hz‑2kHz region. This reverb turned out to do nice things to the nylon guitar solo too, as well as to the main centre‑panned guitar part at a more moderate setting.
A de‑esser paid dividends once more, this time on a simple stereo eighth‑note feedback delay that I used to add complexity and sustain to the guitars and piano. I also dulled the echoes slightly with EQ to keep them in the background. Sending a little of this delay on to the other three reverbs above also helped increase their effective decay times. This is very common practice in any type of music that's obviously reverberant, because although it gives the impression of lengthening the reverb, it actually matches the ebb and flow of the rhythm in such as way that it doesn't have nearly as much impact on the mix clarity as increasing your actual reverb times can.
The remaining send effects were more closely targeted. Another tempo‑sync'ed delay, this time set to a quarter note, provided the opportunity to highlight lead-vocal and nylon-guitar phrases, but otherwise sounded very similar to the existing eighth‑note patch, bar some extra feedback. Schwa's new CMX pitch‑shift and delay plug‑in provided my usual stereo‑widener effect for the lead vocal and rhythm guitar parts, and I cut out the lower frequencies below 1kHz. This is something I often do, because these will usually cause the most dramatic tonal changes if there's any phase‑cancellation with the dry signal.
The bass had its own separate reverb and chorus send effects, both designed to widen and blend the bass without affecting the low end. Finessing these involved some low‑cut EQ below around 100Hz on both effect returns, but the exact delay time used by the chorus also made an important difference to the tone of the instrument. Another separate reverb for the lead vocal came from Smarteletronix's Ambience plug‑in, which gave a very bright and fizzy sound so that it acted almost like a kind of high‑frequency enhancement. Needless to say, another de‑esser was important here to prevent a sibilant spray!
In a ballad like this, you really need to hear all the detail and emotion in the singer's voice, but the danger with fading it right up in the mix is that this can make it seem to sit 'over the top', as if it doesn't quite belong. The effect I turn to most of the time in this kind of situation is short ambience reverb — something under 100ms in length, with a short pre-delay tweaked for a suitable tonal combination of the dry and wet signals. It's the kind of effect that you hardly hear at all in its own right, but when you turn it on the vocal immediately seems to lock more tightly to the mix.

Horses For Courses
As you can see, each one of my reverb and delay effects had a slightly different job to do, and was adjusted accordingly. Being able to use different amounts of the different effects for each track meant that I could achieve a warmer, more reverberant sound without losing clarity, because each instrument was only feeding the effects that suited it. Furthermore, the multi‑effect setup made it much easier to massage the reverb sound with automation in response to changes in the arrangement. So, for example, I could have more short plate on the vocals to keep them full‑sounding where they were exposed during verse one; and then I could back off that plate as I faded up the long soft hall and tempo delays in the first chorus. I was also able to ride up the ambience to give a bit more vocal blend later in the song, and increase the delay sends wherever I wanted more pronounced echoes. It's this kind of work that really helps give a song more of a sense of emotional light and shade — so if you like the way this remix sounds, but you're still harbouring a 'set and forget' attitude to effect levels, now might be the time to rethink your viewpoint.
Precision Pads
 The levels of the two synth pads that Jay had provided didn't track changes in the song's arrangement, so Mike used audio‑region level changes and fader automation to remedy this, as you can see here.
Jay had used a couple of synth pads (strings and choir) from an elderly Korg keyboard, to fill out the sound. However, like most pad sounds, these didn't really warrant much direct attention in their own right, and if I faded them up too far they rendered the song rather bland and homogenous, despite the quality of the other performances. For this reason, I usually treat pads in much the same way as ambience reverb: I filter them to isolate ranges that really count, and then balance them so that you only really notice what their contribution was when you mute them. In Jay's case, there wasn't too much filtering to be done, because he'd already chosen sensible sounds and chord voicings — and a little high‑pass filtering was all I added. Balancing was a little more involved, though, because the pad levels remained fairly constant, despite changes in the arrangement, so I had to do some fader automation to keep the pad levels more consistently in the aforementioned sweet spot.
Remix Reactions
Jay: "The first thing that struck me was how 'in your face' the lead vocal had become. My initial reaction, rather like someone who's embarrassed by a close‑up photograph of themselves, was to cringe. But then I observed the reactions of the other listeners around me! I also love the clarity that accrues to the mix: the bass drum and bass guitar are distinct, yet complementary; the compression and reverb settings change to suit different parts of the song; and the emotion behind the lyric seems to be getting through just as it should.”
Mix Rescue On‑line
If you go to /sos/jan10/articles/mixrescueaudio.htm you'll find audio files in both WAV and MP3 format, so that you can listen to the changes Mike made to this track.