 enables notes to be inserted by a MIDI keyboard (or the Screen Keyboard, shown here) without running through a recording pass. The Step Input Keyboard (above the Screen Keyboard) gives you more control over the incoming information, and you can still edit the data on screen, using Logic's editors, as if you'd recorded it in real time.") The 'In' icon in Logic's Matrix, Event and Score editors (shown in red, below) enables notes to be inserted by a MIDI keyboard (or the Screen Keyboard, shown here) without running through a recording pass. The Step Input Keyboard (above the Screen Keyboard) gives you more control over the incoming information, and you can still edit the data on screen, using Logic's editors, as if you'd recorded it in real time.
The 'In' icon in Logic's Matrix, Event and Score editors (shown in red, below) enables notes to be inserted by a MIDI keyboard (or the Screen Keyboard, shown here) without running through a recording pass. The Step Input Keyboard (above the Screen Keyboard) gives you more control over the incoming information, and you can still edit the data on screen, using Logic's editors, as if you'd recorded it in real time.
Step sequencing is often regarded as a pastime of '80s revivalists, but it can be used effectively in Logic to produce creative results in all kinds of music.
 The 'In' icon.Back in the days before MIDI, when control voltages ruled the Earth, the only sequencers available were analogue devices that could, if you paid an awful lot of money, only record up to 16 individual notes, and play them back with clock-like precision. After the MIDI revolution and the introduction of sequencers that could achieve almost perfect renderings of a performance, one might have expected the step sequencer to die out. In fact, it flourished, with more and more sophisticated dedicated hardware models coming onto the market (just check out the Genoqs Octopus in SOS March 2007!). I think that the reason for this was that some really great music was still being made using these devices, and often people found the limitations of the equipment an inspiration rather than a hindrance. Sometimes what's really needed is a few bars of perfectly sequenced groove to get the creative juices flowing.
Fortunately, the step sequencer lives on in most modern software, and Logic 7 introduced a simplified implementation of this classic music-making technique: the Step Input Keyboard.
The First Step
The Step Input Keyboard is located in the main Windows menu. Of course, you can only enter step data into a MIDI or virtual instrument track, so the first thing to do is select one of these on the Arrange page and insert a suitable virtual instrument; in this example I'm using the ES1 synthesizer. Next, create a blank sequence using the pencil tool and drag it to the required length (four bars, in this case), then open this sequence in the Matrix editor. You can make the Matrix editor the default when you double-click on a sequence, if you select it in the Editing pane of the Global Preferences window.
Entering Data
You can use the on-screen Step Input Keyboard to enter note data with a mouse. If you click on the 'in' button on the Matrix editor's Parameter strip (see screen above right)), you can also use a connected controller to enter notes. (The Screen Keyboard, which pops up when you've engaged the Caps Lock key, can also be used to enter note and other data, which is particularly useful if you want to do a bit of sequencing on the move.) The icons above the Step Input Keyboard give you control over the entered notes and various other parameters. You select the note length from the buttons with the note icons and the note's velocity from ppp (MIDI velocity value 16) to fff (MIDI velocity value 128). The dot button makes the next two notes entered a dotted length, while the '3' button makes the next three notes triplets. There's a MIDI channel data-entry box where you can decide which MIDI channel the notes will send on, and the little right-arrow button will extend the length of selected notes.
 are layered on top of each other at the current SPL position, creating chords.") When the Chord button, located on the far left-hand corner of the Step Input Keyboard, is engaged, subsequent entries (made by clicking on the piano roll) are layered on top of each other at the current SPL position, creating chords. Notes are always entered at the Song Position Line (SPL), so move it to the beginning of the sequence, select a note length and its velocity and click on the Step Input Keyboard's piano roll. A note will be entered, and the SPL will move along the length of the note. The beauty of step sequencing in a sophisticated sequencer like Logic is that you can freely change note lengths and velocities after you've entered them on screen, using Logic' s editors, as if they'd been played in real time. While this may seem fairly unspectacular, it's a giant leap ahead of editing these parameters in a list on the small screen of, say, an Akai MPC sequencing workstation.
When the Chord button, located on the far left-hand corner of the Step Input Keyboard, is engaged, subsequent entries (made by clicking on the piano roll) are layered on top of each other at the current SPL position, creating chords. Notes are always entered at the Song Position Line (SPL), so move it to the beginning of the sequence, select a note length and its velocity and click on the Step Input Keyboard's piano roll. A note will be entered, and the SPL will move along the length of the note. The beauty of step sequencing in a sophisticated sequencer like Logic is that you can freely change note lengths and velocities after you've entered them on screen, using Logic' s editors, as if they'd been played in real time. While this may seem fairly unspectacular, it's a giant leap ahead of editing these parameters in a list on the small screen of, say, an Akai MPC sequencing workstation.
If you're creating bass lines or drum parts, you may want to work one note at a time, but you can also enter chords by selecting the Chord button, located on the far left of the Step Input Keyboard pane. When this is engaged, each subsequent click on the keyboard will place all the notes at the current SPL (see screen, below left), and deselecting the Chord button will move the SPL along to the next position for note entry.
A series of key commands is associated with the Step Input Keyboard, and while some of these are counterparts of the icons on the Step Input Keyboard itself, some, such as step forwards, step backwards and the octave settings, are only available as key commands, so it's worth checking them out, by opening the Key Commands window (Alt-K) and looking under the Keyboard Input section. Here you'll also find key commands to erase the current notes and to define whether the next notes will be sharp or flat. Using key commands enables you to fly around the step-input side of Logic as if it were an old hardware classic like the MPC.
Of course, there's nothing stopping you from combining real-time input with step time, but creating the bass line and drum patterns using the latter method will give the song a specific and solid base on which you can then layer other instruments. For example, if you create several eight-bar sequences, you can then place these 'seed' parts in various positions on the timeline to form the structure of a song. Once basic sequences have been created, you can copy them and use them with Logic 's Transform functions, which can be found under the Matrix editor's Functions menu, to generate different sequences.
Somewhere Under A Menu... Direction Mixer
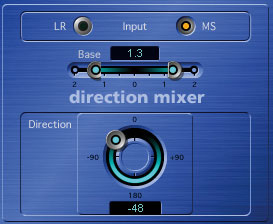 One of the most important things to consider when trying to get a mix right is the positioning of sounds in the stereo field. You need to keep a lot of things in mind when deciding where to pan tracks. These might include working out where an instrument would naturally lie in a orchestra, or live band, or as part of a drum kit. You may want to place a sound so that it avoids clashing with other sounds occupying similar frequency ranges or performing similar roles in the song. You might have to take into account the fact that the mix may be played on a dance floor or an in-car stereo system with speakers placed some distance apart. If you're mixing for TV, the way you've created your stereo picture could have an impact on the sound when it's summed to mono. In these days of iPods and other personal music players, it's also important to consider how a mix behaves on headphones: you don't want the sound that's driving the song to be panned to the extreme left or right. The pan control on Logic 's channel strip is fine for basic positioning of monophonic sources, but with a stereo recording it only adjusts the relative balance between the left and right sides of the stereo image. The Direction Mixer plug-in offers a more sophisticated panning system, allowing you to define not only the position of the centre of a stereo recording (using the Balance parameter), but how far the stereo spread extends as well (using the Base parameter). This should help you avoid the 'big mono' problem you can experience when you're mixing several stereo sources, such as keyboards.
If the Base parameter is set to '0', this will convert the stereo recording into a true monophonic one, and if you increase the value to '1', the stereo source can appear to extend beyond the speakers. With the right kind of recording, such as one with a significant high-frequency content, this can extend the apparent width of your mix. But remember that this kind of processing can sound pretty weird when played back in mono.
But wait! There's more. If you record with microphones using the Mid & Sides (M&S) technique, you can use Direction Mixer to decode the recording into 'normal' stereo, as long as the radio button is set to the MS parameter rather than LR. M&S is a way of recording in stereo that uses a microphone with a figure-of-eight polar pattern to capture the side information and, usually, a cardioid microphone to record the centre. If the Middle signal is recorded to the left channel and the side information to the right, Direction Mixer can be used to recreate and manipulate the stereo image and give you unprecedented control over the position and stereo spread of a recording. For more information about M&S recording, check out www.soundonsound.com/sos/1997_articles/feb97/stereomiking.html and www.soundonsound.com/sos/feb02/articles/cheshire0202.asp.
Arpeggio To Go
, joining them up and renaming the layer, you create a new track source option in the Arrange page. From here, simply arm a new track in the Arrange page and play away! Remember: the song must be playing for the arpeggiator to function properly.") Like many of the Environment's powerful tools, the arpeggiator is often ovelooked. By creating a new Environment layer, inserting an Audio Object and an apreggiator module (both can be found in the 'New' menu), joining them up and renaming the layer, you create a new track source option in the Arrange page. From here, simply arm a new track in the Arrange page and play away! Remember: the song must be playing for the arpeggiator to function properly.
Like many of the Environment's powerful tools, the arpeggiator is often ovelooked. By creating a new Environment layer, inserting an Audio Object and an apreggiator module (both can be found in the 'New' menu), joining them up and renaming the layer, you create a new track source option in the Arrange page. From here, simply arm a new track in the Arrange page and play away! Remember: the song must be playing for the arpeggiator to function properly.
Another device much used in the dark days of step sequencing was the arpeggiator, a feature of many classic synthesizers such as the Roland Jupiter 8. Logic has an arpeggiator too, but as it's part of the Environment, many people find it confusing to use. I find it easiest to create a new Environment layer and keep it as a specific arpeggiator layer. You obviously need to add a new arpeggiator and, depending on whether you want to arpeggiate an external MIDI device or a virtual instrument, you also need to create either a MIDI instrument or an Audio Object on the same layer. To assign this to the right instrument track, change the Object's channel parameter (in the left-hand menu) to the same track number that you've inserted your virtual instrument on. Next, drag the little arrow at the top of the arpeggiator Object to the virtual instrument, select the arpeggiator Object, make sure the Icon parameter has a tick by it, and rename it with a useful name: in this case, 'ES1 Arpeggio'. Now, in the Arrange page, select a track and assign the arpeggiator Object to it — not to the virtual instrument that is actually generating the sound.
You might want to set up a Screenset showing the Environment layer and Arrange page, so you can easily change arpeggiator values while recording a sequence. If you now start Logic and play a chord, you'll hear the characteristic arpeggios being generated. It's important to realise that the arpeggiator only works correctly when Logic is playing, and that you must bounce any songs using it in real time, rather than in off-line mode. Try recording an arpeggiated part first and then add filter sweeps and other synthesizer modulations in a separate run, for that authentic '80s vibe. See the 'Arpeggiate This!' box below for more details.
Arpeggiate This!
While not strictly a part of Logic 's step-time input features, the arpeggiator is another useful way of generating more or less strictly-timed sequences, with the added advantage that it will play most of the notes for you! I remember reading reviews of now-classic synthesizers, where the journalist would get pretty excited on finding that the on-board arpeggiator could go up as well as down! Compared to the limitations of some hardware, Logic 's software version is extremely flexible and can generate quite complex patterns, yet it somehow always manages to keep that arpeggio 'feel'.

You control the Arpeggiator from the parameter strip, located on the left-hand edge of both the Arrange page and the Environment (see screen, right). The Direction parameter defines whether the notes of the arpeggio go up, down or up then down in pitch when a chord is played; the Random setting is particularly nice, and can add a lot of interest to a simple held chord. The All setting causes every note held to play at once, and it's useful for generating those piano stabs that are used in a lot of dance music. The Auto setting generates arpeggios based on which notes you play in a chord first, and can add some controlled randomisation when combined with the Velocity parameter, as this can also be set to output random or fixed values. Key Limit defines the range of notes that the arpeggiator will play, and I sometimes set this parameter to the small range covering the notes that define the hi-hat samples of my drum plug-in. Used in combination with the Direction parameter, it's an easy way to add some spice to your hi-hat parts. The Resolution parameter defines the note value, and both this and the Direction parameter can be set to Random, which also helps to 'humanise' the Arpeggio's playback. Where exactly on the beat each note in the arpeggio starts is set by the Snap To parameter, and if the Repeat parameter is ticked the arpeggiator will continue to play as long as you hold down the keys; if Repeat is off, the arpeggiator runs through the sequence just once. The Octave setting can be used to increase the note Range up to 10 octaves for those dog-pleasing tunes, and the Crescendo parameter causes the notes played to rise or diminish in velocity.
You can adjust the arpeggio using MIDI controller data, a feature that's very powerful for live performance. The arpeggiator's Controller parameter allows you to choose a MIDI controller number, which is then assigned to the Direction parameter. The rest of the parameters then respond to consecutive controller values.
There's something special to my ear in patterns generated by an arpeggiator and the flexible one in Logic is definitely worth a punt if you're in need of a bit of inspiration.
Plan B: Ultrabeat
Logic 's drum virtual instrument also has a built-in step sequencer, which resides at the bottom of the Ultrabeat window. Although it's optimised for Ultrabeat, any sequences created with this sequencer can be used with other Instruments.
 Ultrabeat allows you to programme TR-style step sequences, using its dedicated sequencer. These can be easily dragged onto any track in the Arrange page. To do this, simply click and hold the small grey icon to the right of the word 'pattern', and dump it wherever you like in the Arrange window.
You can create up to 24 patterns of up to 32 steps, and each step can play any of the Ultrabeat sounds, which also means, ultimately, any of the MIDI notes that these sounds are assigned to. If Logic 's step input keyboard is akin to an Akai MPC, Ultrabeat 's is more like Roland's popular TR series of hardware drum machines and sequencers. There's an 'on' button to switch the step sequencer on and off and a start/stop button that runs the Ultrabeat sequencer independently of Logic. Individual patterns are selected from the pull-down menu to the right of the pattern icon. If you click and drag the mouse up and down you can set the pattern length, or drag the horizontal blue bar just under the numbers to perform the same task. You add notes by using the mouse to draw them directly onto the screen. Where the notes appear depends on the Resolution value. Once notes are drawn, the numbers above the bars representing the note velocities turn blue. Clicking on these turns the note's playback on and off, and right-clicking brings up a menu allowing you to clear the notes. Selecting another Ultrabeat sound allows you to add more notes, at different resolutions and pattern lengths if required. Once you have completed your pattern, you can drag it to the Arrange page from the box to the right of the pattern icon (see screen above). The pattern then appears as a MIDI sequence that you can place onto a virtual instrument or MIDI track.
There are a few other things that modify the recorded patterns. Dragging the blue bars up and down changes their velocity values, and an accent can be added to any note by clicking on the small dot above the numbers; the dot then turns blue. The strength of the accent is determined by the associated slider. A swing feel can be introduced by clicking on the Swing button and adjusting intensity from the dedicated knob. You may have noticed, when right-clicking the mouse on the step numbers, that there are a few more options available there. Randomise is self-explanatory and particularly useful and inspiring, while the Alter menu item performs the same task but leaves accents intact. There are also several menu choices for shifting notes forwards and back, and all these modifications are reflected in the MIDI sequence that's generated.
Of course, there's more to Ultrabeat than the step sequencer, but at its simplest it's another useful way to enter notes into Logic. Sequences generated here can be usefully processed with Logic 's Transformer in the same fashion as those generated by the other input methods.