Controlling your synth's dynamics using MIDI, rather than audio plug-ins, can offer you greater flexibility and good results. Here's how you do it.
As well as straightforward louder/softer velocity tweaks, the Cubase MIDI Velocity Tool can be used to compress, expand and limit your performances. Here you can see the original MIDI performance at top left, with the corresponding audio export file beneath it, while at top right 70 percent MIDI compression has been applied. You can see how both the MIDI velocity and resulting audio file are more controlled throughout.

If you can hear a few recorded MIDI notes in your song that are noticeably softer or louder than their neighbours, the obvious solution is to open up the Cubase Key Editor, grab the offending velocity value in the lower pane and tweak it up or down as appropriate. However, when it comes to more general compression, expansion, or limiting of MIDI performances, many musicians still reach for an audio plug-in — largely, I suspect, because that is what they tend to do with vocals, guitars and drums.
However, there's no need. I rarely, if ever, use compression on MIDI sounds, simply because you can get all the same effects by manipulating the MIDI data. This approach is beneficial because it takes little or no processing overhead, and can't compromise your audio quality with pumping effects or increased background noise. MIDI compression can make your keyboard performances punchier if required, while MIDI limiting can deal with occasional notes that stick out of the mix without you having to check through the entire song.
However, it is not all about tweaking existing performances. I've often resorted to MIDI compression afer changing a synth sound to better suit the song I'm working on, only to discover it has completely different dynamics and requires all the note velocities to be radically tweaked (some presets scarcely alter in level over the entire velocity range, while others may be wildly dynamic). Similarly, if you end up layering sounds (playing the same notes on several instruments simultaneously to achieve extra thickness or realism), you'll probably find each duplicated track requires different MIDI dynamics.
There are, however, still a few occasions when audio compression is the only answer to unruly dynamics. So let's explore the different Cubase options for massaging MIDI dynamics, and see where you really do have to reach for an audio compressor plug-in.
Direct Manipulation
As with many Cubase functions, there are various ways to tweak MIDI dynamics: you can directly manipulate the MIDI data inside individual Parts, apply Cubase MIDI plug-ins to the entire track, or, in some cases (depending on which Cubase version you're running), use features built in to the Inspector. One of the simplest approaches is to use the MIDI Velocity tool, which you can find from inside any of the MIDI-based editors, or after selecting one or more MIDI parts in the Project window, by right-clicking and choosing the 'Velocity...' option from the Functions menu.
 If you only have a few notes louder than the rest, MIDI limiting may be more appropriate than compression. Here, the original performance has its top velocity limited to 85, which brings down the loudest five notes, while, with the lower limit at zero, the remaining quieter notes remain unaltered.I use the Velocity tool a lot because you can apply it to a single MIDI part that sounds a little wonky, to a group of adjacent MIDI parts when you want to modify a section of your song, to an entire track's worth of MIDI parts, or to any combination of MIDI parts across any number of tracks (just select the ones you want before opening the tool). I've assigned the Shift-V keyboard shortcut to this tool, because I use its Add/Subtract velocity function so often for fine-tuning the levels of different MIDI parts on the same track, that may have been played in at different times.
I generally start or loop playback before opening the MIDI Velocity window. Have the Add/Subtract setting at +4 or -4 and then you can keep applying this subtle change using Shift-V followed by Return; the usual Ctrl-Z Undo shortcut will remove it again so you can A/B the differences in real time.
Many musicians seem to miss the Velocity tool's Compress/Expand and Limit options. Once you select Compress/Expand, the middle dialogue box becomes 'Ratio'. With this parameter at 100 percent your selected notes will remain unchanged, but as you reduce it below this figure they will gradually get more compressed, with the most extreme zero percent value forcing them all to exactly the same velocity. I rarely use values over 100 percent for expansion, as the results are invariably more extreme than I'd like, but regularly find 80 percent a useful starting value; using the Shift-V/Return key sequence just mentioned, you can gradually apply gentle velocity compression until you hear the results you want.
If you select the Limit option, a third box becomes available, so that you can enter both Upper and Lower limits for your MIDI velocities. The Upper limit is useful if you want to largely preserve the dynamics of your performance, but need to cap some of the louder notes, while I've found the Lower limit useful with some patches that don't make any sound at all once the velocity drops below a certain value, by forcing the quietest notes to a preset 'quiet' value.
Velocity Tool Or MIDI Plug-in?
The MIDI Velocity tool provides far more flexible selection options (any combination of notes or complete parts across any combination of tracks) compared with the global effects of a MIDI track plug-in. Also, because the tool's changes are made directly on your MIDI data, you can see exactly what is happening to your MIDI velocity values, whereas with MIDI plug-ins you get no such direct visual feedback of the changes, apart from the MIDI channel meter.
On the other hand, the dynamic functions of MIDI plug-ins leave the original velocity data intact and modify it in real time, which gives them the advantage that you can change these settings at any time while working on your song, just like an audio plug-in, whereas the Velocity tool makes permanent changes to your data (although you can back-track to some extent using the Undo function). A MIDI plug-in is therefore ideal if you've changed instruments mid-song and need to quickly alter an entire track's dynamics, but not when you're fine-tuning sections of a song.
MIDI Plug-in Complications
Before we discuss the Cubase MIDI dynamic plug-ins, a few words of explanation. When it comes to applying effect plug-ins to VST Instruments, many new Cubase users get incredibly confused, because the VST instrument normally requires both a MIDI track (for the note data) and an audio track (for the synth's audio output). If you want to pass the instrument's sounds through an audio plug-in you need to insert that plug-in on the appropriate audio track/mixer channel, while if you want to add a MIDI plug-in you must do so on the associated MIDI track or mixer channel.
Cubase 4 does simplify this procedure slightly, with its introduction of the Instrument track — a single track/mixer channel containing both MIDI and audio features. You lose MIDI send functions and only get a single stereo audio output, and you also lose the Inspector's MIDI fader (although, since this uses MIDI Continuous Controller 7 Volume data, you can still set or automate the MIDI volume using the appropriate controller lane inside the MIDI editors).
For dynamics purposes you need a MIDI insert, which you can use either with a standard MIDI track or with an Instrument track if you have Cubase 4. Just select the desired channel, click on its MIDI inserts option in the Inspector, and then load the desired plug-in into one of the effect slots.
Timbre Tweaking
There are some things you can do with MIDI dynamics that would be almost impossible to do with any compressor, and altering timbre is one of them. Whether analogue or digital in nature, most synth patches alter a host of parameters other than output level as you change their MIDI velocity, filter frequency, filter or amplifier envelope settings. In the case of multisampled sounds, velocity changes can be used to switch from one sample to another.
So if a particular MIDI instrument in your mix sounds too hard or too mellow, don't automatically reach for the EQ or plug-in effects. Instead, why not try fine-tuning its timbre by globally raising or lowering its MIDI velocity values — part by part, using the info line in the Project window, using the MIDI Velocity tool Add/Subtract option, or (for the entire track) using Velocity Shift in the Track FX plug-in. Once you're happy with the sound, you can then reduce or increase the output level to compensate, using the mixer channel faders (or in the case of hardware MIDI synths, using MIDI Controller 7). This will allow you to make most MIDI sounds harder/softer, faster/slower, or brighter/mellower, without affecting their volume, timing, or the dynamics of your original performance.
This approach can also be extremely useful if you're happy with an existing MIDI performance but want to change the MIDI patch/instrument. If you find a replacement sound that is perfect, except that it's slightly too brash or too mellow, you just need respectively to globally lower or raise the MIDI velocities, and then tweak the instrument's audio level to compensate.
The Compress Plug-in
The Cubase MIDI Compress plug-in has just three simple controls (Threshold, Ratio, and Gain) that will be familiar to anyone who has used an audio compressor. Although the Threshold and Gain parameters refer to MIDI velocity rather than audio level, the analogy works quite well, since only velocity values above the Threshold setting are affected, while the Ratio control provides 10 settings ranging from 8:1 compression, through a 1:1 setting (where the velocity is unaltered), down to 1:4 expansion. Meanwhile, Gain adds or subtracts a fixed value from all track velocities, and can thus be used to compensate for a drop in overall level after compression, or an increased level resulting from expansion.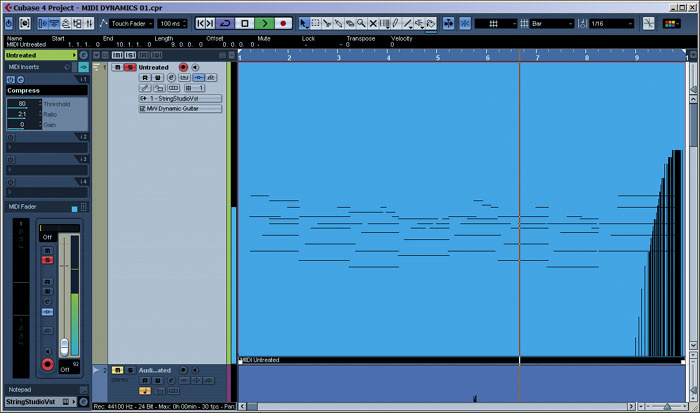
The Cubase Compress plug-in can be loaded into a MIDI channel insert in the Inspector, as shown here. This time a more traditional Ratio control is provided, and notice that the MIDI Fader displays velocity and peak velocity values.
It's tricky to suggest typical settings, because these will depend so much on the original dynamics of your track. However, if you're applying them to a standard MIDI channel you can monitor the resulting velocities on the MIDI channel's 'meter'. If you leave this at its default 'Off' setting it will directly display velocity values from 0 at the bottom to 127 at the top, and even show the peak velocity value below the meter.
Sadly, the meter display (but not the peak velocity value) is modified by the setting of the MIDI Channel level control if you alter it from the Off position (although this is in charge of MIDI controller #7 and nothing to do with velocity). However, if you pull this up to its maximum 127 value, the meter will return to an unadulterated MIDI velocity display. However, it is the audio results that are more important: remember that the Gain control will not only change level but also timbre (have a look at the 'Timbre Tweaking' box above for more details).
Out Of Control: A Job For Audio Compression
 If you do need to use a traditional audio compressor to deal with occasional Hi-Q synth filter peaks, here are some suitable settings as a starting point. For the most transparent results, make sure that the gain-reduction meter only shows activity when there's a peak. As versatile as the various Cubase MIDI dynamic tools are, sometimes you will have to resort to using an audio compressor plug-in. One classic scenario is when using a synth filter sweep (especially at high resonance settings) at the same time as other effects such as phasing/flanging, since occasionally, with some notes, the output level may suddenly shoot up. You can minimise the chances of this happening by carefully tempo-sync'ing your effects so their peaks never 'collide', but audio compression is still a safer bet here.
In situations like this, you're generally trying to alter the basic sound as little as possible and deal with very occasional jumps in level, so use Cubase 's Compressor, with a Ratio setting of perhaps 2:1, to squash the unwanted peaks. Set the Attack control to the fastest setting possible without making the compression too obvious (10ms is probably a good starting point) and the Release control to Auto, so that it adapts itself to your material. Start with the Threshold setting at 0dB and slowly reduce it until you start to see a little activity in the gain-reduction meter, then back it off a little. The idea is that the output level is only reduced when you get a louder peak than normal.
Cubase 4 owners will probably find its Multiband compressor produces more transparent results, since it will control the peak in whatever band it might be, while leaving the other bands largely unchanged. If you want to know more about setting up the Multiband Compressor, look no further than John Walden's April 2007 Cubase workshop column, which explores this and other audio dynamics plug-ins in greater depth.
The Track FX Plug-in
For years I used the Cubase SX Track Parameters section of the Inspector to apply global but real-time tweaks, such as Transpose, Velocity shift, Velocity and Length compression, plus a useful selection of Random and Range functions, to entire tracks. When I upgraded to Cubase 4 I was initially frustrated to find that these Track Parameters had disappeared from the Inspector, but eventually tracked down an identical set of parameters in Cubase 4 's Track FX MIDI plug-in, along with additional Scale functions (which you can also find in the Transpose tool). I was then amazed to discover that exactly the same MIDI plug-in had always been available in SX3, and that you can use either approach.
The Track FX Velocity Shift setting produces exactly the same result as the Add/Subtract function of the MIDI Velocity tool, but with the Velocity Compression parameter we're once again onto new ground. This time Steinberg abandon the percentage setting of the MIDI Velocity tool, and the Ratio setting of the Compress plug-in, in favour of a factor setting offering separately adjustable numerator and denominator settings, so you can use the increase and decrease buttons or directly enter any numbers you like.
The Track FX plug-in provides plenty of real-time tweakable MIDI parameters. Here is a suitable starting point for compression, with a Velocity Compression value of 3/4 and a Velocity Shift of +10 to bring the average level back up after the velocity values are compressed. Notice also the drop-down box for the Random selection, which includes Velocity, so you can add dynamics to a robotic sequence.
There is no threshold parameter setting at all, so you have to use Velocity Compression in conjunction with Velocity Shift. For instance, if you enter 3/4 for Velocity Compression, all velocity values will end up at three-quarters of their previous values, and therefore cover a smaller range (and be compressed). Then you can use the Velocity Shift parameter to push all velocity values back up en masse, to end up with a similar average level but a small spread of velocity values — in other words, compression!
This approach will delight any mathematicians amongst you, but will leave many musicians scratching their heads trying to work out what the results will be and how to combine these controls. Suitable starting points for compression are 3/4 for Velocity Compression and +10 for Velocity Shift, while for subtle expansion you could try 5/4 and -10 respectively. Once again, you can monitor the resulting MIDI velocity on your MIDI channel meter, and once you've got the hang of it exactly the same approach is used for the Length Compression parameter, so you can turn your legato parts into staccato ones and vice versa.
In the Range section of the Track FX plug-in you'll find Velocity Limit and Velocity Filter options. The first is identical to that of the standard MIDI Velocity tool, while the latter excludes all notes with velocities outside the specified range (handy for dispensing with stray notes at low velocities, for instance).
While you're using the Track FX plug-in you really should investigate its two Random slots as well, each of which can introduce random offsets to note position, pitch, velocity or length, to help you add some instant life to a robotic sequence. You just set the minimum and maximum amounts of randomness in the two associated boxes and Cubase will tweak them slightly differently during each playback. I've found these a great help after duplicating tracks on different instruments where, as you slowly increase random note positioning and note lengths, the rigid, layered sound will suddenly turn into the sound of several musicians playing in unison.
Listen For Yourself!
We've provided some audio files illustrating the techniques used in this article, so you can hear the differences for yourself. Go to: www.soundonsound.com/sos/aug07/articles/cubaseaudio.htm.