 Good monitoring during recording is essential. In Digital Performer, flexible monitor mixes can be achieved in various ways. In the screen above, a monitor mix is being sent to musicians via the mixer's aux send section. The Masterverb plug-in is being used in this instance to give the vocalist some reverb in the headphones, but the effect will not be recorded.
Few of us use our software sequencers in isolation — we all need associated hardware, such as monitors, external effects, and favourite MIDI synths. This month we take a look at using DP with such hardware.
While computer-based audio and music production is becoming increasingly 'virtual' in nature, there can't be many DP users who don't have some hardware, whether mixers, synths or effects units. The latest versions of DP have plenty of facilities for integrating with such hardware, and this month we look in depth at some of the most important of these.
Monitoring
No matter how simple or complex your setup, establishing a flexible and reliable approach to monitoring during recording is absolutely crucial.
![]() Clicking the 'headphones' icon, shown here nestling amongst the other buttons in the Consolidated Window's title bar, turns Audio Patch Thru on and off.
Clicking the 'headphones' icon, shown here nestling amongst the other buttons in the Consolidated Window's title bar, turns Audio Patch Thru on and off.
With Digital Performer running under the MOTU Audio System (its 'native' audio mode), monitoring behaviour is controlled by the Audio Patch Thru feature. When this is turned on, by engaging the little 'headphones' button in the Audio Monitor window (or, in DP 4.6, in the Consolidated Window's title bar) DP routes the inputs of any record-enabled tracks to their outputs. So if, say, you have a mic patched into a mono audio track in DP and the track's output is set to use the stereo output that drives your studio speakers or headphones, you'll hear the mic signal as long as the track is record-enabled and Audio Patch Thru is turned on. Turn off Audio Patch Thru, or take off record-enable status, and you'll no longer be able to hear your input. Audio Patch Thru is, then, a very straightforward system for letting DP handle your monitoring, but it can be configured in various ways to allow for different monitoring requirements.
Go Setup menu / Configure Audio System / Input Monitoring Mode and you get a dialogue box that controls how Audio Patch Thru behaves. To begin with, we'll just consider the top two options: 'Direct hardware playthrough' and 'Monitor record-enabled tracks through effects'.
As with so many things in the computer-based studio, the shadow of latency looms over one of these two choices. If you select 'Direct hardware playthrough', DP will work Audio Patch Thru so that record-enabled track inputs are routed to outputs via the shortest possible route — often a brief round-trip from your audio interface, into the Mac and then straight back to your interface — with the result that monitoring is subject to little or no latency, and the musician hears what he or she is performing instantaneously. Select 'Monitor record-enabled tracks through effects', on the other hand, and the round trip from track input to output now not only goes via your Mac, but passes through the MOTU Audio System itself. This allows the possibility of adding MAS effects (such as reverb) in real time to the monitor signal, but also imposes a delay commensurate with the Buffer Size set in the Configure Hardware Driver dialogue box. How serious this is depends firstly on the Buffer Size itself, and secondly on what you're recording. Keyboard players and guitarists frequently seem oblivious to to the delay associated with a 512-sample Buffer Size, whereas singers and drummers may well still not be happy with the few milliseconds latency of a 128-sample setting.
Best practice here would seem to be to use 'Direct hardware playthrough' when latency is unacceptable and 'Monitor record-enabled tracks through effects', coupled with the lowest Buffer Size you can get away with (remembering that low sizes lead to much greater processor usage), when you need to use DP 's effects processing on your monitor signal.
Input Monitoring Mode
Vying for the award of 'most confusing feature in Digital Performer ' is the Input Monitoring Mode dialogue box, which offers various options that control some of the finer points of input-monitoring behaviour.
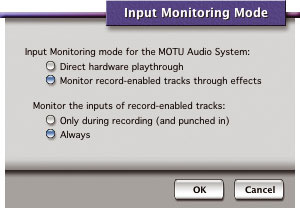
 The Input Monitoring Mode dialogue with four options is the one you see if you're using a separate audio interface. The simpler dialogue is the one that appears if you're using the Mac's built-in hardware. The main point of this dialogue box is to control the way in which you hear any audio inputs on record-enabled tracks, and pre-existing soundbites in those tracks, during playback and recording. Additionally, if you're running a MOTU audio interface, two extra options appear, to control whether audio signals coming into DP are routed straight back out of your audio hardware, for minimal latency, or whether they pass through DP and MAS, picking up a little latency but allowing DP 's effects to be used on them.
To cut a long story a bit shorter, these various options don't always result in the behaviour that you'd expect, so rather than trying to make some sweeping (but probably even more confusing) statements about what's going on, I'm going to give a run-down of what the four possible combinations mean. If you're not using MOTU hardware, by the way, you're effectively monitoring record-enabled tracks through effects, so it's the bottom two choices that apply to you:
- Direct hardware playthrough + Only during recording (and punched in)
Entirely contrary to what you'd reasonably expect, input monitoring is always active with this combination, when DP 's transport is stopped, is recording (or, indeed, punched in or out) and during playback. Soundbites in tracks play back normally.
- Direct hardware playthrough + Always
Again, input monitoring is always active, but now existing audio in tracks can't be heard, regardless of whether you're in playback or recording.
- Monitor record-enabled tracks through effects + Only during recording (and punched in)
This makes more sense. Now you get to hear your input when DP is stopped, and also when it's recording (or when it punches in, during Auto Record). During playback, though, the input signal is muted and you hear the track instead.
- Monitor record-enabled tracks through effects + Always
Just as with its Direct hardware playthrough counterpart, now you always hear your input signal, but you never hear audio already in the track.
What does this all mean? The first combination, as described above, may well be the best for recording drop-ins, as the musician can hear existing audio in the run-up to the section they're about to record, as well as themselves playing. Switching to the Always option might be better if you're doing an entirely new take of a section, as you'll never hear existing audio. Of the two 'through effects' modes, the first is by far the most logical, and is probably the best choice for general recording. However, the Always option can work well as long as you're good at remembering to disengage record-enable after your takes!
I'm probably not alone in thinking that a request for rationalisation of all this could be a good thing to send off to suggestions@motu.com.
Monitoring Using Hardware
Of course, there are other solutions. One way is never to use Audio Patch Thru at all, but to set up all your monitoring on an external analogue or digital mixer. It's then easy to route signals to DP for recording (perhaps via the mixer's group outputs) while providing a separate monitor mix to the musician, along with any reverb or other effects, courtesy of an external effects unit.
 By selecting hardware outputs in the Mixing Board's sends it's possible to mimic hardware mixer practice and set up multiple independent monitor mixes. Here, a vocalist and guitarist are being provided with different monitor mixes courtesy of two output pairs of a multi-channel audio interface.
Then there are audio interfaces, like many of MOTU's own models, that have zero-latency monitoring abilities. If you have one of these, you can turn off Audio Patch Thru and set up all the monitor routing on your interface. This is frequently done by using a separate, dedicated application, such as the Firewire Cuemix Console that controls MOTU's Cuemix Plus-equipped interfaces.
Some interfaces may even have some built-in DSP, for providing a little reverb (for example) on monitor signals, but if yours doesn't, you can still provide some reverb without using any additional hardware. The key to this is combining the interface's zero-latency monitoring with DP 's 'Monitor record enabled tracks through effects' Audio Patch Thru mode, and it works very well.
1. First, set up the (zero-latency) monitoring you require on your interface.
2. Ensure that DP 's Input Monitoring Mode is set to 'Monitor record enabled tracks through effects', before configuring and record-enabling the track you want to record to.
3. In DP 's Mixing Board, place a reverb or other suitable effect in one of your record-enabled track's insert slots and set its wet/dry mix to 100 percent wet. You only want it to supply the effected sound, since all the dry monitor signal is handled by your interface.
4. You can now control the level of the effect by adjusting the track's level fader. Remember that the insert slots on an audio track are 'post-record', so you won't be recording this reverb. Also, the track fader position has no effect on the level being recorded to disk, so you can adjust this with no worries.
You can now combine the benefits of zero-latency monitoring, using your interface, with DP 's real-time effects-processing capabilities. The reverb signal coming from DP is, of course, beset with latency, but since it's in addition to your latency-free signal it's virtually unnoticeable and just comes over as a reverb with a touch of pre-delay.
Hardware Synths & DP
 Cherrypicker is the application for you if you ever want to modify OS X/DP patchlists, or get down and dirty with your synth's MIDI implementation.DP uses the setup you've defined in OS X's Audio MIDI Setup application to determine which MIDI devices it can use, so in order for it to communicate correctly with any hardware synth or other devices in your studio, it's essential to get things properly configured here.
Actually, compared to OS9 FreeMIDI and OMS systems, there's not that much tweaking you can do in Audio MIDI Setup, besides selecting a Manufacturer and Model for your MIDI devices, choosing the channels they transmit and receive on, then drawing in the symbolic connections between them and your MIDI interface. All the 'under the bonnet' MIDI settings, as well as patch list information, comes from the 'middev' and 'midnam' files in [hard drive]/Library/Audio/MIDI Devices/MOTU that you never need to deal with directly.
Audio MIDI Setup's simplicity is all very well as long as you're using mainstream synths and factory presets, but what if you have a more unusual, unsupported synth, or have spent time perfecting your own banks of patches, or have even loaded in banks from elsewhere or from expansion cards? Well, if you want custom patch lists, or need to send precise bank-change and program-change messages to an unusual synth, check out Cherrypicker. This is an all-singing, all-dancing application for creating, converting, adapting and saving patch lists and other MIDI-related information in OS X. It can open patch lists in a variety of different formats (even those from OS 9 days, and from the PC platform) and also translate between the slightly varying 'midnam' patch list formats used by DP, Pro Tools and Cubase. It can also edit and create 'middev' files, which are the files DP uses to determine the basic capabilities and compatibility of individual MIDI devices. If you really want to take control of your MIDI setup, or solve an annoying bank-select problem (for example), the donation-ware Cherrypicker is a must. It's downloadable from www.alterspective.com/cherrypicker and has superb documentation.
Real-world Monitoring
No matter which technique you employ, it's worth considering what the requirements of a good monitor feed are. First, you need to be able to supply a wide overall range of monitoring signal level. Drummers often require an extremely loud click track, for example. You should also be able to simply adjust the mix of backing track (or click track) and live signal in the musicians' headphones. Finally, some means of setting up multiple individual monitor mixes is a real advantage, especially if you regularly work with more than one musician at a time.
It's these last two requirements that can be challenging when you're not incorporating an external hardware mixer or sophisticated audio interface into your recording signal chain (although they can remain challenging even if you are!). Here are a few things to think about that might help in some situations:
- Creating a Master Fader Track in your project means that you instantly get an overall volume control for your existing 'temp' tracks, which is independent of any live monitoring you've got set up on an external hardware mixer, an audio interface, or using DP 's 'Direct hardware playthrough' mode. You can use it to balance the level of your backing track (or DP 's click, if it's routed to the same output pair) relative to your live monitor signal.
- If you use 'Monitor record-enabled tracks through effects' mode, Master Faders are less useful for controlling the relative levels of backing track and live signal, since they control both simultaneously. In these cases, you could consider routing all your backing tracks through an Aux track, which restores independent level control. If that doesn't appeal, set up a Track Group that links all the faders of the tracks used in your backing track. Dragging one then moves the whole lot.
- To set up several simultaneous monitor mixes, you really need either a hardware mixer with multiple auxes (or even groups) that supply separate headphone feeds, or a multi-channel audio interface with sophisticated zero-latency bussing abilities. To go a stage further and provide independent mixes of your backing track (ie. plenty of drums and bass for a guitarist, but more piano for a vocalist, with both takes happening at the same time), you really need to emulate hardware mixer practice and set up monitor mixes on auxes in DP 's Mixing Board. You might choose one of your interface's output pairs in all the topmost aux send 'slots', and a different pair in a lower slot. This way, you can have different mixes going to each musician, and a separate one (on the main Mixing Board faders) for yourself.
External Effects
If you've a really great, characterful or much-loved hardware effects unit — a reverb or compressor, for example — you might consider patching it into your DP setup in a way that allows you to use it within DP just as you would a plug-in.
Doing this is fairly easy if you have a multi-channel audio interface. If you're connecting up a reverb or delay, or any other effect that you might want to access from several tracks, you can simply patch its input(s) to one (or a pair) of your interface's outputs. Sending signals to it is then as easy as choosing the same output(s) in one of DP 's sends and turning up the send level. If you have your effects unit's outputs patched into a mixer, or into the inputs of a zero-latency audio interface, that might be the end of the story.
However, if you want to bring your effect signal back into DP, you're immediately facing the latency demon again. If all you want to do is record the effect signal, you're fine, as DP automatically compensates for the delay that the MAS buffer imposes. But if you want to incorporate your effect-unit signal into your DP mix by bringing it in on an Aux track, it will always be heard late, just as if it were a live input being routed through MAS effects. As yet, there's no automatic compensation for this, as there is in the latest versions of Pro Tools, and the only solution you have is to submix every track in your sequence except the hardware effect return via an Aux track equipped with either a simple 100-percent wet delay plug-in, set to match the amount of latency you're suffering, or an instance of MOTU's Buffy plug-in. Both can help the audio to line up better, but neither is an easy or elegant solution. Expect an automatic scheme in a future update of DP, however.
Digital Performer News
 PSP Audioware's new offering continues the PSP tradition of plug-ins that are immensely powerful and sound beautiful, but are surprisingly easy to get to grips with. In early October, Universal Audio released version 4.0.0 of the plug-ins for their UAD1 Powered Plug-in audio card. The update fixes a couple of key Digital Performer issues associated with mono in/stereo out usage and crashes caused by deleting and re-instantiating automated UAD1 plug-ins. There's also a tasty new Roland Dimension D chorus emulation. The 35MB download is at www.uaudio.com and is free for UAD1 owners.
MOTU recently announced an update to their Symphonic Instrument orchestral sound library plug-in. Possibly available by now, version 1.1 adds disk streaming and multiple outputs to the existing feature set of the plug-in. Both are welcome developments, with disk streaming significantly reducing the amount of RAM a multi-part Symphonic Instrument setup uses, and multiple outputs allowing submixing of groups of parts, as well as the flexible use of third-party reverbs. The 1.1 update will be free for registered Symphonic Instrument users.
A couple of interesting new DP-compatible Audio Unit plug-ins have appeared recently, and are well worth checking out. PSP Audioware have come up trumps again with the PSP608 Multidelay, a multi-channel delay with up to eight seconds of delay time and extremely flexible filtering, modulation, saturation and reverb facilities. As with the long-standing PSP84 and Nitro plug-ins, the sounds that emanate from this thing have to be heard to be believed! PSP608 costs a very reasonable $149, but is cheaper still if you own some of PSP's other plug-ins and take advantage of their special launch offers at www.pspaudioware.com.
Cheaper again (actually, it's free) is Solid State Logic's LMC1 compressor. It's an emulation of the Listen Mic Compressor built into 1980s SSL E-series desks, which was originally designed to aid communication between studio and control room but, almost by accident, ended up being the foundation of Phil Collins' drum sound. Grab it from www.solid-state-logic.com.