The new version of Cubase is all about big ideas, including a completely new way of working with tracks, plug-ins and virtual instruments.
It's hard to believe that Cubase SX has been around for more than four years. Over that time it has developed into a mature, feature-rich application, and the last major release added some unique and innovative features, such as the Play Order track. Nevertheless, Cubase SX is officially no more. As of this upgrade cycle, Cubase SX becomes plain old Cubase, while the more affordable SL version becomes Cubase Studio. The name change accompanies the most thorough overhaul the sequencer has received since its launch: Steinberg have made fundamental changes to the program, introducing a new version 3 of the VST standard and a radical new approach to choosing plug-in and instrument settings, as well as innumerable smaller improvements.
Both Cubase 4 and VST3 support Intel Macs for the first time, and it's heartening to see that Steinberg retain a strong commitment to cross-platform compatibility. For more on running Cubase 4 on an Intel Mac, see Mark Wherry's Mac Pro review elsewhere in this issue. Apparently, VST3 also paves the way for a future 64-bit version of Cubase, but for the time being, it's still a 32-bit application.
Judging By Appearances
I installed the full Cubase 4 side-by-side with SX3 on my Windows laptop, and the process was fairly painless. All my existing SX Project files adopted the new Cubase 4 icon, and Cubase 4 even remembered SX3 's Recent Projects and learned my Key Commands, Macros and template Projects. Older Projects remain SX3-compatible until you save them from within Cubase 4; after that, they can't be loaded in older versions of the program. Because of some issues with older plug-ins, as we'll see, it's a good idea to keep safety copies of your Projects in the old format.
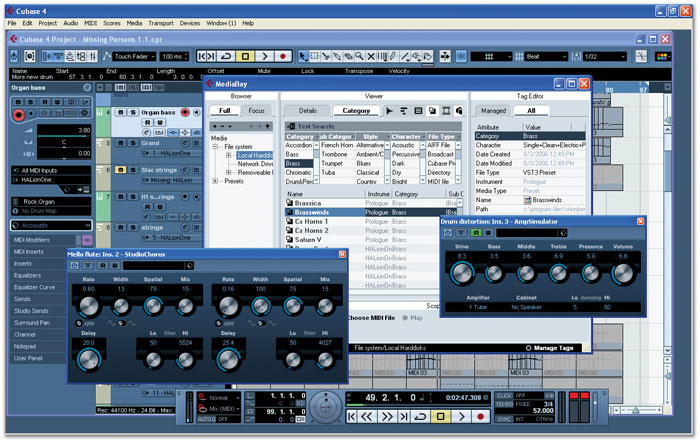
The first thing you notice on booting the program is its new look, the result of a much-needed effort to make the interface cleaner and less cluttered. It does this pretty well, managing to present all the same information as before in a less busy fashion. On the down side, though, it's pretty dark, and at any sort of distance, it's really difficult to see parameters on non-selected tracks in the Track List. Even track names tend to fade into the background, and although you can adjust global preferences for Saturation, Contrast and Brightness, the options range from sepulchral to merely gloomy.
 Instrument Tracks appear as MIDI tracks in the Project Window and audio tracks in the mixer, and their Track Inspector shows a combination of MIDI and audio-related panels.The de-clutter means that some of the familiar icons that used to dot the Track List are absent. For instance, In-place MIDI editing is now accessed by selecting one or more tracks and choosing a global control, while the little plus and minus symbols previously used to append automation subtracks have gone. Instead, you can show automation by right-clicking, or hovering the mouse over the bottom left of a track's space in the Track List until an arrow appears. However, there's still no way of displaying multiple automation curves overlaid on a single track, which is something that would help us poor laptop users keep track of everything. And if, like me, you prefer to select parameters for automation in the Project window, rather than by hitting Write and waggling mixer controls, you still have to go through a tedious browsing process to access them.
Elsewhere, you can now right-click on the Track Inspector to show and hide individual panels, and you can edit and store view presets for both the Track Inspector and the Channel Strip. This isn't something that revolutionised my Cubase experience, but I know it's made a difference to a lot of users.
The mixer graphics have been cleaned up, with new show/hide options added for channels, though unfortunately you still can't view inserts and sends for the same channel at the same time. However, Steinberg have implemented one of the most widely requested ergonomic changes, in that it's now possible to drag and drop to move insert effects between channels, or between slots on a single channel. A nice green arrow lights up in the slot you're dropping it on to, and if there's already a plug-in there, the two will swap places. Furthermore, if you hold down the Alt key, the plug-in is copied rather than moved. (At least, it usually is; there were odd occasions when I couldn't get this to work.)
It's a nice implementation of a simple idea, which works in the Channel Settings window and Track Inspector too, and it's a shame Steinberg didn't extend the principle to sends and channel EQs. Admittedly, there's not much point in rearranging these on a single track, but it would be very useful indeed to be able to copy send settings between mixer channels.
VST Instrument Rack
Cubase 4 's new Instrument Tracks are intended to complement the VST Instrument rack rather than replace it, and for complex setups involving multiple MIDI channels or multitimbral instruments, you'll still need to use the latter. If you do, you'll notice some changes to the way it works. When you load an instrument, Cubase now offers to create a MIDI track for it, which is nice or annoying, depending on whether you actually wanted it to do that or not! You'll also notice a tiny new icon appearing just to the left of each instrument's name. Clicking on this brings up a drop-down menu allowing you to enable and disable individual stereo outputs for the associated instrument. This is a great way of stopping the mixer from drowning under multiple channels from a multitimbral instrument when you just want a cowbell patch. However, it's not mentioned in the manual, and it defaults to only activating the first stereo output, so I spent ages wondering why I couldn't access other outputs in Hypersonic, which still thought it was addressing four mixer channels. I also had one Project (originating in SX3) where MIDI tracks would reset their outputs to point at the wrong instrument in the rack.
Standard Fare
Cubase 4 is the first application to use Steinberg's new VST3 plug-in standard. This makes it possible for a single plug-in to be usable on mono, stereo and surround channels, automatically adjusting its input and output bussing to suit, while multitimbral VST Instruments are no longer tied to a fixed number of mixer channels. VST3 also features sample-accurate automation and silence detection, the latter meaning that plug-ins only operate (and hence load the CPU) when audio is passing through them. This works well in practice, and doesn't seem to stop plug-ins generating sound when no input is present if they're meant to do that! Meanwhile, the most far-reaching change to the VST standard shows its face in an entirely new preset management system, of which more presently.
Steinberg say that the VST3 standard will enable side-chaining to be implemented in Cubase 's mixer. This, along with a new and more flexible mix engine, is planned for some point "within the Cubase 4 generation cycle", but as of version 4.0, Cubase 4 's mixer suffers from exactly the same restrictions as SX3 's. In other words, you can only route audio upwards through the Track List (ie. from left to right along the mixer, assuming you haven't rearranged the order in which tracks appear), and you still can't do things like send from a Group channel to an FX channel below it in the Track List. This is a big disappointment, and I can't be the only user who would gladly have gone without some of the other new features instead.
Moving On Up
The new plug-ins bundled with Cubase 4 are, of course, just about the only VST3 plug-ins around at the moment. When it comes to backwards compatibility, Steinberg say that any plug-in adhering to the VST2.4 standard should be fully supported, but things might be a bit more hit and miss with plug-ins that are older than this. Interestingly, the new effects and processing plug-ins don't come as DLL files that get installed in a plug-in folder, but seem to be integrated, Logic-style, into the program itself.
 One of Cubase 4's many variants on the Sound Frame browser.After verifying that the bundled plug-ins worked, I moved the entire contents of my SX3 plug-in folder to the top level of the Steinberg directory and reloaded Cubase 4 to see what the damage was. The vast majority of plug-ins were recognised, including the older SX3 bundled effects, and all Native Instruments synths and effects, but unfortunately, some of the big guns were among the casualties. Out of the entire Diamond Bundle, the only Waves plug-in that Cubase 4 would recognise was L3; and Halion Symphonic Orchestra went missing for a while before I experimented with moving the DLL out of its own folder and into the top level of the Vstplugins folder. A couple of my favourite processors were also lost, including Eliosound's Air EQ. (I suspect the Waves problem is something to do with their copy protection, since the Diamond Bundle stopped working in SX3 as well.) On plug-ins that did work, I had occasional problems with parameters being wrongly recalled when presets or Projects were loaded. Oh yeah, and all pre-VST3 plug-ins now appear under an extra menu level called 'Earlier VST Plug-ins' in the plug-in list, which is a nuisance.
An important concern for some people will be the fact that Cubase 4 no longer supports Direct X plug-ins at all. This is a shame, since Direct X is widely used both in music applications and the wider Windows world, and many people have invested in Direct X plug-ins which either have no VST equivalent or can only be crossgraded at a price. It may prove possible to work around this using wrappers, but at the very least, Steinberg should have done more to warn users that Direct X support was being dropped. This wasn't trailed at all, and has caught a lot of people out.
The bottom line is that if you're coming from an earlier version of SX and you use a lot of plug-ins, your Projects are unlikely to load straight into Cubase 4 and just work.
Cubase Versus Cubase Studio
More than once during the course of this review, I found myself wondering what would make the average music-production user buy the full version of Cubase rather than Cubase Studio, and the answer was often 'not that much'. The additional plug-ins and better channel EQ are definitely worth having, but I could live without the extra soft synths. The Details search in the Media Bay is a pretty specialist tool, and if you don't need surround sound, extra automation modes or the Control Room functionality, Cubase Studio really does offer a pretty complete package, and saves you 350 quid over the full deal.
In fact, several important features that were previously restricted to the top-of-the-range Cubase SX have found their way into Cubase Studio 4, including In-place MIDI editing, the full Score Editor and MPEX3 time-stretching and pitch-shifting. Cubase Studio also now shares its big brother's complement of inserts (eight per channel) and Group tracks (256). For a detailed comparison between the two, see http://knowledgebase.steinberg.de/158_1.html. There is, as yet, no news of a version 4 replacement for the more basic Cubase SE.
In The Frame
The new preset management system I mentioned above is called Sound Frame, and it's just the tip of a very large iceberg in the Arctic Ocean that is Cubase 4 (I think I'll abandon this metaphor now, but you get the idea). Sound Frame is an ambitious concept that brings together effect and instrument presets, media management, a new type of track called an Instrument Track, and a new system of Track Presets. The thinking behind it is not a million miles from Native Instruments' Kore: in both cases, the central idea is to allow users to make choices on the basis of how things sound, not how those sounds are made.
 The Media Bay offers comprehensive librarian features for cataloguing audio and video files, as well as instrument and Track Presets.For example, let's suppose you want to have some synth strings in your Project. In the dark ages prior to Kore and Sound Frame, you'd have to choose which instrument plug-in to load into the VST Instruments panel, set up a MIDI track pointing to it, and trawl through all its presets until you found a synth string sound — assuming the preset names actually gave you a clue as to what they sounded like. If that instrument didn't work for you, you'd have to insert a different one, change the output on your MIDI track and go through the whole messy business again.
In Steinberg's glittering Sound Frame future, the process is completely different. All the presets for all your effects and instruments will live in a unified database, which contains not only the preset names, but metadata telling you what they sound like. With a few mouse clicks, you can bring up a list of all the synth string sounds anywhere on your computer, and choose whether you want to try out, say, the 'glassy' ones or the 'reedy' ones. It won't matter which VST Instrument is making each of those sounds, because Cubase will take care of creating a new track and loading the appropriate plug-ins automatically. You choose the end, Cubase takes care of the means.
Unlike Native Instruments, Steinberg have had the opportunity to integrate such a system at the host level, and as a result, Sound Frame is far more than just a preset management system for plug-ins. For instance, imagine you're mixing an album. You're working on the first song, and you hit upon a vocal processing chain that really suits the artist's voice. Naturally, you want to make this the starting point for the vocals on the other songs. Before Sound Frame, you would have had to save individual presets for every plug-in in the chain, before laboriously loading them one by one into all the other Projects. With Sound Frame, you simply right-click the vocal track in the Track List and choose 'Create Track Preset...'. Give your processing chain a name, add any other info that might come in handy, and it'll be on tap in all your other Projects, where you can apply it to existing tracks, or select it when creating new tracks. Further flexibility is afforded by the ability to load, say, just the inserts from a Track Preset, or just the EQ settings.
Making (Instrument) Tracks
The Sound Frame system brings with it a sea change in Steinberg's philosophy when it comes to virtual instruments. The old approach was based around the idea that soft samplers and virtual sound modules would adopt the same multitimbral approach as their hardware counterparts, accepting MIDI input from multiple tracks on multiple channels, and outputting different sounds on different tracks. This was tidy, but restrictive in some ways, and the new arrangement is conceptually much simpler: one sound, one track, one instrument. To this end, Cubase 4 introduces a new kind of track called an Instrument Track, allowing Sound Frame to be integrated at the track level when it comes to MIDI and virtual instruments.
 A selection of Cubase 4's new effects and processors.When you want to use an instrument plug-in, you no longer have to visit the VST Instruments panel (though this has now been improved — see box below), or go through the rigmarole of creating a MIDI track and pointing it at the appropriate instrument. Instead, you just browse for the sound you want and Cubase will create an Instrument Track to host it.
As far as the Project window is concerned, Instrument Tracks are MIDI tracks, but from the viewpoint of the mixer window, they're audio tracks, with EQs, inserts and sends. Instrument Tracks can be saved as Track Presets, which is great for those instrument sounds that depend on insert processing for their character. Unlike in Pro Tools, say, the instrument itself doesn't appear in one of the insert points. A limitation of Cubase 's Instrument Tracks is that they can't receive MIDI or audio from another track, which makes it difficult to create Track Presets for layered sounds, stops you using them for vocoders and so forth, and prevents you from keeping controller data on a separate track from note data. Steinberg say that Instrument Tracks aren't supposed to reproduce all the functionality of the VST Instrument Rack, but I did find this restrictive in practice. There's no way to access MIDI pan and volume controls on an Instrument Track, apart from writing controller data into your MIDI parts. This wouldn't be a problem, except that on some of the Instrument Tracks I created, the MIDI pan appeared to be off centre by default.
You can, of course, still use the old system, and if you want to use multitimbral soft synths, you'll probably have to. The same applies if you want to have multiple synths triggered from a single track, or multiple tracks triggering a single synth.
The icing on the cake is the Multi Track Preset. As the name suggests, these save the settings for two or more separate tracks, and can include any combination of audio, MIDI and Instrument tracks.
Browsing Away
Track Presets and so on are accessed using the Sound Frame browser, which has three main areas. At the top left is a Windows Explorer-style folder tree showing all the locations where relevant presets are stored. A Text Search field separates this from the Filter, which consists of a series of columns displaying the various metadata Tags that are appropriate to the sound you're browsing. The supplied Track Presets and patches for the bundled VST Instruments are heavily Tagged using attributes such as instrument Category (bass, drums, percussion and so on) and Sub Category (acoustic guitar, electric guitar, bass guitar and so on), musical Style and Character. Clicking on an entry in a column adds that entry to the Filter settings, and the Browser to the right shows all the patches that match.
 HALion One.As an example, if you wanted to choose a keyboard sound with a soft bell-like quality, you could highlight the Chromatic Perc, Keyboard and Piano Categories, the Bell Sub Category, and the Soft and Dark Character entries. Assuming the presets have been properly Tagged, this would give you a more comprehensive result than doing a Text Search on the word 'bell', which only brings up those presets that actually have 'bell' in the name. (The Text Search and the Filter interact, so you can search within a particular Category, for example.) Conversely, if you hit upon a good sound, you can enter your own Tags when you save it, and if the default attributes such as Category and Character don't do it justice, you can create additional ones. The relationship between Categories and Sub Categories can get complicated, though, and it's easy to end up in situations where nothing appears in the Viewer, but you can't see where it's all being Filtered out. A button to cancel all Filtering would be handy.
With minor variations, this browser appears in lots of different places in Cubase 4. In VST3 plug-ins, it also replaces the old preset menu, where it comes in two slightly different forms, depending on whether you click the preset name or the Sound Frame icon next to it. I'm not quite sure why this is the case, especially as the two behave just differently enough to be confusing. The new system does make it really easy to audition different sounds and effects while your song is actually playing, which is great, but I found its behaviour could be inconsistent. With some presets, double-clicking the name would load that preset and close the browser; with other presets for the same instrument, it would just select the preset; and just for good measure, sometimes it closed the browser without loading the preset.
One thing that really confused me is the way the various Sound Frame browsers decide where to pick up when you close and then re-open them. As far as I can work out, each of these related browsers retains its own record of last-used Filter settings, but in a global sense rather than a track-by-track sense. For example, let's suppose you're working with two instances of the new Halion One synth. You've used the browser to search for a drum sound on the first instance, and then you switch to the second and browse for a piano sound. If you then decide to go back to the first one and change your drum sound, the browser will show you piano sounds, rather than picking up where you left off. And if you've used Sound Frame to choose a drum sound in the Create Track dialogue, then decide you want to change that sound from one of the other Sound Frame browsers, you'll be faced with whatever search focus that browser was last used for, not the Filter settings that found your drum sounds.
Diving Into The Bay
The browser that appears when you load a Track Preset or VST3 plug-in setting is actually the little brother of a new global window called the Media Bay. This is the highest level of the Sound Frame concept, and it encompasses Projects and pretty much everything in them, from Track and plug-in presets to audio, video and MIDI files. Before it can be much use, you need to let it scan your hard drive to create its database. This takes a while, but you only need to do it once. Thereafter, you can have it automatically scan for changes or refresh manually at a time that's convenient for you.
The Media Bay brings under the Sound Frame umbrella all the tasks that would once have been carried out in the Pool, although the latter is still available if you prefer. So, as well as Filtering Track Presets by Category and so forth, you can Filter audio files by attributes such as creation date, number of channels, bit depth and so on. It makes a great librarian tool for sound effects and loops, provided they are properly Tagged. The version of Media Bay in the full Cubase 4 also includes a powerful Details search function, which allows you, for instance, to find all audio files with a creation date after the 12th of July, or all files between four and five minutes long. Cubase 4 users can also create custom Tags.
When you've found the audio file you were after, the Scope window at the bottom of the Media Bay lets you audition it. A nice touch is the 'audition in Project context' option, which plays back loops at the Project tempo. The Scope window can also be used to preview MIDI files, if you have an output device selected, and MIDI and Instrument Track Presets. If you find something you like, you can usually drag it from the Media Bay directly into an appropriate area of your Project. For instance, dragging a Track Preset into a blank area of the Track List creates a new track, while dropping it on an existing track applies its settings to that track. Dragging a Project out of the Media Bay opens it up. However, there doesn't seem to be any way to import elements directly from one Project to another as you can in, say, Pro Tools; you have to create Track Presets first.
The Media Bay is one of those features that will be very, very useful, but perhaps only to a minority of Cubase users. Anyone doing sound design or loop-based composition will appreciate the worth of a powerful librarian for effects and samples, though its usefulness is heavily dependent on files being Tagged with the necessary metadata. With other material, the only real benefit compared with using the Pool or Windows Explorer is the ability to audition at Project tempo, and those with more basic requirements may find it simpler to use the existing approach. Also, it would be nice to be able to tell Media Bay which folders to look at before it begins to compile its database. As it is, it seems to default to cataloguing everything it can find, so my Media Bay now displays thousands of fade files from Pro Tools Sessions, which I'm never going to need to import into Cubase.
Second Opinion
I happily use Pro Tools and Sonar when working with some musical collaborators, but in my own project studio, Cubase SX (often with Acid Pro Rewired in) has been my sequencing weapon of choice ever since the demise of Logic on the PC platform. Like most other regular SX users I was, of course, keen to see how some of the intriguing new features listed in v4 appeared in action. Like Sam, I installed my Cubase 4 upgrade alongside SX3 but, in my case, this was on my 'reviews' partition of a relatively new dual-core Athlon desktop system rather than a laptop.
In whizzing through the headline new features — the new VST effects and instruments, for example — my initial impressions were very positive. In moving from Logic to SX, my green streak has always glowed a bit brighter whenever Logic 's built-in effects are discussed. Steinberg's overhaul of the effects plug-ins bundled within Cubase is long overdue and what is supplied with version 4 is a considerable improvement. Though they're perhaps still not quite up to those currently supplied with Logic, I'd happily use the majority of them in my own work. I'd agree with Sam's comments about the new VST Instruments. I regularly use Halion 3 but, even so, Halion One is a welcome addition, and the flip side of its lack of editing potential is a simplicity that makes it more immediate. The full version of Halion is quite a complex beast, but with Halion One you just load your preset and play without getting too bogged down in the details — and the supplied sound set is very good. Prologue is also excellent, and there are also some fabulous presets within both Spector and Mystic — Spector 's Chainsaw Lead preset is wonderful for some keyboard self-indulgence!
I have not yet spent much time exploring Sound Frame or the Media Bay but I can see the potential of both, and for anyone with a substantial collection of sample libraries, the latter certainly ought to repay the initial investment in time getting to grips with it. In contrast, Track Presets and Instrument Tracks are instant time-savers, as is being able to drag and drop copies of effects to other channels in the mixer. Unlike Sam, on my particular system, I didn't experience any odd behaviour with this.
I'd agree with Sam about the changes made to the user interface. Steinberg have done a good job of streamlining various aspects of the Project Window, for example, but the colour scheme is a little dark and the new VSTis, while sounding great, could perhaps have been wrapped in something rather more eye-catching. While I didn't experience some of the particular problems Sam mentions in the main review (for example, Cubase found Halion Symphonic Orchestra on my system without any problems), in constructing a couple of trial projects, I did encounter the occasional bit of bad behaviour. However, what I found a more significant issue was simply that the considerable number of new and re-worked features meant that my workflow was somewhat slower than in SX3. This is, of course, an issue that would disappear with further use but, for any upgraders, I would recommend staying with SX3 for anything that has a short deadline until you can devote time to fully bedding in Cubase 4 and becoming familiar enough with it to make it work for you. That said, I think Steinberg have taken some bold steps with this release and, while some of the new features may still require some fine-tuning, their potential is considerable. John Walden
Sound Judgment?
Sound Frame is probably the biggest conceptual leap in Cubase 's evolution since the invention of VST Instruments, and in principle I think it's an excellent, far-sighted idea. To me, it makes lots of sense to have this sort of functionality built into the application, allowing it to work at the track level, rather than having it restricted to a plug-in, as it is if you run NI's Kore within a host application. The integration of preset management with Track Presets and the Media Bay has the potential to be a real step forward in ease of use and flexibility.
In use, I found that Track Presets quickly showed their worth. In the past, of course, you had the option of creating template Projects, but the flexibility of the new system leaves them in the dust. Templates are only really useful if you know in advance what you're going to want. If your projects tend to evolve in unpredictable fashion, or you find yourself working on Projects created by other people, the ability to store and load track settings — and apply them to existing tracks as well as new ones — is a Godsend.
Having said all that, the Sound Frame system is frustratingly incomplete at the moment. I could hardly believe my eyes when I discovered that the Track Preset system doesn't apply to FX or Group tracks, because, to my mind, that's where it would be most useful. If there's one thing most of us probably recycle across different Projects, it's global effects such as reverb and delay.
A related issue is that Track Presets don't store sends. I can see that this would be tricky to implement, because obviously it would be up to the user to ensure that the destinations for any sends were available in a Project where you loaded a Track Preset, but it does mean that a Track Preset won't capture a complete picture of any track that relies on auxiliary effects. Most vocal sounds, for example, involve reverbs or delays as well as compression and EQ. Unless you're willing to allocate a separate reverb to every vocal track by using it as an insert, there's no way that a Track Preset can store all that's important about the vocal sound. (One solution would have been to save a Multi Track Preset consisting of audio tracks plus the FX tracks they send to, but this isn't an option, because Track Presets can't include FX or Group tracks.)
Meanwhile, the implementation of Sound Frame through the program is still quite inconsistent. If the idea is to let you choose sounds, rather than plug-ins, how come you can't browse presets just by clicking on an insert slot? As it is, the principle of choosing sounds only applies to Track Presets, and not to individual plug-in slots; and applying a Track Preset to an existing track wipes out any plug-ins that are already inserted on that track. I'd like to be able to simply hit an insert slot and choose, say, a delay sound, without caring which delay plug-in makes that sound. Hopefully this will be developed in future releases of the program.
Finally, when it comes to choosing sounds, Sound Frame suffers from the same problem as Kore: it's only as good as the information you put into it. Naturally, Steinberg have done a good job of Tagging the presets that come with their new plug-ins, but at the time of writing, they hadn't yet released the Sound Frame SDK to other developers, and there are no third-party effects and instruments that come with the necessary metadata to support the whole 'choosing sounds rather than plug-ins' concept. Except, that is, for those made by Native Instruments, who have spent thousands of man-hours creating such metadata for their own products — but in a different format. Are they going to open up this metadata so that it can be accessed through Sound Frame, and risk making their own Kore system redundant? Or are we going to end up with two incompatible systems, which would completely undermine the whole idea of both?
Native Instruments told me that Steinberg had not consulted them during the development of Sound Frame, and that they haven't yet decided whether to make Kore Sound's metadata compatible. Let's hope for everyone's sake that a universal standard can be established. There are certainly some obstacles to be overcome first, not least the fact that many third-party plug-ins with large preset libraries are multitimbral and use their own internal preset-handling systems. It's not clear how, say, Sampletank or Kontakt could be made to work well with Sound Frame without fairly radical changes.
New Plug-ins
With the overhaul of the VST standard comes a new collection of bundled plug-ins. There are new VST Instruments, which I'll come to in a minute, but more important to many users will be the selection of bread-and-butter effects and processors. Many of the old plug-ins supplied with SX3 have now been superseded by better equivalents, and not before time.
Studio EQ — confusingly, not available in Cubase Studio — is, as the name suggests, intended as a premium-quality equaliser. It's included as a plug-in, but also replaces the old channel EQ in the full Cubase. Two of the four bands are conventional parametric EQs, and those at either end can be switched to shelving, filter or peaking response. Sonically, it's an improvement on what went before. The sound is smooth and I'd happily use it in a real project, though I have third-party EQs that I still prefer. You have to hit a button to switch each band on individually before you can use it, which gets old fast. I had one Project where the Studio EQ plug-in refused to load and save presets correctly, which was odd.
 Mystic.Also limited to the full Cubase is Mod Machine, which uses modulated delay lines to create everything from short, ambience-style reverb patches, through conventional filtered delays and tape delay sounds, to chorus, flanging and all sorts of wibbly weirdness. Three other delays — Mono, Stereo and Ping-Pong — are included in both versions of the program, and seem versatile enough to take care of all everyday delay requirements. I never got on with the older Double Delay plug-in, so these are very welcome. The stock of delay-based effects is further boosted with a new surround-capable, dual-stage Studio Chorus, which is a definite highlight. I was less impressed with the Cubase-only Cloner, an ADT plug-in that tries and fails to capture the magic of Waves' Doubler, imposing a heavy CPU hit in the process.
As well as the 'classic' VST Dynamics plug-in, there is now a separate Compressor, Limiter and Gate, plus the Cubase-only Vintage Compressor. This is a very simple but quite nice-sounding little plug-in that can add thickness and warmth to a sound. New, too, are a basic Loudness Maximiser and a simple Transient Designer-style Envelope Shaper, while Steinberg's Multiband Compressor has been updated to offer independent control over time constants for each band; none of these is available in Cubase Studio.
An Amp Simulator is now included in both versions of the program. It doesn't rival any of the third-party alternatives, but its simplicity makes it handy for getting a mix quickly when your brain is paralysed by the thousands of parameters in Guitar Rig. Meanwhile, Cubase and Cubase Studio users envious of Logic 's Sub Bass plug-in can now employ a simple Octaver, and there are a couple of oddities, such as Tone Booster, Wah-Wah and two graphic equalisers, plus a handy guitar tuner. However, there are no new reverbs.
Overall, the quality of the new effects and processors is a marked improvement, though there are no show-stoppers like Space Designer in Logic Pro. I'd be happy to mix with these, for the most part, but I suspect they still won't see that much use if you have a good set of third-party alternatives like one of the Waves, TC or Universal Audio bundles. Also, though it's good that the new plug-ins share a common look, I wish it was less sombre — they look as though they're permanently switched off!
 Prologue.
New Instruments
Steinberg do seem to be making a serious attempt to rival Logic Pro in the synth stakes, with no fewer than four new VST Instruments making an appearance. Two of these, Halion One (below) and Prologue, are included in both Cubase and Cubase Studio. The full Cubase also comes with the Monologue and Embracer plug-ins that were part of the SX3 package (though these won't be available to Intel Mac users), plus two rather unusual new synths called Mystic and Spector. All of them are, if anything, even gloomier in appearance than the new effects, but I suppose it's the sound that counts.
Halion One, for me, is the highlight of the Cubase 4 upgrade. It combines sample-playback technology derived from Steinberg's Halion with a 300MB sound set sourced from Yamaha's Motif range of keyboard workstations, and it sounds great. Like the other new synths, Halion One is clearly designed to show off the benefits of the Sound Frame architecture. It's monotimbral, so it fits into the one-track-per-instrument model, and its preset library has been lovingly Tagged to enable you to find those Percussive Dark Sound FX patches at the click of a mouse.
The sound set covers exactly the ground you'd expect from a workstation synth, including a General MIDI set, and covers it well. The emphasis is on emulations of real instruments, and there are usable sounds in every department. I particularly like some of the acoustic drum kits, which are a huge improvement over the old LM7, and the standard seems solid throughout. Clearly, the idea behind Halion One is to provide a good basic set of bread-and-butter sounds; as such, it's comparable to the Xpand! plug-in that Digidesign now ship with Pro Tools, and on the whole, I think I prefer Halion One. I also found myself using it in preference to Steinberg's own Hypersonic 2 on a number of occasions.
On the down side, Halion One seems much less efficient in terms of CPU use than Hypersonic 2. Playing a two-handed chord would use 10 percent or so of my computer's processor resources, and when I did some test songs using Halion One to generate most of the parts, I invariably had to freeze some of them. I also found its almost complete lack of editability frustrating. The interface presents you with eight knobs, and these are pre-configured to modify whatever parameters Steinberg deem most important in a given preset. In practice, this means that most of them control effects parameters, leaving you with virtually no ability to shape the raw sound. For example, the drum kits present no way of changing the balance between kick, snare and hi-hats. Halion One won't import user samples, and will only be expandable at all if Steinberg make additional material available in its proprietary format. Nevertheless, it's a seriously useful thing to get for free!
Keeping Score
SX3 offered pretty respectable facilities for producing notation — not, perhaps, in the same class as a dedicated scoring package, but certainly usable. In Cubase 4, the Score Editor has received a fairly substantial overhaul, retaining all its previous functionality but, hopefully, resulting in more efficient workflow, as well as offering some new features. These new features include a reorganisation of the Score menu and two new high-quality fonts (Jazz and Classical), in addition to the original Cubase font. However, perhaps the two most significant changes are the reworking of the Score Settings dialogue and the inclusion of an Inspector-like panel within the main Score window, which makes access to the various symbol palettes much easier.
 In Cubase 4, the Score Editor has received a fairly substantial overhaul, retaining all its previous functionality but, hopefully, resulting in more efficient workflow, as well as offering some new features. Opening the Score / Score Settings dialogue now provides more direct access to all the settings that were previously split amongst a number of items from the Score menu. This is achieved through four tabs called Project, Layout, Staff and Text: within each of these are some of the more familiar settings from the way SX handled this. For example, the Staff tab contains four further tabs called Main, Options, Polyphonic and Tablature as in SX3. For initial configuration of you score, this new approach is undoubtedly an improvement and certainly more efficient.
Within the Score window itself, the new Inspector button on the toolbar looks and functions just like the equivalent button in the Project window. In the case of the new version, it opens a series of palettes down the left-hand side of the Score window, containing Keys, Clefs, Time Signs, Note Symbols, Dynamics, Line/Trill and Other symbols. Any of these palettes can be expanded within the Inspector panel simply by clicking on it just as you would moving between the Inserts, EQ or Sends panels for the currently selected audio track within the Project window Inspector. Again, this brings considerable workflow improvements when you're constructing and editing notation.
I've never had the pleasure (!) of, for example, constructing a complex orchestral score using Cubase 's notation features. My own use is dominated by the need to score the occasional part for a solo string, brass or woodwind player to replace a sample-based part, or for creating guitar tablature, but even for these sorts of simple tasks, the improvements to the Score window are very welcome. Steinberg should get a pat on the back for keeping this section of the software — which is probably of interest to only a minority of the user base — moving forward in a positive direction. John Walden
A Subtractive Addition
Prologue is a subtractive synth that can do virtual analogue, but also has a few other tricks up its sleeve. It seems that Steinberg intend it to supersede the old Waldorf A1 synth bundled with earlier versions of Cubase — I always thought A1 was rather an under-rated instrument, but that's progress. Anyway, Prologue is quite an impressive piece of kit. In addition to the usual sines and triangles, its three oscillators offer an interesting range of other waveforms including resonant pulses, vowel tones, formants and combinations of partials at different levels.
These can be sync'ed, frequency-, wave- and ring-modulated, detuned and combined with white or pink noise, before passing through Prologue 's filter. There's only one of these, but it's a good 'un. A selector that seems to have fallen off a washing machine switches it between various low, high, notch and band-pass modes, with an internal dial adjusting cutoff frequency. Resonance is available, as is a Drive control that distorts the filter in pleasing fashion. There are two LFOs and four envelopes, each of which can be routed to more destinations than you would ever want to, as can velocity, modulation, aftertouch and keytracking. These are accessed through four panels along the bottom of the interface, as are the distortion, delay and chorus/flange effects.
Apart from being free, Prologue is quite reminiscent of Digidesign's newish Hybrid soft synth. It's not quite as versatile (partly because the envelopes are simple ADSR designs) or as convincingly analogue-sounding, but I've already found it a very valuable instrument. It'll take you a long time to exhaust the possibilities of Prologue, and for many people, its inclusion will make buying a third-party virtual analogue synth unnecessary.
Fly Into The Mystery
The two new Cubase-only synths, Mystic and Spector, recycle many of Prologue 's interface elements, including the four panels at the bottom that handle modulation and effects. In synthesis terms, however, they're quite different, and in fact quite unlike any other soft synths I've seen.
 Although it's not described as a physical modelling synth, that might be the best way to understand how Mystic works. In essence, it creates sound by firing short impulses into a network of resonant comb filters. This technique has been used to model the behaviour of physical systems like guitars, where the impulse from a plucked string triggers resonances in the body of the instrument, but here it's targeted more at abstract sound design. A trawl through the presets reveals some nice basses and leads, and lots of clangorous metallic pads and washes. Many of these sound impressive, at least until you switch off the effects.
Mystic isn't over-burdened with controls, but the ones it has aren't always familiar, and it takes a while to get past the poke-and-hope stage of programming. Before arriving at the network of comb filters, the impulse sound is shaped by an envelope generator and two parallel spectrum or formant filters. A variety of preset filter shapes is available, or you can draw your own responses with the mouse; for reasons I don't fully understand, the two are linked such that drawing in one creates an 'inverse' response in the other.
Control over the comb filters that do the donkey work is limited: you can offset their base frequencies, and adjust the amount of Feedback and Damping that is applied to the filter network. Nevertheless, this is clearly a pretty deep instrument with plenty to offer if you're into abstract textures and warped bell sounds.
A Spector Calls
The twin spectrum filters also make an appearance in Spector, but here they're independent. Spectrum filters are often used in additive synthesizers, but Spector couldn't really be called that, as its oscillators offer only a tiny selection of preset harmonic spectra to work with. However, variety is introduced — along with plenty of weirdness — by a pop-up menu which adds various configurations of stacked oscillators. For instance, one of the options is to have three oscillators stacked at the normal pitch, and three an octave below. The stacked oscillators can be detuned for a richer sound, and the more far-out configurations lead you quickly into highly inharmonic territory.
It sounds simple, but as the presets show, it's capable of a surprising range of sounds. There are some genuinely meaty analogue-style basses, plenty of tinkly bells, textures and pads, and some driving leads, though, again, many of these are rather dependent on effects. I found it easier to get into programming Spector than Mystic, and quickly came up with some splendidly queasy Farfisa organ sounds.
Both Mystic and Spector are unlikely to duplicate other synths you may already have. They're nice things to have around, they don't use excessive CPU power, and they might offer inspiration for that moment when you need something different. However, I wouldn't miss them that much if they suddenly disappeared from my plug-in folder, and on their own, they wouldn't be enough to make me pay extra for the full version of Cubase. I doubt I'm alone in wishing that Steinberg had turned their development resources to issues like side-chaining and bussing instead.
The Control Room
A high-end feature that's new in Cubase 4, and not in the Studio version, is the Control Room, which has been available for a while in Steinberg's Nuendo 'media production system'. Like some of the other new features in Cubase 4, I suspect that this one will be really useful, but only to a smallish minority of users. In essence, the idea is to provide the same functionality that you would get in the master section of a large-format analogue desk. You can use the Control Room to create up to four separate cue mixes for performers, with talkback, and it can also be used to provide a folded-down stereo mix in parallel with a surround mix, so that you can check stereo compatibility on the fly. In addition, it can bring up to six external playback sources such as DATs and CD recorders into a Cubase-controlled monitoring environment, and emulates features like Dim buttons that you often find on hardware monitor controllers.
 Studio channels carrying cue mixes for musicians live on their own separate Control Room mixer.An extra page on the VST Connections dialogue is used to create Control Room channels and assign them to physical inputs and outputs on your audio hardware. Once you've done that, the channels appear on a separate Control Room Mixer window. Meanwhile, hitting the five-pointed star button on the main mixer reveals a new Studio Sends view. Each channel has four Studio Sends, and you can have up to four Studio channels routed to separate physical outputs, enabling you to create four separate monitor balances for different musicians. Fortunately, there's an equivalent to Pro Tools' 'Copy Faders to Sends' command, so that you can replicate the main mix on the Studio Sends as a starting point. The Control Room setup is retained until you change it, so there's no need to save it in a Project template. However, a major limitation is that ASIO Direct Monitoring doesn't apply to inputs routed through Studio Sends, so this cue-mix functionality is only really useful if your audio interface is capable of very low latency.
I've only really scratched the surface of what the Control Room can do here: suffice it to say that it is powerful, but complex enough that you need to put some effort into setting it up and making it work for you. There are plenty of nice touches, such as the ability to simultaneously adjust all the Studio Send levels at a touch. Hiding the Studio channels away on a separate mixer, and having dedicated Studio Sends on the main mixer, helps to keep the visual clutter down, and permits the Studio channels to have custom features such as dedicated buttons to switch the Cubase click in and out. On the other hand, you could argue that it lacks the conceptual simplicity of the Pro Tools approach, where the same busses, sends and aux channels do everything, and any signal can be routed anywhere.
On Balance
Cubase 4 is the most extensive overhaul the program has received since VST was superseded by SX. Perhaps inevitably, the result is that it sometimes feels like you're using a version 1, with some features not yet realising their full potential. The obvious example is Track Presets, which are already very useful, but would be so much more useful if they encompassed sends, FX and Group channels.
Steinberg have not yet implemented features like side-chaining and automated export of individual tracks, despite pressure from users. Instead, they have introduced a radical new approach to sound management, which no-one asked for. Is this visionary, or simply arrogant? Steinberg have always been an innovative company, and in the past, some of their big ideas have gone on to revolutionise the entire industry. Sound Frame may well do the same. It can't be coincidence that two of our most forward-looking manufacturers have been thinking along similar lines, and in a couple of years' time, we may be wondering how we did without something like this or NI's Kore. At the moment, however, its usefulness is limited, partly because of the inconsistent way it's applied, and partly because there are no third-party plug-ins that come with the required metadata. Likewise, the revision of the VST specification is likely to cause turbulence for many upgraders, and although it opens the door for exciting future developments, it has yet to produce many tangible benefits for Cubase 4 users.
There are areas where users will immediately notice the difference. Halion One and Prologue are excellent, and will save many users the cost of buying a third-party sound module or virtual analogue synth. The new effects and processors are a great improvement over their predecessors, and although they won't get the pulse racing, they do bring this aspect of the Cubase world much closer to parity with rival packages. Most of the changes to the interface are clear improvements, especially the draggable inserts, though really I would have liked to see Steinberg go further in this department.
Despite these improvements, though, I would think carefully before upgrading straight away, especially if you're in the middle of an important project. Cubase 4 will become a much more appealing prospect when some of the niggles have been ironed out, third-party developers have caught up with VST3 and Sound Frame, and Steinberg get around to implementing side-chaining and flexible bussing. When those things happen, I've a feeling that the innovations Steinberg are now introducing will bear ample fruit. After all, we didn't know we wanted VST Instruments back in 1999 — but who would be without them now?
Pros
- Track Presets take a lot of the hassle out of setting up a mix.
- Sound Frame has the potential to revolutionise the way we choose instrument and effect patches.
- Instrument Tracks provide an elegant alternative to the VST Instrument rack.
- There are some worthwhile improvements to the user interface and Score Editor.
- The Halion One and Prologue instruments are great.
- The new set of effects and processing plug-ins is a big improvement.
- Media Bay and Control Room will be very useful to some users.
- Cubase Studio is much more affordable, yet contains all the features most users will need.
Cons
- Track Presets don't apply to FX or Group channels, and don't store sends.
- Sound Frame will only really come into its own when third-party plug-in vendors support it.
- The implementation of Sound Frame is inconsistent and sometimes confusing.
- Instruments on Instrument Tracks can't receive MIDI from other tracks.
- Support for Direct X plug-ins has been dropped, and there seem to be problems getting some VST plug-ins to work properly.
- Still no side-chaining or flexible mixer bussing.
- Though it hasn't crashed on the review machine, there are some smaller bugs.
Summary
Steinberg seem to be playing the long game with Cubase 4: there are some important new ideas here, but they will take time to come good. In the meantime, early upgraders risk a slightly bumpy ride.
information
Cubase 4 £649.99; Cubase Studio 4 £299.99; upgrades £129.99 (SX3 to Cubase 4) or £79.99 (SL3 to Cubase Studio 4). Prices include VAT.
Arbiter +44 (0)20 8207 7880.
+44 (0)20 8953 4716.