Think computer music's got no soul? Think again! Join us as we explore Reason's ReGroove mixer...
 Reason 4: new semi-modular analogue–style synth? Great. Improved Sequencer? Yes please. Arpeggiator? Of course. Real-time multi-track MIDI groove quantise thingy? Um... OK, I guess.
If this was your reaction to the feature list when Reason 4 was announced, you were not alone (I have my hand up too). Over a year after Reason 4 was released, the ReGroove mixer still has many scratching their heads and thinking, well, why?
New Groove
What the Props have done with the ReGroove mixer is completely re-think the way you apply timing and dynamic variation to MIDI sequences. All respectable DAWs have ways to quantise MIDI notes (and audio notes in some cases, such as Pro Tools) to the grid or to groove templates. They also usually allow you to offset the timing of MIDI tracks, so that notes are shifted earlier or later, resulting in performances that are ahead of or behind the beat. These operations are traditionally treated as editing tasks — that is, you select notes or a track and apply settings. These edits may not be destructive but are generally something that you will set and then leave alone afterwards.
What Reason 4 attempts to do is make adjusting the 'feel' of a performance a real–time, mixing-stle task.The ReGroove mixer allows you to apply varying amounts of groove quantisation, shuffle, offset, randomness and velocity variation to individual tracks or note lanes. You can add different types of groove to each track, or use the same type and vary the amount and blend of timing and dynamics. The beauty of it is that it all happens in real time, and you use faders to adjust the amount by which each track is affected, allowing you to tweak multiple tracks by ear until they sit just right with each other.
Getting Into The Swing
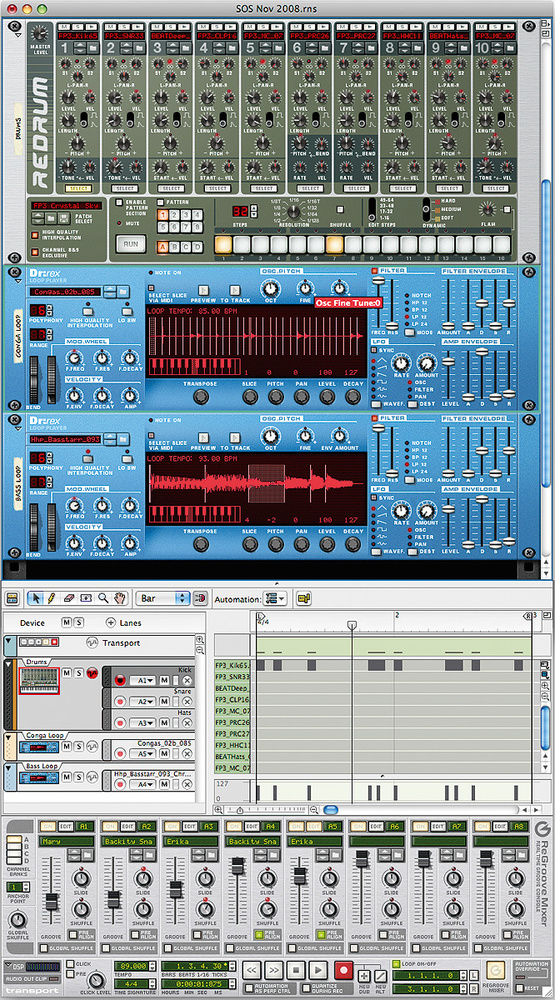
Let's look at an example to get a feel for how the ReGroove mixer works. The main picture shows a Reason song with a Redrum drum machine and two Dr REX loop players. The drum machine is being triggered from the main sequencer (rather than its built–in step sequencer), and instead of using a single note lane to record the pattern, separate note lanes have been created to record the kick, snare, and hi-hat sequences. Taking this step allows each drum part to be groove-adjusted independently.
In the sequencer (fourth down in the Reason rack, overleaf), you can see that each note lane has a pop-up menu between its record-ready button and Mute button. This is where you assign each lane to one of ReGroove's 32 channels. The hi-hats lane, for example, is assigned to A3, so it will be adjusted in real-time by whatever is going on in the third channel of ReGroove's 'A' bank. This song has a hi-hat pattern comprising 16 consecutive 16th notes, as you can see in the screen above A simple 16 step hi-hat run can be transformed into countless different rhythms.. This is an ideal pattern to use for experimenting with ReGroove, as it reveals all the effects of any groove template and shuffle settings. You will, in fact, be astonished by how many different rhythms and feels you can generate from even this most basic of starting points.
In the screen on the previous page the display in ReGroove's A3 channel is showing that a groove template called 'Erika' has been loaded from the factory presets Presest grooves are derived from real performaces, programmed rhythms, classic tracks and the Akai MPC shuffle.. The channel's fader determines the impact of this template on the assigned MIDI lane and the template affects timing, velocity, and note length. As well as setting the overall amount of these three effects with the fader, you can adjust them relative to one another. This is achieved in the Groove page of the Tool Window, opened by clicking the Edit button at the top of the ReGroove channel, as shown in the screen at the top of the next page<
 The mix of timing and dynamics from a template is set in the Tool Window.. In this case, I'm only adding a subtle timing change, and mainly using the veloctity variations inherent in the template.
Shuffle & Slide
Two knobs on each channel — Slide and Shuffle — operate in addition to the groove template, and are unaffacted by the fader position. Slide shifts notes earlier or later in time with respect to other tracks, allowing you to create a more 'rushed' or laid-back feel respectively. Shuffle adds a 16th-note swing, moving every other 16th note's position within each measure. At the central, 50 percent position, no shuffle is applied. Turning the knob clockwise yields a traditional 16th swing, with the 66 percent setting pushing the even numbered 16ths to triplet positions.
Working in conjunction with all the channel settings is a Pre Align button, which hard quantises all notes to the grid prior to treatment by the Groove, Slide and Shuffle controls. This can be useful if you want to hear the true effect of the groove template, but you can leave it off to keep a flavour of your original recorded performance.
Doctoring Your Groove
Even if you work primarily with loops in Reason, you can still enjoy the benefits of ReGroove. The Dr REX loop player uses ReCycled loops, which are chopped into slices and played back by MIDI notes. When you use Dr REX's To Track button, MIDI clips are created that play back the loop with the exact timing of the original recorded performance. These note sequences can be affected by the ReGroove mixer like any other, allowing you to change the feel of REX loops. In order for loops to be affected by velocity variations as well as timing, you need to turn up the Velocity To Amp knob on the Dr REX device.
Using ReGroove can overcome one of the great problems of loop-based song-writing. Often, electronically produced songs feel disjointed because the layered loops have different feels. In the example picture (right), I've added conga and bass guitar loops. In their original form, neither of these fit with each other, or with the Redrum pattern. Pre-aligning the loops' note sequences and applying the same groove template as the hi-hats makes the parts immediately begin to gel better. However, you can now go further, adjusting the groove amount and the other settings until you hear the point where everything is obviously 'in the pocket'. In the example track, the bass guitar really fell into place when some shuffle was added, introducing some swing to the runs between the main notes.
Roll Your Own
 can be removed by using the Pre Align button.") ReGroove can be used to change the feel of REX loops. The inherent timing in the loop (which can be seen in the MIDI clip) can be removed by using the Pre Align button.Once you've been hooked by the ReGroove mixer you'll probably want to start adding your own grooves to the pot. This is pretty much the same kind of process as you would find in previous incarnations of Reason. Simply right–click on a notes clip that has a feel you like, and choose Get Groove From Clip. Reason will analyse the timing and velocity variations in the Clip and create a template. This will immediately replace the groove in whichever ReGroove channel currently has the active Edit button.
ReGroove can be used to change the feel of REX loops. The inherent timing in the loop (which can be seen in the MIDI clip) can be removed by using the Pre Align button.Once you've been hooked by the ReGroove mixer you'll probably want to start adding your own grooves to the pot. This is pretty much the same kind of process as you would find in previous incarnations of Reason. Simply right–click on a notes clip that has a feel you like, and choose Get Groove From Clip. Reason will analyse the timing and velocity variations in the Clip and create a template. This will immediately replace the groove in whichever ReGroove channel currently has the active Edit button.
If you want to save the template to disk, so that you can load it into other channels, you can save it by clicking the Save button in the Groove page of the Tool Window.
Like many, I was initially fairly underwhelmed by the idea of the ReGroove mixer. However, after getting to know it I've come to think this could prove to be one of the most significant developments in MIDI sequencing for a long time — I can't think of anything else that can do what it does.
If you mostly make straight-cut electronic music or techno, ReGroove will probably do little to change what you do in Reason. However, if electro, house or hip–hop — not to mention rock or jazz — are your thing, you're seriously missing a trick if you don't give the ReGroove mixer a go.
Global Shuffle
The Global Shuffle knob to the left of the ReGroove panel replaces the Pattern Shuffle knob that was found in the Transport bar in earlier versions of Reason. This knob sets the amount of shuffle applied to any Redrum, Matrix and RPG8 devices that have their Shuffle buttons activated. In previous versions, you could apply the Pattern Shuffle to any sequence of MIDI notes, by selecting them and choosing Shuffle from the Quantise menu. This allowed you to match the feel of MIDI tracks and step-sequenced parts. You can still do exactly this, using the Quantise section of the the Tool Window. However, you can now also apply the Global Shuffle to any track in real time using the Global Shuffle button found at the bottom of each ReGroove channel. This overrides the channel's local Shuffle knob.
Regular Quantise
Simple grid quantisation is still treated like an edit task in Reason 4. The familiar Quantise controls that used to be in the sequencer's toolbar have now been moved to the Tools tab of the Tool Window. It's a shame that a straight quantise option is not included in the ReGroove mixer. This would allow you to add grid quantisation by varying degrees with a fader, instead of by the limited range of preset amounts that are offered in the Tool Window.
No matter — it's very simple to add this feature yourself, by creating a groove template with no groove. To do this, you need to use the Get Groove From Clip command on a one bar clip with 16 straight hits at 16th–note intervals. The quickest way to generate such a clip is to create a Redrum, select all 16 steps on any drum, set a one–bar loop with the Left and Right timeline locators, then use the Copy Pattern To Track command. Now you can use the steps detailed in the main text to extract and save a groove template from the clip. You can then load this clip into ReGroove channels and apply varying amounts of grid quantisation to tracks.
Anchor Points
An important setting in the ReGroove mixer is the Anchor Point. This tells Reason which bar your song starts on. In my example track, the song starts on bar one, but if there is an intro section or a pick-up measure you need to make sure that the Anchor Point is set to the bar that your song actually kicks in on. This is because many groove templates are more than one bar long, and need to be aligned correctly with your song.