An account of an acoustic newbie's journey from bare walls to a well‑balanced, sonically pleasant space.
 It's easy to get carried away once the boxes of gear arrive. But make sure you have a clear plan before sticking it up!
The physics of the propagation of sound is immensely complicated, and when the assortment of materials that make up the walls, floors and ceiling (plus any windows, doors and furniture) are added to the equation, it's very difficult to predict what will happen to sound waves once they've left their source. What's more, every room is different, and it's not just the dimensions that will dictate how the room will sound... Imagine two rooms of the same shape and size. One has two‑metre-thick concrete walls, and the other a single‑layer plasterboard stud-wall. Even with those brief, albeit extreme descriptions, you probably know already that the two rooms will sound very different. Add in the multitude of room shapes, sizes, wall‑construction methods and surfaces found in home studios, and it becomes impossible to provide a one-size-fits-all guide to acoustic treatment.
The subject of acoustics is regularly discussed in SOS, but plenty of readers still ask for the subject to be covered from a much more basic starting point. What follows is a look at installing acoustic treatment from a complete beginner's perspective: some basic, essential information, along with a bit of advice from acoustics professionals that should give you the confidence to get started. I'll follow this up by taking you step by step through my own recent experience of treating a room.
Why Bother With Acoustic Treatment?
 Four hands are better than two when it comes to measuring and marking the walls. The spirit level is essential.
Untreated rooms have an uneven frequency response, which means that any mixing decisions you make are being based on a sound that is 'coloured', because you can't accurately hear what's being played. In short, you can't possibly tell how your mix will sound when played back anywhere else. It isn't just an issue for mixing, though, because any recordings you make of acoustic instruments will bear all the hallmarks of the space in which you record them. That may be a good thing if the space in question is Ocean Way or SARM West, but probably preposterously bad if it's your living room or bedroom. So, if you want your mixes to transfer well, and your recordings to be free of room 'honk', you need to pay attention to the acoustic properties of your environment — no matter how good the gear you're using.
First Things First
 A spirit level will help to keep things looking neat.
The first thing to grasp is the outcome you want to achieve. It's a common misconception that acoustic treatment should kill all reverberation, and that you want a room covered floor‑to‑ceiling with foam tiles: this isn't what you're aiming for. You also need to bear in mind the limitations imposed by space and budget: most home studios are small in comparison with the Abbey Roads and AIR Lyndhursts of this world, and many home‑studio owners simply don't have the funds for bespoke treatment solutions.
So what is the aim? Andy Munro, acoustic design specialist, remarks, "acoustic design is the science that restores a neutral sound balance”. Applying that science means interfering with the path of sound to control the sound energy. Jorge Castro, chief acoustician at Vicoustic, says that "in the case of affordable treatment, we need to control the energy of the sound first. Then we can take care of the sound quality. With small spaces, bass frequencies are always a problem, and we should control the low frequencies as much as we can.” In fact, he continues, "In small rooms, I've never heard people saying they have too much absorption of low frequencies.”
Absorption & Diffusion: What, Where, Why?
 The multi‑use space before…
To achieve the right balance, there are two main approaches: absorption and diffusion. Products that have absorptive properties include foam and rigid mineral-wool (see the 'DIY & Rockwool' box), and they 'soak up' the sound energy, turning it into heat, through friction. Most effective on high‑frequencies, absorption is essential for reducing flutter echoes and for taming bright‑sounding or 'ringy' rooms. Bass trapping is also a type of absorption, but is specifically designed to absorb low‑frequency energy. A clever combination of soft, hard, thick and thin materials, including air, is used to make the most efficient bass trap, and an empty gap between the wall and the back of the trap helps to make it even more effective.
Diffusion is the scattering of sound energy using multi‑faceted surfaces. Diffusers are commonly made of wood, plastic, or even polystyrene. Jorge Castro explains: "diffusion helps in energy control and improves the sound quality in frequencies throughout the middle and high range of the spectrum, and also improves sweet‑spot image.” The 'sweet spot' is the place between the speakers where you should be sitting to get the best stereo image (imagine that your head and the two speakers form an equilateral triangle). That pretty much concludes the theory: now for the practice!
Getting Started
 The treated performance space: note the mixture of diffusers, absorbers and reflective surfaces.
Before undertaking this project, I'd read plenty about acoustics, but had never attempted to properly treat a room myself: the nearest I'd come was propping foam panels against the walls to tame flutter in the spare‑room‑cum‑studio of my rented house. I hadn't been able to glue or screw anything to the walls, for fear of incurring my landlord's wrath, and the thought of retouching the paintwork after tearing strips of self‑adhesive velcro pained me too! So this was very much a learning experience.
The space in question included an area that would provide a reasonable‑sized live room, and another that would serve as a small control room, and although both were important, I really wanted to get the performance space right. I decided that I'd buy commercially available panels, because I simply didn't have the time, space or inclination for the DIY option. Most manufacturers of acoustic products also offer a consultation service, and they often have free on‑line calculators to help you decide on a suitable treatment option, too, so even if you choose the DIY route this can be a sensible place to start.
I chose to get my treatment from Vicoustic, a company relatively new to the UK acoustic‑treatment market who make a range of products for studios and home theatres. I told them that, as this was the only live room for a small project studio, it needed to be quite versatile, with both a 'dead' corner for dry recordings and a more ambient space to liven up acoustic recordings where needed. I'd expected a solution with almost complete wall coverage, foam panels and diffusers covering every square inch, but Vicoustic came back with a plan that surprised me, which suggested that total coverage wasn't necessary.
In fact, Jorge says that the typical home studio needs only between 30 and 40 percent coverage to adequately treat it. So don't go over the top: remember that we're trying to control the energy, or "restore the natural sound balance,” and not to kill the sound completely.
As for the proportion of diffusion to absorption, Jorge says, "some believe it should be 50 percent absorption and 50 percent diffusion. In the home studio, because of budget and space constraints, the actual proportion can vary considerably.”
Planning
 This kind of glue requires a skeleton gun to apply, but is nicer to work with than the aerosol‑based adhesive. So, you've decided on your acoustic treatment, you've had it delivered, and it's piled in the middle of the room. The next step is sticking it up on the walls, right? Well yes... but you also want to make sure that it goes in the right place, partly to optimise its acoustic performance, and partly because you don't want it to look like it's been put up by a two‑year old! As a first‑timer, I found it useful to have the 3D drawings Vicoustic had supplied, as they enabled me to plan precisely where each panel would go. You can create a computer‑generated version of your room yourself using a freeware 3D drawing programme such as Google Sketchup (http://sketchup.google.com). This may seem a bit over the top (sketches on the back of an envelope would do the job), but it can provide a useful guide to print out and use like a map during installation. What's more, you can plan the look of a room, moving tiles and panels around on the computer instead of having to rip them off the wall if they look silly.
Measure Twice, Stick Once
With my 'map' in hand, it was time to mark up the walls. The Vicoustic plans showed the panels equally spaced along the walls, but without any dimensions or measurements to indicate how to space the tiles, so I measured the whole room and planned the position of all the panels supplied. A quick and easy formula for plotting the position of a row of equally spaced panels soon emerged. To calculate the distance between each panel, and between the end panels and the walls, you just measure the length of the wall, subtract the total width of all the panels to be fixed to it, then divide that figure by the number of gaps between panels (or by the number of panels plus one). Marking up is then a cinch, but to get things looking good, you'll need to mark the corner points and will require a spirit level and a spare pair of hands. Applying adhesive to a foam bass-trap. Once plotted and marked, it's also a good idea to double‑check that you have the same number of actual panels as you have on your plan!
Stick 'Em Up!
With the planning done, it's time to stick the panels to the walls and ceiling. The way you do this depends on the type of treatment you're applying. Large, framed panels will come with brackets and (hopefully) sturdy fixings, whereas foam‑based tiles will need to be glued, using an aerosol‑based product or a tube of paste‑like glue that needs a skeleton gun. Spray‑mounting can often give less than satisfactory results, so I was glad to discover that the Vicoustic delivery included the tube variety. With just two tubes supplied, though, I soon had to resort to alternatives, and found that the sticky gunk used to fix mirrors to walls worked exceptionally well.
 When applying glue to the surfaces, use conflicting patterns, so that you achieve maximum adhesion.To prevent the glue squidging out from the sides of the panels, I piped the glue on no less than an inch from the guide line on the wall and on the back of the panel itself, in different patterns, to increase the adhesion. With this kind of glue, I found that it would begin to set in about a minute, allowing just enough time to pull the panel off and turn it if it was the wrong way up. When sticking panels to the ceiling, I took the same approach. It was a textured ceiling, which called for lots of glue and a firm hand to seat the panels: again, it's useful if you can get a friend to lend a hand.
Hearing The Result
Once in place, the Vicoustic treatment worked very well. The main part of the room is now nicely controlled, if a bit on the 'live' side, and the diffusers ensure excellent intelligibility of speech: a sure‑fire sign of good acoustic control. I had a few spare corner traps, which were put into the dry corner, to make it even more 'dead', and it will be easy to add a few smaller foam tiles to dampen the sound further if it's found to be too 'roomy' further down the line.
 Vicoustic's on‑line 'solutions finder' suggesting some of their different products for a 25 square‑metre control room.Having tried some recordings in the room, I'm happy to say that excellent separation can be achieved between acoustic instruments and vocals by using the different areas of the room. Because the sound inside the room is controlled, the ambience can be used to good effect if a roomy sound is desired on the recording.
Ultimate Control
So far, I've only addressed the dedicated live/recording space, and most home studios are single rooms, with both the monitoring and performance areas in the same space, so I asked Andy Munro to explain how to approach treating such a space. "The best approach,” he said, "is to sketch the room out, then divide each dimension into thirds. If the mixing position is on a third ratio, and so are the speakers, they will not stand on any of the half or quarter 'standing' wavelengths that cause a peak or trough in the bass [see the 'Standing Waves' box for more information]. The result will be a smoother sound, with fewer problems when the acoustic absorption is added. Ironically, most professional rooms are set up about the centre line, which tends to result in a 'hole' at certain frequencies.”
Also important in monitoring rooms is the control of early reflections. When a speaker cone is driven, it disperses acoustic energy to the listener's ears directly, and also to the walls and ceiling of the room. Uncontrolled, these early reflections bounce back into the room and reach the listener a few milliseconds later than the direct sounds, because of the additional distance they've had to travel. Unless in a large room, this delay is not perceivable as a different sound; instead it disturbs the phase, and therefore the clarity, of the sound. To keep early reflections on a tight leash, the 'mirror points' of the room should be identified and treated. To do this, sit in the listening position and 'guesstimate' where a mirror would have to be placed to enable you to see each monitor cone from the sweet spot. Then apply absorption to these points. A 'ceiling cloud' can be positioned in a similar way, to control vertical reflections.
Conclusion
, using a freeware CAD package such as Google Sketchup.") Left: the untreated room. Below: I used the plans supplied by Vicoustic as a map when mounting the panels. You can make your own (perhaps not as detailed as these), using a freeware CAD package such as Google Sketchup.
Left: the untreated room. Below: I used the plans supplied by Vicoustic as a map when mounting the panels. You can make your own (perhaps not as detailed as these), using a freeware CAD package such as Google Sketchup.
No matter how much you spend on instruments, amps, speakers and recording gear, you still need to pay attention to the space in which you use them. The treatment of home studios is tricky, because of their size and the construction materials used, not to mention the budget of the average home‑studio owner. It's impossible to get a 'pro-studio sound' from a space that's built as a spare bedroom, mainly due to the laws of physics, but also because 'proper' studios might have big bucks spent on acoustic design. But if you can get your head around what you're trying to achieve, you can still make such a space perfectly usable, with only a small amount of money, some forward planning and a little bit of knowledge.
If you find yourself asking questions that I've not answered here, you could do worse than dip into the regular Studio SOS series of articles (in which the SOS Team troubleshoot readers' studios), or read some of the more in-depth articles about acoustics, such as the one in SOS December 2007 (/sos/dec07/articles/acoustics.htm). But the bottom line is that it needn't be expensive, and it isn't rocket science — so now you have no excuse!
The Experts
Without some pointers from these two acoustic treatment experts, I'm sure I'd have made some serious errors when tackling my project!
Jorge Castro is the lead acoustician at Portugese acoustic treatment product manufacturer Vicoustic (www.vicoustic.com), who make foam‑based absorbers, and wooden and polystyrene diffusers. In the UK, Vicoustic products are available through Systems Workshop (www.systemsworkshop.com).
Andy Munro is a leading acoustics expert who has designed some of the most acoustically impressive rooms in the world. His company, Munro (www.munro.co.uk), carry out all the construction work on multi‑million pound installations, but they also offer a consultancy service for self‑builders.
Quick Tips
1. Use this formula to find out how much space to leave between panels to achieve even spacing:
(Wall Length minus Total Panel Width)
divided by
(Number Of Panels plus 1)
2. Mark up the room, using a pencil to draw on the walls before fixing anything. Mark where the corners of the panels should go so that you can line them up precisely.
3. Measure twice, stick once!
4. When applying the glue, draw a zig‑zag on one surface and a dashed line on the other, to help optimise the adhesion.
5. Once you've lined up the rigid panel, give it a firm push and a wiggle to help 'suck' it on to the surface. This is especially effective on textured ceilings.
6. Get a friend to help!
Fixing Tips
Different types of acoustic treatment products require different fixing methods, depending on the surface to which they're being fitted, so:
 Heavy‑duty plasterboard screws and anchor bolts provide sturdy fixing points on plasterboard walls. Whatever you do, don't use a standard plastic wall plug!
 Use the right glue: solvent‑based glue is very sticky, and great for fixing foam to normal painted walls and ceilings, but contains solvents that will eat through polystyrene. So, when fixing polystyrene to walls, or putting foam on to polystyrene‑covered walls (as we did in Studio SOS in SOS October 2009), make sure you're using the solvent‑free stuff.
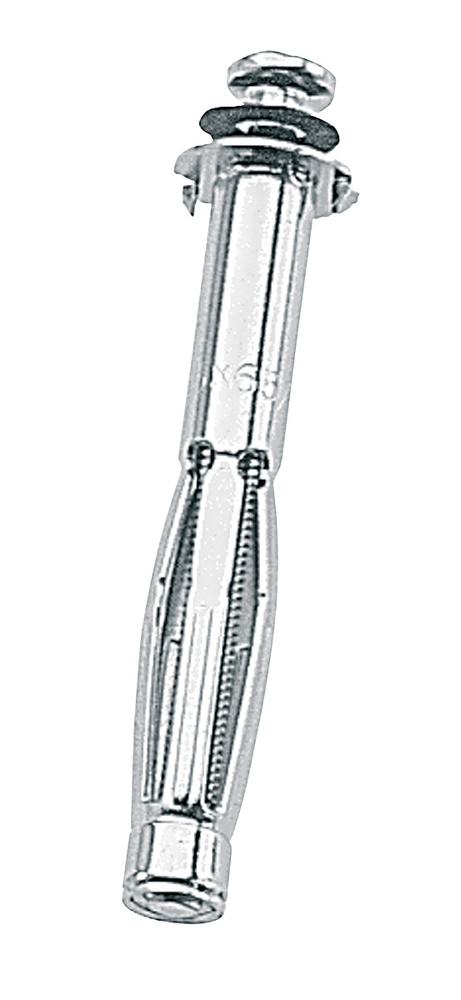
- Use the right fixings: plasterboard (or 'drywall') walls can be a pain if you're mounting heavy objects. The best approach is to find the upright wooden joist or batten to which it's fixed, and screw into that. The next best thing is dedicated plasterboard fixings (right), which are basically big, self‑tapping screws with holes in the middle, into which standard fittings can be screwed. Failing that, and for really heavy objects, use wall anchors (far right), which are simple but clever contraptions that pinch the plasterboard from both sides, to make a sturdy fixing point.
- Leave air gaps: leaving a gap behind rigid absorption panels will increase their effectiveness. An easy way to hang them from the ceiling involves plasterboard fixings, cup hooks, and some of the cable used to hang pictures. That shouldn't need too much explanation; just make sure you use proper fixings!

Standing Waves
Most home studios suffer from low‑frequency 'standing waves', where the physical length of the wave is a multiple of the room dimensions. The result is increased volume at frequencies where the wavelengths match room dimensions, and deep troughs or dead spots in places where the room dimension is an even factor (such as a half or quarter) of the wavelength. Standing waves are more apparent in smaller rooms; and square and cuboid rooms, or rooms where one dimension is an exact multiple of another, are the worst culprits. The wavelength of open 'E' on a guitar is around 14 feet (just over 4m), so if you've converted a single garage into a studio, your longest wall will probably be almost exactly the length of a waveform at that frequency!
DIY & Rockwool
If you're strapped for cash but have time to spare, you could try building your own broadband absorbers instead of buying commercially made ones. For a guide to the DIY approach, see Paul White's comprehensive guide on how to fabricate these panels in SOS July 2006, and on‑line here: /sos/jul06/articles/studiosos_0706.htm.
Paul often recommends using 'Rockwool' in his design. Rockwool is the name of a company who were instrumental in the popularising of naturally occurring mineral wool, and the product called Rockwool is exactly that: rock that has been melted and spun into wool‑like fibres. You'll find a variety of products with the 'R' word on the packaging, but the ones that we're interested in are the semi‑rigid insulation slabs. In America, Owens Corning are a popular alternative brand, while others such as Knauf Insulation, who make Rocksilk, cater for numerous territories. There are two figures to look out for: density and thickness. Most manufacturers have expansive tables on absorption coefficients and the like, which are a good guide if you know exactly which frequencies you need to tame, but for the 'plain vanilla' slab, I'd suggest something around the 60kg/m3 mark, with a thickness of 75mm. In most cases, this will act usefully as an absorber across a broad range of frequencies.