Getting your recordings fit for the mix is crucially important, but is something that nearly all Mix Rescue candidates seem to overlook to a greater or lesser extent.
 Here you can see the two main tactics Mike used to improve the bass part: extensive timing edits to lock the part firmly with the drums; and a simple MIDI synth line layered underneath Ollie's bass guitar part to fill out the low end, using a low‑pass filtered patch from Reaper's internal ReaSynth plug‑in.
This month's Mix Rescue candidate is the song 'All The Same' from Surrey‑based alternative rock band North To Alaska. The track was sent in by their lead singer and recording engineer Ollie Wright, who felt he'd run out of ideas when it came to achieving a more polished and powerful sound, particularly with respect to getting the vocals to sit properly in the mix. On my first listen, the name Andy Wallace sprang to mind, a mix engineer renowned for his work with people like Nirvana, Limp Bizkit, Linkin Park, Rage Against The Machine, System Of A Down, and Velvet Revolver. And sure enough, when I asked Ollie to suggest some reference material, he name‑checked one of Wallace's more recent credits: Biffy Clyro's Puzzle. In addition, he mentioned Brand New's The Devil And God Are Raging Inside Me, mixed by another big name in the rock mixing world, Rich Costey (responsible for records from bands like Muse and Arctic Monkeys). When comparing these albums directly, it seemed to me that while North To Alaska had more in common musically with Brand New, the production sonics were closer to those of the Biffy Clyro record, so I ended up favouring that from a mix perspective.
Surveying The Tracks
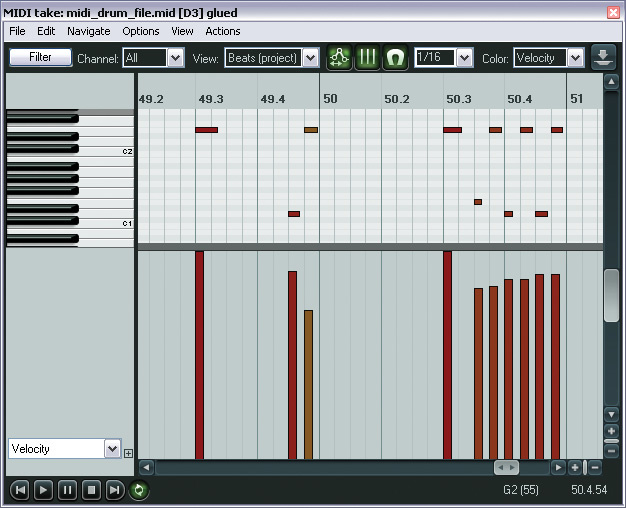
 to the edited version used in Mike's remix.") The 'machine‑gun' feel of Ollie's snare fills at the end of the first loud section can be traced to a lack of velocity shaping. Compare his original MIDI part (upper screen) to the edited version used in Mike's remix.
The 'machine‑gun' feel of Ollie's snare fills at the end of the first loud section can be traced to a lack of velocity shaping. Compare his original MIDI part (upper screen) to the edited version used in Mike's remix.
The bar was clearly set pretty high, then, but things were stacked against 'All The Same' because of how the band had put the project together in the first place. Examining the multitrack files for the programmed drums in more detail in Cockos Reaper, it was clear that insufficient attention to velocity shaping was making them sound mechanical. Because the kick drum on so many commercial rock records is heavily processed (or even replaced with a retriggered sample), the lack of dynamics was less of an issue there, but both the snare and the cymbal parts were definitely coming across unnaturally, despite the use of XLN's very respectable Addictive Drums virtual instrument. An added problem was that Addictive Drums seemed to have been used in mono by mistake, which didn't make things any more impressive.
The main quadruple‑tracked rhythm guitar part was another sticking point, because Ollie had used almost identical sounds for each layer. While layered guitars are certainly par for the course with this kind of production, if you use the same sound for each layer you'll find that the sound quickly becomes stodgy and bland, with very little character. He'd also made the all‑too‑common mistake of overdriving his guitars too far, so the power and harmony of the parts was getting lost in a hash of high-mid frequencies.
 A further problem with the guitar parts (and, indeed, the bass) was that their timing wasn't tight enough against the drums. There are some styles of music where small timing variations between performers are a vital part of the appeal, but this isn't really one of them! If the bass doesn't agree with the drums, the apparent power and momentum of the track as a whole suffers, and the same goes for the rhythm guitars. You'll also find, with guitar parts, that the attack of each chord will never sound punchy unless the different layers agree on when it occurs.
Timing was a concern with the lead vocals too, especially in the choruses, which were again quadruple‑tracked, but tuning was also an issue. No matter how good your mixing chops, you won't be able to get the vocal to blend with the backing track in the way it does on this kind of commercial record if consonants are flamming against each other everywhere. Fairly tight tuning is also characteristic of this mix style, and is partly what enables the smooth, slightly chorused sound that many listeners now expect.
The vocals had been recorded using an SE Electronics SE2200 microphone, which seems to be a very common budget choice these days. What I've noticed over time, though, is that the mic's hard, bright tone tends to suit softer and breathier singing much better than full‑on tonsil‑battering, and this song was a case in point: while the verse and middle‑section vocals were pretty respectable, the mic was unpleasantly emphasising a hard edge that (quite naturally) appeared in Ollie's voice when he shifted his larynx into 'arena' mode!
Overall, then, what was primarily holding back this song wasn't Ollie's mixing as much as his programming, initial sound choices, editing, and vocal‑mic choice — in other words, the production work prior to the mixing stage. Indeed, Andy Wallace's mixing approach is, by all accounts, pretty simple (as was mine for this track once I'd spent some time tackling the underlying production issues). Given that many mixes sent in to SOS also suffer from lack of attention to pre‑mixdown details like this, I'm going to go into a bit more depth about how you might approach preparing a project such as this for mixdown.
Building The Rhythm
 The drum sounds Mike added to the mix came from Sonic Reality's Ocean Way Drums library, running in Native Instruments' Kontakt Player. Mike's settings for the two cymbal sounds can be seen in this screenshot.
The main task with this mix was getting the main riff‑tastic chorus section to work, and given that everything else in the track had to be viewed from the perspective of that, I began work there. First stop: sorting the timing. This is an activity where it's really easy to start playing games with yourself, so it's usually easiest to strip back the whole track to the drums, check that their timing sounds smooth (which doesn't necessarily mean 'locked to the grid' in the case of live drums, although in this case the drums were indeed metronomic), and then reintroduce the other tracks one at a time, checking for timing problems as you go. This means that at each stage you're usually pretty certain which part is responsible if you hear the groove stumbling.
The way I usually start is by locking the bass pretty tightly to the drums, using the song's metric grid as a visual guide. I say 'guide' here advisedly, as even with completely quantised drums you won't get the best subjective timing match by just using your eyes. For a start, it's not uncommon for a specific bass note to look fine even though you're actually hearing it as out of time, and you need to trust your ears over your eyes. However, by the same token, a note that actually looks and sounds in time in isolation can feel like it's early if the preceding notes have been progressively dragging, and vice versa. I also often find that the bass/kick combination drives along better for me if the kick leads just fractionally — although this kind of decision comes down more to personal taste than anything.
It's worth pointing out that after you've done a section of detailed timing edits (for instance, in this case there were almost 50 edits in the bass part for the main riff section), you'll typically have lost a certain amount of perspective on how the timing of the whole section feels, so it's important to listen to the section from the top again and give yourself the opportunity to refine more subtle medium‑term timing drifts that aren't as apparent when you've got individual notes under the microscope.
 The upper screenshot here shows Ollie's original MIDI cymbal part. Although there are some velocity variations, they're fairly random and not really musically related. Mike's reprogramming of the same part can be seen in the lower screenshot. There's still some random variation, but there's also some more structured velocity sculpting to reflect the musical importance of each individual beat.Guitars were next on the surgeon's table, and while the editing process here was fundamentally very similar to that for the bass, there are some additional considerations when dealing with panned double‑tracked parts like these. The first thing is that the timing between the different opposition‑panned guitar layers may need to be even tighter than that between the guitars and the bass/drums, because the brain is extremely sensitive to timing disparities between similar sounds arriving from different directions — even slight flamming between notes/strums can get distracting. The second thing to say is that you'll probably get good results quicker if you deal with micro‑level timing corrections for the guitar layers one at a time. This will be most time‑consuming for the first part, but you can then use the first edited part as a visual reference to speed up editing of the remaining layers. That said, with layered parts, I find it easier to edit each one in turn without hearing the others — I can hear what I'm doing better — and only check their combined effect once they're all edited. At that point I may find the odd strum here and there that needs shifting a little across all parts, but there's rarely very much left to do otherwise.
You'd be well advised to get to know your sequencer's keyboard shortcuts if you're embarking on this kind of work, because it can make an enormous difference to your work rate. On a commercial level, one of the reasons for the rise in importance of professional Pro Tools operators is that this kind of editing is so widespread and these guys have such an instinctive grasp of all the system shortcuts that they can deal with repetitive editing tasks in a tenth of the time it would take mere mortals!
Working With MIDI Drum Parts

The other sections of the song were edited in a similar manner, although they didn't take quite as much work as the chorus and outro, on account of there being fewer layers involved. Without timing issues distracting my attention, I could now concentrate on the sonics. First, I looked at trying to improve the drums, but this wasn't a job for which mix processing was really the answer: giving mono files an impression of stereo is a bodge at the best of times, and it's also very time‑consuming to try to create performance dynamics using mixer/effects automation. I asked Ollie to send me over a MIDI file of his drum parts, so that I could try out some more suitable stereo sounds, and maybe refine the MIDI programming into the bargain.
Once the MIDI files were imported into the project, I opened up Sonic Reality's Ocean Way Drums (running as a VST instrument in Reaper, using Native Instruments' Kontakt Player) and surfed through the sounds until I latched onto a snare and a couple of crash cymbals that sounded like they might work well with the rest of the arrangement. Triggering these sounds from Ollie's MIDI files, I tuned them into line with the song's key and then balanced the different virtual mic signals to add in the right amount of room sound. A lot of people ignore tuning their drums to match the song key, but it can have serious practical advantages. The lower pitched frequencies of a drum are often what give it its sense of power, but they can also be difficult to blend into the mix. If you tune these elements to the track, they'll blend much better, so you can have a more powerful snare with more low-end.
 alongside a number of freeware Simul Analog plug‑ins.") Ollie's main guitar riff sound was built from four takes of DI'd guitar processed with the heavily overdriven settings from Apple Logic's Guitar Amp Pro. To give the sound more edge, Mike mixed in re‑amped versions of the same DI signals, using Native Instruments Guitar Rig 3 (shown) alongside a number of freeware Simul Analog plug‑ins.The remainder of the drum work was to go through the MIDI data and adjust Ollie's velocity programming. For the snare backbeats in the chorus, I left the backbeats fairly consistently at the maximum 127 velocity level (in line with the all‑out rock explosion going on at that point), but made sure that the other hits were scaled down appropriately, to give them a little less prominence and help the groove to work more smoothly. A good example of the effects of these changes can be heard during the snare fills in the loud instrumental section following the chorus vocals. Originally, all those hits had a similar dynamic level and therefore a rigid 'machine gun' feel, whereas a bit of a velocity ramp through each fill immediately made things much more musical. Another trick you can use with a lot of the big multisampled drum sample libraries is to alternate between the supplied left‑ and right‑hand stick hits during fast snare fills, and that helped in this example.
Ollie's main guitar riff sound was built from four takes of DI'd guitar processed with the heavily overdriven settings from Apple Logic's Guitar Amp Pro. To give the sound more edge, Mike mixed in re‑amped versions of the same DI signals, using Native Instruments Guitar Rig 3 (shown) alongside a number of freeware Simul Analog plug‑ins.The remainder of the drum work was to go through the MIDI data and adjust Ollie's velocity programming. For the snare backbeats in the chorus, I left the backbeats fairly consistently at the maximum 127 velocity level (in line with the all‑out rock explosion going on at that point), but made sure that the other hits were scaled down appropriately, to give them a little less prominence and help the groove to work more smoothly. A good example of the effects of these changes can be heard during the snare fills in the loud instrumental section following the chorus vocals. Originally, all those hits had a similar dynamic level and therefore a rigid 'machine gun' feel, whereas a bit of a velocity ramp through each fill immediately made things much more musical. Another trick you can use with a lot of the big multisampled drum sample libraries is to alternate between the supplied left‑ and right‑hand stick hits during fast snare fills, and that helped in this example.
For the cymbals, I noticed that although there was a certain amount of velocity variation in Ollie's original programming, this variation wasn't necessarily supporting the music. While random velocity variations are one characteristic aspect of human performance, much more important are the instinctive and intentional musical stresses. For instance, it's usually fairly natural to put most stress on the main downbeat of a 4/4 bar, a little less on beat three, a little less on beats two and four, and even less on successively smaller subdivisions of the main beats. However, while this can be a useful rule of thumb, you do need to listen to the track and think where the musical stresses are in context. In this case, each of the main guitar onslaught's three eight‑bar subsections had a slightly different stress pattern: more stress on beat four in the first subsection; a fairly regular stress pattern underneath the vocals; and increased weight on beats two and four during the third subsection.
I'm usually a bit hesitant to completely replace someone's drum parts, because there's usually some aspect of the original sound that appealed in the first place, so I also asked Ollie to re‑bounce stereo versions of his own snare and cymbal parts for layering behind Ocean Way Drums. With Ollie's parts mixed in at a lower level, I was able to retain more of a connection to his original sound, although I did find that I much preferred the attack of the Ocean Way Drums snare, so I heavily limited Ollie's snare to extract just its sustain.
Guitars & Bass
 Probably the most important thing Mike did to the lead vocals was edit them for tuning and timing. This made the lyrics more intelligible, reduced apparent sibilance levels, and blended the vocals better with the backing track, even before any mix processing had been carried out.
A similar layering approach also paid off when trying to breathe life into the overdriven guitar parts, because Ollie was able to provide me not only with his amp‑modelled tracks, but also with the DI signals from which he created them. This meant that I could effectively re‑amp his guitars to improve the sound in a way that would have been next to impossible using mixdown processing. However, again I wanted to keep the essence of Ollie's original sound intact, so I started from his existing quadruple‑tracked sound and built up from there.
In the first instance, I wanted to increase the sense of pitch, as well as giving the sound some edge through the hash. For this I turned to a couple of the Fender amp models (Tweed and Tweedman) in Native Instruments' Guitar Rig 3, being careful to keep the gain fairly restrained, to avoid anything too ragged. I'm no guitarist myself, so I can't say I had any real plot while fiddling with the amp controls, but the main thing is just to concentrate on how the resultant sound complements what's already there.
While the additional Guitar Rig 3 parts helped the overall tone, I still felt a need for some extra fullness and width, so decided to add in another double‑tracked re‑amp layer for that purpose. I've found that different layers of amp‑modelled guitar seem to work better together when you don't use the same modelling for them all, so rather than firing up Guitar Rig 3 again, I pulled out some handy freeware plug‑ins from Simul Analog instead: the Oberheim PS1 phaser, the Boss DS1 distortion, and the amp‑modelling Rednef Twin. (Do you think that last one might have been reverse engineered?) A bit more blind tweaking of controls and I had something that fitted the bill.
For the bass, I was happy to work with the amp‑modelled track that Ollie had supplied, although I did compress it heavily, to keep it really solid in the track against the wall of guitars, using a combination of 3‑6dB slower 2:1 compression from Bootsy's Density and faster 8:1 compression from Stillwell Audio's The Rocket. The latter plug‑in's fast time-constants can really distort bass instruments if you're not careful, and while this isn't necessary a bad thing in some cases, you should probably still tread carefully. As I frequently do, I also layered in a sub‑bass tone using Reaper's simple built‑in Reasynth instrument to gently fill out the lower octaves of the mix and make it feel a little more 'hi‑fi'. What was tricky, though, was deciding how much of the mixdown's low-mid range was going to come from the bass part, and how much from the guitars.
Although I tend instinctively to rely more on the bass for low end in my mixes in general, high‑pass filtering any conflicting guitar low frequencies out of the way, some careful comparison of my mix in progress with the Biffy Clyro album indicated that a fuller low end to the guitar sound was going to be more appropriate, spreading the low-mid range across the stereo image and increasing the sense of size during the chorus sections. However, there simply wasn't enough room in the mix for the guitars and bass to let it all hang out in this frequency region: it just made the overall mix tone muddy. So what I ended up doing was filtering out less LF from the guitar parts and then cutting the bass by a couple of decibels at both 220Hz and 360Hz, using Universal Audio's Neve 1073 EQ plug‑in for their UAD1 and UAD2 DSP cards.
Vocals
 Ollie had tracked his vocals through an SE Electronics SE2200A microphone, and while this mic's hard sound suited the softer sections of the track, some notes in the louder sections came across too harshly. Because static EQ wouldn't solve this problem, Mike turned to Platinumears' IQ4 dynamic EQ plug‑in, compressing with two narrow peaking bands at the most aggressive frequencies.
Before starting timing edits for the vocal parts, I passed them all through Celemony Melodyne to tighten up the tuning. Tuning makes a big difference to how a vocal sits in the mix, but you have to be careful not to take it too far, or you'll lose all the emotional character of the voice. This was especially important in this song, as a certain vagueness of tuning (in the verses, in particular) contributed considerably to the expression of the lyric. I use Melodyne for most of my vocal pitch‑correction these days, and this lets you adjust the average pitch of any note without otherwise changing the degree of pitch variation within the note, that makes it much easier to get natural‑sounding results than when trying to use any kind of automatic real‑time processing.
The chorus vocals could afford to be tightly pitched most of the time, because I wanted them to have that characteristic close‑double‑tracked sound which doesn't take up much space in the mix, so most notes found themselves adjusted to some extent. However, for the verses, and especially the middle section, I reverted to my more usual 'hunter killer' method, correcting only the bare minimum of notes required to keep the tuning secure. In any given phrase, you'll usually find that some notes are more important to the sense of tuning than others, so if you focus on those you'll find that the less important pitch vagaries on other notes keep a whiff of realism about the performance as a whole. The more uncorrected notes I feel I can get away with in an exposed lead vocal, the happier I am, and although there are parts of the lead vocal in my remix that are clearly still technically out of tune, I'd not have left them that way if I didn't feel that they improved the emotional impact.
Timing correction also played an important role for the vocals, especially during the choruses, but there wasn't much difference in my approach compared with when I was editing the guitars: I worked through one vocal layer at a time, before combining them and making final adjustments. The moment the vocals were in tune and in time, they blended better with each other and with the mix. Also, although I'd initially suspected that sibilance might be a problem, this sorted itself out once it was tidied across all the parts.
The Mix That Wasn't
After the editing work, there wasn't much to this mix beyond what I've talked about already. A dollop of 1.6kHz boost on the kick was useful in approaching the Andy Wallace sound, while some parallel compression from a 4:1‑ratio instance of The Rocket did its usual job of gluing the drum kit as a whole together and increasing sustain. Most of the guitar parts were pretty straightforward too, although I found myself using more low‑pass filtering than I would normally, to keep the upper frequencies clear for the vocals, snare and cymbals.
The verse and chorus vocals were processed separately. For the former, I turned to the UAD emulation of the LA3A, which provides lots of smooth dynamics control, but with a clearer tone than that of its more famous valve sibling, the LA2A. For the choruses, I used The Rocket again, for its general attitude and fast time-constants, although with hindsight something less edgy might have worked better, because I later found myself fighting with the harshness of the SE2200's sound, and I reckon that the choice of compressor probably exacerbated the situation a bit. The difficulty I had was that although I could fairly easily find the problem frequencies in the vocal recording (3.8kHz and 5.4kHz), the singing only became unduly harsh on certain notes, so simple EQ dips were not the answer. My solution was to dial up the Platinumears IQ4 dynamic EQ plug‑in to target these frequency areas only when they got beyond a certain level. Each EQ band in IQ4 can act a bit like a compressor, so you can set a threshold beyond which the EQ begins to reduce its gain. The trick in my case was to set the thresholds of my two EQ bands so that gain reduction was triggered mostly during harsh‑sounding notes. I don't often resort to this kind of processor, partly because it can be fiddly to set up, but on occasion the precision effects of dynamic EQ can be just what the doctor ordered.
Fix It Before The Mix
A lot of people working on their own music seem to think that the record production process proceeds straight from tracking to mixing, but in reality most commercial projects involve a lot of editing and processing to transform the raw recordings into something that is mix‑ready, whether this intermediary stage constitutes comping, rearrangement, timing correction, sound replacement, retuning, or a mixture of them all. This month's remix took considerably more time to edit than it did to mix, and while most tracks sent in to Mix Rescue don't need quite this level of work, it's fair to say that a lack of this kind of groundwork is part of the problem with practically every Mix Rescue I've seen. So if you're struggling to get the mix sound you're after, try spending a bit more time honing your editing skills, and you may find that a bundle of mix problems vanish in the process.
Rescued This Month

This month's song, 'All The Same' was co‑written by Ollie Wright (vocals, guitars and programming) and Brian Leftley (bass), going under the name North To Alaska. When they sent their original mix to us, they said they had been struggling to avoid parts getting lost in the mix and had been battling to 'sit' the vocals nicely without too much compression. They also felt that the drum sound was a bit robotic and dry, and that their general live dynamics weren't really coming across.
Reader Reaction
Ollie Wright: "I really, really like the new mix! It sounds 10 times as big as the original, and everything's a lot crisper and tighter. My mix was lacking the punch and clarity I wanted, but now the track sounds more solid, with a much bigger and more epic ending than before — it really finishes the track off nicely! The first verse builds more quietly too, which has helped the dynamics out, so we've decided to adopt this change live as well.
"The vocals now sit nicely and are audible without standing out, which is exactly what I was hoping for, and the guitars sound less muddy, while still packing a real punch when the main riff kicks in. The drums really fit now too, and have that raw edge I was hoping for, so I now have a good idea of how I can bring them to life with my next mix. It's such an eye-opener to see what I could eventually achieve with my mixes.”
Mix Rescue On‑line
As usual, we've placed a number of audio files on the SOS web site at /sos/dec09/articles/mixrescueaudio.htm so that you can hear how things sounded before and after Mike had done his remix. The MP3s should give you a feel for the changes, but you can download the WAV files for more detailed comparison in your own DAW.