DP's latest version brings the ability to change the look and feel of the program. We find out how, and explore other additions in v7.2
 From the neat and tidy 'MOtools' to the futuristic 'Plasma', DP7.2's Themes feature lets you choose a look that suits you.
There's long been plenty of heated debate about the look and feel of DP, not least since its make‑over back in the days of DP6. Users complained that the predominantly bright, light‑grey windows are tough on the eye, especially at the end of long sessions into the small hours. A few complained that the whole environment was too boring! This led to a thriving interest and market in interface hacks, mostly centred around commercial 'mods' available from www.ampguimods.com. It all had a bit of an underworld vibe and was never likely to get the blessing of MOTU, but there were many happy customers who felt their DP experience was improved.
Clearly MOTU were well aware of all this, because in DP7.2 we have 'Themes' — essentially a built‑in user‑interface modification scheme that offers control over basic colour, as well as a way to swap out graphical elements of the interface. There's now a dedicated page for it in the Preferences window, and there you're offered a list of Theme presets. Click on one, then click the Choose button, and DP may be literally transformed before your eyes. You can make two simple modifications to each preset: to its Meter colour, and to the colour used for selected data. In each case, there are three straightforward, self‑explanatory options.
If you still can't find a result you're happy with, though, you can go further. First of all, you could use a third‑party or custom theme, and designers such as www.ampguimods.com that I mentioned before now offer their own DP7.2 themes. To install these, click the Open [Themes Folder] button in the Preferences window, or go directly to /Library/Application Support/MOTU/Digital Performer/ Themes in your Mac's Finder, and place your new theme's package there. Restart DP and it should be available. However, if you're of a fearless, experimental inclination, and handy with an image‑editing application, you could also try a bit of DIY.
In that same Themes folder, you can open up the themes packages (or, even better, duplicates of them that you've made, so you don't mess up the originals) by right‑clicking on them and choosing 'Show Package Contents'. Drill down into Contents/Resources and you'll discover that DP's interface elements are stored as PNG files, and it's pretty easy to modify or replace elements within them to really customise your own DP environment.
Range Rover
DP's automation is a wonderful thing, and the different operation modes available for it add to its flexibility. In DP7, there are four new ones — Range Touch, Range Latch, Range Trim Touch and Range Trim Latch — and, like the others, they're most visible and most easily accessed in the Mixing Board, where a different mode can be selected for each track. If you need a recap of how DP automation works, check out /sos/jun05/articles/performernotes.htm.
What the new Range modes add is the rather useful possibility of resetting or adjusting automation values within a specified time range. That makes them a fast, easy, hands‑on alternative to the fiddly process of deleting or modifying automation data graphically with the mouse, in the Sequence Editor.
Here's a typical scenario. You've got a heavily automated mix, and are happy with most of it, but you want to try out some completely different levels and pans for a group of tracks, in one small section of the song.
1. Make a time‑range selection for the section and tracks you want to work on. A quick way is to simply drag in the time ruler, making a selection on all tracks.
2. In the Mixing Board, record‑enable automation for the tracks you want to remix, and set their automation modes to Range Latch.
3. Start playback within or a little way ahead of the region specified in step 1.
4. Still in the Mixing Board, start setting the new levels and pan positions. As you do so, new, static automation values are written for the time range you selected, regardless of whether you're actually in it, and instantly replacing any similar automation that was there before.
5. If you want more attempts to really refine your mix, just place a Memory Cycle loop around the same section. A really quick way is to choose 'Set to Selection Bounds' in the small Memory Cycle pop‑up menu next to the 'start' and 'stop' values in the Control Panel. Then start playback once more and keep tweaking until you're happy.
The difference between Range Latch and Range Touch is subtle. In Range Latch mode, automated faders or knobs stay still as soon as you begin to adjust them during an automation record pass. Data outside your selected time range won't be changed, but you can 'zone in' on your new settings in the run-up to it. In Range Touch mode, faders and knobs always track existing automation, other than when you're actively adjusting them, or when the playback wiper is within your selected range. Try both out to see which you like the best.
As for the Range Trim modes, these allow you to tweak the values of existing automation up or down within the selected time range. Again, it's a really nice alternative to doing this graphically, with the mouse.
If you really get into this new feature, it's worth noting that you can define the time range in several ways. Making a time‑range selection on multiple tracks, as I suggested above, is good, clear way of doing it. But in the absence of any selected data or a time range, DP will use the Memory Cycle region itself. That could save a step or two, depending on how you like to work.
Keep It In Context
 Contextual menus, implemented throughout DP 7.2, are a brilliant workflow enhancement — and not before time!
For many years, DP has been one of a very small group of applications that didn't use contextual menus, those handy pop‑ups that appear when you right‑click your mouse, and which offer a streamlined range of commands suited to whatever you happen to be currently doing. Well, no longer, because with version 7.2 contextual menus in DP are a reality. It's a great enhancement — for example, right‑click in or below the track list in the Tracks Overview and you get a menu that includes options to Add, Duplicate, Move or Delete tracks, or open individual tracks in different editors. Right‑click on a selected soundbite in the Sequence Editor and you can quickly apply any number of Edit and Region menu commands. And that's just the tip of the iceberg.
There are a couple of little things to watch for, though. First, you only need to click near selected MIDI notes, a little above or below them, to bring up their contextual menu. Don't waste time trying to be super‑accurate with your mouse and clicking precisely on the events themselves. Second, if you're holding out against the 21st century and still have a single‑button mouse, clicking it while holding down the Control key will do the same thing as a right‑click. But watch out: there are certain data‑manipulation techniques that themselves utilise the Control key, an example being 'throwing' soundbites left or right in the Sequence Editor (which you do by control‑dragging them). When there's any potential conflict, the old, long‑standing behaviour is prioritised, so in this particular instance, control‑clicking will never give you a contextual menu.
MOTU On The Phone

In July's DP workshop, I described how to set up DP7 to use the AC7 control-surface application for iOS devices. Soon after, MOTU went one better and released their own dedicated app, DP Control, which has the distinct advantage of being free, and much easier to use. To try it:
• First download the app for your iPhone, iPod Touch or iPad, from the App Store. Search for it in iTunes, or use the link that's currently up at www.motu.com.
• Next, both your DP Mac and your iOS device must be connected to the same Wi-Fi network.
• In DP7, visit the Setup menu, and choose 'Control Surface Setup...'. Use the little '+' button to add a driver, and choose Open Sound Control from its pop-up menu. Then simply OK the dialogue box to dismiss it.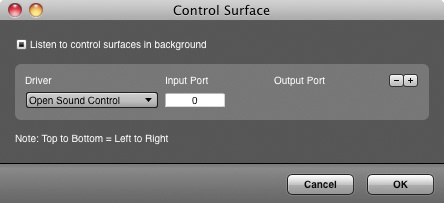
• On your iOS device, launch DP Control. It might all work beautifully, straight off. If not, go into DP Control's Settings view, and use the Change Connection button to set the link to your DP Mac.
As soon as the connection is made, DP Control is a beautiful thing, letting you work from vocal booths or on remote monitoring systems. What's more, the mixer allows true multi‑touch adjustment of faders and pans. A glimpse of the touchscreen future!
Tiny Tricks
Here's a trio of other great little DP7 enhancements to try on your next project:
• Scroll Play: Use your mouse's scroll‑wheel (or other scrolling function) to adjust Mixing Board parameters by pointing to them and then scrolling. Just select 'Enable Mouse Wheel for Sliders and Knobs' in the Mixing Board mini‑menu.
• New Seeker: If you want to check a DP keyboard shortcut, or quickly define a new one for a particular command, use the Command Window's new live search field. Just type a command name there and every associated shortcut is automatically shortlisted.
• Pitch Perfect: Using pitch automation on audio that was not tuned to A=440Hz? Now you can reset the reference pitch for middle‑A in the Preferences windows' Data Display pane.