Whether you're an experienced or a novice Logic user, going back to the beginning might show you a thing or two.
The sheer scope of Logic can make it daunting for the novice user, and even for the DAW ace there may be quite fundamental aspects of the program that remain unclear. Consequently, we thought we'd take time out this month to recap some of the basics.
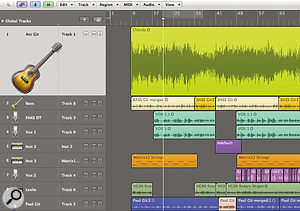
 In much the same way as any other DAW, Logic uses several different track types (Audio, Software Instrument and External MIDI) and produces 'Regions' alongside them as you record.If you're a Logic novice, you've bought Logic and fired it up. You've got a good idea of what it does, but now, close up, it's hard to know where to start. Are there some decisions to make and settings to change first? And where do you find everything?
On The Menu
There are two types of menu in Logic: the main menus and the local menus. The main menus are at the top of the screen, and here you'll find items relating to the whole project, such as opening and saving files, window selection and the misleadingly named 'Undo History'. Then, in the Arrange and Editor pages, there are local menus where you will find options relating to the function of each particular window; for example, settings related to tracks and regions on the Arrange page and those related to graphics and music fonts on the Score page — you get the picture! We'll look at some quicker ways to access these in a minute.
Single File!
When you start Logic up and select File / New, you'll be offered a variety of templates — basically, songs that are pre‑configured for a particular purpose. The ones you get with Logic are designed to demonstrate various features of the application and not generally intended as a starting point for a song. What you need for your new masterpiece is 'Empty Project'. However, you'll probably want to make your own custom templates with a few favourite instruments and a couple of audio tracks ready to record a quick guitar and vocal, for example. (To do this, go to File / Save as Template). Like Microsoft Word '.dot' files, templates are protected from overwriting.
If you've used earlier versions of Logic Pro or Express and have simply carried over your default song, you could be inviting problems, due to differences in the way the mixer now works, so I strongly recommend you create a new template to take advantage of the newest features. Try to store the 'cleanest' template you can, as it can be very frustrating having to weed out sends, inserts and especially automation, which were great on one project, but could make their presence felt in a baffling way as you start mixing.
Logic will ask you where you want to store this song, and it will default to the Logic folder in your home Music folder on your startup disk. This may not be the ideal place, and here's why…
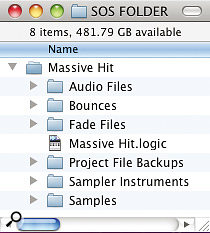
Back in the days when no one had heard of DAWs, an early ancestor of Logic emerged, living entirely on a diet of MIDI. He and those like him were called sequencers, as all they did was put things in sequence. This is essentially what your Logic song still does, although now it has the accumulated baggage of audio files, software instruments and effects settings. Similarly, sampler instruments need their family of samples to go with them wherever they go, so these need to be kept together. We thus end up with a raggle‑taggle band of mutually dependent files that make up our Logic project. The whole household is typically made up of the following:
 Making sure that everything is saved in the correct place is important, as your Logic project requires all manner of files to be saved alongside it. With every song you'll find accompanying audio files, bounces and fade files, for example, that will need to be accessed by the project file.
- The Logic song
- Audio files
- Bounces
- Fade files
- Project file backups
- Sampler instruments
- Samples
- Undo data
You might also add to that a movie, lyrics, and anything else that the obsessive compulsive inside you tells you to keep in a safe place.
With much of this needing to stream quite rapidly from the disk, it makes sense, if you can, to designate another disk as a work disk, where you are not competing with the computer's own system for disk access. After that, Logic will look after its own filing while you get on with the music.
Tracks & Channels
There are three types of track in Logic:
- Audio: For live sounds, whether through a mic or plugged into the interface. This is also what you want for loops.
- Software Instrument: This gives you a visible, editable track of MIDI data, while the resulting sound — from Logic's synths, organs, Ultrabeat and EXS24 sampler — is treated in the same way as an audio track.
- External MIDI: Although this will address your external synths and racks, it doesn't have any provision for returning their output into Logic's mixer. If you want to use an external keyboard or rack sound source, you should use a software instrument track and, from the list of instruments, select External Instrument. A little dialogue box will ask you for the MIDI number of your instrument and which input channels of your audio interface you have plugged it into. This turns it into a hybrid track sending MIDI and streaming the audio from your instrument into the Logic mixer.
 You can set up an External MIDI instrument to behave in a similar way to a Software Instrument.
In Logic's mixer you can have five types of channel strip. As well as the aforementioned inputs — Audio, Software Instrument and MIDI channel strips — there are Auxes and Outputs. Auxes are used as buses for sub‑grouping things that you might want to treat as one, like backing vocals or a drum kit, or for hosting effects, such as reverb and delay, that you might want to apply to several things in different proportions (for example, having one instance of Space Designer on an aux that you send to from lots of channels is more efficient than having lots of instances of Space Designer on individual channels). Just click on a send and select a bus from the pop‑up menu to create a ready‑configured aux. In the same way, if you select a new output on any channel strip, that output will magically appear at the right‑hand end of the mixer.
It's worth remembering that although the channel-strip meters show input signal levels, the fader controls what you hear out of Logic, not the record level. You have to set that with the knob on your interface (or mixer, if you're using one.)
You will also have seen the inscrutable 'Master' fader. You only need this when you are mixing in surround, so you can just click the 'Master' button at the top of the mixer to get it out of the way until then.
The Inspector
On the left of the Arrange page is the Inspector. Although it takes up valuable space on your screen, it has some handy shortcut features. The two faders at the bottom are for the track and the aux or output that it's routed to, so a lot of the time you don't need to open the mixer. If you click on a send button, the second fader turns into that send's destination, so you can quickly change or adjust the relevant effect without leaving the Arrange page. At the top left‑hand corner of the toolbar is the Inspector button to toggle the Inspector should you need to reclaim that extra bit of space.
Once you've created your channel strip, you can select a software instrument from the pop‑up list in the I/O panels just above the fader. Or, for an audio channel, set the input and you can modify that 'raw' sound by inserting effects. Alternatively, by clicking on the 'Setting' button on the channel strip, you can avail yourself of ready‑made channel strip settings. To get you started, Apple have included many possible combinations of instruments and effects. You can store, recall, copy and paste these and, perhaps more usefully, store your own channel strip settings here.
With tracks installed, you can go for a take. As you record, a block appears on the track. This is a known as a region and can represent audio or MIDI data. You can copy and move these wherever you like, although a MIDI region won't play in an audio track, and vice‑versa. You can make an alias of it (Alt‑Shift‑drag), which will reflect any changes you make to the original, or make it loop (tick the box in the Inspector, or mouse up to the top right‑hand corner of the region and, when the cursor changes to a circular arrow, drag to the right). This loop can be any length; it doesn't have to be a multiple of the length of the original.
Tools Of The Trade
The tools are pretty self‑explanatory, but the 'Swiss Army Knife' of them all is the Marquee tool. Just as in any graphics application, dragging with the marquee tool defines a free‑sized area (covering multiple regions, if you like) for further operations. You can now do a variety of things with the selected area: set locators, play just this area, punch‑in record, mute, cut and copy, along with a thousand (or so) more operations.
If zooming is something you like to do (and I think you do), note that if you drag out an area ('rubber‑banding' it) while holding Control‑Alt, that area is enlarged to fill the screen. Holding Control‑Alt and clicking zooms you back out to where you started.
Help Yourself!
A lot of new user enquiries are what those in the support business call 'RTFM' issues, whose chief characteristic is that the solution can be easily be found by consulting the included documentation. But since Apple have commendably adopted a greener packaging strategy, Logic no longer ships with a bulky tome of instructions.
You do still get one, though. It's there under the Help menu. Although this won't help you if what you need to learn is how to launch Logic itself, for other enquiries it is invaluable and offers a fast‑paced introduction, as well as dealing with the instruments and effects in detail. At the risk of appearing pedantic (moi?), I suggest that a few hours exploring here will save weeks of your time later. It's great, too, to have this searchable document at hand for when problems do arise. The Help menu also directs you to Apple's discussions on the web, where you can share your frustrations (and solutions) with others. It's well worth making friends with the very knowledgeable and generous community at the Logic Users' Group (www.logic‑users‑group.com).
Save & Prosper
You can set Logic to keep the previously saved copies of your song — up to 100 of them (look in Preferences / General) — just in case you discover some earlier blunder and need to scuttle back. This is very reassuring, as is the Undo History, which goes back to when you launched the song. You can't undo selectively, however, only return to a previous snapshot state, which might also involve undoing some actions that you would otherwise like to keep. Some audio functions are not undoable, though, and since you're actually altering the original audio file, it can be worth your while creating a copy to work on as you perform a destructive function. To do this:
 For extra backup you can convert specific regions to audio files. This is a good idea when you're about to perform a destructive function, as it gives the option of restoring exactly what you were working on, rather than using the Undo function.
1. Cut out an area from the audio region you want to change.
2. Select Audio / Convert Regions to New Audio Files.
3. If it doesn't sound right, you can use the Undo History to go back to that blissful state before you began the whole sorry process.
I have found it useful to develop a nervous left hand that hits Command‑S whenever I make any changes — every five or 10 seconds, I should say — as trying to retrace your steps since the last save, following a crash or freeze, always leaves you feeling that it's not as good as you had it before.
Settling In
The extent to which you can customise Logic can be quite daunting, but that shouldn't prevent you from trying a few adjustments to your working environment. Key commands and screensets can be a good starting point.  Logic's user interface is highly customisable. From small actions, such as is shown here, to completely changing what appears in the toolbar, you can really make yourself at home!
It can be very slow and long-winded to use the mouse and menus for every operation, and while you will have quickly found the key commands for the transport controls, there are plenty of reasons to explore the Aladdin's cave that is the key commands page (Alt‑K). You'll find commands for things that you didn't know Logic could do, even for things that you can't imagine a need for. But you'll also find some things that delight you.
Note that you can select commands by 'key label' or 'key position'. This means that you could have, for example, numbers 1-0 at the top of the keyboard to take you to Markers, while the numbers on the number pad perform a different function: recalling screensets, for example. I also have a key for dropping markers on the fly at important song points, giving me a snappy way to navigate the song. If you want to move a marker, or drag it out of the timeline entirely, you will need to hold down Alt first.
One of my favourite key commands is 'Play From Selection', but your method of working will determine exactly which commands you find most useful. The Toolbar at the top of the Arrange page is a place to keep buttons of your favourite functions to hand. Click and hold in the Toolbar area, and select Customise Toolbar from the menu that falls open under your enquiring touch.
You probably know that screensets enable you to recall the size of various pages in a layout that you find useful. If you're working with limited screen space (and who isn't?), you can easily flip between different views, or instantly tidy up your workspace after you've been editing or browsing lists and libraries.
But that's not all: at the top right‑hand corner of the Arrange and Editor pages lie two tool icons. These are the default left‑click and Command‑click tools and, at Preferences / Editing, you can choose to add a third for right‑click. There is a different selection for each editor too. Choose the ones you use most in each page and then save the screenset so that they come back next time you need them.
There is an Auto Zoom button in the toolbar that zooms just your selected track, saving both space and eyestrain. Click and hold the bottom left of the track header (where the open hand changes to a pointing hand) to adjust the amount of zoom.
Another clutter buster is to limit to just one the number of effects windows open at any one time. Open an effects window and click on the link icon in the top left‑hand corner — it will glow purple — and as you select another effect, the window of the first one will dutifully vanish. Clicking the link icon in the top of an effects window will mean that, when you open a second effects window, the first will close, thereby saving valuable space on your screen.
Ready, Set...
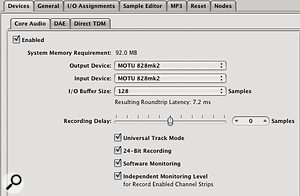
As for setting up your Logic system, you will, for the most part, be quite alright getting started with the default values. However, one that you might want to check is the I/O buffer size. This is a bit like the amount of cash that banks are required to hold against the risk of liquidation, in that if the buffer is too low, you risk instability problems! Playback also might stutter, or you could start to hear clicks and pops. If the buffer is too high, you get problems with latency (the delay you experience when recording, between the live signal and what you hear back once it's passed through Logic). Ideally you would have the buffer lower when recording and higher when mixing. Realistically, though, you want to just set it and forget it. Go to Logic (Pro or Express) / Preferences / Audio / Devices / Core Audio and try a setting of 128. You can move up to 256 if you start to notice pops and clicks.  If you're suffering latency problems, you might try lowering your buffer settings. Ideally, the buffer would be lower for recording and higher for mixing, but setting it at 128 is a good start and you might be able to just leave it there. If you start to hear clicks and pops, try moving it up to 256.
A few other settings may catch your eye on this page, beneath the Buffer Size drop‑down menu:
- Universal Mode: Using this means that you can have stereo channels instead of two linked monos.
- 24‑bit recording: Why wouldn't you?
- Software monitoring: Leave this ticked unless latency is driving you mad, in which case you will have to rig up an alternative way of monitoring your live input with the already recorded track.
Settings in Preferences apply to Logic universally, but similar controls may be found in File / Project settings, which are saved with and apply only to your current project. These include whether to save used Sampler Instruments and their samples with the project (which you only need to do if you're going to work on it elsewhere), the amount of count‑in before record, and the sample rate for recording. For most of us in the UK, 44.1kHz is fine, but you can up this as far as 192kHz if you have disk space to spare and the marginal quality difference is important to you.
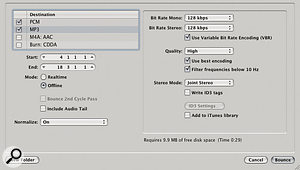
Note that this is only for Logic's internal use, and when you bounce to create your master, other considerations apply: When bouncing your tracks, tick MP3 in the Destination list to create an MP3 file alongside any other format you're creating.
- Output format: What you output depends on what you or your client are going to do with the mix. If it's going to CD, 16‑bit WAV or AIFF at 44.1kHz is what you need; otherwise go for 24-bit. TV broadcasters like 48kHz, and WAVs have a time stamp so can be easily laid into a soundtrack edit. Also, choose interleaved unless you're sending the mix to a Pro Tools user.
- MP3: If you want an MP3 to send to a friend, Logic will bosh you one out at the same time if you check the box. A setting of 128 to 160 kbps is a reasonable trade-off between compact file size and unlistenability.
Logic has grown into a hugely versatile and immensely configurable application that seems to reflect each individual user's personality. We all have to discover our own way, but if you have previously encountered mists of confusion, I hope you can now discern a track that might bring you nearer your own personal Nirvana.
