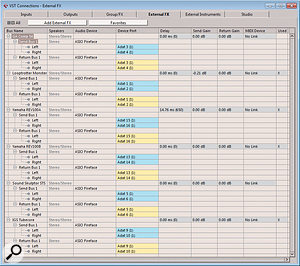
 1: Cubase's External FX plug-ins are specified in the VST Connections Window.
I've compared a lot of analogue modelling plug-ins with equivalent outboard gear recently, and while there's no doubt that some software is capable of great results, and offers superb value for money, it's plain to me that there's still a place for decent outboard in a studio. For example, even the best models from the likes of Waves, Softube and UA seem to me to be incapable of replicating precisely the complex behaviour of gear that uses audio transformers, particularly in the case of compressors and limiters that the user deliberately pushes hard for effect.
Back in SOS May 2010, I wrote an article (/sos/may10/articles/hybrid.htm) about so-called 'hybrid studios' which combine software and outboard gear, and that's well worth a read if you're new to the idea of using hardware with a computer recording system. As I explained in that article, different DAWs offer different advantages and disadvantages when working with outboard gear. Arguably, Cubase has more features dedicated to this purpose than most DAWs, but it also has some frustrating idiosyncrasies. In this article, then, I'll explore how best to integrate your preamps and outboard effects and processors in your Cubase projects, for both recording and mixing applications.
Outboard In
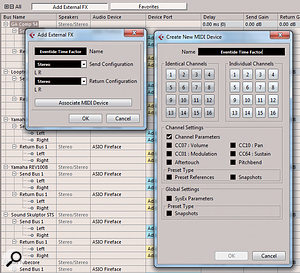
 2: Creating a new External FX plug-in and associated MIDI Device.
Let's start with hooking up your gear and establishing the routing in Cubase. You'll need a multi-I/O audio interface — one with enough inputs and outputs to hook up your outboard and still have sufficient I/O left over to connect your microphones, other input sources, and speakers.
Connect the inputs and outputs of each piece of outboard to outputs and inputs on your interface. In Cubase, go to Devices/VST Connections and select the External FX tab. There are no External FX listed until you create one by clicking on the '+' symbol. Then name the new External FX with a description of the processor in question, and choose whether it's to be a mono or stereo unit. Finally, assign the I/O from the audio interface to which you've hooked up your gear. Next time you go to select an insert plug-in, your gear will be available in the drop-down list under Steinberg/External Plug-ins. You can't reassign the external plug-ins to another folder, as you can with conventional VST effects.
Obviously, you can only use one instance of each External FX plug-in. Frustratingly, though, if you have a stereo/dual mono compressor, you have to choose whether you're going to use it as stereo plug-in, or as two separate mono plug-ins: you can't assign the physical I/O to more than one external plug-in, so you don't have the option of creating both. Or rather, you could create two different versions, but you'll have to redefine the I/O settings each time you want to use the plug-in. There's no option in Cubase to use two mono plug-ins in parallel on a single stereo channel.
MIDI Control
 3: You might sometimes need to specify a negative latency, in which case you'll need to create a manual offset in the track's Inspector window. If you then remove the plug-in, remember to change this back to zero!
You don't need to use MIDI with external processors and effects at all, but some units, particularly reverbs and delays, are automatable to some degree via MIDI. There's provision for creating a dedicated MIDI device (screen 2) when you specify an external effect in Cubase, as there is when creating an external instrument plug-in. You just click on 'Associate MIDI Device' when you create an effect. Despite the terminology used, the MIDI device you create doesn't really seem to be 'associated' with the effect, and you'll need to create a dedicated MIDI track where you can select the device. While I'd love to see the ability to program automation data from the audio channel, it's still very useful to be able to create the external MIDI device when specifying your effect's I/O.
Globalism
External FX and instruments are classed by Cubase as 'global', which means they're loaded for every project. The audio I/O for recording and playback, on the other hand, are 'local' settings, stored with each project. That makes sense in theory, but it doesn't work in practice! If you select an input or output for recording or playback that's already occupied by an external effect, the effect will lose its I/O settings, and they'll require resetting manually. Any I/O that are already in use are highlighted in the drop-down list when selecting, but it's still easy to overwrite your 'global' external effects. For example, I've had this happen when opening someone else's project where they'd used the same audio interface as me, but had defined the I/O differently.
Both External FX and External Instruments (another topic) can be saved as 'favourites', for future recall, but these presets only store the name and the latency (see later), and not the I/O settings! That's potentially a lot of resetting if you have several pieces of gear, so when you define External FX, it's a good idea to take a screen grab of the I/O settings you used.
Another consequence of this overriding of I/O settings is that you'll have to decide in advance whether to hook any preamps or channel strips up as insert effects, or simply to your input channels. That could cause confusion if you want the option to use them both as recording front ends and as insert processors. I'd recommend treating them as insert effects. When recording, you simply insert the plug-in on the relevant input channel (not the audio channel you're recording onto, as the signal will be monitored but not recorded). You can then unload the plug-in and load it again later where required in the mix.
When I shared my concerns about the limitations of External FX routing, Steinberg agreed the situation wasn't ideal, and said they'd rationalise the External FX system in a future update (probably in Cubase 7).
Latency Compensation
 4: Once created, to use an External FX plug-ins, click on the desired insert slot and go to the Steinberg/External FX submenu. Any external plug-ins already in use will be greyed out and unselectable.
With everything hooked up, you'll need Cubase to compensate for the latency introduced by the round-trip from Cubase, through your audio interface and gear, and back via the interface into Cubase. Most outboard won't introduce significant latency, because it's designed to operate in real time, and all-analogue gear will introduce no latency at all. However, your interface's converters and any USB or Firewire connection inevitably introduce a small delay, and if you don't compensate for that there can be audible problems. If you're performing parallel compression on a vocal part, for example, with a dry part remaining in Cubase and a copy running out through your compressor, latency will manifest itself as a phasey smearing of the sound. Similarly, a small delay on drum overheads in relation to the snare or kick could cause nasty-sounding phasing that robs your drums of impact and sucks the life out of your sound.
With standard VST plug-ins, Cubase's automatic plug-in delay compensation deals with this very neatly: the plug-in declares its latency to Cubase, and Cubase introduces the necessary offsets to compensate. With External FX, Cubase has no way of knowing what the round-trip latency is unless you tell it. There are two ways to do this... or rather there should be!
First, there's a slider with which you can specify the delay manually. That's easy if you know what the latency is, but otherwise you'll need something to measure the latency (the free NAT sampler that comes with Acustica Audio's Nebula, for example), or to use your ears to line things up as best you can. I know it sounds silly, but it is possible for an interface to report a negative latency, and Cubase's External FX can't cope with this: in this case, you'll instead have to enter a track offset in the Inspector, as shown in screen 3 — and if you remove the external plug-in you'll have to set it back to zero.
The second approach is an automatic 'ping' facility, which suffers from a bug on my Windows 7 Ultimate x64 system. It may apply on other OS as well, but I've not had chance to test that. This is supposed to fire a sound out through your interface and your bypassed gear and back, so that Cubase can measure the round-trip latency and compensate for it. You should then be able to take the effect out of bypass and use it. Unfortunately, this doesn't work at all on my system (Cubase fires the signal out, but the compensation remains set to zero), and it still can't compensate for negative latency. Again, I've mentioned this to Steinberg, who recognise that there's a bug, and have said they'll fix it in an update during the current product cycle.
