 1a. Auto-Tune’s Auto mode is as simple as pitch-correction can get for the end user, and if the original vocal was fairly solid to start with, relatively subtle settings can produce transparent results.
Pitch-correction software has lots of uses besides putting vocals in tune! We uncover the creative roles to which today’s pitch processors can be employed.
Most of us are familiar with the ways in which software tools can be used to correct dodgy vocal pitching. However, the same tools also open up lots of creative possibilities — and I don’t just mean the ‘Cher effect’! In this article, I’ll take you step-by-step through several handy techniques, using various different pitch-processing tools along the way.
Whatever tools and techniques you’re using, it’s best to prepare your audio first by doing all your routine editing work, such as comping the best performance from multiple takes, editing breaths, perhaps de-essing and so on; the closer the result is to being what you want, the less hassle you’ll have to endure when pitch processing. I usually render this ‘cleaned up’ part, on which I’ll perform my pitch tricks, to a new track, leaving the original available in the event that things go badly wrong!
1. Auto-Tune Basics
 1b. For more detailed pitch-correction work, Auto-Tune’s Graphical mode can achieve excellent results, especially when applied only to those notes or phrases in need of attention.In the rest of this article, I’ll concentrate on more ambitious tasks but, to bring all readers up to speed, let’s first explore ‘traditional’ pitch-correction. It seems only right to do so with reference to Antares Auto-Tune. The name Auto-Tune is often used as a generic verb for pitch correction, and derives from the plug-in’s real-time automatic correction process, where you set a few controls to taste and let the software do its thing. However, Auto-Tune also features an off-line Graphical mode, for when a more surgical approach is needed.
Auto Mode: Insert Auto-Tune on your vocal track and select Auto Correction mode using the switch at top right. This being a non-destructive process, there’s no need duplicate your part: just bypass the plug-in to compare the processed and unprocessed versions. From the Input Type drop-down options (top left) pick the most appropriate choice for your part. For example, you’d choose Soprano for most female vocals. If you know the key/scale of the song, select it (top centre) but otherwise use the default Chromatic setting, which can still yield decent results if your vocalist sang pretty well in the first place. Alternatively, experiment: select different scale types or disable ‘wrong’ notes so that Auto-Tune doesn’t attempt to force the audio pitch to them.
For a natural result that gently nudges your vocal towards the chosen key/scale note centres, start by setting Pitch Tracking to 70, Retune Speed to 90 (so notes are dragged to pitch a little more slowly) and Humanize to 50. In the latest Auto-Tune 8, you can try switching the Correction Type from Classic to Flex-Tune, where pitch-correction is applied only to notes that are close to a scale’s note centres. The idea is that other pitch variations may be deliberate, for expressive purposes, and these will be left unaltered.
Use the bypass button to compare the original and corrected versions, and adjust the controls to taste. If there are sections of the performance that sound better unprocessed, use your DAW to automate Auto-Tune’s bypass control.
The T-Pain/Cher Warble: With different settings, the same technique can give you this classic (or clichéd, depending on your point of view) robotic pitch-correction effect. Set the Correction Style to Classic, the Retune Speed to (or very close to) zero and set the key/scale combination as normal. Again, automate the bypass button to apply the effect only applied to certain words or phrases.
Graphical Mode: For some corrective tasks Auto Correction mode is fine, but for others you’ll need Graphical mode. This time, duplicate your ‘cleaned up’ vocal part: you’ll perform your pitch processing on this duplicate, so it’s easier to start again if things go pear-shaped. Insert Auto-Tune on your edited/cleaned vocal track and select the Graphical Correction mode at the top ight of the GUI. This mode needs to ‘track’ the pitch of the audio before it can be processed, so engage the Track Pitch button (lower left of screen) and play the section of your vocal you wish to edit. A red pitch line will be superimposed over the waveform in the Auto-Tune GUI.
Auto-Tune provides a combination of curves, lines and note objects for manual editing. The last category is by far the easiest to work with, so hit the Make Notes button to generate note ‘blobs’, which will automatically snap to the nearest note centre. Superimposed on the original red pitch curve, you’ll see a green ‘corrected’ pitch curve. Use your mouse to manually reposition notes that haven’t been placed on the musically correct note centre.
Switching off Snap To Note allows you to fine-tune the vertical note positions and hence pitches, which can help you achieve a more natural-sounding result. If you wish to apply pitch correction only to specific notes, select any blobs that aren’t required and press the Cut button to remove them, leaving just the original red pitch line. The scissors tool allows you to split note blobs, and if you want to correct note transitions not originally allocated to a blob, you can resize a blob so that it butts up against the start of the next note. Graphical mode also offers tools for adjusting the timing of a performance, whether that’s moving whole words forward/backwards in time or, within a single word, stretching one syllable while compressing another — there’s a lot of control on offer here!
Once you’ve done all your manual tweaking, use your DAW to render the pitch-corrected version of your vocal as a new audio event. This will avoid any accidental loss of all that detailed editing work!
Most pitch processors follow the approach used by one or other (or both) of Auto-Tune’s two modes, but the most useful for our purposes are those which use some sort of note-blob editing. Building on these basics, then, let’s look at some more interesting possibilities...
2. Re-write A Vocal Melody
 2a. Before you attempt to rewrite your vocal melody, tidy up the original and do any routine editing tasks so you’re working with the cleanest version possible: then make a copy that you can edit independently of the original audio.
 2b. VariAudio displays the pitch curve and note blobs over the waveform. Although VariAudio can only operate on monophonic parts, it can display more than one part at once, which can be helpful while you’re exploring new options.
 2c. Each vocal note includes minute pitch variations, so when centring note blobs on the pitch grid, make sure you use your ears rather than your eyes to decide what sound best!
 2d. In order to ensure a smooth end result, you might have to do some detailed editing on the note transitions and how the pitch curve glides from one note to the next.One great use for pitch processors is the creation of guide parts: completely new parts adapted from an existing take to, for instance, demonstrate a new countermelody, ad lib or backing vocal idea to a singer. When a re-pitched part has to serve as the finished article, you need to make sure you’re using software that offers high-quality results. Celemony Melodyne, Antares Auto-Tune, Synchro Arts Revoice Pro, iZotope Nectar and Waves Tune are all capable of such results, and so are the processors embedded in some DAWs, such as Cubase’s VariAudio and Logic’s Flex Pitch. But when creating ‘only’ a guide part, the sonic quality may be less critical (it rather depends on what the vocalist is happy working with).
I’ll use Cubase’s VariAudio 2 for this example, but the principles are the same for most such software. Duplicate your prepared vocal part, as performing your processing on this duplicate makes direct comparison with the original melody easier. Double-click the part to open it in Cubase’s Sample Editor and activate the Pitch & Warp option in the VariAudio tab. Cubase should create ‘blobs’ indicating the pitch of each note.
As the guide vocal is to be ditched before the mix, you can start experimenting with note changes right away: position the cursor in the central portion of a blob (not at the ends) and drag up/down to change the pitch. In this mode, you can also select two notes and warp them, so that one becomes longer and the other shorter. You might need to refine the ‘judgments’ Variaudio made when creating its blobs, though — perhaps you want more or fewer notes than in the original — and that means using Segments mode. This allows you to change the start and end points of a blob, or to cleave blobs into two. (You’ll find similar functions with different names in most pitch processors that use the same note-blob editing approach.) A note that sustains for a bar can easily be split into, say, eighth-note blobs, and each new blob moved to a different pitch. Unlike in Auto-Tune, you can’t move the blobs along VariAudio’s timeline — instead, you need to use the other tools in Cubase’s Sample Editor, or edit directly on the Project Page arrangement.
When re-pitching notes, it helps to follow some melodic conventions. For instance, unless you’re completely overhauling the harmonic structure of the song (something I’ll cover later), you should stick with notes that fit the song’s key. Also, note that melodies often stick in our heads due to the repetition of short phrases — look/listen for such patterns in the original melody and try not to undermine them in your new one.
Note the uneven pitch curve in each blob: for a human voice, this will never be straight unless you’ve processed it to be so. Because of this natural pitch variation, the ‘pitch snap’ algorithm might not always quite centre every note on a pitch interval that sounds natural. It’s well worth ironing out such ‘wrinkles’ and VariAudio has three tools that can help.
First, try re-pitching only the offending blob. Select the note, making sure others aren’t selected, and use the Quantize Pitch slider. Second, try smoothing the pitch curve using the Straighten Pitch slider. Finally, if all that fails to impress, hold down the Shift key to temporarily disengage pitch snapping, and simply position the notes by ear.
This should be enough to provide a singer with a workable guide part but if, for whatever reason, your new melody needs to be a ‘keeper’, you’ll want to finesse things. If you’ve moved any notes more than a semitone or two, three facets may require attention. First, as described above, every note needs to be centred so your ears (not your eyes!) are happy with the perceived pitch. Second, focus on the transitions between notes, because if you’ve changed the interval between adjacent notes, the transition may no longer sound natural. You can attempt to tackle this with VariAudio’s Straighten Pitch tool, but this will also alter the note’s natural pitch variation and probably won’t result in the most natural sound! Instead, hover the mouse around the start/end of a note segment until the cursor changes into an ‘I-beam’. Click to create an anchor point towards the start or end of the note, then hover at the start/end in the upper half of the note. When the cursor changes to an up/down arrow, click and drag up or down to adjust the pitch curve only at the start/end of the note. This really useful feature gives you independent control over the pitch transitions!
Finally, if your pitch-correction tool offers the option, you can also make minor changes to the formants. In essence, formants represent the resonant frequencies added to a vocal due to the characteristics of a singer’s vocal tract. They’re important in giving each voice its unique character, helping our ears to identify the age, ‘size’ and gender of a singer. Unfortunately, VariAudio 2 doesn’t offer formant shifting; Auto-Tune, Melodyne and several other processors are suitable, but the off-line Elastique pitch-shift in Cubase could be used too.
Perfecting this kind of manual editing in any software can take a long time, but I promise it gets easier and quicker with practice! Once satisfied with your reworked melody, render it a new audio clip so there’s no danger of losing your hand-crafted edits to some technical glitch. Again, keep the working version, in case you wish to refine things later.
3. Fake Double-tracking
 3a. Unless your DAW supports ARA plug-ins, you’ll need to record the audio into your Melodyne plug-in. Only then will Melodyne display its note blobs and pitch curve ready for editing.
 3b. Melodyne includes tools for automatically adding random pitch and timing variations to selected note blobs: ideal for creating realistic double-tracked vocal parts.
 3c. To further tweak the character of the double-track, Melodyne allows you to shift the formants slightly.To double-track an instrument, you record two or more takes of the same part, layer them and perhaps opposition-pan the takes. It’s a particularly effective trick on lead vocals: a good singer can usually nail a second take fairly easily, closely matching the pitch and timing of the original take, but each take is still subtly different. A good double-track’s sense of fullness lies in the slight pitch and timing differences, and sometimes small differences in the performance dynamics of the two takes. Done well, it’s a very effective way of giving a vocal a sense of presence and depth without it sounding obviously effected.
To successfully fake a good natural-sounding double-track (not to be confused with the classic Artificial Double Tracking or ADT effect) from a single take requires you to create one or more duplicates and tweak each one to mimic the subtle differences that naturally occur when double-tracking. The pitch-variation side of things is pretty easy to accomplish, but not all pitch-correction processors allow you to tweak the timing or volume of notes, in which case you’ll need to use them in conjunction with your DAW’s more conventional editing tools. Attention to detail is essential if you want a believable result. For this example, I’ll use Celemony Melodyne, which allows all three properties (pitch, time and level) to be manipulated, caters for formant shifts, and has some functionality that makes this task very easy — but I’ll also include a few words on achieving similar results using less well-endowed tools.
Perform your routine editing, render the result to a new track and duplicate the track. Each duplicate must be editable independently, rather than being a dynamically linked ‘ghost copy’ based on the same underlying audio file. (Different DAWs default to different ways of copying: if in doubt, check the manual.)
Now to create some variation. If you use a DAW that supports the ARA plug-in format (PreSonus Studio One, Cakewalk Sonar or Tracktion) you can access Melodyne directly within the arrange page, and edits in Melodyne can be dynamically linked with your DAW track. In DAWs that don’t support ARA, you’ll need instead to use Melodyne as an insert effect, which requires you to transfer the audio into Melodyne before you can do any processing. Note that any timing edits made on the arrange page of your DAW after recording the part into Melodye will have no effect unless you then re-record it into Melodyne, overwriting previous edits.
Once the audio’s been analysed, you’re presented with a series of editable note blobs. Melodyne’s separate tools to adjust a note’s pitch, timing and amplitude are great for fine-tuning things but there’s a much quicker way to generate fake doubles. Select all the note blobs and, via the Edit menu, choose Add Random Deviation. Specify the desired amount of pitch and timing variation: the ‘moderate’ option, will usually produce quite a ‘tight’ double-track, but do investigate the ‘slight’ or ‘drastic’ options to understand the different feel they’ll bring.
If you want still more variation then, with all the notes selected in Melodyne, switch to the Formant editing tool (the one that looks like the teeth of a comb). Use this to apply a very subtle formant shift to the double, giving it a slightly different tonal character. When played alongside the original, this can add a lovely thickness to the vocal — but if you overdo things here it will sound like two different singers (and probably awful!). Finally, taking things to super-nerdy extremes, use the Amplitude editing tool (the one that looks like a note blob) to create a few small volume variations in some of the blobs. You want genuine variation here but not complete randomness, which would destroy the overall performance dynamic.
When you’re happy that you have a convincing ‘second take’, try panning it and the original to opposite sides of the stereo field. This should create a nice effect in which the lead vocal will still appear in the centre, but with a nice sense of space and width. Another approach, for extra thickness, is leave the original vocal panned centre and create two double-tracks, each with different random pitch and timing shifts. Pan these hard left and right and mix them in slightly lower in level than the main lead.
Melodyne’s Add Random Deviation, is perfect for this trick but you can replicate the same effects manually in most off-line pitch-correction tools — it just takes a little more time to create all those small pitch and timing changes, and not all tools will give you the option to shift formants.
4. Create Harmonies
 and ‘harmony’ (lower track) vocals in Logic. The latter is selected for editing within the Audio Track Editor, with the Flex Pitch algorithm selected.") 4a. My original (upper track) and ‘harmony’ (lower track) vocals in Logic. The latter is selected for editing within the Audio Track Editor, with the Flex Pitch algorithm selected.
4a. My original (upper track) and ‘harmony’ (lower track) vocals in Logic. The latter is selected for editing within the Audio Track Editor, with the Flex Pitch algorithm selected. 4b. Use Flex Pitch’s Show Local Inspector option to see its full set of pitch-adjustment controls.
 4c. Having manually shifted all the notes up by four semitones, some notes may not now fall ‘in key’ so, using your ears to guide you, some further small pitch shifts to individual notes will be required.
 4d. For a more convincing result, apply a little pitch and time quantisation to your harmony part to make it more distinct from the original.
 4e. Flex Pitch, like Melodyne, Auto-Tune and a few others, supports formant adjustment — experiment with subtle shifts to change the vocal character of the harmony part.There are some excellent dedicated tools for this next task (ZPlane Vielklang, Antares Harmony Engine and iZotope Nectar, for example), but most pitch-correction software can be used to generate vocal harmonies. The basic process doesn’t differ wildly from that in the previous examples, and once again the most convincing results are best achieved via fairly subtle pitch/timing/level variation, but there are a couple of specific challenges.
You’ll need to alter the pitch more radically than when faking a double-track, which asks more of the pitch-shifting algorithm and makes formant-shifting more important. You also need to know what notes will work in the harmony: re-pitching in a way that makes the harmony ‘in key’ with the original will require some of the intervals to be changed, and some tools make it easier and quicker than others to identify suitable notes.
Melodyne’s Add Random Variation feature could again be handy here, but this time I’ll use a different tool: Logic Pro’s Flex Pitch. Like Auto-Tune, VariAudio and others, Flex Pitch allows you to use a MIDI input to define the target notes for re-pitching. However, although this has its uses (in particular for rapidly ‘protoyping’ harmonies) more natural-sounding results are achievable when re-pitching notes manually, so that’s the approach I’ll describe.
As before, perform routine editing work, render to a new file and create genuine (not ghost) copies of any vocal sections you wish to be sung in harmony. You’ll need a separate copy for each harmony part. Then, open the ‘harmony’ version of the vocal in Logic’s Audio Track Editor and set the Show/Hide Flex button at top left of the Audio Track Editor pane to On. If not selected by default, choose the Flex Pitch algorithm, to display note blobs and a pitch curve. Then, from the View drop-down menu, select Show Local Inspector to display the pitch-correction settings in the track’s Inspector.
For now, set the Pitch Correction slider to zero and switch Scale Quantize off. By the way, don’t worry if your pitch-correction tool doesn’t offer a snap-to-scale/key function: while manual tuning requires more time and effort, you’ll be fine if you stick to the ‘rules’ associated with harmony singing, and you can always stick to harmonies that are very commonly used. (Plus, of course, if it sounds right it is right!)
Let’s create a harmony part a third above the original vocal, for a song in C major. Each harmony note has to be raised to the third degree in the scale above the original note: C is raised to E, D to F and so on. It’s easiest to do this is in two stages. First, select all the blobs, identify a root note blob (in this case a C note) and shift that to the appropriate ‘third above’ note (in this case, an E); all the note blobs will move by the same number of semitones. Some notes will have been suitably pitched for our harmony, others won’t, as in the key of C major includes no sharps or flats. In this case, the obvious offenders are the former D notes now sitting on F#. We simply need to manually move these down a semitone to F. Don’t be afraid to experiment with different notes if you want to make things a little more interesting, though — let your ears, not your eyes, be the judge.
With this basic pitching done, follow the steps described previously to create a fake double-track, adding subtle ‘controlled randomness’ to the pitching, timing and amplitude of the harmony phrase. In Flex Pitch, this is the best time to apply any pitch correction and/or experiment with the Time Quantize settings — only very small movements are needed. If you know the key/scale of the melody, see what, if any, interesting alternative harmonies the Scale Quantize tool suggests. To experiment with subtle shifts to the formants in Flex Pitch, select all the note blobs, hover the mouse over one of the larger blobs, and grab the lower-right ‘hotspot’ node. Then drag up/down to adjust the formants to taste. Finally, tuck the harmony voice in a few decibels below the lead vocal, perhaps also panning it slightly to one side — and repeat the process if you want to create more harmony parts.
5. Extracting MIDI
 5a. VariAudio provides a number of different options for generating MIDI pitch-bend data.
 5b. When turning a sung/hummed/whistled part to MIDI, you’ll probably need to do a little extra editing work on the pitch-bend data that results!
 5c. Usefully, Cubase offers the ability to ‘scale’ MIDI pitch-bend data.A number of pitch-correction tools can generate MIDI data, so if you can hum a tune, you can get a virtual instrument to play it! You needn’t limit it to vocals, though. You could, for example, extract MIDI from a real bass-guitar performance, allowing you to double the part with a bass synth if the bottom end of your mix needs a little beefing up. Or perhaps you could use a guitar to create melody lines for synths, or transpose the resulting MIDI to trigger a bass guitar part. Extracted MIDI data could also be used with your DAW’s scoring features as a starting point for notating parts you’ve played in.
I’ll use Cubase’s VariAudio 2 again for this example, as it includes some tools that are useful for this specific job, but other software can be employed. Once again, the first step is to open the audio in Cubase’s Sample Editor and engage the Pitch & Warp button to create a series of note blobs. Before generating any MIDI notes, it’s worth listening through a few times first and zooming right into the display to check that the note blob start and end points match the obvious amplitude changes of the underlying waveform. If they don’t, switch to the Segments tool to make adjustments.
You don’t normally want all the fine pitch-variation details in a vocal part to be recreated as pitch-bend data, so it’s not a bad idea at this stage, particularly if you’re starting with a sung or hummed vocal, to select all the blobs and apply a global Quantize Pitch and Straighten Pitch. Just don’t over do it!
Now to generate MIDI data using the Extract MIDI function. There are several options in the dialogue box but I’ll focus on the most useful two. The first, ‘Just Notes and No Pitchbend Data’, ignores the detail of the pitch curve and automatically pitch-quantises the MIDI notes to the nearest semitone. This is useful if you want to play the part back on an instrument with no pitch-bend such as a piano, for producing notation (simpler is generally better for generating a clean-looking score) or if you just need the basics of the part extracted for further detailed MIDI editing.
The second, ‘Notes and Continuous Pitchbend Data’ uses MIDI pitch-bend data to match as closely as possible VariAudio’s pitch curve. It’s great for extracting the maximum amount of expression from an audio performance but it can require a lot more ‘tidying up’, as it can generate large pitch-bends where legato notes slide from one pitch to another. Depending on the pitch-bend range that’s specified in the centre of the output dialogue, a warning indicating the semitone range of the largest pitch-bend in the extracted part might be displayed. If this happens, manually change the setting in the dialogue box to match this. This setting will be embedded as controller data at the beginning of the MIDI event you create, and automatically changes the pitch-bend range of any compatible MIDI instrument. (If things don’t sound right, you may need to manually adjust your instrument’s patch settings.)
VariAudio 2 can also attempt to derive MIDI velocity data from any amplitude variations in the audio, but note that different instruments will respond in different ways to the MIDI note velocities, and you might find that you need to scale the velocity data to get the best results.
With all that in mind, select your preferred mode and hit OK. A new MIDI track containing a MIDI part with the extracted data will be created. If you ignored the pitch-bend data (advisable for your first attempt!), hopefully all that’s required is a minor tidy up in the piano-roll editor, to catch any duff MIDI notes that were created because you didn’t quite edit VariAudio’s blobs perfectly.
Now let’s consider parts with pitch-bend data. If your source was an instrument such as a bass or lead guitar, then (provided the player didn’t play any extreme note bends) the MIDI part will generally be pretty easy to clean up, but if you’re dealing with an expressive vocal performance, there may well be lots of subtle pitch variations. Depending on the instrument you’re trying to trigger, such pitch variations can be a genuine part of the magic, but they’ll almost always require finessing. I’m afraid there’s no substitute for tweaking these manually — always by using Cubase’s MIDI editing tools, but possibly also by going back to VariAudio and editing the pitch variations there to make your job easier. Most modern DAWs allow plenty of scope for editing MIDI controller data in this way. One easy option that will get you in the right ball park is to scale (alter the amplitude of) the pitch-bend data, something you can easily do using Cubase’s controller lanes.
6. Beat Manipulation
 6a. Melodyne includes an algorithm specifically intended for percussive sounds.
 6b. Melodyne’s selection tools include some very useful options for manipulating rhythmic elements.
 If you’ve ever done any old-school sampling or sound-design work, you’ll appreciate the way exaggerated, deliberately unnatural-sounding pitch shifts can change a sound’s tonal character. In a musical context, this can be used to good effect on many sources, but it can be particularly interesting on drums: the same sense of rhythm is maintained, but the sound itself can be changed radically. It’s a good way to breathe new life into your loop collection, to spice up a few bars of the main drum part in a song, to provide a bit of ear-candy during a breakdown, or just to use as an interesting spot effect.
You can do this sort of thing with almost any pitch-correction tool but note that some — VariAudio and Auto-Tune included — aren’t as good as others at creating note blobs from percussive sounds with no easily identifiable pitch. Melodyne features a dedicated percussive mode, so let’s use that...
For this example, I bounced down a short section of my drum submix in a project as a stereo audio file and placed it on a track in my DAW. I inserted an instance of Melodyne on that track and recorded the part into Melodyne. Melodyne created blobs for each distinct sound, as before, but this time the engine recognised the percussive nature of the sound and automatically applied its Percussive algorithm rather than the Melodic one it defaults to with a typical vocal. Neat, huh?
Melodyne offers a number of possibilities for drum manipulation. You can, obviously, select a short section of the performance (let’s say four bars) and lower the pitch by an extreme amount; while that’s something you could just as easily do with your DAW’s own transpose functions, it can be performed in Melodyne in tandem with other tricks.
One of Melodyne’s neatest features is its ability to replicate blob selections from one bar to others. For example, I selected the main snare-hit blobs on beats 2 and 4 of bar 16, holding the Shift key to select multiple blobs. I then used the Edit/Select Special/Select Same Beats in Other Bars option, and blobs falling on beats 2 and 4 in every bar of the tracked audio became selected.
Let’s employ a combination of Melodyne’s editing tools on the selection. First, you could lower the pitch by a number of steps, to beef the snare sound up a little and change its tonal character. Next, you might adjust the length of the snare hits to extent them. Note, though, that to stretch the snare blobs without automatically shortening the blobs that follow, you have first to ‘separate’ the snare blobs from adjacent ones. The simplest way to do this is to select all the snare hits (very easy if they’ve all been dropped in pitch) and use Melodyne’s Cut option, followed straight away by the Paste command. You might also need to move all the snare blobs back to their original timing position. This Cut/Paste cycle breaks the link between the selected blobs and the rest, so you can change the length of these blobs without it affecting any if the others, even if that means blobs overlap. So, with the snare blobs selected and back at their original time position, use the Timing tool to grab the end of one of the blobs, then click and drag to extend the length of all selected blobs. For the snare sound, the result is not unlike adding some kind of filtered long-decay reverb.
With the blobs still selected, switching to the Amplitude tool allows the volume of the snare blobs to be increased by clicking on one blob and dragging up, exaggerating the impact of the pitch-shifted, time-stretched snare. Note that you needn’t limit this to a snare drum or only specific sounds. You could apply the process to any beat in the bar irrespective of the sound — for example, by selecting all the blobs on the first beat of each bar — thus allowing you to refashion a loop’s groove dramatically.
Finally, with the same blobs selected, use the Formant tool if you want further timbral change. Don’t be shy here: you’re aiming for a dramatic, ear-catching, result, and you can usually create a lovely ‘electronic’ result from acoustic drums if you’re prepared to experiment.
You can, of course, perform the same sort of processing on different note selections, to create a drum part that is sonically completely different from your original yet retains the underlying rhythmic feel of the original, and so still ‘fits’ your overall song. This only really scratches the surface of what can be done with drum loops in Melodyne, especially when you copy and paste blobs to create extra hits of pitch- or formant-shifted echoes! But hopefully you get the idea.
7. Vocal Character Effects
 7a. Nectar’s formant tools can be applied to any selected note blobs. Even without any pitch-shifting of the notes themselves, formant shifts will change the character of the voice.
 I already explored formant adjustments in passing, in the fake-double and harmony exercises, but if your pitch-processor offers formant editing, it’s a feature that’s well worth exploring in its own right. When singing, the human voice produces a wide range of frequencies. Some are related to the pitch of the note being sung, but others to the way an individual’s throat allows to the sound to resonate. The frequencies involved will vary based on the sounds being made (that is, different vowels or consonants), but they are always a key element in giving a singer’s voice its unique sound. You don’t need to adjust the pitch to change the formants — so you have independent control over the character of the voice. For example, raising the fundamental frequency of the formants implies a smaller (perhaps younger-sounding or more feminine?) voice and vice versa. There are two fairly obvious aims for this kind of processing: you can use it quite unobtrusively to subtly change the character of a voice, and if you’re in search of a special effect (think chipmunk or Darth Vader vocals) you can take it to extremes.
Most blob-based pitch-correction tools include formant processing in their pitch-shifting algorithms with the exception of VariAudio, as I’ve mentioned) but both Auto-Tune and Melodyne are particularly flexible in this regard, as they offer independent editing of formants. For this exercise, though, I’ll use the pitch-correction plug-in that’s included in the full version of iZotope Nectar 2’s Vocal Production Suite.
Nectar’s Pitch Editor shows the note blobs and pitch curve with which, if you’ve read this far, you should now be very familiar. As with some other tools we’ve looked at, you have first to capture the audio into the plug-in before you can process it. In this example, I’ve tracked a short vocal part and used Nectar’s Snap To Scale, Correction Strength and Correction Speed controls to apply a little pitch-correction globally.
Clicking on the Formant button reveals two sliders that allow you to adjust the way formants are processed — but note that any adjustments you make here are applied only to notes blobs that you’ve selected in the main window, so you must make any selections prior to adjusting these controls.
For a subtle approach, select all the note blobs and apply just a small amount of formant adjustment using the Formant Shift slider — I suggest a maximum of ±3 semitones, although what you can get away with depends on the specific audio part being processed. In this example, using a female lead vocal, -2 semitones gives the voice a more soulful character, while the opposite (+2) gives you something a little more childlike.
Now let’s push the technology slightly further. Take a copy of the lead vocal, then pitch-shift it up or down a whole octave by dragging the blobs, and apply a little of both sliders (Global Formant Scaling tries to exaggerate how singers themselves shift their formants as they sing higher or lower notes). Shifted down, you can create a male-sounding octave-below harmony, while shifting up takes you into Bee Gees falsetto territory. By the time you get this far from the original pitch, things will not be quite as believable as you’d wish, and won’t work for a main lead part, but when panned to the side slightly and dropped a few decibels below your lead vocal you might well get away with it — and hand-crafting the formants in this way certainly increases the chances of a successful result.
In electronic or production-rich pop music, it’s usually not so important that the result sounds ‘natural’ — obvious processing is the whole point! — and this means that you can get away with more extreme settings, particularly when applying formant shifts only to a short vocal phrase. As a spot effect, the singer’s voice can, for example, be made to evolve over the course of a single sung line from ‘small girl’ to Barry White, without the pitch of the notes being adjusted from the standard melody line. (There’s something similar going on at the end of Madonna’s track ‘Hollywood’.) In Nectar’s Pitch Editor, this simply requires you to select each note blob in turn and adjust the Formant Shift slider to gradually increase the values. Try adding in some over-cooked pitch correction too, or flattening the actual pitch of the melody, for an even more ear-catching, robotic result!
8. Re-write The Music
 8a. Once tracked into Melodyne Editor, my piano part is analysed using this software’s unique Polyphonic algorithm.
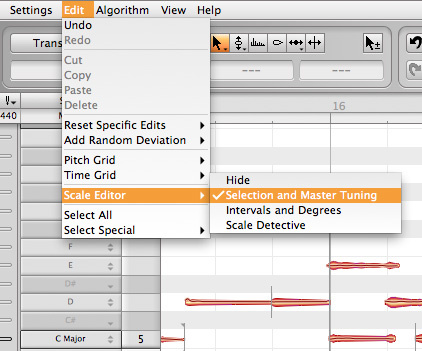
 8d. If the pitch-shifting produces any undesirable harmonics, try to isolate which note blobs are responsible and use the Amplitude tool to lower them in level.Finally, let’s take things to extremes, and completely re-write a song’s harmonic structure. You might wish to try this for a couple of reasons. First, it’s a way of writing a new arrangement of existing material. As with the guide-track example, you’re using your audio as a scratch pad, so the sonic quality of the results isn’t critical. Second, you might feel that radical surgery is necessary to remix or to rescue a track: perhaps you’ve written a song and captured some stellar performances in your DAW that can’t be re-recorded... yet you wish you’d chosen a few different chords! MIDI parts are easy enough to edit to fit new chords, but what about recorded audio? Well, if you have the right pitch-manipulation tools, you can rework the monophonic or polyphonic audio parts as desired, but the sonic quality of the result is all important!
For monophonic parts, such as vocals or bass guitar, you can use the approach I described for guide-part creation, but some software offers more convenient tools than others. Version 7 or later of Cubase, for example, has a Chord Track in which you can record or program the song’s chords, and both MIDI and monophonic audio events (using the VariAudio process) can be forced to follow any harmonic changes made to the chords automatically. If interested, check out my tutorial in SOS June 2013 (http://sosm.ag/cubase7-chordtrack).
The task is trickier with polyphonic parts, such as piano or strummed guitar and re-recording is the best option where possible. If it’s not possible you’re going to need the full version of Celemony Melodyne Editor: at the time of writing, this is the only pitch-processor that can identify the different notes within a polyphonic audio part. It displays each note as a separate blob, which you can edit in the same way as those we created from monophonic parts earlier. The technology isn’t foolproof, but when used with plenty of care and sometimes a little luck, it’s remarkable just what sort of results can be achieved.
Imagine you have a short acoustic piano part and wish to keep the performance but tweak the chord progression. For demonstration purposes, I’ll keep things simple, with a chord progression in C major, in which I wish to swap a few C chords to G chords, F chords to C chords, and so on. But there’s no reason you can’t attempt something more challenging if you want to — the principles are the same, you just need to do more work!
As before, unless you’re using a host DAW that supports ARA plug-ins, you need to transfer the part into Melodyne Editor. Melodyne Editor should automatically use its Polyphonic algorithm and display a set of blobs in the editor window corresponding to the chords in the piano part. Now to set a few options and prepare the audio to make this task a little easier. First, assuming you know the key/scale of your project, engage the Edit/Scale Editor Selection and Master Tuning option, which will display key/scale options. Pick the appropriate key/scale combination for your project and ensure you the Edit/Scale Snap option is engaged. This will snap the notes you’re moving to the nearest note in the scale. Next, check that View/Show Note Separations is on. Using these visual guides, wherever you’re planning to change the chords, look for any blobs that extend across a chord change, and use the Note Separation tool to split these note blobs if required.
Select all the notes that need to be changed in the first chord and drag them up or down to the desired pitch. To stop Melodyne attempting to insert short pitch glides between any legato notes that are being re-pitched, you’ll need to apply the same select/cut/paste procedure as described in the beat-manipulation example. This breaks the pitch links between adjacent notes and you can then move the notes as required.
Depending on the chord change that’s required, the task might be as simple as moving all notes up/down en masse but it’s usually a bit more fiddly than that. To ensure the smoothest results, or if the chord change is quite complex, you’ll usually arrive at better results by moving notes individually.
Chords can be played in various inversions and you’ll find that the best-sounding results (sonically, if not always musically) are achieved when you choose an inversion that demands the smallest movement from the original note to the new one. For example, in the example, to change a C chord (C, E, G) into a G chord, I can leave all the G note where it is, as G is common to both chords, move the C down only one semitone to B, and the E two semitones to D. Small pitch shifts such as these will make unappealing processing artifacts less likely, and less obvious than, say, if you also moved the G down a full octave. If you prefer other inversions, though, it’s worth experimenting to see if you can live with any sonic trade-offs.
Once all the chords have been re-pitched, give the results a very careful listen. Hopefully, the transitions will sound relatively smooth. Also, remember that in the context of a mix, minor ‘issues’ you hear when the part’s soloed may not be so problematic. For harmonically complex sounds (acoustic pianos playing stacked two-handed chords for example), that’s unlikely, but in this case, unwanted audio artifacts can usually be tracked down to one or two notes in a specific chord, where the pitch-shifting hasn’t handled all the associated harmonics as smoothly as you’d wish. If you can work out which note blobs are causing the issue, try using the Amplitude tool to lower them in volume. Providing you still have other note blobs that include that note in the chord, the tonality of the chord itself should still come across satisfactorily.
For the example shown in the screenshots, I used this approach with a piano performance but you could use it with any audio recording. One obvious use would be to match the harmonic content of a commercial loop-library sample into an existing project in which the key/scale is already set. Or, if you fancy taking on a real challenge, you can experiment with a full stereo mix in Melodyne. A transparent result might not always be possible (unless the changes you wish to make are very subtle) but creative ‘notice me’ effects are certainly possible.
Pitching Up!
As I hope my examples illustrate, each of these pitch-manipulation tools has its own strengths. They’re all more than capable of fine-tuning a vocal performance, but the pitch, time and formant processing, and deep DAW integration they offer is sophisticated enough that they all hold plenty of creative potential. I’m sure that, if you experiment, you can come up with some more great pitch-processing ideas of your own — in which case do let us know!
Audio Examples
As mentioned in the main text, I’ve created a number of audio examples to illustrate the ideas discussed in this workshop and you can find these on the SOS web site at http://sosm.ag/dec15media. The track I’ve used for these examples is based on the first verse/chorus section of ‘So Easy’ by Cristina Vane, which featured in a Mix Rescue by Mike Senior in SOS September 2013 — thanks to Mike and Cristina for allowing use of the original multitracks. You can find out more about Cristina’s music at the URLs given below.