This month we beef up drums and bass, polish guitars and vocals, and give choruses a lift, as the Belgian band Leaf get the Mix Rescue treatment.
Had the Belgian band Leaf been in need of rock & roll credentials, they might have been able to put some kind of positive spin on their drummer Bert Carremans breaking his vertebrae in a snowboarding accident. However, the more mundane reality for SOS reader Maarten Thiry was that he had to rely on samples to supply drums for his group's atmospheric guitar pop while Bert convalesced.

Working in the living room of his small three-room flat, Maarten set about adding drums to one such song, 'Come Around', using Steinberg Cubase SL3 and Propellerhead Reason 3 (with a drum library Refill). With drums in place, bassist Sigi Thewis laid down a part through an Ampeg simulation in Native Instruments' Guitar Rig 2, on top of which Maarten and fellow guitarist Evelien Vanlede overdubbed a variety of different electric and acoustic guitar layers, building up the structure of the song as a whole. A lead vocal (Karen Verresen) and several different backing vocals (Patricia Leyssens) completed the arrangement, all recorded using a Rode K2 through an SPL Goldmike preamp, SPL Dynamax compressor, and RME Multiface audio interface.
Maarten had a go at a mix for himself, but wasn't very happy with the result, so contacted Mix Rescue for help. The first thing that hit me on listening to his mix was the gorgeous breathy vocal recording — a real treat, and also something of a rarity in Mix Rescue submissions, as you can probably imagine! The guitar work was also lovely, with lots of sensitive playing and real attention to detail. The main thing Maarten was concerned about was that the drums sounded rather lacklustre and two-dimensional next to the other instruments. However, it also seemed to me that, assuming the drum sound could be improved, there was also a lot more that could be done to maximise the potential of the other source recordings, and to increase the dynamics and momentum in the track as a whole. I therefore asked Maarten to send over all his unprocessed original recordings as WAV files so that I could have a go at remixing them for myself.
Rescued This Month
The Belgian band Leaf comprise Karen Verresen (lead vocals), Patricia Leyssens (backing vocals), Evelien Vanlede (guitar, piano — pictured), Maarten Thiry (guitar), Sigi Thewis (bass), and Bert Carremans (drums). Founded in 2003, they describe their sound as 'fragile, rocking, atmospheric, touching', and list vocal references such as Heather Nova, Norah Jones, and Anouk.
Following success in music contests this year, they've been performing at a couple of big festivals this summer, and are currently planning to release an EP. They're also looking into taking their material in a more acoustic direction, with just drums, double bass, two guitars, and vocals.
+32 499 296883
Changing A Snare Sound In A Mixed Drum Loop
Maarten's main cause for concern with the drums was the snare drum, which sounded pretty thin and weak in the context of the track because it was all attack, with not much in the way of follow-through. The difficulty with tackling this was that the drums were already mixed to a single stereo track, so any EQ, compression, and other processing he attempted compromised the other instruments in the kit. In the end he decided to soften the snare drum with EQ at the expense of the cymbals, adding in an extra programmed cymbals track to make up for this during the choruses.
Auditioning the unprocessed drum loop in Cubase SX2 (the mix system I had available to me on this occasion), I felt that the problem of overemphasised attack transients afflicted the kick and tambourine instruments as well to a lesser extent, and that generally the low-level detail within the loop wasn't really audible enough for this style of music. However, the first thing to deal with was the snare, for which I decided to employ one of my own favourite 'secret weapon' techniques.
 In order to change the snare sound within the mixed stereo drum recording, the snare was isolated on a duplicate track using gating, and then processed heavily with off-line pitch-shifting, EQ, compression, soft-clipping, and de-essing before being mixed back in. This track was also fed to the drum reverb send effects and faded up during choruses.First of all I copied the main stereo drums file to a mono track and inserted an instance of Digital Fishphones' Floorfish gate plug-in. Homing in on the 1kHz region using the gate's side-chain filtering, I managed to get it opening reliably for just the snare beats, and adjusted the gating envelope's release time to leave a fairly long tail on each one. With this gated signal faded in alongside the main stereo drums track, it became possible to boost just the snare level without influencing the rest of the balance.
Of course the snare only needed a boost in the low mid-range frequencies, so I bracketed the spectrum of the gated track using with Cubase 's Q plug-in, switching in high-pass filtering at 80Hz and low-pass filtering at 4kHz. The snare also required greater sustain to balance out that pesky attack transient, so out came Cubase 's VST Dynamics plug-in. Cranking the Ratio up to maximum and using the shortest attack and release times available, the snare peaks were soon being heavily squashed, but it still didn't go far enough, so I switched in the plug-in's Softclip section to round things off even further.
I now had more low end and sustain on the snare, but I still wasn't quite happy with the tone I was getting — it just didn't feel thick and substantial enough, even after I'd spent a good ten minutes playing around with different EQ settings. My own experience is that if I can't get the results I'm after with EQ within ten minutes, then I'm probably barking up the wrong tree in trying to tackle the problem with EQ alone. Thinking laterally for a moment, I tried pitch-shifting the audio on the gated track downwards by a few semitones. This worked much better than I suspected that it would, and got me pretty much exactly where I wanted to be with the sound.
All this processing did make the gated track sound a little odd on its own, but within the context of the whole drum sound it served its purpose of lengthening and thickening the snare hits so that they could compete against all the other sounds in the mix, particularly during the choruses.
Overall Drum & Guitar Processing
Now that the snare had expanded its waistline a bit, the next drum-mixing job was to increase the low-level detail in the drum part as a whole. First of all, I sent the drum and gated snare tracks to a communal buss (along with a separate tambourine part which supplemented them during the choruses), and then sent from there to a compressor set up as a send-return effect — a technique often referred to as 'parallel' or 'invisible' compression. This is not the normal way you'd set up a compressor, but it has the advantage that it lets you boost low-level sounds a lot with fewer pumping artefacts and without messing with the punch of the main drum hits.
In this case I wanted to improve the sustain of all the drum sounds, so I absolutely hammered the effect signal going through the compressor, switching the ratio to maximum in peak-sensing mode and keeping the attack and release times very short, much as I'd done on the gated 'snare' track. Despite the gain reduction meter showing a ridiculous 15-20dB of gain reduction on the main drum hits, this processing worked really nicely for most of the kit instruments, although I was concerned that the kick drum was now sounding too resonant, so I high-pass filtered the compressed signal at around 350Hz to head this off.
 Much of the instrumentation was provided by the two guitarists Maarten and Evelien, but when a mix has many different guitar parts it's easy for it to end up sounding cluttered. In this case a fair amount of high-pass filtering was required to retain clarity.A similar compression tactic worked well for the verse guitar parts, giving a bit more warmth and sustain without interfering with the nice playing dynamics of the original parts. The main additional processing I applied to most of the guitar parts was high-pass filtering, mostly just to keep the low end of the mix clear for the bass and kick drum, but also so that I could fade some of them (such as the echoed guitar phrases in the verses and the Ebow part in the choruses) higher in the mix without them masking out other parts.
I had a bit of a go at one of the two verse guitar parts with Cubase 's Quadrafuzz and DaTube distortion plug-ins, not because I took any particular dislike to the original part, but because I felt that a clearly differentiated timbre would be more useful for manipulating the overall dynamics of the verses — fading the overdriven sound in towards the end of the first verse, for example, helped me ramp up the mix into the first chorus.
The acoustic guitar part posed a slight problem, in that it appeared to have been compressed while recording, but not in a very suitable way — the processing wasn't assertive enough to control the strumming noises, yet was sufficiently heavy-handed to emphasise the instrument's rather unflattering low body resonances. That said, I liked what the basic part was adding to the choruses, so I was keen to make it work within the mix.
To start with I high-pass filtered it at around 400Hz to remove the low resonances and to home in on the most useful bit of the sound — the electric guitars in the chorus were already giving me all I needed at the low end of the mid-range. The strumming noise was still obtrusive, so I dusted off another old stalwart mixing trick and de-essed it. Although a de-esser is primarily designed to duck sibilant vocal sounds, it can be used to reduce the intrusiveness of any unwanted high-frequency elements in your recordings, so can also work very well for the mechanical noises produced by acoustic guitars. I find that you usually need to experiment a bit with the settings of your de-esser to find the best sound — with Cubase 's built-in SPL De-esser plug-in the Auto Threshold and Female modes worked best for me, and I dialled in a large dose of S Reduction to keep a tight lid on things.
The bass part was nicely recorded, but rather noisy, so I low-pass-filtered it at 4.5kHz to make the hiss less noticeable. I reduced this filter's cut-off frequency further during the final bass note using automation, as the thinning out of the arrangement in the outro was making the noise much more obvious there. It also became apparent that the sound wasn't holding its own very well against the other parts as the mix got going, and I first tried some ordinary compression to address this. Although this did work to an extent on more full-range speakers, the sound was still diving in and out of the mix on smaller systems because of the wide dynamic range of the high mid-range frequencies.
My solution was to substitute Cubase 's Multiband plug-in in place of the full-band compressor, and use two bands of processing crossing over at 500Hz. The lower band gave a consistent warmth on more hi-fi systems, while the upper band kept the bass exactly where I wanted it on smaller speakers. While I was at it, I also boosted the level of the upper band with its make-up gain control in order to pull the bass pitches a bit further forward in the mix.
Hear The Differences For Yourself!
The original drums for the first verse and chorus.
My processed drums, using an unusual parallel gated track to beef up the snare sound, as well as lots of dynamics plug-ins to tame excessive transients and add body to the sound in general. During the chorus, some reverb processing is also being added under automation control to increase the size of the sound.
The raw bass recording for the first verse and chorus.
An instance of Cubase SX 2's Multiband compressor processed the sound in two separate frequency bands in order to keep a constant subjective level in the mix on both small and large speaker systems.
The acoustic guitar source recording for the second chorus.
Low-frequency filtering removed bass resonances that were clouding the rest of the guitar mix, while some assertive de-essing kept the strumming noises in check.
The nicely played original arpeggio guitar recording during the first verse.
Parallel compression gave the sound more warmth, while a high-pass filter kept the low end out of mischief.
The main rhythm guitar part during the second chorus.
I faked a double-tracked sound by using a very short spring-reverb impulse running in the convolution plug-in SIR, and then rolling off the low end at around 90Hz, before adding in a little of the main tempo-sync'ed delay effect.
This is the guitar recording that opens the second verse, before I applied any processing.
I applied a 'special effect' delay (inserting Cubase's Metalizer plug-in into the effect return) to make more of a feature of this part, but I did need to give some attention to EQ, both on the guitar and effects return channels, to avoid swamping out the whole mix.
My edited backing-vocal parts for the middle section and final chorus, without any processing or effects.
The same parts with EQ, compression, and a variety of different modulation, delay, and reverb send effects.
The raw lead-vocal recording for the second verse and chorus.
After fairly subtle EQ and compression, some send effects were added under automation control, including Symphonic, Mod Delay, and an SIR ambience impulse response.
The mix that Maarten originally sent in to Mix Rescue. He and the band had slowed it down slightly by resampling it, because they thought that the tempo didn't leave the vocal with enough room to breathe.
My final mix, which I preferred at the original, slightly higher tempo.
Filling Out The Guitar Mix With Effects
With the dry drum, bass, and guitar tracks roughly where I wanted them, I began to look at some ways of making the sound a bit more lush using various send effects. My mainstay for this was a stereo delay setup, comprising two mono Mod Delay send-return effects, panned hard left and right respectively. The delays had a healthy feedback level of 25 percent, but were sync'ed to crotchet beats and bracketed with filters at 80Hz and 2.5kHz, so they remained very much in a supporting reverb-like role. Some delay modulation also helped sink them into the mix. For the verses, I sent the two main guitar parts to the delays on opposite sides of the stereo image for extra spaciousness while the texture was sparser, whereas the panning of the guitar delays pretty much followed that of the direct sound during the choruses.
 The rather uncontrolled low frequencies in the acoustic guitar recording served no real purpose during the chorus, as all the necessary weight was being provided from the bass and electric guitars, so it was filtered at around 400Hz to leave only the frequency region that was actively contributing to the mix. Over-compression while recording had also emphasised strumming noises, so a de-esser was used to bring these back to a more suitable level.I set up a couple of more audible 'feature' delay patches as well, the first to highlight the echoed guitar part I mentioned earlier. An instance of the Double Delay plug-in was switched out of tempo-sync mode, which immediately made the delay more noticeable, and the left- and right-channel delay times were slightly skewed to widen the echo in relation to the direct sound. More spectral bracketing with filters at 600Hz and 2.5kHz kept the delay sound focused within a limited frequency band, so that I could again mix it quite loud without it becoming overpowering.
The second 'feature' delay was applied mostly to the chorus Ebow guitar and to the solo before the second verse. Here I used Double Delay with tempo-sync'ed delays of 3/16 and 5/16 in the two channels and a relatively high feedback level, followed by Cubase 's resonant Metalizer effect to create an almost wah-wah-style effect on the circulating delay repeats. With a little high-pass filtering to keep it under control, this added a slightly trippy complexity to those sections.
The only other treatment was applied to the main distorted rhythm guitar that underpins all three choruses. Had I recorded this part, I'd probably have double-tracked it so that I could pan the two versions to opposite sides of the stereo image — a simple way to increase the apparent 'size' of the guitars for choruses. As it was I had only one part, so I conjured something like a double-track from an instance of the excellent SIR convolution plug-in (www.knufinke.de/sir). To keep the character of the double-track quite different from the original part, I loaded in a distinctly lo-fi reverb spring impulse response I had acquired from the Echo Chamber web site (memi.de/echochamber/responses), reducing the length of the impulse response by two thirds to keep the doubled sound pretty dry-sounding. I have to admit that I wasn't holding out too much hope that this tactic would work, but it turned out surprisingly well.
Backing-track Mix Dynamics
By this point it was becoming clear to me that the overall dynamics of the mix were going to suffer unless I pared down the arrangement at some points. My main concern was that each section tended to keep the same instrumentation throughout, which reduced the opportunities for building from one section into the next. I therefore spent a fair deal of time carefully editing sections of guitar parts in order to introduce a little more light and shade. You can hear this most obviously by comparing the original mix's first verse with my remix, but I ended up editing most of the sections of the song in one way or another. Just because you've recorded a part, it doesn't mean that you should necessarily leave everything you've recorded in the mix.
 In order to control the bass levels on different playback systems, the recording was compressed in two bands, crossing over at 500Hz. Overall this processing made the sound brighter, which emphasised some background noise, so a high-cut filter at around 4.5kHz was employed to make this less obtrusive.In tandem with this process, I began engaging Cubase 's mix automation so that I could keep a handle on the guitar balance throughout the song — there were, after all, more than a dozen separate parts! I took the opportunity while I was at it to ride a few little melodic details in some of the main parts to make sure that they got the attention they deserved, and also created some subtle swells into the beginning of each chorus.
The improved guitar balance threw the lack of drum dynamics into sharp relief, so I turned back to those tracks and automated send levels to a couple of other SIR reverb effects, primarily in order to scale the drum size to match that of the massed chorus guitars. The first reverb was a fairly bright ambience impulse just to make things a bit more live-sounding, while the second reverb employed a darker chamber impulse to suggest a larger acoustic space and sit the drums a little back in the mix. I also rode the gated track's level in these spots to make the snare heavier-sounding in the choruses.
With both of the reverbs, I spent a little time adjusting the length and envelope of the impulse response, and also adjusting the frequency balance with the plug-in's built-in, post-reverb EQ. Even the most suitable of impulse responses aren't usually ideal for most multitrack mixes without some work of this type. In this case, I wanted to keep the low end of the mix uncluttered, so I filtered off the low end of both reverbs below about 250Hz and also reduced their lengths.
Lead Vocal: Compression, EQ, Effects & Edits
I had already been listening to the unprocessed lead vocal periodically alongside the backing-track parts, trying to leave a space for it in the mix. A vocal sound as good as this doesn't want to be compromised by heavy mix processing and now that the backing track was roughly in balance, I figured it was time to concentrate properly on Karen's sound.
 Level and reverb-send automation helped to increase the contrast between the verse and chorus drum sounds.Maarten had compressed the vocal during the mix, and had boosted a few decibels at 200Hz and 700Hz for body and at high frequencies for 'air'. I also felt that some compression might help, but I kept it pretty subtle, choosing the Opto setting of Digital Fishphones' Blockfish and keeping the response times slow. Rather than trying to add body with EQ, I chose instead to turn up Blockfish 's Saturation control, which thickens the sound using subtle analogue-style distortion artefacts, but doesn't change the tonality as much. Where I did use EQ was to gently cut at 1300Hz using a low shelving filter, thereby shifting the tonal emphasis slightly towards the high frequencies — the area of the spectrum that made the sound really special as far as I was concerned.
From this processed track I fed a handful of different send effects. The only one of these present at the start of the track is a Symphonic plug-in, which I used to make the vocal image slightly wider and more 'hi-fi'. As the arrangement of the first verse develops, a vocal ambience impulse response from SIR begins to make an appearance, blending the vocal more into the track, and this effect recurs more consistently in the second verse. I wanted this reverb pretty bright to keep the vocal up-front, but I also didn't want vocal sibilants echoing around hissily and drawing attention to the effect, so I inserted a de-esser plug-in just before SIR to deal with this and again filtered out the low frequencies below about 250Hz to avoid muddiness.
During the choruses, the vocal is also sent to the main stereo delay patch so that Karen stands within the much larger space implied by the backing track at that point. However, I kept the level of this slightly lower for the first chorus, and reduced the level temporarily to avoid compromising the intelligibility of the faster 'Danny come around' part of each chorus lyric.
Backing Vocals

 A little compression from Digital Fishphones Blockfish and some low-cut filtering were all the processing that Patricia's backing vocals needed during the middle section, and it only took a dash of the main stereo tempo-sync'ed delay to sit them in the mix.Patricia's backing vocals in the chorus seemed a little stranded in the original mix, so I made the decision to copy and paste between the choruses (which were separate recordings) so that I could have them double-tracked. This immediately made the sound more what I'd expect in this kind of production. I cut a lot of low end from them with a high-pass filter at 290Hz and a peaking filter at 350Hz, to keep them out of the way of the bass and guitars, and also compressed them firmly to nail down their position within the backing track.
Despite the compression, Patricia's voice initially proved difficult to blend into the mix, because of a slightly hard edge to the sound, so I used a fairly narrow filter set to cut at 11kHz to soften this. This made it much easier to find a suitable mix level. All that remained was to feed the signal to a variety of the reverb and delay send effects to give the tracks depth, and I also sneaked on a little of the lead vocal's Symphonic effect.
For the middle section, I resorted to some more copying and pasting of backing-vocal phrases to fill out the sound and widen the stereo image (much as in the choruses), and I also looped the final entry to extend it over into the final chorus. Bussing all those vocals together, I compressed the whole submix and set up another high-pass filter at 120Hz before adding in a little stereo delay.
The only remaining backing-vocal part was the little line during the second verse, which I processed quite heavily, to make it audible as 'ear candy' without detracting from the clarity of the lead vocal. Compression kept the level strictly under control, while flanging and low EQ cut thinned out the sound to make it almost akin to a synth pad. Sending to a selection of the loop effects I'd already set up (Symphonic, the Metalizer delay, and the dark drum reverb) made the sound more spacious while also sinking it into the mix.
Structure Tweaks, Drum De-essing, & Vocal Automation
As the mix began to come together, I noticed that there were a couple of sections where the song structure seemed to be compromising the musical flow. The first of these was during the middle section, where it just took a little too long for the vocals to build up into the chorus: chopping out a couple of bars made all the difference here. I also felt the track was just treading water a little during the outro after the final chorus, where there seemed to be four fairly redundant bars before the final vocal phrase entered. Again, I felt that ditching these was worthwhile to tighten up the ending of the song.
With all the tracks up, it still sounded like the drum parts contained a few too many high-frequency transients, especially on the tambourine sound. As another experiment, I inserted de-essing on the drum parts to try to tame this, and this finally did the trick, allowing me to decide on a suitable level for the drums without feeling I needed to tweak the fader the whole time.
My final task was to automate the fader levels for the vocal parts. With arrangements as busy as this, the lead vocals in particular usually benefit from fairly extensive fader riding in order to keep them exactly where they need to be in the mix. By the time I'd finished, the automation curve looked a bit like a graph of the FTSE100, but that's not unusual for this kind of fairly commercial style. The backing vocals also needed a few little rides during the choruses, but nothing too drastic.
Remix Reactions
Maarten Thiry said: "I love the final mix — the song builds up much better and it sounds more threatening, more dynamic, and more 'produced', with a lot more space in the mix. The verse arpeggio guitar sound is very nice, very warm and still tight, exactly how it sounded in my head. In the chorus the guitars finally 'bang' out of the speakers, and the more dominant Ebow guitar riff gives it a lot of atmosphere. I like the new 'trashy' drums — they remind me a bit of Portishead! I put way too much ambience on them and especially the snare sounded too thin. The bass sound is also much better, giving a nice mix between bottom end and punch — it really carries the song.
"I'm always struggling to get backing vocals to nicely in the mix, and most of the time I put lots of reverb on them, but it almost never works out how it should. You've managed to get them sitting nicely, and the vocals in the middle section are absolutely amazing! I'm dying to find out how you've done this, because I'm working on two other songs right now with a lot of vocal harmonies and I love the dreamy, wide sound you've given them. I also like the editing work with the backing vocals in the last chorus — it really adds something extra, and we'll probably play this live in the same way in the future.
"Yesterday I went to a nationally organised 'musician day' event where young musicians can attend workshops and talk with record labels, booking agents, and other record industry big-shots to get demo feedback. We talked to three different people and they all liked your mix very much. Two of them actually said they really liked the drums and tambourine idea, so I think we'd better abandon the idea of scrapping it... Thanks a lot!"
Snag List & Band Feedback
By this time my ears were getting tired and I began worrying that I was losing my objectivity, so I burned the mix as it was to CD and took a break of a day or two. I then began comparing my mix with some of my favourite commercial tracks on a variety of different systems: my studio monitors, the car stereo, a couple of boom boxes, some computer multimedia speakers, and a few pairs of headphones.
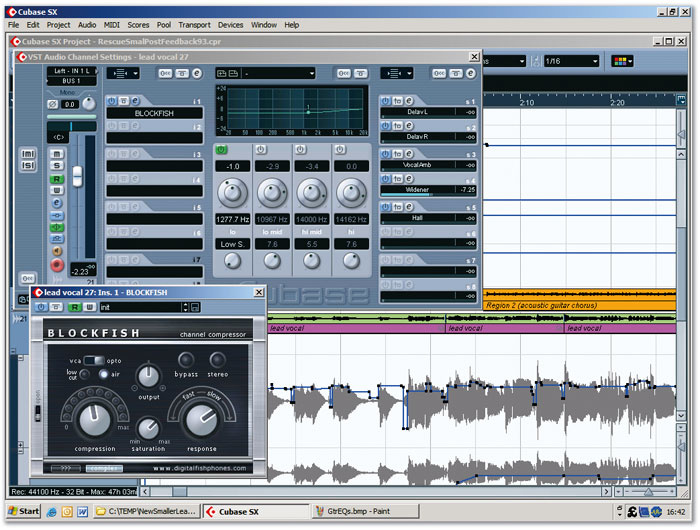
 Karen's lead vocal part was treated to a fairly subtle compression and saturation treatment courtesy of Digital Fishphones Blockfish, and was also EQ'd slightly to emphasise the high frequencies. As you can see, automation then played a big role in keeping the vocal levels consistent and in balancing the contributions of various different send effects at different points in the arrangement.
As you can see, automation then played a big role in keeping the vocal levels consistent and in balancing the contributions of various different send effects at different points in the arrangement.While doing this listening I began building what I usually call my 'snag list', where I write down anything that I still want to change. This list usually ends up being revised as I work my way from one system to another, because each playback chain tends to emphasise different aspects of the sound. The bottom line is that anything that sounds wrong on most of the systems usually needs attention.
Karen's lead vocal part was treated to a fairly subtle compression and saturation treatment courtesy of Digital Fishphones Blockfish, and was also EQ'd slightly to emphasise the high frequencies. As you can see, automation then played a big role in keeping the vocal levels consistent and in balancing the contributions of various different send effects at different points in the arrangement.
As you can see, automation then played a big role in keeping the vocal levels consistent and in balancing the contributions of various different send effects at different points in the arrangement.While doing this listening I began building what I usually call my 'snag list', where I write down anything that I still want to change. This list usually ends up being revised as I work my way from one system to another, because each playback chain tends to emphasise different aspects of the sound. The bottom line is that anything that sounds wrong on most of the systems usually needs attention.
There were a few overall balance issues (the drums were a bit too loud and the main chorus rhythm guitar too quiet) as well as a few little automation additions to ensure that the lead vocal was sitting right and that various little melodies in the backing parts were noticeable enough. Although I really liked the way the Symphonic effect was working on the lead vocal in the verses, it became more and more apparent as I listened on different systems that it was emphasising a hard edge in the vocal sound whenever Karen switched from head to chest voice, so I automated a high-frequency EQ cut in the effect return to remedy this at the offending moments.
Another thing it took me some time to realise was that the feedback from the main stereo delay treatment was set a little too high, which meant that excessive delay repeats were making the mix a little indistinct. To confirm that this was the real problem I listened to the mix without the drums and bass (a trick often associated with Beatles engineer Geoff Emerick) so that I could hear the delay and reverb effects balances in more detail.
Having returned to the studio to de-snag the mix, I emailed an MP3 to Maarten and the band for their comments. Although I couldn't do anything to replace the tambourine sound (with hindsight they'd have preferred to use a different sound), I was able to make a few further adjustments in response to their feedback, most notably fading up the mid-section drum parts a little and adjusting a couple of effect levels.
Non-linear Mixing
This was an interesting project to get involved with, but like a lot of pop-style work it was also a bit of a juggling act, given the number of different recorded parts. In particular, I found myself having to flit continually between processing, automation, and editing tasks as the mix began taking shape, in a way that's quite difficult to convey in print. However, with a track like this where most of the parts are nicely recorded, lots of subtle adjustments, as time-consuming as they are, can really make a big cumulative difference to the clarity and impact of the final product.