This unusual new preamp from UA is designed to make life easier, both for the recordist and 'the talent'.
 Universal Audio (UA) have a proud history dating back to the 1950s, when their founder, Bill Putnam, started manufacturing the equipment that he'd designed and built for his own use as a studio owner and recording engineer. They're best remembered for their classic LA2A and 1176 compressors. In 1999 Putnam's sons relaunched the company, focusing on the manufacture of vintage and modern hardware products, as well as cutting-edge DSP products for the DAW market.
UA's latest offering, the DCS Remote Preamp, is the first in a new range called the Desktop Console Series (the result of a partnership between UA and the founders of Euphonix). The series is designed to 'expand and enhance' typical DAW systems, providing the hardware facilities that such systems lack, in a convenient and compact package. A Monitor Master unit and various other products will follow the preamp that is being reviewed here.
Preamp Overview
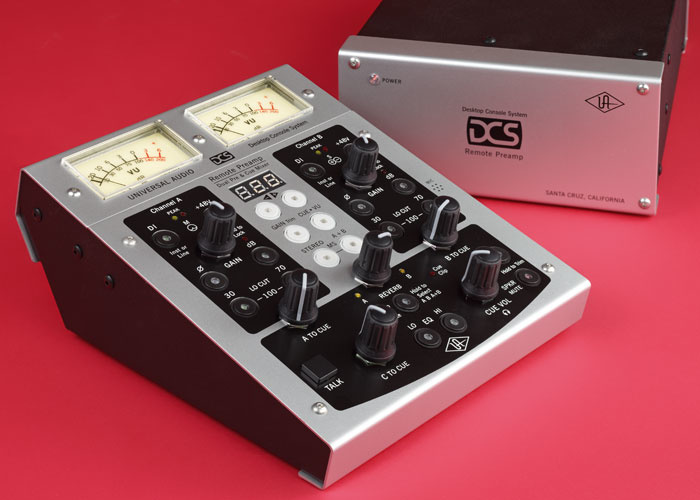
The DCS Remote Preamp is a dual mic preamp that incorporates sophisticated cue monitoring facilities. A two-box system, it comprises a small control surface and a separate interface box containing the audio electronics — all of which are digitally-controlled analogue. The control panel measures 175mm by 145mm, and is angled to suit desktop placement; its meter bridge can also be angled more steeply to improve visibility when the panel is placed to the rear of a desk. The only connection between the control panel and the main hardware box is a single Cat 5 cable, so installation is very neat and straightforward. A suitable six-metre cable is provided, but the system will work with up to 100 metres of cable if necessary.
The hardware unit is a chunky and heavy 'brick' of a thing, measuring roughly 220 x 145 x 75mm. The front panel has no controls or connectors, carrying only a single orange (not blue: hurrah!) power LED. The interesting stuff is hidden around the back on a tightly packed connector panel. To the left is the fixed-voltage fused IEC mains inlet (230V for the review model, but available in 100 or 120V), and above it is the Cat 5 socket to link with the remote control. A green LED lights when the link with the control panel is working, and flashes if the connection is broken. The box gets quite warm after an hour or two's use, and I was surprised to see no ventilation slots on the case anywhere.
The crowded nature of the connector panel makes the labelling less than perfectly clear, and I had to resort to reading the manual to clarify what some things did, but that's the price you pay for a unit that is both compact and flexible, and once it's installed you won't have to worry about the labelling anyway.
The preamp inputs start on the right-hand side of the rear panel, with two XLRs for microphones and two quarter-inch sockets alongside to provide unbalanced instrument and/or balanced line inputs. The XLRs are mounted upside down, with the release buttons underneath, and this makes unplugging mics a little fiddly. The +4dBu balanced preamp outputs are presented on a pair of TRS quarter-inch sockets immediately below the XLRs and, very usefully, there is also an unbalanced stereo output on another TRS socket running at -10dBV.
Almost all of the rest of the panel socketry relates to the headphone cue system, which features two external inputs and provides two separate outputs. The first input is labelled 'C-In', and is equipped with two balanced line-level inputs (configurable for +4dBu or -10dBV operation). These are intended to be fed from the DAW's main stereo monitoring outputs. The second input is labelled 'Cue in', and is provided on a single unbalanced stereo input socket. It is intended to accept either the signal from a headphone output or some other unbalanced stereo line input. The sensitivity is adjustable over an 18dB range in 6dB increments.
The output from the cue-monitoring section is presented as both a dedicated stereo headphone socket and two balanced, line-level outputs. The output level can be attenuated with a 12dB pad if required, which is useful when feeding powered monitors.
Given the crowded nature of the rear panel when the box is installed and fully wired up, it would have been helpful if the Cue headphone socket was duplicated on the front panel (perhaps with the DI inputs), to make access easier, but this is a minor complaint, and at least the headphone and DI sockets are all at the top of the panel. All in all, the interconnectivity means that there are a lot of well thought-out facilities and features — and there's even a balanced line-level output from the built-in talkback mic, to allow integration with other talkback systems.
Mic Amps
Presumably because of the Euphonix connection, the mic-amp circuitry used in the Remote Preamp is unlike any other UA design. The preamps are completely transformerless and use a 'transimpedance' topology, which employs current feedback instead of voltage feedback — an approach that is claimed to provide superior distortion characteristics and 'zero coloration'. The circuitry has also been designed to preserve a very wide bandwidth, extending between 4Hz and 150kHz (at -3dB).
A very healthy maximum gain of just under 70dB is available too, adjusted in 1dB increments, so you'll have no trouble using ribbon mics. The mic input impedance is a fairly traditional 2kΩ, with good common-mode rejection (better than 70dB between 20Hz and 20kHz). There is plenty of headroom, with the mic input able to accommodate peak signals of +14dBu, and the line input taking the full +24dBu on balanced signals and a good +18dBu for unbalanced ones.
Very usefully, the preamp's output level is adjustable via a facility referred to as 'Gain Trim', which is provided to optimise gain structure and help match the unit's peak levels with the expectations of a DAW's A-D interface. Essentially, this facility allows the clipping point of the preamp to be aligned with the level required to achieve 0dBFS in the converter it is feeding — thus perfectly optimising the gain structure. The range of adjustment of the clipping point is from 0 to +24dBu, which should span every converter on the market.
Control Surface
The control surface has a clean, professional look about it, with silver-on-black or black-on-silver legends. Each input section and the cue controls are located within separate black panels, while the configuration controls lie in the centre on the background silver panel. There are just seven rotary controls (all normal pots rather than shaft encoders), plus 23 illuminated buttons, one non-illuminated button, a three-digit LED display and a pair of backlit VU meters. Unusually, the buttons activate on release, rather than when pressed — something that feels slightly odd when you first start using the preamp.
The preamp controls are all pretty intuitive. Two buttons select the line/DI input and phantom power but, cleverly, these are interlocked, such that selecting one deselects the other, and the outputs are muted for a few seconds to minimise the risk of clicks or splats. The phantom voltage also ramps up and down over a few seconds when switched on and off, which is nice. The first in the next row of two buttons introduces a polarity inversion, while the second recalls the current gain value to the central three-digit LED display and, if depressed for a couple of seconds, locks all of the channel's preamp controls to prevent accidental adjustment. The last two buttons insert a high-pass (low-cut) filter with 18dB per octave slope, turning over at 30, 70 or 100Hz.
 The portable control panel of the Remote Preamp system. As well allowing you to set up the preamp, the controls also adjust the cue mix facility — so, for example, a vocalist could use the unit to mix their own monitor signal using the built-in reverb.The rotary gain control provides a 59dB gain range for microphone inputs, the precise start and end points being determined by the Gain Trim setting. With the trim set to the default +18dBu, the range is +4 to +63dB in 1dB increments, and at the +24dBu setting it rises, logically enough, to span +10 to +69dB. In line-input mode the gain range is 42dB, nominally from -6 to +36dB (at the default +18dBu Gain Trim setting). So the display always shows the true amount of gain applied to the signal. I noticed that while the gain is being adjusted low-level clicks are audible, so it would be advisable to set and leave the preamp gain rather than trying to ride levels while recording.
The centre section of the control panel carries the configuration buttons. The top two are used to increment/decrement parameter values, and when pressed together they call up the configuration menu (see below). The next two buttons allow the Gain Trim value to be adjusted and swap the signal feeding the VU meters between the preamp outputs and the stereo cue-monitoring output.
If the Gain Trim button is held down for a couple of seconds the display enters a mode that allows the illumination level of the yellow Peak warning LED to be set, relative to the red clip LED. The default is -4dB, but it can be set anywhere between 0 and -12dB in 1dB steps. Another useful feature here is that if the VU meter button is held down for two seconds, the signal level corresponding to 0VU can be adjusted anywhere between -3 and -20dB below the peak clip level established with the Gain Trim function. So, for example, if the Gain Trim is set to align clipping with +18dBu, setting the 0VU point to -14dB, the meters will show 0VU for a +4dBu input, which is the normal standard. If the Peak warning LED is set to come on at its -4 default, then it will light up when the signal reaches +14dBu.
The maths might seem complicated, but what it means is that you can calibrate the meters, the output clipping level, the Peak warning LEDs and the gain structure to suit pretty much any system requirements, which is very helpful indeed: would that more manufacturers made life this easy!
The last two buttons determine the operating mode of the preamps: dual channel, summed mono, stereo or decoded MS stereo (that is, the preamp accepts inputs from a Mid/Side mic array and provides a decoded left-right stereo output). When switched to stereo mode, channel A's gain control sets the gain equally in both channels, but in all other modes the gain controls remain independent.
The section at the bottom of the panel gives access to the cue-monitoring facilities. Each preamp channel has its own rotary level control to feed the monitoring, but in the stereo mono sum and M/S modes, the control for channel A determines the level that feeds both channels.
Since most performers like to hear some reverb in their headphones when recording, UA have included a simple digital reverb facility within the unit. It sits in the signal path after the preamp level controls and is provided with a Mix control to set the appropriate wet/dry balance. A push button allows the reverb to be applied to either or both channels — so, if you wish, you can add reverb to a vocal mic on one channel but not to a guitar mic on the other, for example. The reverb only appears on the Cue monitor outputs, too — the main preamp outs are completely clean. The same button that determines which channels get reverb also selects the type of reverb. There are three studio rooms and three plates (with large, medium and small options), plus two concert halls (bright and dark) and a medium studio room with chorus. The feature is simple, but there is a useful range of options and it does the job well enough.
Of the two external inputs, only the C-In inputs are provided with a rotary level control. The assumption seems to be that the separate stereo Cue In signal can be level-controlled from its source. The last rotary control sets the overall cue output volume, and two more illuminated push buttons activate independent low- and high-frequency band-pass (bell) filters which, again, only affect the monitoring signal. The low filter is centred on 85Hz while the high filter is located at 14kHz, and both can be adjusted over a ±12dB range in 3dB steps. Usefully, pressing both buttons together bypasses the EQ, but doesn't reset it. To the right are two illuminated mute buttons: the first mutes the main cue output and the second switches off the stereo Cue-in input signal. Over to the left, the final non-illuminated square black button (on a black background) activates the internal talkback mic.
The action of some functions can be modified by entering the configuration mode. For example, the C-In sensitivity can be switched between +4dBu and -10dBV, and the talkback mic sensitivity can be adjusted over a 21dB range in seven 3dB steps. The talkback mode can also be configured so that pressing the talkback button sends the mic output to the cue headphones (as well as appearing on the talkback output socket), or just to the talkback output socket, either switched or continuous. The headphone cue output can also be configured to remain on at all times, mute when the main monitor output is muted, or toggle with the main monitor mute (so either the main monitor output or the headphone output is active, but not both), something that is useful if you want to toggle between main and alternative monitors.
In Use
It took a while to get used to the Remote Preamp. While most of the functionality is obvious, some features are not that intuitive and I had to resort to the manual on more than one occasion to figure out how to set some functions up. That wasn't helped by the fact that although the manual has a lot of information, it's not the most flowing, logical or easy-to-read document. However, my perseverance paid off, and I quickly grew to like the Remote Preamp very much indeed.
 Mic inputs come via two XLRs and there are two quarter-inch jack sockets to provide unbalanced instrument and/or balanced line inputs.The preamps are very quiet, clean, and with a neutral character, although the bottom end doesn't quite have that larger-than-life quality of some of the best high-grade preamps. Having said that, I would say these preamps sound comparable with any decent professional console — I've certainly heard a lot worse over the years! There was no discernible crosstalk between channels, the stereo and MS modes worked exactly as they should, and channel gain tracking was extremely precise in the stereo mode.
I was able to match the gain structure to a variety of converters without any trouble. For example, the inputs on my Genex recorder are calibrated for 0dBFS = +18dBu, my Yamaha DM1000 console is set for +24dBu and my Apogee PSX100 is set to 0dBFS = +12dBu, and I was able to align the Remote Preamp to all with considerable ease and not a trimmer tool in sight!
The monitoring facilities are flexible and easy to use, and although the reverb isn't in Lexicon territory, it was more than adequate for the task in hand. I favoured the dark concert hall most of the time, though other users seemed to prefer the various plates. The studio rooms tend to have very strong early reflections that add a good sense of 'liveness' and space too.
I found the Remote Preamp the ideal tool for a vocal tracking session. I set the control unit up in the studio, feeding the control line through a small hole in the wall normally used for mic cables. With everything calibrated properly, it was easy to set the ideal recording level in the studio, leaving a healthy headroom margin using the VU meters, and then I locked the controls to prevent accidents. When I returned to the control room, the 'talent' was able to adjust their own monitoring level, latency-free mic balance, backing-track level and reverb type and balance completely independently of me, which was quite a nice luxury for both of us. The headphone output level seemed quite loud enough for me, although one user complained that it was a little lacking in ultimate volume.
In a more conventional home studio, the Remote Preamp makes an ideal two-way interface, with all the key controls for recording and monitoring immediately to hand, and controlled from a neat panel with a single cable running from the rear — so moving it out to the studio area for recording and back to the computer area when mixing is very easy and convenient.
Lasting Impression
All in all, I'm very impressed with the Remote Preamp. It is very well engineered and cleverly thought out, and it meets a variety of needs that aren't immediately obvious until you've used this device. The built-in reverb solves a perennial monitoring problem very neatly, and the ability to mix latency-free local mic inputs with two external sources is very handy too. The preamps themselves are of excellent quality, being accurately matched for stereo, and mono sum and MS decoding are built in, which should certainly be useful on occasions. I'm very much looking forward to seeing other units in this series.
Alternatives
I'm not aware of any directly comparable alternatives that offer the preamp, monitoring and remote control functionality of the DCS Remote Preamp, though some audio interfaces, such as the TC Konnekt 48 and the Presonus Firestudio, are capable of covering this sort of ground.
Summary
A well engineered and very cleverly thought-out preamp-cum-monitoring unit with excellent preamps, handy stereo, MS and mono facilities, and built-in monitoring reverb.
information
£822 including VAT.
Source Distribution +44 (0)208 962 5080.