 Pro Tools can play back Quicktime movies in its Movie window, but only at the original resolution specified in the Quicktime file.
This month's Pro Tools workshop is the first in a series where we will explain how to use Digidesign's DAW to work to picture. First of all, we look at the decisions you need to make in setting up your system.
There are three basic ways to work to picture in Pro Tools. First, you can lock Pro Tools via time code to an external video playback machine and then Pro Tools can 'chase' the VT machine. This process doesn't put any extra load on the computer but it is slow, because you have to wait for the VT machine to spool backwards and forwards and cue to the correct position on the tape before you can work on a section. You will also need some sort of timecode synchroniser like Digidesign's Sync I/O.
Second, you can import video files directly into a video track in Pro Tools. This is fast, because there's no waiting for the VT machine to catch up: Pro Tools can continue to work in a 'non-linear' way and will jump to the correct part of the video file as you move the cursor around the Session, just as it does with the audio files. However, handling the video file puts a load on the computer, and you will find that with high track counts and plug-in counts, Pro Tools is more sluggish when using a video file as your picture source.
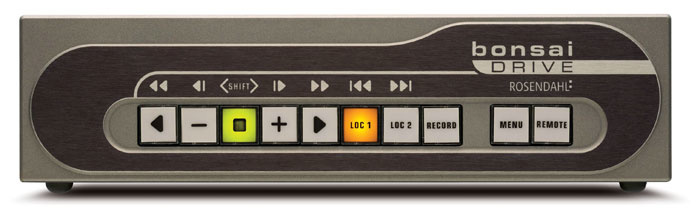
Third, you can use a separate non-linear video player. This can be either a second computer running an application like Virtual Video Tape Recorder from Gallery Software, or a dedicated non-linear player like Rosendahl's Bonsai Drive. This has the benefits of both of the first two options, with the only down side being cost.
In this series, however, I'm going to concentrate on the second option, as it is both the easiest one to implement and the most affordable. Pro Tools, on both Mac and PC , can use any type of movie file you like as long as it is a Quicktime movie! However, you have to be careful which codec is used to create the Quicktime movie — see box above for details.
Quicktime Movie Tips
Pro Tools can handle most QuickTime movies, but not all. If the video card used to create the QT movie has hardware data compression, Pro Tools will be unable to play the movie unless the correct card is available in your computer. This tends to make taking the Session from system to system difficult unless they all have the same video card. Second, when exporting from Avid Xpress DV, always use the Apple DV codec in the Export dialogue box. Do not use the Avid codec — if you do then it won't play in Pro Tools. Third, Pro Tools currently doesn't support DV stream files, so make sure you have a DV movie and not a DV stream.
Opening Windows
The great news is that without any additional hardware Pro Tools will play and display a Quicktime movie in a special movie window on your computer screen. The size of this window is set by the pixel size of the Quicktime movie, and cannot be changed in Pro Tools, which is where Quicktime Pro comes in very handy. It costs £20 to unlock Quicktime Player, which enables you to carry out numerous tasks such as video resizing, file conversion and so on. You can buy the 'unlock' code for Quicktime Pro for Windows or Mac OS from the Apple web site.
If you prefer to view your movie on a separate screen or video monitor, there are several options available to you (but see the 'Video Latency' box). First, you can use a DV Firewire bridge transcoder to play out your movie via a Firewire port, through the transcoder, and into a video monitor. Digidesign approve the Canopus ADVC 100 and the newer ADVC 110 model, but for this to work the movie files must be DV movies. No other type of codec can be used, and if you have a movie in any other format you will find that the Play DV Movie Out Firewire Port menu option in the Video menu in Pro Tools is greyed out.
Second, if you have a Mac and a spare PCI slot, Digidesign have approved the use of the Aurora Igniter LT/IgniterX Lite video capture card. You can use this to route your movie file out to a video monitor, and it gives you a broader choice of movie codecs that you can use. The third option is the use of a Miro Motion DC30 or DC30+ video capture card. Although these are not approved by Digidesign, a number of users have found this option to work very successfully using freeware OS X drivers from Squared 5, and Miro cards can be picked up very cheaply second-hand.
Decisions, Decisions
In terms of the materials needed to work to picture in Pro Tools, you will encounter three basic elements, some or all of which will need to be delivered to you. First, you'll obviously need the movie file. Second, you'll want an EDL (Edit Decision List) from the video edit, if one exists. This is a list that records how and where the video was edited. Third, there is what's called 'sync audio', if any exists for the project you're working on. Adverts, for instance, are often shot 'mute', with all sound added in post-production.
Useful Links
www.alfanet.it/squared5/dc30xact.html
www.avid.com/content/7697/OMF v 1.0.doc
www.northbeachpost.com/
audio_primer/omf_export_for_avid.html
This workflow has been made a lot simpler with the introduction of electronic delivery of these elements. Before, you would get the video and audio on tapes which would then need digitising and loading into your audio editing system, and then the EDL (which often used to come on a floppy disk) would be used to 'conform' the audio material to match the video edit against the original timecode data from each edit. This process is rarely plain sailing, and is thankfully less common these days.
The EDL now more often comes in the form of an OMF (Open Media Framework) file: there are other formats but this is still the most common one. These are interchange standards that enable the user to import, edit and export information to and from different brands of editing station, whether video-to-audio, audio-to-audio or audio-to-video.
OMF files can come in two types, 'embedded' or 'referenced'. An embedded OMF is one large file that includes all the audio used in the project and the EDL consolidated into one file. A referenced file is where the OMF file is simply the EDL data, which then points to all the individual files, in the same way as a Pro Tools Session does. The down side of the referenced format is that it is very easy to lose a few files in the transfer process, and I always ask for an embedded OMF file. These can easily be created from video workstations like Avid or Final Cut Pro. If the video editor is unsure on how best to handle the OMF export, there are loads of help guides available on the Internet. For example, for a guide for exporting from FCP see Ken Stone's site, or for exporting from an Avid have a look at Avid's own site (see the 'Useful Links' box).
.") If you want to work with non-linear digital video but need to take the strain off your Pro Tools machine, options include Rosendahl's Bonsai Drive and Gallery Software's Virtual VTR (running on a second computer).These files tend to be delivered on DVD±R or on a portable hard drive as the DV video files can be quite large — around 200MB per minute of video. My last project came in at over 50GB of data! There may be situations where you will still receive the video on a 'tape', whether it is VHS or DV or Beta. You will then need to capture this video from a player into the computer and so create your own Quicktime movie. Use your preferred video editing application to capture the video. Mac users will probably have iMovie somewhere, as it comes free with most Macs, or you can use Final Cut Pro — you don't need the latest version and so you can pick up a second-hand copy for a song. Make sure you export it as a DV Quicktime movie, not a DV stream, and all should be fine. On Windows I would recommend getting Quicktime Pro and using that to convert the video files from, say, Adobe Premiere to Quicktime format. If you get your video on a DVD Video disc, you will have to rip the disc and then convert the results into a Quicktime movie, which is a slow process.
If you want to work with non-linear digital video but need to take the strain off your Pro Tools machine, options include Rosendahl's Bonsai Drive and Gallery Software's Virtual VTR (running on a second computer).These files tend to be delivered on DVD±R or on a portable hard drive as the DV video files can be quite large — around 200MB per minute of video. My last project came in at over 50GB of data! There may be situations where you will still receive the video on a 'tape', whether it is VHS or DV or Beta. You will then need to capture this video from a player into the computer and so create your own Quicktime movie. Use your preferred video editing application to capture the video. Mac users will probably have iMovie somewhere, as it comes free with most Macs, or you can use Final Cut Pro — you don't need the latest version and so you can pick up a second-hand copy for a song. Make sure you export it as a DV Quicktime movie, not a DV stream, and all should be fine. On Windows I would recommend getting Quicktime Pro and using that to convert the video files from, say, Adobe Premiere to Quicktime format. If you get your video on a DVD Video disc, you will have to rip the disc and then convert the results into a Quicktime movie, which is a slow process.
Wherever possible, then, get the client to supply a Quicktime movie as a video file. Pro Tools will be happy and it won't take you forever to get the video file into the correct format. Note that if the file is delivered to you on a DVD±R, you'll need to copy it off onto a hard drive before trying to import it into Pro Tools. Put the DV movie onto a different drive to your audio files — your boot drive will be fine if you don't have another drive other than your audio drive. While you're on the 'phone to the client, try to make sure they send video with 'burnt-in' timecode. This is where the timecode is overlaid, in numbers, on the video so at any point you can see the exact timecode point. This is very useful to check that the video file matches the Pro Tools timeline by going to the end of the video track and comparing the burnt-in timecode with the Pro Tools counter.
Video Latency
If you use any external display to view video files in Pro Tools, it's important that you take into consideration video latency — the delay between video being output by Pro Tools and appearing on a screen. This will be different depending on which method you use to view your video file and what device you use to view it with. For example, some people use video projectors, which tend to have a higher latency than other display devices. Why does this matter? Well, if you are trying to get things in sync with the video and the video you are viewing is delayed, then all your carefully positioned 'hit points' will be out of sync on the finished product and you will have a very unhappy client on your hands! Note that video latency is an issue with both TDM and LE systems. Pro Tools has a feature in the Movie menu where you can compensate for this latency to make sure everything is bang in sync, but first you need to know how much compensation to apply!
There are some extremely useful documents on the amounts of latency on the different systems at the Pharoah Editorial site (see 'Useful Links' box), under the Products/Papers section. Richard Fairbanks compares all the different options outlined above with their relative performance and has been very supportive on the Digidesign User Conference on these matters.
Importing Video
Importing a video file into Pro Tools is simple. Select Import Movie... from the Movie menu in Pro Tools, navigate your way to the location of the movie file. Click on the Open button and Pro Tools will create a video track and open the Movie window. The size of the Movie window will depend on the pixel size of the movie and the resolution of your computer screen.
It is not possible to have 'full screen' video from within Pro Tools unless you dedicate one computer monitor to it and set that monitor's resolution to a size in pixels similar to that of the movie. For instance, for a standard 4:3 TV movie, the movie file is 720x576 pixels, so by setting the screen resolution of your second monitor to 800x600, the movie will almost fill the screen. For most purposes it's best to route the video out of the computer to a video monitor (see above) and so view the movie on a screen designed for the job — this could be a domestic TV using the AV input, so it doesn't need to break the bank.

 or Frames. The latter is helpful, but demands more of your computer.") You can choose whether Pro Tools' video track displays your video file as Blocks (top) or Frames. The latter is helpful, but demands more of your computer.You can set the video track to show either blocks or frames, which displays thumbnails along the track in the Edit window. Although this can help navigate around the movie it does put extra demand on the computer, so I tend to leave it in blocks mode. You can also hide the video track using the Show/Hide menu, to free up both computer resources and screen real estate.
You can choose whether Pro Tools' video track displays your video file as Blocks (top) or Frames. The latter is helpful, but demands more of your computer.You can set the video track to show either blocks or frames, which displays thumbnails along the track in the Edit window. Although this can help navigate around the movie it does put extra demand on the computer, so I tend to leave it in blocks mode. You can also hide the video track using the Show/Hide menu, to free up both computer resources and screen real estate.
When you import a video file into Pro Tools it will place the start of the video file at the start of the Session, but the timecode in the video file might not start at zero. You can compensate for this by changing the Session Start time in the Session Setup Window to match the start time of the video file. Some people like to have some space before the video file starts for line-up tone and so on. No problem: just set the Session Start time back, say, 1 minute. You can then use the Spot tool to position the start of the video file at the correct timecode point.
Now you may well be asking: so how does all this stuff actually help me do something useful with my Pro Tools system and working to picture? Well, this month we've covered what you need to get to a position to start work. In the rest of this series we will look at how you can use Pro Tools to handle the nuts and bolts of audio post-production for TV documentaries, drama and films as well as composing music to picture. We will also be exploring how it is possible to work to picture with nothing more than a laptop, an M Box and Pro Tools LE even though there is no Timecode ruler in PTLE, and also how Digidesign's DV Toolkit package can help.
If you want to go into the topic in even more detail, you might want to take a look at Ashley Shepherd's book Pro Tools For Video, Film And Multimedia (Muska Lipman: ISBN 159200069X).
The Upgrade Dilemma
A few days after having ordered the Pro Tools 7 upgrade for my HD system I was checking the Digidesign web site for compatibility information, to find to my horror that my 933MHz G4 Mac was no longer on the list! What's more, Digi have issued a very clear statement recommending against any of the Quicksilver models from 2001/2002. I had expected I would need to upgrade some of my plug-ins and upgrade from Mac OS 10.3.8 to Tiger, but I certainly hadn't bargained on having to replace my computer at this point!
So what computer to upgrade to? There are a couple of things that complicate matters. All Macs are now being produced with PCIe slots instead of old-style PCI slots except for one model, and from June 2007 Apple are going to move to Intel rather than Power PC processors.
Digidesign have announced they will be producing PCIe-compatible HD Core and Accel cards, with a crossgrade route for existing users. However, these will be identical in power to the existing cards, so I was reluctant to spend the money for no gain in performance. What's more, even this system would only be an stopgap: my guess is that within 12 months Digidesign will have new cards that will only be available in the PCIe format and Apple will have Intel-based Macs. Apple have stated that Power PC models won't be dropped from the range until late 2007, but again Digidesign are surely going to put their efforts into developing new software and hardware for the Intel-based Macs with PCIe slots in them.
So bearing in mind what the future holds, what's the best option now for a system that can run Pro Tools 7? It seemed to me that there were five options to choose from:
1. Stop at Pro Tools v6.9 running on my G4/933 until the world settles.
2. Fit a processor upgrade to my existing G4/933 so, unofficially at least, it would be fast enough to run Pro Tools 7.
3. Buy a second-hand 'Mirror Door' G4 Mac that is on the Pro Tools 7 approval list and sell my G4/933.
4. Buy a new G5 with PCI slots before stocks run and sell my G4.
5. Buy a new G5, crossgrade my Digidesign cards to PCIe ones when they come out, and sell my G4.
Option 1 would cost me nothing, but would build a brick wall around my facility that will get higher and higher as the world moves onwards outside.
Option 2 would cost between £300 and £500 depending on what sort of card I got, but it would still be a G4 processor and of course totally unapproved by Digidesign. I did some research and found mixed reports as to the success of processor upgrade cards and Pro Tools — and of course no one was able to report success with Pro Tools 7 so I would be completely on my own there.
Option 3 would seem to cost around £500 to £700 for a well specified G4 Mirror Door machine, to which I would probably need to add some more RAM and buy a copy of Tiger. I would be able to sell my G4/933 for around £400 to £450, ending up with a net cost of between £200 to £400. This would give me an approved machine with some reasonable life in it but it would still be a G4 rather than a G5.
Option 4 would have a net cost of around £800 and I would end up with a dual-2.3GHz G5 computer with PCI slots, but it would be a new computer with built-in obsolescence.
Option 5 would give me a G5 with the most life but at an as-yet-unknown cost. Digidesign have as of the time of writing not published the crossgrade price for going from PCI to PCIe cards. My guess is that it will be around £500 per card, so for my HD2 system this would give me a net cost of around £1800 for this option, and it still doesn't get round the problems of the Intel Macs coming over the horizon.
My gut feeling, having researched this as thoroughly as I could, is the world will change completely within the next 12 to 18 months. In the present, however, I need to have a system that allows me to make a living and keeps me close to the front of the technology race. In the end, I decided to go with option 3 as being the least expensive solution that keeps me well inside the supported hardware window until the revolution comes. When that happens I plan to go for a well specified new Intel Mac with PCIe slots, as well as whatever new Pro Tools hardware is current at that time, having had my money's worth out of this system and built up a nice reserve out of current earning to pay for its successor. That's my choice — what's yours?