
Steinberg have drawn on some of the technologies they pioneered in Cubase 4 to create a new entry-level sequencing package.
Steinberg's Sequel is described as a "new entry-level sequencer designed to be an easy-to-use, all-inclusive music production platform". It combines straightforward multitrack audio recording and MIDI sequencing, an integrated software instrument, and a set of tools especially designed to aid in the construction of loop-based music. As such, it's broadly comparable with Apple's Garage Band and Sony's Acid Music Studio.
Sequel is available for Windows (XP, and "compatible with Vista Home Basic") and Mac OS X (it's a universal binary requiring OS 10.4 or higher). The quoted minimum system requirements are perhaps slightly on the high side, demanding 1GB of RAM and at least a 1280 x 1024 display resolution, but not excessive for new or recent machines.
The package contains a single DVD, which contains the application along with sample content and demo and tutorial projects. A very well-written and well-presented printed manual is also included, which provides a clear and easy-to-understand overview of the whole application.
An 'activation code' serial number is provided on a printed slip, but an Internet connection is nevertheless required to complete the activation process before Sequel can be used. This is a minor irritation, although not an uncommon one. (Note that, because a unique authorisation is written onto the hard drive, it isn't possible to have Sequel installed on two different computers at once.) Mid-way through the installation process I was prompted to 'connect your eLicenser(s) to the USB ports you are about to use'. I don't own an 'eLicenser', none is provided in the box, and the manual makes no mention of any need for one. Puzzled, I clicked Next a couple of times and the problem went away. This hiccup aside, the installer continued straightforwardly, before launching an application called Syncrosoft LCC License Download Wizard, into which I was prompted to enter my activation code. After I entered the code and clicked 'Next' a couple of times, the program began downloading my license. A dialogue box then announced that 'The license was succesfully [sic] downloaded and is now PERMANENTLY stored in the protection device. The used activation code is now INVALID and can no longer be used.'
On investigation, it turns out that an 'eLicenser' is a Synchrosoft hardware dongle; and although Sequel doesn't come with a hardware dongle, it uses a software emulation of it. I'm not aware of other applications that use this form of copy-protection, and I can't help feeling that few words of explanation should be added to the installation instructions, given that this is an 'entry-level' package aimed at technically inexperienced users. The concluding message could also have been worded differently, so as to read a little less like an error. However, clicking OK and Finish rounded off the installation process and I was ready to continue.
Pre-plugged
Although the internal workings of its effects and instrument features are presumably built on Steinberg's industry-standard VST technology, Sequel doesn't allow the use of third-party effects plug-ins. Fortunately, a reasonable selection of good-sounding effects is included, grouped by category. These are:
- Delay: Ping Pong Delay, Stereo Delay.
- Distortion: Amp Simulator, Distortion.
- Dynamics: Compressor, Gate, Maximiser.
- Modulation: Auto Pan, Chorus, Flanger, Phaser, Rotary, Tremolo, Vibrato.
- Other: Roomworks SE, Stereo Enhancer, Dual Filter.
- Channel equaliser: three-band EQ with variable frequency Lo/Hi Shelving, parametric mid-band with variable frequency and Q.
Additionally, each track has a simple compressor, with Threshold and Gain Reduction controls, fixed in the signal path after the other inserts but before the EQ.
The Acid Test
If you've ever worked with Acid, you'll feel at home with Sequel almost immediately. Even if you haven't, pretty much the same applies. The main window is divided into three panes, stacked horizontally. The top strip is called the Pilot Zone and features straightforward transport controls and a time and position display, together with buttons for accessing file management, automation and edit functions. It also features a convenient built-in tuner for guitar or bass, which is a nice touch.
The Arrange Zone beneath is a fairly standard sequencer window, with parallel horizontal tracks running left to right. Each track has an editable name field and a convenient collection of controls gathered at the left-hand end.
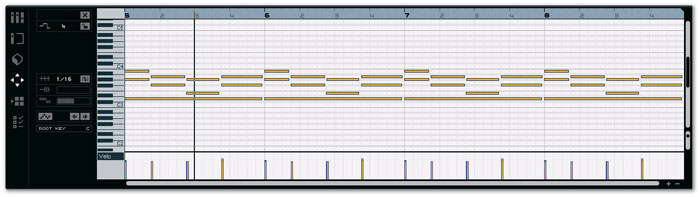
, and a sample editor for audio loops (below).") Double-clicking a loop in the main Arrange Zone brings up an appropriate editor in the Multi Zone: a piano-roll editor for Instrument loops (above), and a sample editor for audio loops (below).The Multi Zone at the bottom displays different parameters depending on what you're doing. By default, a simple mixer is visible, with volume faders pan controls, solo, mute and record arm buttons for each track. Double-clicking a loop in the Arrange Zone displays the Editor Page in the Multi Zone; for audio loops this brings up a simple sample editor, while instrument loops have a piano-roll editor (see screens on previous page).
Double-clicking a loop in the main Arrange Zone brings up an appropriate editor in the Multi Zone: a piano-roll editor for Instrument loops (above), and a sample editor for audio loops (below).The Multi Zone at the bottom displays different parameters depending on what you're doing. By default, a simple mixer is visible, with volume faders pan controls, solo, mute and record arm buttons for each track. Double-clicking a loop in the Arrange Zone displays the Editor Page in the Multi Zone; for audio loops this brings up a simple sample editor, while instrument loops have a piano-roll editor (see screens on previous page).
The piano-roll editor is clear and easy to use, and allows control data (velocity, volume, pan and modulation, among others) to be edited alongside note data. The sample editor has several useful features. Add Silence is basic non-destructive muting, Audio Quantise does a pretty good job of automatically correcting the phrasing of audio loops to make them better match the tempo of the Project, and the Manual Adjust Beats function allows you to fine-tune things 'by hand'.
The Multi Zone can also display a Track Inspector Page (see above), which shows a set of controls relevant to the selected track. For audio tracks, these include Track Effects, which are slots for two different insert effects that can be loaded in series, and a flexible EQ. Global Effects, which are a pair of send effects, and Output Effects (a set of master channel inserts) are also visible on the Track Inspector Page, although only one set of each exists per Project. Any of Sequel 's effects can be used as Global Effects, while Output Effects have two freely assignable slots and two fixed effects (Maximiser and Stereo Enhancer).
Instrument tracks have all the same options as audio tracks, plus an Instrument tab containing instrument parameters such as filter cutoff and amplifier envelope, among others, and an Event Effects tab. This features MIDI effects such as a Chorder, which generates chords from single notes, and an Arpeggiator.
Live & Kicking
Sequel 's Live Pads are also displayed in the Multi Zone. These are 16 small, clickable squares (see top screen above) which work in conjunction with the Arranger Track that runs along the top of the Arrange Zone. Parts created in the Arranger Track act as markers for delineating sections within a screen full of stuff. For example, you might decide that the stuff in bars 1-8 in the Arrange Zone would make a good 'verse', while bars 9-17 would sound good as a 'chorus'. In the Arrange Track, you can create corresponding parts to mark each section. These will automatically be named A and B (and so on alphabetically).
 or Global Effects.") The Multi Zone can also show Track Effects and EQ (as here) or Global Effects.Each of the parts created in the Arranger Track has its own Live Pad automatically associated with it, and clicking the pads causes Sequel to jump from one to the other. By carefully setting up a few different sections in advance, it's possible to improvise a live arrangement (or rearrangement) of a tune 'on the fly'.
The Multi Zone can also show Track Effects and EQ (as here) or Global Effects.Each of the parts created in the Arranger Track has its own Live Pad automatically associated with it, and clicking the pads causes Sequel to jump from one to the other. By carefully setting up a few different sections in advance, it's possible to improvise a live arrangement (or rearrangement) of a tune 'on the fly'.
A list of options to the left of the Live Pads allows you to control exactly how the transition from one section to another is performed. When Now is selected, the transition will happen immediately after you click on the pad — so if your timing is off, everyone will hear. The '4 bars', '2 bars', '1 bar' and '1 beat' options tell Sequel to make the transition after you click, but neatly at the end of a bar or beat, whilst End plays the one section through to its end before moving to the next. More options are available in Chain Play mode, which allows a whole list of changes to be stored, so that full 'song' arrangements can be mapped out in advance.
Immediately below the Arranger Track is the Transpose Track. Parts created in the Transpose Track allow you to set a global pitch offset (plus or minus 24 semitones, in semitone steps) which will affect the pitch of all tracks, for the duration of that part.
Second Opinion
My first reaction when I saw the announcement of Steinberg's Sequel was 'About bloody time!' After Apple threw down the gauntlet for entry-level music production at the beginning of 2004 with the release of Garage Band, there was a noticeable silence from other music software developers, especially on the Windows platform, with which Garage Band wasn't compatible. M-Audio released Session last year, which was one of the first blatant stabs at the ' Garage Band for Windows' concept, and while Cakewalk have always had a range of software to accommodate all price points, Steinberg have been noticeably absent from the sub-£100 market since the demise of Cubasis.
The choice of name is a little odd, since Sequel implies there was something before it. And to say that Cubase came before Sequel would be equally odd since the former is designed to be more powerful and feature-rich than the latter. Still, I will feel a certain perverse pleasure if Steinberg ever release a new version called Sequel 2.
Sequel uses the same Syncrosoft copy-protection software as Steinberg's other products, although it relies on a virtual dongle to store your licence instead of the normal hardware equivalent. This means you can only run Sequel on the one computer that has the virtual dongle with the appropriate license. Not to worry, though; surely the license can be stored on a hardware dongle instead of the virtual one, if you happen to have a proper Syncrosoft dongle — I mean, Steinberg Key — lying around? Er, no. And since Sequel requires you to license your computer before the program even runs, there isn't even a grace period.
On the plus side, Steinberg make the installation process quite easy and the License Download program runs automatically as part of the procedure. However, when I tried to activate my license, Syncrosoft reported that no devices were found. I realised that this was probably because I was trying to install Sequel on a system running the 64-bit version of Windows XP Pro, and figured that there weren't any 64-bit virtual dongle drivers just yet (Syncrosoft's hardware dongles have been 64-bit compatible for some time). After running the same installer on a machine with 32-bit Windows, everything installed flawlessly. Still, some kind of 64-bit compatibility notice would have been nice.
When you see Sequel for the first time, the Garage Band influence is very clear, although Sequel 's appearance is rather more sophisticated. I couldn't quite work out if I liked the black background for the Track List and Multi Zone: it gives good contrast to the very colourful Arranger Zone, and the way the Track colours stand out has a kind of '70s neon-disco appeal, but it does create large areas of blackness on higher-resolution displays. As with Cubase these days, there are also many cryptic icons that take a little while to figure out — when did text labels become so unfashionable? Still, with the aid of tool tips, the icons do make sense once you've acclimatised to the interface.
My favourite feature is the Arranger, which is presumably based on Cubase 's Play Order Track. Being able to trigger sections of the song from your computer's keyboard is pretty neat, especially for performing with Sequel live, but it leaves me wanting more. Wouldn't it be cool if you could trigger the Arrangement Parts via MIDI pads as well? And, perhaps the most obvious idea: isn't it a shame that Sequel can't record an Arrangement that you perform with the pads as a Chain that can be played back when Chain Mode is active? When you build your own Chain, you can't actually define the length a part plays for, even though you can effectively do this when playing live by triggering the next Part with the jump time set to one beat, for example.
Perhaps the most surprising features in Sequel are those that Steinberg chose to leave out. Considering Garage Band is free (yes, you still have to buy a Mac; but to run Sequel on a Mac you'd have to buy a Mac and a copy of Sequel) you'd imagine a competitor would at least match its feature set after all this time. But there are some features in Garage Band that Steinberg chose not to include in Sequel, such as simple notation editing and support for adding a soundtrack to a movie — not to mention the ability to use plug-in instruments and effects.
While Steinberg's Media Bay functionality keeps everything nice and organised for the user (and there was presumably some thought of keeping the environment clean from the potential chaos of third-party plug-ins), I think most users would probably have liked to see VST plug-in support. And the one feature I would like to have seen in Sequel that isn't in Garage Band is the ability to create tempo and time signature changes. I can't believe that this is viewed as a feature the home user wouldn't necessarily miss.
If you've got a Mac with Garage Band 3 already, I'm not sure Sequel really offers much more; and if you're looking for something a little more powerful, Logic Express 7 or Cubase Studio 4 would make a better next step. On the Windows platform, Sequel is slicker than the competition in the entry-level market, but falls a little short on features when compared to something like Cakewalk Home Studio 6, which has a similar price tag. Overall, though, Sequel is a generally excellent attempt on Steinberg's part to cater for the entry-level market, combining high-level sequencer technology with an accessible user interface. The level of functionality is about right, even if there are some surprising omissions considering Sequel 's cost. Mark Wherry
File Finding
The Media Bay page (above) is a file browser for audio and Instrument loops, instrument presets and track presets, and is recognisably similar to the Media Bay introduced in Steinberg's flagship Cubase 4. Various filters allow you to search by Categories such as Drum&Perc or Musical FX, Styles such as Country or Pop, and so on. You can also choose to view User Content only, in which case you'll be shown only files that you've added to Sequel 's content folder yourself (by dragging and dropping from the Arrange Zone to the Media Bay page).
Two different kinds of loop are available from Sequel 's library, although they appear almost identical from the point of view of the end user. The first are sampled loops, roughly equivalent to Apple Loops or Acid ised WAVs. These are audio clips processed by Sequel for easier handling. They can have their tempo and pitch freely and independently adjusted, with the results sounding reasonably natural over quite a wide range. Extreme changes of pitch or tempo can cause things to sound a bit crunchy and granular — but by no means always unpleasantly so.
 Above: The Live Pads allow you to trigger different sections of your arrangement in real time.Instrument loops, by contrast, are short MIDI sequence patterns used to drive Sequel 's internal instrument engine, which appears to be some kind of sample-playback instrument. I suspect that it's derived from the Halion One instrument bundled with Cubase 4, if the HalionOneLoader.dll file lurking in Sequel 's Components directory is any indicator. Sequel 's instrument engine is fully integrated with the application, and editable parameters appear directly in the Multi Zone pane, rather than in a separate editor window (as would be the case with a plug-in instrument in Cubase, for example).
Although Sequel boasts a 'VST 3 audio engine', the program doesn't actually allow the use of third-party VST Instrument plug-ins, and seemingly not third-party effects either. Certainly I was unable to load any VST 2 effects plug-ins; there are no third-party VST 3 plug-ins as yet, and I didn't have any of Steinberg's own installed on my machine. No mention of third-party effects plug-ins is made in the manual, and the person I emailed at Arbiter, Steinberg's UK distributor, told me he thought Sequel was limited to using its bundled effects.
You aren't limited to only using the supplied loops, however. Sampled loops can be imported into a Sequel Project by simply dragging and dropping them from your desktop. Sounds can be imported in WAV, AIFF, MP3, WMA and Ogg Vorbis formats. Once imported, they can be treated in exactly the same way as the factory loops.
Special Arrangements
Mix automation is very straightforwardly implemented in the Arrange Zone. Anchor points can be added by clicking in the relevant track with the Edit/Write Automation button activated. Automation can also be recorded by moving a GUI control (for example, a track's pan control) with the mouse pointer while recording. In this way, automated fades, pans and other parameter tweaks can easily be produced.
Audio and Instrument parts in the Arrange Zone are referred to as Events, in typical Steinberg fashion, and can be moved and resized by clicking and dragging. The selected Event can be deleted by pressing Delete or Backspace. Events can also be split; the mouse pointer automatically turns into a cutting tool when hovering over the lower portion of an Event. You can choose whether or not to snap to grid when making these edits.
 The Media Bay helps you organise and browse for loops to use in a Project.Events also feature two small buttons that are only visible when moused over. One is a mute button to non-destructively silence a part. The other is a repeat button. Clicking the repeat button and dragging over an empty area of track allows you to fill that area with copies of the original Event. A mouse pointer 'tool tip' tells you how many copies will be added to fill the track up to the current mouse position.
New audio and Instrument parts can be recorded directly into empty tracks, then edited and utilised in just the same way as preset loops. The manual includes several very clear, step-by-step tutorials to guide new users through these possibly unfamiliar processes, and reference chapters explain the basics of setting up a computer for MIDI and audio work. ASIO, Direct X and Core Audio-compatible hardware is supported for recording and playback. New audio recordings are made in WAV format (mono or stereo, 16 or 24-bit) at 44.1kHz.
Sequel allows finished Projects to be exported in several different formats. 'Export Project to iTunes' exports the whole arrangement as an AAC file, then launches iTunes (assuming it's installed) and adds the file to your Library. You can also, of course, export Projects as audio files, the supported formats being WAV, AIFC, AIFF, Wave 64 and Ogg Vorbis.
Diminishing Returns?
An automated loop-based approach to composition was novel when Acid first shipped, but Acid-like features have since been integrated into a wide variety of software packages — from affordable entry-level offerings to high-end professional applications. At £75, Sequel is priced to compete with Sony's Acid Music Studio, rather than more costly and feature-rich packages like Ableton's Live or Sony's Acid Pro, but of course it is unlikely to be as affordable as Garage Band, which comes free with new Macs.
These packages all share similar user interfaces, where as much functionality as possible is presented in one window, with panes providing browser functionality for choosing and auditioning loops, tools for editing audio, and accessing effects and other mix controls. Unlike the Mac-only Garage Band and Windows-only Acid, Sequel is available for both platforms, and so potentially provides an alternative to anyone dissatisfied with either of its nearest competitors. Built-in support for ASIO and Core Audio-compatible hardware is a point in its favour, but lack of support for third-party plug-ins is disappointing. Overall, Sequel is certainly a capable alternative, but not a radical improvement on any of its competitors.
Pros
- Clear, easy-to-learn user interface.
- Good selection of effects.
- Extensive sound-loop library.
- Well-written user manual with good tutorials.
Cons
- No third-party VST plug-in support.
- Copy-protection system is confusing.
Summary
Sequel is an easy-to-use, loop-based composition tool with basic recording and sequencing facilities, which will be easy for novice users to find their way around. It couldn't really be called innovative, but it's a more-than-competent variation on a very popular theme.
information
£75 including VAT.
Arbiter +44 (0)20 8207 7880.
+44 (0)20 8953 4716.