Achieve MIDI mastery in DP's Graphic Editor.
 Here's the Graphic Editor in the cut and thrust of editing. It's showing two MIDI tracks simultaneously, thanks to the Track Selector in the left-hand sidebar, and some controller data has just been entered with the pencil tool.
This month I'm presenting a batch of MIDI editing tips and tricks to get you working fast and fluently in the MIDI Graphic Editor, the place to be for editing most MIDI parts in Digital Performer. You can get to the MIDI Graphic Editor in various ways:
- Click the MIDI tab in the central section of the consolidated window.
- Use the keystroke Shift‑G.
- Double‑click a MIDI 'phrase' in the Tracks window.
- Click its button in the Shortcuts window (see screen above right).


Once you're there, it really pays to know how to get around quickly, and for that there's a great little set of keyboard shortcuts:
Left and Right: Hold Ctrl and use the left and right arrow keys to scroll a 'page' at a time — great for shuttling backwards and forwards through your sequence. The Alt key plus the arrow keys scrolls a little bit. You can also use mouse scroll-wheels, and on fairly recent Mac laptops, try a two‑finger swipe to the left or right.
Up and Down: A vertical scroll in the MIDI Graphic Editor moves you through the pitch range of the piano keys, and by default it's mapped to the double‑stroke arrow keys on an extended keyboard. For fine control, a mouse scroll-wheel or trackpad two‑finger up and down swipe is even better.
Zoom: Command plus any of the four arrow keys zooms in or out horizontally and vertically. If you're very zoomed in vertically, DP indicates the presence of notes that are 'off screen' with a thin coloured bar at the top or bottom of the note display. If you don't see this, you can enable it by calling up Preferences (from the Digital Performer menu), selecting the MIDI Editing page, and ticking 'Show notes when scrolled offscreen'.
Now we get to the nub of the matter: note editing. To move a note, click and drag it (of course!). To change its duration, point to either end and drag. To move a chord or phrase, select it first by dragging a selection box over it from an empty part of the note display, then drag one of the notes in the selection. With a note (or notes) selected like this, try a Nudge. Pressing the left or right arrow key moves the events by whatever amount is currently set in the Snap Information window (open that from the Studio menu, or by clicking the 'G' in the Snap To Grid display above the note display). In DP7.1 and later, you can also use a keystroke to move notes up or down in pitch, a semitone at a time: Ctrl plus Command, and then the up or down arrow. Nudge is a useful tool for all sorts of editing actions. You set the nudge amount in the Snap Information window, conveniently opened with a click on the 'G' symbol in the Graphic Editor.
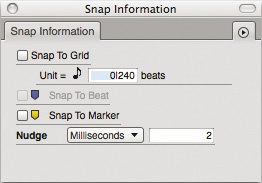
Grid Reference
Talking of Edit Grids, DP's can be incredibly useful, restricting note‑drags to musically useful time intervals. You might choose a 16th-note or 32nd-note grid for editing intricate stuff, and perhaps a whole‑note grid for making it easier to shift entire phrases. There's a power users' short cut for stepping up and down the grid resolution — the Control key and the [ or ] square‑bracket keys — but it's probably just as easy to choose a value from the Snap To Grid pop‑up menu. The tick box there enables or disables the grid completely (or use Ctrl‑G). However, there another way too, which I think counts as a real core editing technique.
Let's say you've got an eighth‑note grid enabled, but want to drag a note a very tiny bit, for the sake of improving musical feel, perhaps. With the mouse pointer, click and begin to drag the note, but then also press the Command key. While the key's down, the grid is disabled, so now the note can be sneaked forward or backwards. This feature works the other way around, too: if you start dragging when the grid is disabled, but you need it enabled temporarily, Command does the trick.
When you want to use the Graphic Editor to write in a MIDI note or two, press and hold the 'P' key to temporarily select the pencil tool. Now click and drag in the note area. To select the pencil permanently, double‑tap the 'P' key, or just click it in the Tools palette. You can open that from the Studio menu, or with the Shift‑O key command.
Another great simple technique for creating new notes is copying existing ones. Hold down the Alt key and then simply click and drag a note (or notes) to duplicate.
Commander Data
So far, we've concentrated almost exclusively on notes, but the Graphic Editor is ideal for working with continuous controllers and other data types too.
First, some basics. To control how much of the editor window is dedicated to each type of view — note and data — drag the horizontal divider in between. Then it's good to be aware of how the data section's vertical ruler works. There are three different scales, showing different value ranges. One is for note velocity and continuous controller data, showing values ranging 0‑127. Another is for pitch bend, with negative and positive ranges above and below a zero centre-line. Then there's a combined ruler, showing all data types in a single view. To cycle through the types, click anywhere in the ruler area. Writing in new controller data is easy:
- Choose the required data type from the Insert pop‑up menu.
- Hold down 'P' to temporarily select the pencil tool.
- Click in the data area to add a single event, and drag to draw a curve or other shape.
DP offers many drawing options, selectable from the Tools palette's 'curve' pop‑up menu. I find 'Free' and 'Straight Line' cover 99 percent of my needs, but the cyclic waveforms and random options are there for more elaborate requirements (see screen above).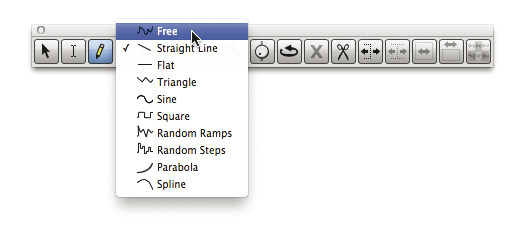
Editing data events is just like working with notes. You can select individual events, or click and drag over a region to select many. Once selected, click and drag again to move them, and hold down Alt to duplicate them. Dragging a note‑on velocity event also moves the note itself, and it's worth noting that you can't select note‑off events directly at all. If you want to tweak the values of existing data events, select them first, switch to the Reshape tool in the Tools palette (by clicking on it or holding down 'R'), then draw in your new curve.
As a final thought, although it can look pretty, working with multiple data types can be a bother. To make your life easier, try hiding everything but the one you're concentrating on. One way is to choose the data type you want from the view filter pop‑up menu at bottom left. An 'All' option in that menu shows everything again. Alternatively, just click on a data event of the type you want to work with, and then click the Quick Filter tick box.![]() At the bottom left of the MIDI Graphic Editor, the View Filter menu, Insert menu, and Quick Filter (from left to right) help you zone in on individual data types.
At the bottom left of the MIDI Graphic Editor, the View Filter menu, Insert menu, and Quick Filter (from left to right) help you zone in on individual data types.
Lost In Spaces?
If you have OS X's multiple desktop Spaces feature enabled, as I do, some of its keyboard shortcuts — Ctrl plus the arrow keys — conflict with DP's default horizontal scroll commands, and the alternative shortcut options in OS X's Exposé and Spaces Preferences pane conflict with other DP commands. But you can easily reprogram the DP commands. Choose Commands from the Setup menu and type 'scroll' in the search box. Click in the Mac Key 1 column for the 'Scroll Left' item, and then type your keystroke; I chose Shift plus the left arrow key. Continue in the same vein with the 'Scroll Right' item, and you're all set.
Tracks Unlimited
The MIDI Graphic Editor can display note information for any number of tracks simultaneously. With the editor open, click the icon at bottom left to open the Track Selector (if it's not open already). Then just select additional tracks in the list by clicking on them. It really helps at this point if you've chosen different colours for each of your tracks, as you'll be able to easily see which notes belong to which track.
One thing to note is that the Graphic Editor can only display controller and pitch‑bend data (and so on) for one track at a time. The little pencil icon in the Track Selector list indicates which is currently selected. To view the data for a different track, simply click to the left of the track's name, in the pencil's 'column'. Look at the screenshot at the start of this article to see what I mean.