Part 2: Learning to capture the behaviour of controls will take your custom Nebula creations to another level.
Last month, I explained the basic tools and techniques required to 'sample' preamps and reverbs for Acustica Audio's Nebula plug‑in (http://sosm.ag/outboardin_nebula-pt1).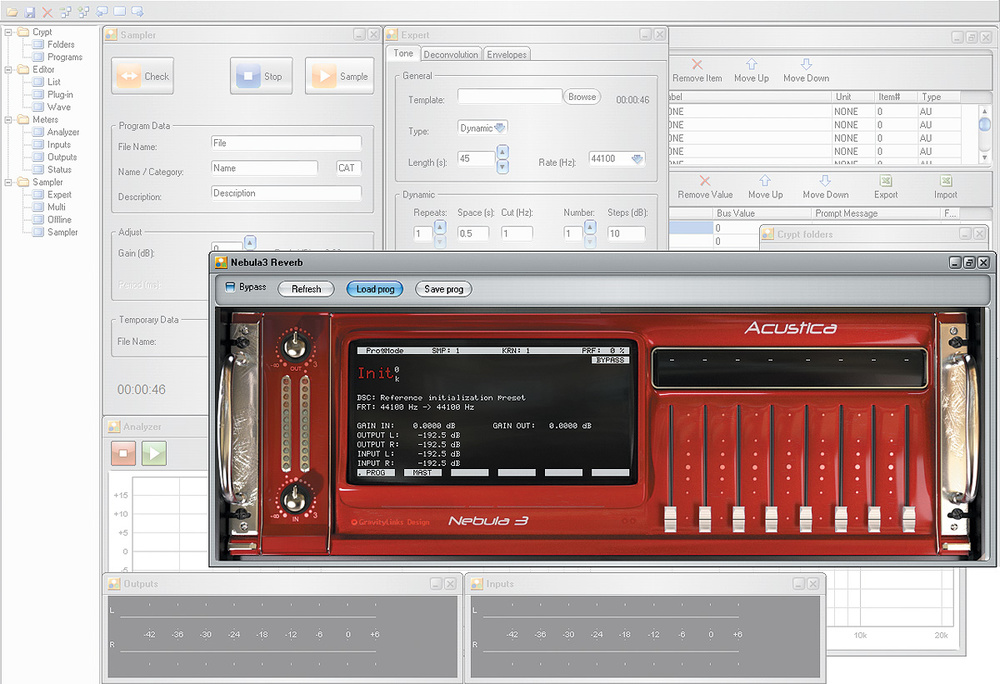 If you're new to Nebula or its bundled NAT sampler, I recommend reading that article before this one. This month, I'll demonstrate how to capture gear with multiple controls, using EQs for the main examples. As Nebula is so demanding of processing power, I'll also help you make your Programs more resource-efficient.
Multi Programs
A Nebula Program with sampled adjustable controls is called a Multi, because impulses are captured for multiple positions of at least one control. As you adjust the control of the resulting Nebula Program, the plug‑in shifts between the corresponding impulses. While I'll focus on EQs in this guide, Multi Programs don't have to be EQs or even have proper controls, for that matter — you could make one based on different mic positions relative to a guitar cab, for instance. Even compressors are possible (albeit tricky) with sufficient experience and experimentation. You don't have to sample EQs or even something with real controls — you could use the techniques here to create switched mic options, or mic positions in relation to a guitar amp cabinet, for example.
Some of you will, no doubt, hope to capture every control on some esoteric bit of hardware, with lots of controls and lots of resolution per control. I'm afraid that's not going to be possible. Stunningly good results are achievable, but there are several limitations that mean you'll need to spend a lot of time planning and prioritising before you hook up your gear and start sampling.
First, note that Nebula can't capture everything: it can't recreate Mid/Side processors; it can't do pitch‑shifters; and, as discussed last month, it can't replicate heavy distortion or hard clipping. Then, with Multis themselves, there are specific issues to consider. A Multi Programme in Nebula can only have up to three sampled controls. There's a good reason for this — and thus why most Nebula EQs  Most Nebula EQ, including the one pictured, offer only a single band per Program, and with good reason: the number of samples multiplies for every setting you capture for each control.offer only a single band. Fine resolution demands many samples, each sampled position has a multiplying effect on the number of samples a Program requires, and there's a limit to the number of samples that a Nebula Program can use.
Consider this theoretical example. Sample just five positions of the frequency control for one band of an EQ, then five gain positions for that control, and five positions for the Q (bandwidth), and you'll already have 125 separate samples. If you were to attempt the capture of a complete outboard EQ, with several bands and fine control on each band, you'd require thousands upon thousands of samples. That's a lot of knob turning, it would make mistakes more likely, and it would take a very long time. It just wouldn't be practical, even if it were possible.
You'll learn that some controls will require larger numbers of samples, which means that you may be forced to use fewer than you wanted for the other controls. But, if you know where and how to make those compromises, you can still get a good result. In other words, it's all about prioritising, knowing where you need more samples and where you can get by with fewer when you need to.
The sample count also means that Multis are almost always non‑dynamic: they trade the ability to recreate dynamic behaviour for the ability to have adjustable controls. It's possible to have both features in one Program, but it's very tough to pull that off. Again, it requires many samples to be recorded, and it's usually impractical. A common and effective workaround is to make a preamp‑style Program that mimics the dynamic behaviour of the unit but not the equalisation, and use this alongside a Multi that takes care of the EQ'ing but not the dynamics.
No extra effort is required to create a Multi with sampled harmonics, though. These are always captured during the sampling process, so you simply tell NAT how many you want in your Program and it will extract them from the recordings. The limits to how many samples Nebula can handle in a single Program mean that, if you want to make a Multi with lots of sampled positions on multiple controls, you might have to accept having fewer harmonics than you wanted. Don't worry about this now, because you can always change your mind after the recording process.
Stepped Or Variable Controls?
Consider whether you want (or if it makes sense) to have a control that transitions smoothly from one sampled position to the next, or if you want it to behave in steps, like switched hardware; you don't always have to choose the same approach as the hardware you're sampling. Your decision is particularly important for controls that adjust a filter's frequency. Imagine you're capturing a switched high‑pass filter (HPF) on a preamp that only has five positions. If you make a Program that fades between those positions, it will sound poor; you'd be better off simply recreating the switched behaviour of the hardware. However, a stepped control that simply adjusts the gain of an EQ band should sound good in a Program that fades smoothly between the positions.
If the hardware control is fully variable, you'll always have the option to create stepped or variable controls, even with filters. You don't need many positions for smooth gain transitions, but to recreate a frequency control of any kind of filter you'll need very high resolution (ie. you must sample a large number of positions). You must also figure out how to tell whether the results are any good. I recommend using the (32‑bit freeware) VST Plugin Analyser by Christian Budde (www.savioursofsoul.de/Christian/programs/measurement-programs)  Christian Budde's freeware VST Plugin Analyser is an indispensable tool when it comes to checking your Nebula Programs — and a quick trip to his web site should reveal lots of other useful analysis tools.to look at the frequency spectrum of your final Program. You load Nebula (32‑bit) into it, load your Program, and adjust the sampled control. Look to see whether the shape of the filter's roll‑off becomes distorted as you fade between the sampled positions. If it does, you need to capture more samples. (You don't have to worry about this with switched Programs, which makes them easier to create.)
Getting Started: A Switched HPF
Rather than embark on something huge and complex, it's best to create several simpler Multis, with fewer positions per control. In fact, I strongly advise starting by sampling a single control — as in our first example. We'll use the Offline sampling technique to recreate one control of an EQ plug‑in (it's quicker than using hardware but, calibration aside, the principles are exactly the same). Despite the different names, NAT's dedicated Equaliser and Multi Sessions are variations of the same thing; whether you're capturing an EQ control or one from another processor, you could start with a Session from either folder. So, inside NAT go to File/Open, and navigate to the Acustica Session archive. As there are no dedicated EQ/Multi Sessions in the Offline folder, choose the Sampler Presets folder, then the subfolder called Multi. Select the Session called '1 knob (1 kernel) — switch 1 var — smooth2.xml'.
Since we're sampling Offline, rather than automatically inside NAT, the first thing you should do is open the Offline sampling window (double‑click Offline in the Sampler group, in the column on the left). Also open the Expert window, look at the Tone tab and select the sample rate you wish to work with. Then, open the Multi window, which is where you define the control(s) you'll be sampling. There should be a single control listed. Rename this 'HP' and under Unit, replace the dash with 'Hz'. Leave the other fields alone.
The bottom half of this window is where you state the number of samples you'll capture for each control. By default there should be two, but we'll need more, so click Add Value until you have five in total. The Value field determines where along the Nebula control each sample will be 'triggered'. The lowest number you put in any of these fields for the samples will designate that sample as the lowest setting on the control. The highest-numbered sample will be the maximum setting on the control. Any samples with numbers in between will appear on the control according to the spacing of those numbers. For example, if the lowest sample's value is 0, the highest is 100, and a third sample's is 50, the third sample will be located at the mid‑point of the Nebula control. If the third sample's value is 75 it will reside instead on the control's three‑quarter point. This may seem strange, but you'll soon find that it enables some very useful customisation. If you want the samples evenly spaced on the control, the simplest thing to do is to start at 1 (or 0), and add 1 to the value for each sample. So, do that: label them 1 (top) to 5 (bottom). Choosing the Session file for the first example.
The fields in the Bus Value column instruct Nebula what text to display under the control. Going down the list, enter these numbers: 50, 100, 250, 400, 600. The Prompt Message column is for use during Online sampling, so leave that and the Flat field (of which more later) alone. Go to the Offline Sampling window and enter 'HP1' for the File Name, 'HP 1 Test' for the Name (the Program's name inside Nebula), and 'FLT' for the category. The Description can be left alone.
Next, create a folder (name it what you like) on your hard drive for your project. Click the Browse button by the File Name box, navigate to that folder, enter 'high‑pass' as the filename, and save. There's a bug in NAT that sometimes causes it lose what you last entered in any of these fields, so click on the Description field and erase what's in there, then make sure the Sync box is unchecked (it's often checked by default); I've never discovered what it's used for, and my own tests suggest that having it checked results in garbled Programs. A modified Session file, ready for the first example.
Save this modified Session in your project folder as 'High‑pass‑NAT‑Session'. Click the big Generate button, and look in the folder. See the 'high‑pass.wav' file that just got generated? That's what we'll be processing with our EQ plug‑in, so load it into your DAW and insert a plug‑in with a high‑pass filter on that track. It doesn't matter which EQ — you can use your DAW's in‑built one — as long as the cutoff frequency is fully variable and can be set as high as 600Hz. If there's a width/Q control, make the filter fairly narrow and lower the output by several dB to avoid clipping. Once you've clicked 'Generate' you should find a few files in your project folder, including a WAV file and a file called Instructions.txt.
In the same project folder where you found the WAV file, there's another file called 'Instructions.txt', in which you'll find a column of WAV filenames.  The Instructions.txt file tells you what you must call the various files you create for an Offline project, when bouncing from your DAW. If you plan to copy and paste these names, note that it's the bit before the '<' that you require — the rest is just description!These are what the audio files you create must be called for NAT to make a Program from them, and they must also be placed in this folder. For the preamp and reverb Programs we made last month, you had one WAV per Program, but with Multis you need one for each sampled setting of each control. So, set the HPF to 50Hz (the first Bus Value), and render/save/bounce (whatever your DAW calls it) the tone sweep to a new WAV in your folder. Check to make sure the new file is the same length as the original, and that its filename is the same as the first name in the Instructions.txt list: if you've followed my instructions to the letter, it will be 'high‑pass_H0.wav'. Set the HPF to 100Hz and render to the next filename on the list, then repeat these steps for the 250Hz, 400Hz and 600Hz settings. With all your files in place, click Deconvolve in NAT to generate the N2P and N2V files, and place these (as described last month) where Nebula can see them.
 Rendering NAT's test tone through a software high‑pass filter in Cubase. The process for capturing hardware and software is almost identical — but you'll find that the offline bouncing facilities available in most DAWs makes things a little quicker and easier while learning.
.") When you've bounced, check your project folder to make sure that all the rendered WAVs are there, and that their names match up to those in the Instructions.txt file. If they are and they do you can click Deconvolve in NAT, which should create your Program for you — and hopefully put the files where Nebula can see them (if not, you can copy them manually from your project folder).
When you've bounced, check your project folder to make sure that all the rendered WAVs are there, and that their names match up to those in the Instructions.txt file. If they are and they do you can click Deconvolve in NAT, which should create your Program for you — and hopefully put the files where Nebula can see them (if not, you can copy them manually from your project folder). Checking your creation in Christian Budde's 32‑bit freeware VST Plugin Analyser.
Program Adjustments
Now you can load Nebula in the VST Plugin Analyser software I mentioned earlier, to make adjustments to your Program. You'll find your Program in Nebula's FLT category. To access the Edit section of Nebula, you have to be in Guru mode, which you enter by going to Nebula's Mast page and changing the Mode setting from '0 simple' to '1 guru'. Then click the Save button on that page, close and re‑open Nebula. You can use Nebula itself to fine‑tune your Program by editing global parameters such as an output pad, but you'll need to be in 'Guru' mode.
In Nebula, click Edit then Glob and adjust the Pad Out setting so that the level for most of the pink line in VST Plugin Analyser is right on the 0 in the middle of the frequency graph. This calibrates your Program so that the level coming out of it will be the same as what came in (except for what gets filtered, obviously). Press Exit (again in Nebula) to get to Nebula's Settings page, and then save, so that the next time your Program is opened it will load with the changes you made in the Glob page. Now, with Nebula loaded in VST Plugin Analyser, you can play with the HP control to see how things turned out. You should see the effect of the high‑pass filter clearly: note how it jumps to the different positions as you adjust the control; this is how a 'switch' control works. If you now load Nebula in your DAW and run some material through it — and listen — it should sound very close to the filter settings you just sampled.
Continuous HPF
Now, let's make a non‑switched version of the Program from the same Session. In NAT's Expert window's Tone tab, browse to select another Template. From the Acustica archive's Template folder choose 'Template_multi1d_b (3K).xml'. In the Offline Sampling window, rename the file 'HP2' and change the Name field to 'HP 2 test'. Save the Session, then click Deconvolve. NAT will make a new Program from the tone sweeps you processed previously. Place the Program and Vector files where they need to go, and check your results in VST Plugin Analyser. Calibrate the level of this one in the same way as for the stepped control, and check what the HP control does now.
You should notice that, as you move the control, the result just doesn't look right. When you hit the exact positions you sampled, the filter shape should be fine but, in other positions, it won't look the same at all, with some settings looking far worse than others. This is what happens if you try to sample a filter-frequency position control without sufficient resolution to recreate a fluid transition across its range!  If you don't sample enough positions for a frequency control and try to create a smooth transition in your Nebula Program you might run into problems. You should check your results in VST Plugin Analyser for such problems: as you can see, they stick out like a sore thumb!
So, how many positions would you need to sample to achieve a smooth result? Well, it depends. A wide‑slope filter will require fewer samples than a sharper one. Something like a resonant LPF with a very sharp resonant peak would need many, many samples. Essentially, the sampled positions need to be close enough that the change between them isn't abrupt. It's hard to put this into words and it's different with every filter, so experiment: if you're not satisfied with the results, just delete all the filtered tone sweeps and start again, but sample many more positions of the cutoff control. You'll need to guess how many more you might need, based on what you saw in the VST Plugin Analyser, and save each according to the scheme in the instructions text file, but going incrementally past where the list ends for however many positions you use. You should also keep track of where you set the cutoff for each one, so you can type that data into NAT (so the Program shows the correct value).
After you've made your new filtered tone sweeps, go to the bottom half of the Multi window and add new positions until you have as many as you sampled, and fill in the correct values in the Bus Value column. Value column entries should start at '1' and go up in increments of one as mentioned earlier, to keep it simple. Enter new names in the Offline Sampling window to keep this new one separate, then deconvolve and check the results. You're aiming to use enough samples to avoid distortion of the filter shape, but without using too many samples and making your project needlessly complex (which will become more of an issue with Programs with more than one control). Unfortunately, the only way for you to learn how to find this balance is practice.
Peaks & Shelves
Now let's use the NAT Session we've modified and saved (as above) once more, but this time with a peak or high-/low‑shelf EQ band. Instead of multiple frequency positions, we'll sample multiple gain settings. Go to the Multi window, rename the HP control 'Gain', and the unit 'dB'. Make sure there are only five samples and in the Bus Value column enter (top to bottom): ‑10, ‑5, 0, 5, 10. The Value column entries should be 1‑5, to space things evenly along the Nebula control. In the Offline Sampling window, name both the file and the Program Name 'EQGain' and change the category to 'EQU'. Save the Session and hit Generate. In the new Instructions.txt file, you'll find that the filename scheme has changed; the letter at the end of each filename has changed from 'H' to 'G'. This letter will always be the first in the control's name. Process the tone sweep with a high or low shelf, or a peaking filter — it doesn't matter which, but do keep the frequency position fixed — and repeat so you have files for five different gain settings for the band: ‑10dB, ‑5dB, 0dB, 5dB and 10dB, as per the Bus Value entries. Do things in that order, and save each file as per the filenames listed in the Instructions text file.
Now click Deconvolve, and check out your Program in VST Plugin Analyser. Make sure the sampled Gain control is set to 0dB, then calibrate the level of the Program as before. Adjusting the Gain control, you should notice that the shape of the filter never looks very distorted or unnatural — even though you only used five samples.
As I mentioned earlier, gain controls almost always need less fine resolution to create good‑sounding results than frequency ones do, and the examples so far demonstrate that pretty well. You still want a fair amount of resolution in the controls, though, because at some settings the filter shape may otherwise be less authentic representations of the hardware. But remember what I said at the outset about the number of samples — you must always consider what your priorities are when you start sampling multiple controls!
Multiple Controls
Now that you have some understanding of how a sampled control works, as well as some experience with the different types (switch, interpolated), and hopefully some idea about when and where to use them, you're ready to attempt creating a Multi with more than one control. You could sample one of these Offline, as before, but it gets a little bit trickier because the naming scheme of your recordings becomes more complex. I find it much more convenient to let NAT record the files and name/organise them, so we'll use the Online approach this time.
The general instructions in this next section can be applied to anything you want to sample that has either two or three parameters, but the specifics are geared towards a single hardware EQ peak band, which has frequency, width and gain controls. For our purposes, width controls are usually like gain controls, in that they don't need particularly fine resolution. Note, though, that even if you only sample three width‑control positions, you're multiplying the total number of samples your Program requires by three. , as described in one of the examples in the main text.") Right: editing the control descriptions, parameters and prompt text in the Multi window, in preparation for the capture of a Studer filter (pictured below), as described in one of the examples in the main text.
Right: editing the control descriptions, parameters and prompt text in the Multi window, in preparation for the capture of a Studer filter (pictured below), as described in one of the examples in the main text.  Note the 'Y' in the 'Flat' column. This tells Nebula that no gain is being applied, which makes it possible to achieve the same results with fewer samples.For this example, I chose to sample two racked channels of a Studer A900 console, the frequency controls of which are fully variable. I only sampled a few fixed frequency positions, to make a switched control. You should be able to identify a similar device to sample if you want to follow this step by step.
Use the 'Equaliser 3 knobs (3 kernels) — smooth2.xml' Session in the Acustica Archive's Sampler Presets/Equalisers folder. This Session doesn't say anything about having a switch control, so in the Expert panel switch to a different Template: 'Template_multi3d_e (3K — switch — no dynamic).xml'. This will make only the first control act as a switch. We won't change anything else in the Expert window, except to untick the 64‑bit and mono (we're sampling two channels) boxes, in the Deconvolution tab, as explained last month.
To be consistent with the way I approached this, in the Multi window, rename the 'Q' control 'Width', and the unit as '%', but leave all else alone. The value in 'Order#' determines the order in which the controls will be sampled (it has no effect on the Program itself), and that in 'Item#' dictates the order they'll appear in the Nebula Program — but for some reason it goes backwards (leave it alone for now; you'll see how to rearrange them later). To tell NAT how many samples will be captured for each control, click on the controls in the top half. The list of samples for the selected control will appear in the bottom half of the window.
For Frequency, I made sure I had a total of five samples, with values ranging from 1-5, and Bus Values of 380, 800, 1500, 2500, and 5000, since those are the frequencies I was sampling (in Hz). In the Prompt column I entered the same values: you can enter anything in there to prompt you to set the hardware appropriately for each stage of the sampling process, and I recommend you use them, as it's all too easy to lose track! For the Gain control, I created five samples (Values 1‑5 and Bus Values ‑15, ‑5, 0, 5 and 15, again duplicating those values in the Prompt column). For the 0 gain position, I entered a 'Y' in the Flat column: this tells NAT that in this position there's no EQ boost or cut being applied to the signal. NAT will therefore only ask me for one 'Flat' sample,  A peak or shelf boost will add overall level to a signal, so take this into account when calibrating your levels for sampling hardware EQs.which it will reuse for all frequency and width positions at that setting. For the Width control, I needed only two samples, because the hardware control only has two positions, so the Value entries are 0 and 1, and the Bus Value entries are 0 and 100 (making the control show up as 0‑100 percent). For the prompt, I used 'Narrow' and 'Wide'.
In the Sampler window, I filled in all the boxes to my liking and told NAT where to record the WAV files, all as described in the earlier examples, and finally saved everything as a new Session in a new project folder. When you're sampling hardware it's a good idea to have NAT recalculate the offset added by your converters each time you set up a new Session (I told you how to last month, but remember that this requires you to close and restart NAT, as it's easy to forget that bit!).
If you're sampling a hardware EQ, as I was, refer to the instructions for setting up your hardware levels in the first part of this guide. An extra consideration here is that when an EQ is set to its highest gain position your overall output level will be increased.  The author's racked Studer channel strips, used for one of the examples.You must ensure that this doesn't result in clipping — so calibrate your levels with the EQ gain settings at the maximum value you'll be sampling and look at a few test recordings in a wave editor (make sure you zoom in) to ensure that nothing is clipped. To do this, click the Sample button, then click the Sample button on the window that pops up (ignore anything else in this window for now). If you look in the folder, you should notice that the naming scheme for the WAV files you used to set the levels is a bit more complex now. At the end of the filename is a letter representing each control, then a number for the position used for that recording (it starts at 0 and goes up incrementally). Now, go ahead and close (without saving) and reload this Session in NAT.
Now you can start the actual sampling process, by clicking the Sample button. There's a drop‑down menu in the pop‑up window, and this tells you at which stage of the sampling process you are at any given time: it shows you what sample you're currently on and indicates any you've already recorded. You can see all the controls you've set up under the Label column, and in the Sample column are the prompt messages you entered for each position of those controls. You'll need to refer to these positions in order to set the hardware manually to the right settings for the sample you're about to take.
When sampling hardware instead of software, a new problem arises: if a control is fully variable and you need to be accurate with the settings, how do you know where you are setting it in relation to where it is currently? NAT has an analyser built in, which you can open from the left‑hand column under Meters, but I prefer to use a Reaper project I've set up for this purpose (you can use any DAW software for this). This project loops an audio clip of noise that I've EQ'd to be flat across the frequency spectrum, sends that out through my hardware and back in, and analyses it with Voxengo's free SPAN plug‑in. I keep this open while sampling with NAT, and will jump to it between any samples for which I need to make fine adjustments. Make sure you remember to stop the playback looping in the DAW before recording the next sample in NAT, though (I've forgotten to do this a few times)!
So, set the hardware controls to the settings you entered in the sampling window, and hit Sample to make the first recording, then repeat for each additional setting. Every once in a while you should open and examine all of the recordings you've made, to see if there are any obvious flaws. If you ever need to redo a specific recording and it was earlier in the list, save your Session, select that recording from the drop‑down box in the Sampling window, figure out from the WAV filename what positions the controls were in for it, select that combination from NAT's drop‑down menu, and make sure you close the WAV file in the editor/DAW before trying to re‑record it. After you redo it, you'll probably notice that the list of samples you've taken has been cut back to the sample you just did again — this is why I told you to save the Session beforehand! Check the new recording, and if it's fine, close and reload the Session to get back to where you were.
There may come a time when you somehow lose track of your progress in the list, and can't get the information back. If this happens you can edit the XML file for the Session  If you have to abort in the middle of an Online Multi Session things can seem a bit confusing, but you don't have to start the lengthy process all over again — although you may need to 'get surgical' with the Session XML file!. Look for this entry: '<MULTIPOSITION> X </MULTIPOSITION>', where 'X' will be a number (probably 0 if everything from the list was lost). Just put in a number big enough to include the sample you were at. You can put in a larger number just to make sure, but you will have to select the proper sample from the list before continuing.
After you've captured all the samples, NAT will automatically deconvolve the whole set to make a Program. If everything went well, it should be a working Program, with all controls acting as switches. But do consider, as I suggested earlier, creating a separate preamp‑style Program, with all EQ controls set to flat positions, just to capture the dynamic behaviour of the unit too.
Advanced Tips & Tricks
You should now have a good basic understanding of Multis, and a sense of the results that are realistically achievable. Most of the rest is a case of learning through experimentation, so I'll sign off with a few ideas you can explore to make better, more efficient Nebula Programs.
Whether you've done the sampling in a DAW (Offline) or automatically within NAT (Online), you can always go back to NAT and deconvolve the recordings to make a new Program, as many times as you wish. You can change some of the settings in the Session to get different results in the final Program, but note that some parameters can't be adjusted after sampling without causing errors in the Program. Essentially, if it's something that defines the tones before they're generated, you can't change it; everything else you can. To make a new Program, just click Deconvolve in the Offline Sampling window, always making sure the Sync box is unticked first. Things you might want to try changing include the number of kernels, the Template used, the Program, filename, category, description, the order in which a Multi's controls will appear, the control spacing for the sampled positions, and the values you'll see for each control position.
It's important that you always remain aware of the limitations of Sessions, Templates and Programs. Note that the number shown in the Session filename is the maximum number of kernels you can use; you can adjust the Session to allow fewer (using more kernels won't always sound better, but it will always increase the CPU hit) but not to enable more. I've mentioned a couple of times that Nebula can only handle so many samples per Program: consider the limit to be somewhere around 1000. If you made a multi with 200 recorded samples, and want 10 kernels, that expands the Program to 2000 samples. It might load and work at first, but I've noticed an error in that when I've saved Programs with over 1000 samples that loaded into a DAW project — in any DAW I've tried — it crashes when re‑loading the project. So you should consider having only, say, three kernels (or just one) for larger Multis, and having your full harmonic set in a dedicated preamp-style Program, as I suggested earlier.
On the subject of Templates in general, you can try selecting different ones as long as they match the type of Program you are making (preamp, reverb, et cetera). With Multi Programs you might want to try different Templates to try to get one or more controls to act as a switch (or not). It's confusing if you have more than one control because the Template names don't tell you which controls will be switches. If any single control will be a switch, the Template will just say 'switch' somewhere in the filename. So, for the three‑control Multi Templates, there are several that say 'switch', and you'll just have to try all of them to find the one you want (unless you want the first control only to be a switch, in which case you should use the same Template I used for the EQ in this guide). With preamps and reverbs, different Templates might allow you to create Programs with different controls in them, some of which aren't really that useful and might just be confusing. So you may want to try to use one of my custom Templates, which simplify things (included in the download that accompanies this series. Go to /sos/jun14/articles/outboard-media.htm).
When you have a Program that you're happy with, you really should make the effort to edit the output padding so that the level coming out will be close to what goes in. It's easiest to do this in the VST Plugin Analyser. Open the Program, click Edit, then go to the Glob page and adjust the Pad Out parameter so that the level is as close to 0dB as possible. If the frequency response is uneven, try to get it somewhat centred around 0dB (in other words, some above it and some below it, but 0dB being the average level). When you have it set where you want, click Exit and then Save, to save the change. You should double-check this by running audio (something that has a nice range of frequency content, like a drum loop) through it. Bypass/un-bypass Nebula a few times with a short clip looping so you can hear if the levels are similar.
Another useful facility in NAT for refining your creations is the List window in the Editor folder in the left-hand column. You can click the Add button in this window and add any Programs (load the N2P files) you've already made to the list, and this allows you to edit various things. You can change the Program name, the category it's found in, the sub‑categories, and the description. Click Save to make the changes. You can create duplicate N2P files with different filenames (that will still use the corresponding N2V file with the original name) by editing the data in the Original Name column and clicking Save. It just generates a duplicate, it doesn't delete the original. (Don't try to edit any of the other data and the Original Name at the same time or the duplicate won't load in Nebula.) If you want to change any of the other stuff for the duplicate, you will have to click Restart and then add it to the list after making it. It's always a good idea to back up your Programs before you go messing around in here.
You can use the Offline method I showed you above to do the preamps and reverbs I discussed in part one of this guide. Just use the Generate button to make the WAV file and then you can use whatever DAW you want to record it through your hardware, process with software, or a combination of both. You'll just have to delete the original WAV and rename the new one to replace it before deconvolving. Lastly, you can convert the sample rate of a Program (which converts the samples contained in the vector) by going into the Programs window, found under Crypt in the left‑hand column. You just load a Nebula plug‑in (DLL file) where it says Instance, and from the top drop‑down list just below that, you pick the Program (it has to be where the Nebula plug‑in you just loaded can use it). You should always make sure that the same Program is selected in the second drop‑down list, because if they have two different Programs selected, they will convert every Program in the list that's between those two. So, unless you want to do that, make sure they both point to the same program. Then all you have to do is enter the new rate you want in the Rate box and hit OK. And with that, it's time for me to sign off and wish you luck in creating your own Nebula Programs!
Tim Wisecup is the man behind Cupwise FX, one of the leading developers of third‑party Libraries for Acustica Audio's Nebula platform. His releases encompass libraries based on well‑regarded hardware including a Neve 33609 compressor‑limiter and some Urei filters, as well as a collection of more quirky analogue gear, including guitar pedals, reverbs and various other devices that feature tape and tubes. For more details check out his web site at www.cupwise.com.
Online Resources
We've placed a number of useful files on the SOS web site, including the latest NAT Sessions and Templates, as well as the Programs the author created for the first part of this workshop.