
Can't get rid of clicks when comping takes? You need to learn how to crossfade, and here's how... plus plenty of other Sonar-related tips.
An email signed 'Desperate Guitarist' says: "I use Sonar XL v1.0 in my home studio, and when I try to connect two different guitar parts, there is almost always a small disturbing sound (click) on the border between them. How can I eliminate this?"
A click occurs when there is an abrupt level change between two audio clips. One cause could be DC offset, where a clip's 'zero-crossing' line (ie. the place in the waveform where it crosses from positive to negative or vice versa) is not at zero, but higher or lower due to an offset. Unfortunately, Sonar's Audio Menu does not have a 'Remove DC Offset' option, so you will need to export the clip to a digital audio editor with this function (eg. Steinberg's Wavelab or Syntrillium's Cool Edit Pro). Go to the Tools menu; selecting your waveform editor will launch it (while leaving Sonar open) and load the clip simultaneously.
A level change could also occur if you split or slip-edit a clip. When slip editing or splitting to a grid, the odds are remote that the snap point will occur exactly on a zero crossing. To get around this, you can snap the clip to the grid and line up the edit or slip point where you want it, but then change to the finest possible snap resolution so you can tweak the clip start or stop to land on a zero-crossing point.
To do this, click on the small arrow next to the 'Snap to Grid' icon. When the Snap to Grid dialogue box appears, tick 'Absolute Time' and set the value to '1 sample'. Then, tick 'Snap to Audio Zero Crossings'. Move the slip edit (or split) point to the nearest zero crossing.
If this doesn't solve the problem, enable 'Automatic Crossfade' (the icon next to the 'Snap to Grid' icon). Clicking on the arrow next to the icon lets you choose the default crossfade curve; I recommend 'Slow Out — Fast In'.
Now arrange your clips end-to-end as desired. If there's a click, extend the end of one clip into the beginning of the next over a period of between two and four milliseconds (around 100 to 200 samples if you're using the 'samples' time-ruler calibrations).
This technique works only if there is extra material beyond where the clips begin and end (ie. you slip-edited to create the beginning or end). If not, there will be nothing to crossfade into. This technique also doesn't work if there's a gap between clips.
Which brings us to our final, fail-safe option: add a very short decay time to the end of the first clip and/or attack time at the beginning of the next clip. Try just decay and just attack to see if either solves the problem by itself; otherwise, do both. A fade of between one and three milliseconds in length should work. You can select a default fade-in and fade-out curve as well as a default crossfade curve; I generally use Fast Curve for the fade-out, and Slow Curve for the fade-in.
Before assuming you need to try one of the above procedures, first check the channel and buss meters to make sure the wave isn't going into the red, as an overload can also generate a click.
 Fade out and in.
The Master Buss Fader
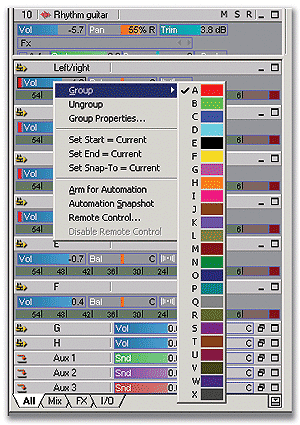
Recently, a user complained to me that Sonar doesn't have a master volume control for busses. This would be important if you were working on something like a surround project, and wanted to mix tracks down through six individual busses for a 5.1 output signal. Granted, Sonar doesn't have surround panners or other surround functions, but as a workaround you can clone tracks and use level and panning for the two tracks to place a signal more to the left, right, front, or back. You can also dedicate separate busses to bass and centre outs.However, there is a way to change levels on all busses at once: group them into one of 24 groups, just as you would channel faders. The easiest way is to hold down the right mouse button and click on the volume control of each buss you want to group, and select the desired group from the pop-up menu.
But there's one more step: hold the right mouse button, click on a grouped fader and select 'Group Properties'. In the 'Group Properties' box, tick 'Relative' so that the faders work relative to one another. That way, even if the levels are offset, they can all go to the minimum level (-INF). Setting to 'Absolute' preserves any offset, so once the lowest fader hits -INF, the other faders can't be lowered further.
 Setting custom Group properties.
More Grouping
Grouping offers quite a bit of flexibility; you can set up the faders in a group to act oppositely, or cover only a particular range.
For example, suppose you're having a 1960s Pink Floyd flashback, and decide that it would be cool to have one track pan from left to right while a second, related track pans from right to left. Of course you can just draw in envelopes that go in opposite directions, but it's easier to use grouping.
Group the two panpots together, then go to the Group Properties page. Tick 'Custom' and click on one of the pan pots. Two fields toward the bottom show the fader's start and end values. Enter a Start Value of 0 and End Value of 127 for one pan pot, and a Start Value of 127 and End Value of 0 for the other (note that as a shortcut, you can reverse the Start and End values by clicking on Swap). When you've set up the desired values, click on OK.
Now move the ganged panpots: as one goes left, the other goes right. Even better, the custom mode lets you enter any value between 0 and 127 for the Start and End values. For example, if the first pan pot has a Start value of 0 and an End of 64, while the second has a Start value of 64 and an End value of 127, then as the first pot pans from left to centre, the second will pan from centre to right.
In Custom mode, one control doesn't necessarily stop when the other reaches its limit. In the example above, if you're moving the first pot and the second reaches 127, you can still move the first manually above 64 and override the preset limit. If you find that entering numeric start and end values is too tedious, simply set a fader to its desired start point, click on it while holding down the right mouse button, and select 'Set Start = Current'. Then set the end point, right-click again, and select 'Set End = Current'.
You can also override a control's grouped status by holding down the Control key while you move it. Furthermore, you don't necessarily have to create a custom group to have custom settings; you can hold down the right mouse button and click on a fader in an Absolute or Relative group, then use the 'Set Start/End = Current' commands.
|
|
|