 Photo: Mark Ewing
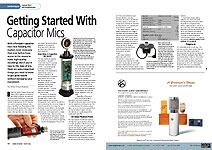
Everyone knows how much a classy vocal sound can add to any recording, but achieving this in the studio can seem something of a black art, so this month we demystify the recording, processing, and mixing techniques required to produce professional results.
In theory, getting a good vocal sound should now be easier than ever, as studio quality microphones seem now to be available for little more than pocket money. However, we still get lots of letters and emails at the SOS office about problems that musicians are encountering with this task, and we are often called on to advise on this topic in our regular Studio SOS visits. So I felt it would be valuable to put all the pertinent information in one place. Clearly the vocalist will always be the most important factor — a great vocal recording takes a great singer — but if we assume for the moment that the singer is delivering a good performance, what can you do at the engineering end to capture this in its best possible light?
Choosing The Right Mic
Most pop vocal work is done using some kind of large-diaphragm, cardioid-pattern capacitor microphone, but there are exceptions. For example, some singers like to work with dynamic mics such as Shure SM58s, because the tonality suits their voice and/or the style of music. It's also perfectly possible to make a good vocal recording using a small-diaphragm capacitor microphone and, in the right room, an omnidirectional microphone can give good results, so it's really a case of the end justifying the means.
Perhaps more relevant than the type or make of microphone is its tonal character, as matching the microphone to the singer is more important than many people appreciate — and if you've never had the chance to compare a range of different mics in a recording situation, that's quite understandable. Even now I still get phone calls from people asking which mic is the 'best buy' within a certain price range, but that's really impossible to answer in a meaningful way without knowing something about the voice being recorded. Most studio microphones, especially large-diaphragm models, have a distinct tonal character, so it's best to have a selection of microphones available, allowing you to select the preferred one for each recording task, even if that choice is only between two or three different models.
 Although figure-of-eight mics aren't the most common choice for lead vocals, there are occasions where their deep 90-degree rejection nulls are ideal for the task in hand. For example, if you need to record a vocalist while he is playing an acoustic guitar, the nulls can be angled to give much better separation between guitar and vocal than could be achieved with two cardioids.If your budget can reach this far, then the obvious choice is to get one fairly neutral mic, one with a warm, syrupy quality, and another with a bit of sizzle on the top end. You may also wish to consider a tube microphone, though these can sound very different — so different, in fact, that it's hard to say what the tube sound is. To me, the better tube mics sound crisp and clear without being harsh or sibilant, and they also add weight and density to the lower vocal frequencies. Those mics that deliberately overdrive the tube to get a 'warm' sound can end up sounding mushy, dull or just plain distorted. Fortunately most mic manufacturers have now realised that the best-sounding tube mic is the one that doesn't use the tube to create artificial distortion — what it contributes naturally is quite enough.
Now I wouldn't dare suggest that women are in any way 'difficult' as a species, but I have found that choosing the best microphone to suit a female singer is generally more difficult than for male singers. Maybe it's because their voices tend, on balance, to be smoother sounding than men's voices, which probably equates to less harmonic complexity — or at least, a lower level of some of those complex harmonics. This leaves the throaty elements of the sound more exposed, so if you pick the wrong microphone you can end up with what sounds like distortion when what you're really hearing are the less desirable throaty artifacts of the sound being emphasised. Close miking is pretty unforgiving of unattractive vocal characteristics anyway, but if you're unfortunate in choosing a mic that exaggerates these less attractive artifacts, you're in trouble from the start.
As you might expect, microphones with a strong presence peak in the upper mid-range are the most likely to give rise to problems of this kind (presence peaks up above 8kHz are less likely to aggravate this type of problem), but then that same mic might rescue a session where you're dealing with a singer who has a voice that lacks definition. It's not usually a case of 'good mic versus bad mic', but rather 'suitable mic versus unsuitable mic'. Of the microphones I've reviewed over the past few years, very few of them have actually been poor from a technical standpoint, and even then, it's usually been from the perspective of noise rather than tonality.
The same tends also to be true for microphone preamplifiers. It's undeniably true that expensive boutique models can sound noticeably better than budget models, but I've used preamps and mixers costing under £100 in combination with budget Chinese capacitor mics and had great results, both artistically and technically. That's not to say that the very best gear wouldn't sound even better, but in many of the situations I've encountered, the equipment has not been the limiting factor. More often than not, it's what the microphone picks up that's the main problem with the recorded sound.
Large-diaphragm Or Small-diaphragm?
The usual choice is a large-diaphragm capacitor microphone as many of these are designed to have a specific tonal colour, often described as warm, airy, smooth, sizzly and so on. By picking a model to suit the vocalist, you can produce an optimal recording, but by the same token, the wrong mic can make a singer sound worse than they should. Small-diaphragm mics tend to have less off-axis coloration, and in general they are more accurate than large-diaphragm models. In my experience, they often make fine vocal microphones, although the large-diaphragm world does give you more choice over tonal colour. Nevertheless, large diaphragm mics now seem to have been adopted as the established, traditional method of recording vocals.
Polar Patterns: Which Is Best?
Most people know that microphones 'hear stuff', but they're not always aware of what stuff they hear. If you stick a singer a few inches away from the microphone, then obviously you're going to record the singer, but you're also going to record any other sound approaching the microphone. Vocals are almost always recorded using cardioid-pattern microphones, as they have a directional characteristic that excludes more off-axis sound (such as room reflections or spill from other sources) than omnidirectional microphones, which are equally sensitive all the way around. If you have a very dead room or vocal booth that will allow you to use an omni-pattern microphone, you may find that you get a more natural or 'open' sound than you do from a cardioid microphone, with the added bonus that there will be no tonal variation if the singer changes position slightly while singing. Omni mics also don't exhibit a bass boost when used close up (the so-called 'proximity effect'), so the amount of low end they produce doesn't vary as the singer gets closer to the microphone.
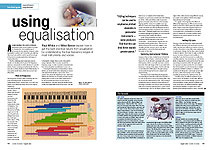
, which picks up best from directly in front of the capsule while rejecting sound from directly behind. The omnidirectional pattern (centre) is more common in mics used for acoustic music, and picks up equally well from all directions. The figure-of-eight polar pattern (right) is fairly uncommon for recording vocals, picking up sound from in front and behind while rejecting sound from the sides. However, if you decide that the sound of a ribbon mic would suit your vocalist, then it will almost certainly use this pattern.") Here you can see response diagrams for three polar patterns used in vocal mics — the lobes of each figure show the sensitivity of the mic to sound arriving at different angles relative to the mic's capsule. The most common pattern used in modern vocal recording is the cardioid pattern (left), which picks up best from directly in front of the capsule while rejecting sound from directly behind. The omnidirectional pattern (centre) is more common in mics used for acoustic music, and picks up equally well from all directions. The figure-of-eight polar pattern (right) is fairly uncommon for recording vocals, picking up sound from in front and behind while rejecting sound from the sides. However, if you decide that the sound of a ribbon mic would suit your vocalist, then it will almost certainly use this pattern.The other time an omni microphone might be preferable is when you're recording in a live environment where you want to capture the natural ambience of the room. An obvious example of this is choral music, but it can also be applied to solo parts where artistically suitable. Where you have a choice, a single-diaphragm, dedicated omni mic generally produces a more accurate off-axis response than you get from a multi-pattern mic that combines the outputs from two capsules to create the different polar patterns.
Here you can see response diagrams for three polar patterns used in vocal mics — the lobes of each figure show the sensitivity of the mic to sound arriving at different angles relative to the mic's capsule. The most common pattern used in modern vocal recording is the cardioid pattern (left), which picks up best from directly in front of the capsule while rejecting sound from directly behind. The omnidirectional pattern (centre) is more common in mics used for acoustic music, and picks up equally well from all directions. The figure-of-eight polar pattern (right) is fairly uncommon for recording vocals, picking up sound from in front and behind while rejecting sound from the sides. However, if you decide that the sound of a ribbon mic would suit your vocalist, then it will almost certainly use this pattern.The other time an omni microphone might be preferable is when you're recording in a live environment where you want to capture the natural ambience of the room. An obvious example of this is choral music, but it can also be applied to solo parts where artistically suitable. Where you have a choice, a single-diaphragm, dedicated omni mic generally produces a more accurate off-axis response than you get from a multi-pattern mic that combines the outputs from two capsules to create the different polar patterns.
One further polar pattern to mention is figure of eight, because there's recently been a resurgence of interest in ribbon microphones, which all have a figure-of-eight pattern. Ribbon mics have a distinct tonality that is different to both normal condenser and dynamic mics, and they can sound good on a vocal that needs its high end smoothing out a little. These mics are equally sensitive to the front and to the rear of the capsule, so putting an absorbent screen behind the microphone while recording can help prevent unwanted room reflections from getting onto the recording. Figure-of-eight mics can be useful when recording a singer who plays acoustic guitar at the same time, as you can arrange for the dead zone of the mic (90 degrees off-axis) to be aimed towards the guitar to minimise spill. Note that all figure-of-eight mics have a strong proximity effect, so, again, if you work too close to them, the bass end will increase very noticeably.
Returning to the subject of cardioid microphones, one factor that hasn't attracted the attention it deserves is that single-diaphragm mics often behave differently to dual-diaphragm models. Dual diaphragms are used in switchable-pattern mics, and in cardioid mode they seem to pick up more of the room sound in close-miking situations than single-diaphragm models. The single-diaphragm mics always seem to produce a drier, more focused sound, which helps in situations where the amount of acoustic treatment that can be applied is limited. On the other hand, the dual-diaphragm model may deliver a more open sound, but often needs to be used in a more controlled environment to be effective.
Beware The Booth!
 Home-made vocal booths typically have too much acoustic absorption at high frequencies, resulting in a boxy sound. Fixing old CDs to the wall can help reinstate some reflections to remedy this.Once you graduate from recording in your bedroom and start thinking about converting your loft or garage into a studio, the idea of a separate vocal booth can seem very appealing. Done properly, a vocal booth is a great asset, but simply creating a cupboard-sized enclosure with a door and then lining it with a couple of inches of acoustic foam invariably leads to disappointing results — what you end up with is a sound that is dull and lifeless at the high end, but uncontrolled and boxy at the low end. The reason this happens is that any absorbent material such as foam needs to be significantly thicker to be effective at low frequencies than it does at high frequencies. Where the foam is only a couple of inches thick, its effectiveness is much reduced below 400Hz or so, leaving those lower frequencies to behave almost as though the room hadn't been treated at all. What's worse is that by drying up all the high-end and upper mid-range reflections, the tonal balance seems worse than it was before, as the boomy low end now overwhelms the top end.
To create an effective vocal booth, the enclosure needs to be large enough to allow you to lose at least six inches from each of the three non-door walls, which will allow you to use a suitable depth of trapping. Four-inch foam or Rockwool slab on two-inch spacers to keep it off the wall is reasonably effective, but you should also consider leaving some small areas untrapped to add a little high-end reflectivity back into the booth, otherwise it may still end up sounding too dull. Another alternative is to fix small areas of reflective material to the surface of your traps — we used old CDs during one Studio SOS visit and it worked really well. Other approaches include putting the trapping behind perforated metal, plastic, or MDF sheeting.
Acoustic Treatment For Vocals
As all microphone pickup patterns are three-dimensional, 'the sides' also pick up from above and below. Even if your room is quiet and there's no traffic noise, unless the room has been designed by a studio acoustician there will be reflections from walls and other surfaces that bounce 'second-hand' vocals back into the microphone. These reflections will be captured in addition to the direct sound of the voice, so you'll get the sound of the room overlaid on the sound you're actually after.
 Here you can see the kind of setup that usually yields good results in the home studio. A cardioid microphone is mounted in a suspension shockmount and protected from breath blasts using a pop shield. The vocalist sings within 12 inches of the microphone and with her back to a suspended duvet to avoid sound reflecting off the wall behind her into the sensitive side of the mic.Photo: Mark EwingThis is often a significant problem in the home studio, as there are reflective walls, ceilings and furniture conspiring to corrupt your vocal sound. While you might add reverb afterwards, you'll find that it doesn't hide the boxy tone caused by room reflections. Even people who've bought seriously professional-grade equipment fall foul of this problem. There's a parallel here with photography: even a budget camera can give you an artistically fantastic picture if what is in front of the lens looks good and is correctly lit. But if the subject is badly lit, then no amount of upgrading will bring about a significant improvement in the end result.
Regular readers will know that there is a way to improve this situation without resorting acoustic treatment of the whole room. All you need to do is improve the acoustics in the vicinity of the microphone. I think most people appreciate this on an instinctive level and, because I keep banging on about it, some musicians have tried using duvets for acoustic treatment. However, a surprising number simply hang a duvet on the wall and then sing facing the duvet! This may help a little, as the duvet will absorb some of the sound that would otherwise bounce back off the wall, but it's far from the best solution. Think back to the cardioid mic's pickup pattern and you'll see that in the above scenario its least sensitive area (directly behind it) is now facing the duvet, while its sensitive front and sides are still picking up room reflections.
A better option is to hang the duvet behind the singer, as any reflections coming past the singer's head will otherwise be picked up by the extremely sensitive front of the microphone. To reduce side pickup, you can hang a double-size duvet in a curve or use two to form a 'V' shape and have the singer stand with their back facing into the apex. That still leaves the ceiling and floor as possible reflection sources, but a rug or carpet on the floor will help enormously. If the ceiling is low, a foam panel above the mic and singer will do the trick nicely.
Improvised acoustic treatments made from duvets or blankets are effective at high frequencies and in the mid-range, but their efficiency falls off at low frequencies. In most cases, they work adequately over the vocal range, but doubling up the thickness or using a heavy, winter-grade duvet will improve their performance at the low end — useful when recording baritones. Such 'blanket' absorbers also work best when spaced away from a wall, so the best option, where practical, is to set up the vocal mic and absorbers out in the room, well away from the walls, but at the same time avoiding the very centre of the room, as that attracts its own set of special problems associated with room modes based on the room dimensions. As a final fix, you can shield the rear of the mic (after all, even a cardioid mic isn't totally deaf in the rear) by fixing a piece of acoustic foam close behind the microphone. Auralex make some neat devices of this type in triangle and butterfly shapes that slot onto the mic stand, but if looks don't concern you, a chunk of furniture foam will serve almost as well.
Comping & Tidying Up Your Vocal Takes
 Even great vocalists sing better on some takes than on others, so it is common practice to record the same vocal part several times and then compile (or 'comp') the best phrases together into the final take. This is easy to do in a typical DAW as you can view the various takes on adjacent tracks, audition them, then separate out the phrases you wish to keep and move them to a new track. If you only cut in between phrases, your edits shouldn't be audible, but if you do have to edit during a continuous phrase, try to edit either just before a hard consonant or during a sustained sound such as 'eeh or 'aah', using a short crossfade to hide the transition.
Breath noise is a natural part of singing, and if you remove it completely, the resulting track can sound unnatural. You can reduce excessive breath noise by manually selecting the offending sections of the audio file and doing a destructive gain change to reduce the level by a few decibels or, if you're a little more cautious, you can use mix automation to do the same thing. It's also often possible to use a gate processor, setting the amount of gate attenuation when closed to around 6dB, rather than having it mute everything completely. The same techniques can be used to reduce headphone spill in sections where there is no singing, but this problem is easily avoided by using closed headphones in the first place. If your singer likes to work with one phone off, make up a special lead so that only one of the phones is working, as shown in the diagram above and explained in more detail in the article on cue monitoring in SOS January 2003.
Shockmount & Pop Shield
Having got this far, can you now get on with your recording? Almost, but first you need to fit a pop shield a couple of inches in front of the microphone, otherwise you'll almost certainly get popping and banging on plosive sounds (usually 'B' and 'P' consonants), regardless of whether you're using a cardioid or omni mic. This is simply due to gusts of air being expelled from the mouth when a singer creates these sounds and those gusts slam into the mic diaphragm, producing a loud thump. A fine-mesh shield between the mic and singer will break up those gusts and fix the problem.
 Photo: Mark Ewing
 If your vocalist prefers to sing wearing only one headphone, the spill from the loose earpiece could be very audible on your mic track. Fortunately, it's easy to make up a special switch to turn off one channel, as shown below.Various commercial nylon and metal mesh pop shields are available, but you can improvise your own from nylon stocking material stretched over a suitable hoop, if you prefer. Note that the foam wind shields that come with some mics are not very effective as pop shields, and they also tend to compromise the tone by filtering out some of the high end. I've covered this point many times before, but I make no excuse for repeating it, because I still come across people trying to use microphones with no pop shield. Even if you're using a stage dynamic vocal mic for recording vocals, a pop shield is still necessary to guarantee freedom from popping problems.
While a microphone shockmount is not mandatory, it really helps cut out low-frequency vibrations coming up from the floor, as they are prone to do if the singer has a habit of tapping their feet! This can be a real problem on wooden floors, so a shockmount is highly recommended. Some mics come with a shockmount, but if not, inexpensive generic mounts are available for most microphones — they not only solve vibration problems, but also look cool.
Now you're ready to record, and given that modern recording systems offer so much headroom, I'd suggest not using compression or EQ at the recording stage, as recording flat leaves you more flexibility for adjusting the sound afterwards. More experienced engineers sometimes process as they record, but as you may have already discovered, what sounds right in isolation may not always sound right once all the other parts have been recorded, so until you have gained the necessary experience, it's safer to leave your options open. Just make sure you leave a few extra decibels of safety margin on your recording system, as it's not only guitarists who get louder when the red light goes on!
Getting The Best Performance
You'll need to set up a suitably balanced headphone mix for the singer, and in most cases giving the singer a little reverb in the phones will help their pitching and also make them feel more confident about their performance. Make sure you don't record the reverb, though, as you'll want the freedom to adjust it at the mixing stage. Your 'bedside manner' can also make a big difference to the quality of the performance so try to be encouraging rather than critical, but at the same time make sure you capture enough takes to make up one good one.
If you intend to use a pitch-correction program or device, such as Auto-Tune, always apply this after recording — if the corrected sound is fed into the singer's headphone monitor mix, it will completely undermine their ability to control their pitching, and will result in a disastrous performance. Subdued lighting can also help get the singer in the right mood for the performance, but make sure you also look after the practicalities, such as making sure there is cool drinking water on hand and that the room is a comfortable temperature. Once you have captured that perfect vocal performance, you can polish it using EQ, compression, and reverb at the mixing stage, and I have a number of suggestions for tackling this in the most effective way.
Taking The Ssss Out Of Sibilance
 The old pencil trick!Photo: Mark EwingNo recording textbook would be complete without a discussion on de-essers, but in my experience they are very rarely needed. A de-esser is a technological solution to the physical problem where some singers produce very pronounced 'S' and 'T' sounds because of the way air moves around their teeth. In most instances, using a different microphone or moving the mic slightly above or below the singer's mouth is enough to reduce the problem to manageable proportions. You can also try fixing a pencil, vertically, right in front of the mic grille, holding it in place with a couple of elastic bands around the mic body. This shields the centre of the diaphragm, and definitely reduces sibilance, though the exact reasons have probably never been properly researched. Yet another solution is to put an extra layer of stocking material over your pop filter to attenuate the high end slightly.
However, where the problem is serious, electronic de-essing is sometimes necessary. A de-esser is, essentially, a special type of compressor that only reacts to frequencies in the sibilance range (typically 3-6kHz). Simple de-essers will reduce the level of the entire audio signal when the level of the sibilant frequencies rises above a threshold you set. Unless the degree of processing is very light, this can impart a lisping quality to the vocals. Models that attenuate only the upper half of the audio spectrum are better, but the very best ones attenuate only frequencies in the sibilance band, leaving other frequencies unchanged.
Mix Processing & Effects
Once you have compiled the best vocal take possible and cleaned up any unwanted noise in the pauses, what next? If pitching is still a problem, you can use Antares Auto-Tune or one of its competitors to automatically force the vocal pitch to the nearest note in a scale you set, or to the nearest semitone. That said, in my experience chromatic correction gives problems if the singer uses a lot of vibrato or if they scoop up to notes. I find it's best to take the time to get the scale right, then use the slowest pitch-correction rate that will do the job properly, as this gives the most natural sound. You can always automate the rate of correction if some parts of the song need more help than others. Where more drastic correction is needed, you may be better off using a program such as Celemony Melodyne that allows you to fine-tune individual notes in a graphic environment. Less serious pitching issues can sometimes be resolved by processing individual words using a pitch-shift algorithm to push them up or down by the necessary few cents. You can even automate the amount of shift applied to different words or phrases if you have the patience.
When it comes to EQ, there are no standard settings. In an ideal world you'd have teamed the singer with the mic that best suited their voice, but in less-than-ideal conditions, removing some low mid-range in the 150-400Hz range can help clean up boxiness, while a broad boost at 8kHz and upwards can add 'air' and sizzle to the sound, but use as little as you can get away with. Using a low-cut filter to get rid of subsonic audio and breath rumble can also be useful, though this is best done at source if your mic or preamp has a low-cut filter.
Reverb is also pretty much a question of taste, but for most classic vocal sounds I usually end up going back to a plate emulation, as these don't try to impose any particular room type on the sound. Combining this with a suitable short-ambience treatment (there are some lovely convolution reverbs available) also suits most voices. By balancing the two reverbs, you can get anything from a fairly upfront and focused vocal to a long ballad reverb, and I've had some success making the attack of the plate reverb slower or adding some pre-delay, as this keeps it out of the way of the ambience reverb. Vocal plate reverbs rarely need to be longer than 1.8 to 2.5 seconds, and in many cases rolling off some low end below 200Hz gives a cleaner and more lively sound. Putting a subtle repeating delay before the plate reverb can also produce a nice effect, provided that the music has enough space to allow the effect to breath.
Should you wish to double-track the vocal part for any reason, the best results are obtained by doing it for real, getting the singer to duplicate their part on another track. You may even have enough spare parts left over from compiling your vocal that you can build a second track. Where the singer can't match the first performance closely enough, you have the option of slicing up the phrases and aligning them visually using your DAW's waveform display. Where this fails, you may have to resort to cheating using processing, though in my view none of the fake methods sound as good as the real thing. In the early days of recording, 'fake' double-tracking or Automatic Double-tracking (ADT) was often attempted using a short tape delay using a spare tape recorder. Somebody then tried to vary the delay time by slowing the tape reels by hand and accidentally invented flanging!
Although there are plug-ins that do a passable job of faking double-tracking from a single vocal, introducing pitch and time variation, you can get almost as good results by copying the vocal to a new track, then processing it with Auto-Tune or something similar, as this will create subtle pitch differences between the original and the copy. Adding a delay of 60-100ms to the second part can also enhance the illusion that there are two different parts.
Keeping the vocal level nice and even is generally done with the aid of a compressor, aiming for around 6-8dB of gain reduction (using a ratio of between 2:1 and 6:1) on the loudest points in the track. We've written a lot on this subject, but the optimal attack and release time settings depend on the type of compressor or plug-in you are using. If you're unsure as to how to set these, take a peek at some of the presets and see what values they used, but don't expect a preset to work without further adjustment, as the correct threshold setting always depends on the level and dynamics of the signal being processed. However, compression alone isn't always enough to tame the dynamics of some singers, so use your mix automation to bring up any words or syllables that are getting lost or to drop the level of those that stand out too much.
If you find it hard to judge how loud the vocals should be, try listening to the track from outside the door of your studio, which will make your mix sound more like it would on a domestic radio or hi-fi. From this perspective, the vocal should be clearly audible above the backing, but not so loud that it doesn't sound like part of the same performance. If in doubt, play a commercial record and listen to that from the same position. Ultimately this is a subjective decision and it takes experience to get it dead right every time.
Further Reading
 If you're interested in learning even more about the topics covered in this article, then head over to the Sound On Sound web site, where you can find a huge number of related articles from previous issues of the magazine:
- For more detailed information on choosing and using studio microphones check out 'What Mic Should I Buy First?' (SOS July 2003) and 'Getting Started With Condenser Mics' (SOS March 2005) for some pointers.
- Managing any overdubbing session can be difficult, and vocal sessions can be particularly challenging. However, there's help at hand in 'Basic Overdubbing' (SOS March 2001), and you can also find advice on the important task of setting up the best headphone mix for the talent in 'Cue Monitoring Techniques' (SOS January 2003).
 Equalisation is probably the most common processing tool applied to vocal recordings, so if you want a detailed explanation of what equalisers are, how they work, and how to get the best out of them, try 'Equalisers Explained' and 'Using Equalisation' from SOS July and August 2001 respectively.
- Compressors are not only extremely common in recording studios, but they are also vital to almost all modern vocal sounds. For an in-depth look at the different types of compression, as well as tips on making the most of your own outboard and plug-ins, have a look at our two-part 'Advanced Compression: Part 1' masterclass that appeared in SOS December 2000 and Advanced Compression: Part 2 in January 2001.
- We get asked questions about vocal reverb processing here in the Sound On Sound offices. Our 'Advanced Reverberation: Part 1' and 'Advanced Reverberation: Part 2' articles discuss all the common reverb types and algorithm parameters you might encounter, as well as going into some of the finer points of how to find the best settings for your particular track.
Mike Senior