These days, when inexpensive software synthesizers seem to be released on a weekly basis, it's easy to forget that Logic comes complete with a fine suite of sound-making tools. ES2 is, from a programming perspective, one of the most powerful of these, and it has the flexibility to create everything from emulations of synth classics to completely new and unique-sounding instruments.
It does, however, have a very complex user interface, so many users tend to skip the programming and use the presets supplied by Apple. Creating your own sounds is always the way to go if you want to stand out from the crowd, so here's a guide to ES2 's features (with further detail overleaf), which should help you do exactly that.
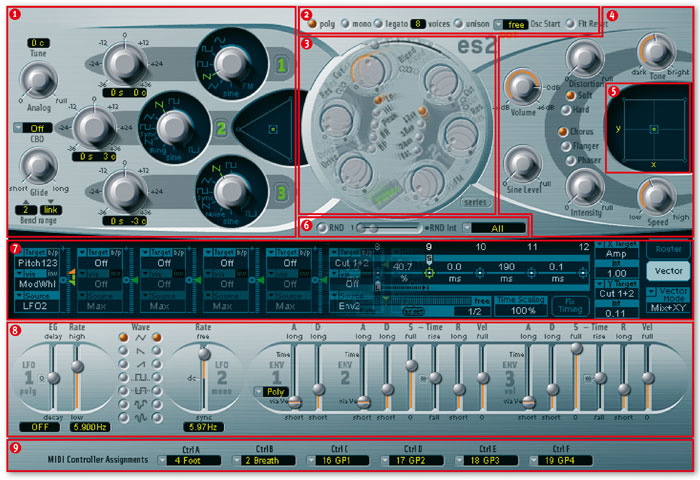
1 - Oscillator section
ES2 's three oscillators employ a layout that has much in common with the classic Minimoog, but is much more flexible:
* Each oscillator has a slightly different role.
* All three have a familiar line-up of waveforms, but a library of 100 Digiwaves can be called upon to spice up your sounds.
* The Oscillator Mix Field (the triangular pad) is used to crossfade between the three oscillators; when the locator is central, an equal mix of all three is sent to the filters.
* The controls to the left of the section can be used to introduce elements common in analogue synths.
* Complex FM synthesis can be created using Osc 1's dedicated FM mode.
2 - Keyboard mode
Here, as with most software and hardware synths, you can control how the keyboard input will affect the synth's output:
* There are the usual poly, mono and legato modes.
* A maximum of 32-voice polyphony can be selected, but higher voice counts increase CPU load.
* Unison mode can be engaged to add those classic warm chorus effects.
* The Osc Start menu enables you to restart the oscillator cycles every time you press a key.
* Filter Reset can be used to instantly engage filter self-oscillation when a key is pressed.
3 - Filters
ES2 has two filters that can be used in parallel or series. They behave differently, depending on which mode is in operation:
* Filter one can be selected to work in five different modes.
* Filter two is permanently low-pass, but has variable slopes.
* When in Parallel mode, Blend effectively crossfades between the two filters.
* In Series mode, positive and negative Blend values affect each filter differently.
* There are three chain symbols, which all do slightly different jobs and let you modulate the filters' cutoff and resonance simultaneously in real-time.
4 - Output section
This section controls the master output of ES2, and apart from the ubiquitous volume knob, there are a few handy tools for processing the synth's output:
* The Sine Level knob introduces a pure sine signal at the output stage.
* Tube- and transistor-derived distortion can be added.
* One of three effects can be blended with the master signal.
5 - The X-Y Square
ES2 's modulation parameters can be assigned to the X and Y axes, then modulated in real-time using this area:
* X and Y 'targets' can be specified in the Router.
* The Vector mode can be used to create complex 'moving' sounds, by setting up points along a timeline with different X and Y values.
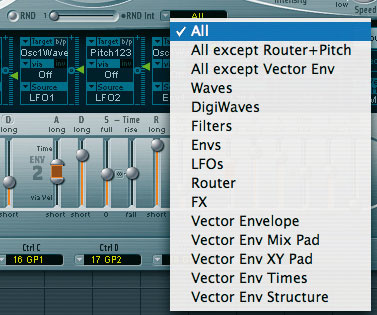
6 - Randomiser
A simple yet effective way to create your own sounds is to choose an ES2 preset, then use this random parameter generator to warp the sound:
* The amount of parameter alteration is governed by the Random Intensity slider.
* The drop-down menu enables you to choose the parameters that will be affected by the Randomiser.
* Each time the RND button is pressed, a new, random sound is generated.
7 - Router/Vector section
This panel is extremely flexible. When the Router is displayed, 10 independent modulation routings can be made. When the Vector button is pressed, an envelope is displayed, which allows you to create evolving sounds using the X-Y Pad and Oscillator Mix Field. In the Router mode:
* Source defines the function that's being used to send the data.
* Via offers an additional modulation source, enabling you to modulate the intensity of the modulation.
* Target defines which parameter will be modulated by the combination of the last two parameters.
* A slider allows you to control the intensity of each modulation routing.
When in Vector Mode:
* Up to 15 points can be created along the envelope line.
* Each point can represent a different position on the triangular and square pads, or both simultaneously.
* Sustain and Loop points can be created to make looping envelopes.
8 - LFOs & Envelopes
This section is fairly basic in concept, and comprises two low-frequency oscillators and three envelopes, all of which have slightly different feature sets:
* LFO 1 is polyphonic, while LFO 2 works monophonically.
* A variety of waveforms can be selected for each LFO, and their rate can be sync'd to Logic 's tempo.
* Env 1 can be set to work in Poly, Mono, or Retrig modes, to create a variety of effects.
* Env 2 and 3 have the same feature sets, but Env 3 is permanently assigned to the master level.
9 - MIDI Controller Assignments
A total of six external controllers (Ctrl A to Ctrl F) can be assigned here, and used to modulate ES2 's parameters.
* Simple drop-down menus allow you to assign MIDI controllers to each control bank.
* The six assignments are displayed as Router sources.
1. Oscillator Section
ES2 's three oscillators can each be used to create different sonic flavours, and when certain combinations of waveforms are used, they interact together with the potential to create incredibly complex sounds. First things first, though; let's start with the basic stuff.
 The Oscillator Mix Field (OMF; below) lets you mix the amount of each oscillator's signal. When the square dot is at the top of the triangle, only the output of Osc 1 is heard; in the far-left position, Osc 2 is solo'd, and when it is at the bottom, Osc 3 plays on its own. To create FM tones, set Osc 1's waveform selector knob somewhere between the sine wave and FM settings, then move the cursor in the triangle to the topmost position. Now, whenever you change the waveform or the pitch of Osc 2, the frequency of Osc 1will modulate.
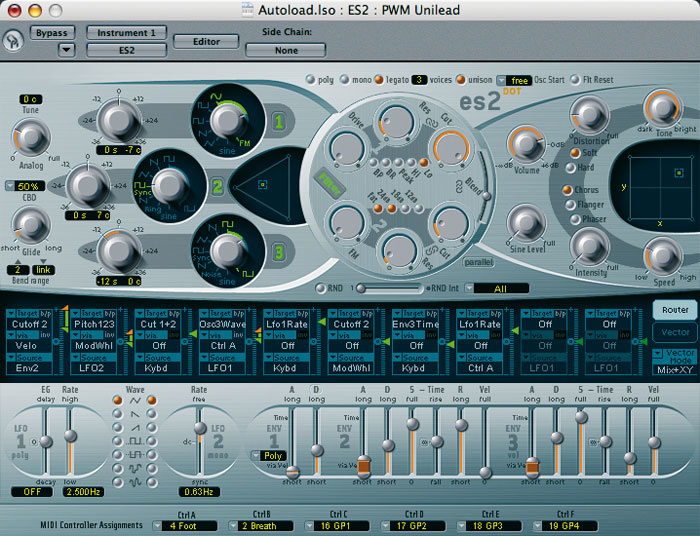
Osc 2 and 3 are similar to each other in that their square waveforms' pulse width can be modified by moving the knob between the two square-wave graphics on the right-hand side of the waveform control. Osc 2 has a ring modulator, which is fed by the output of Osc 1 and modulated by the square wave of Osc 2. Osc 3 features a noise generator that, by default, produces white noise. If you set up a modulation via the Router and set the target to 'Osc3wave', you can change the spectrum of the noise automatically. Alternatively, you can directly adjust parameters using the Controls view on the ES2 (as shown in the screen below).
If you click and drag on the setting at the bottom of each of the oscillators' waveform knobs, you can select one of the 100 Digiwaves. These are complex, single-cycle waveforms that can create less conventional-sounding tones.
 The Analog control randomly alters the ES2 's pitch and cutoff, in an attempt to emulate wobbly old synthesizers, and there's a Constant Beat Detuning (CBD) parameter that is used to reduce the 'out of tune' effect you sometimes get when slightly detuned oscillators are beating together at different pitches.
The Glide parameter applies to all oscillators. Its behaviour depends on the Keyboard mode. If it's set to Poly or Mono, you'll get portamento between notes. If it's set to Legato, you'll only hear the glide when you press a new key before you release the old one. The Bend Range fields give you the option to set different ranges for upward and downward pitch-bending. When these are set to Link, an equal bend range is applied in both directions.
2. Keyboard Mode Section
Here, you can choose how the synth will react to the controller keyboard's MIDI note data. As well as allowing you to choose Poly, Mono or Legato modes, this area lets you define ES2 's polyphony. Up to 32-voice polyphony is possible, but remember that CPU load will increase with the number of voices in use.
The Unison control behaves differently according to mode setting. In Legato or Mono modes all the voices are stacked on a single note; in Poly mode, the number of stacked voices is reduced depending on how many notes you play. The Osc Start parameter can be set to either allow the oscillators to run free (like in most analogue synthesizers), or start a new cycle when a key is pressed.
3. Filters
ES2 's filter section employs complex virtual circuitry beneath its sleek, rotating module. Filter 1 has five settings: Lo (low-pass), Hi (high-pass), Peak, BP (band-pass), and BR (band-reject). Filter 2 is low-pass only, but it has variable slope settings: 12dB, 18dB and 24dB. There's a Fat button that compensates for the loss of bass that is encountered when Filter 2's resonance is increased.
When the filters are used in parallel mode, the Drive knob overdrives both filters equally, with a single drive circuit appearing pre-filter. When in series mode, the filters have independent drive circuits, the positioning of which depends on the status of the Blend slider (for a full explanation of this, check page 244 of the Logic Plug-in Reference PDF).
The FM knob allows you to modulate the cutoff of filter 2, using the sine wave of Osc 1, leading to interesting bell-like timbres.
The three chain-link symbols enable the modification of the filters' cutoff and resonance parameters simultaneously, using the mouse. Unsurprisingly, they all perform different modulations:
- The two controls situated between each filter's main controls vary the cutoff (on the X-axis) and resonance (on the Y-axis) of the filters.
- The icon located in between the filters manipulates just the cutoff of Filter 1 and Filter 2, on the X and Y axes respectively.
Needless to say, clicking and dragging on these icons creates a variety of effects.
4. Output stage
In addition to controlling the main volume of the synth's output, this section offers a number of processors for adding character to your sounds:
- The Sine Level knob introduces a pure sine wave at the same frequency as that set in Osc 1. It can be useful for beefing up bass drums and so on.
- Hard and Soft distortion types (modelled on transistor fuzz and tube overdrive respectively) can be mixed into the output.
- There are three types of modulation: Chorus, Flanger and Phaser. These can be altered using the associated intensity and speed knobs.
 5. X-Y Square
The X-Y controller (the 'Square' in Logic parlance) at the top right of the ES2 's GUI works hand in hand with the Router and Vector panels. You can route the X and Y axes to different targets, by setting assignments in the Router. Using the Vector mode, points on the X-Y Square can be plotted, and assigned along a timeline (the Vector envelope). Real-time adjustments to the sound can be made using the mouse, and any on-screen movements you make can be easily controlled by Logic 's track automation.
6. Randomiser
ES2 has quite a sophisticated random sound generator that allows you to create completely new or modified patches without programming. While it's rare to generate something useful from the default preset, modifying a sound that's already pretty close to what you are trying to achieve can generate some really useful patches.
- Specify the intensity of the randomisation with the RND Int slider. This effectively governs how much the new patch will deviate from the original.
- The pull-down menu shows the Randomiser's destination, enabling you to select which parameters you want to be randomly altered.
- A useful way to slightly vary the tone of your instrument is to randomise the oscillators' Digiwaves. Doing so will create new sounds with a similar feel but a different timbre to the original.
 7. Router & Vector Mode Panel
This prominent central panel is the heart of ES2, but has two completely different modes. Details of how the Vector Mode works can be found in the box immediately below, but in its Router mode the panel acts as a virtual patchbay that enables up to 10 different modulation assignments to be active simultaneously. The modulator is referred to as the Source, while the Target is the parameter being modulated, as you might expect. 'Via' gives you access to an extra modulation source, and enables you to modulate the modulation!
8. LFO & Envelopes
ES2 's LFOs and Envelopes have quirky features that can be used to good effect:
- LFO1 is polyphonic; this means that the LFO is applied individually to each voice that's played. For example, if a three-note chord is played by hand, the slight timing variations that occur will result in slightly shifted phase, which can add to the richness of a sound.
- LFO 1 has a built-in Envelope Generator (EG). At positive values, this introduces delay, so the LFO gradually increases in intensity. Negative values make the LFO's modulation decrease in intensity.
- LFO 2 is monophonic, so whenever a note is played, it will remain phase-locked with other voices. Its rate can be sync'd to Logic 's tempo or set 'free', and measured in Hertz.
- Each LFO has two different types of random generators. The topmost of these two generates stepped randomisation, while the bottom waveform interpolates between the steps, creating a smoother result.
- There are three envelope generators on the ES2. Env 3 is hard-wired to the amplitude of the output, so is always used for level control
- Env 1 has three triggering modes. Poly assigns each voice its own envelope, and retriggers it every time a key is pressed. When switched to Mono, the envelope is only triggered if the previous note is released before a new one is pressed. Retrig mode assigns each voice an envelope, but globally retriggers them with every 'note on' message.
- In addition to a standard Sustain slider, Env 2 and Env 3 feature Sustain Time controls. These determine the length of time that it takes for the amplitude to reach its maximum or minimum level after the decay phase.
- Env 2 and Env 3 can have their sensitivity to incoming note velocities set by the Vel slider.
9. MIDI Controller Assignments
These define the MIDI controllers which can be used as Sources in the Router (Ctrl A-F). Handily, the Router-source pull-down menu gives you the current settings of the MIDI controller assignments.
Vector Mode
The Vector section is where sweeping, evolving modulations can be generated. The timeline that runs horizontally through this panel is known as the Vector Envelope, and up to 15 points can be created along it. Each point corresponds with the positioning of the cursors on either the triangular Oscillator Mix Field (OMF) or the X-Y Square, or both.
The Vector Mode drop-down menu (located on the bottom right corner of the Router/Vector panel) determines which controller the Vector Envelope will be applied to: Mix relates to the OMF, while XY, unsurprisingly, relates to the X-Y Square. Points can be added to the Vector Envelope in a similar fashion to the way automation points are created in the Arrange page. Shift-clicking on the timeline creates vector points, while clicking on the points while holding down the Ctrl and Option keys deletes them. If you click on a vector point and move the cursors on either of the pads, their new positions will be stored.
 You can set the amount of time that you want the sound to hold at vector points by adjusting the millisecond values next to each one. Doing this while holding down the Control and Apple keys ensures that the relative time values after this point maintain their absolute positions, which can be useful if you've set up a precise vector change on a beat. A Sustain status can be assigned to any Vector point by clicking on the line above the point's marker. In practice, envelope movement is suspended when a Sustain point is reached. It is then held until a MIDI note-off message is sent. Sustain points are flagged by an 'S' marker above the hold length data on the timeline.
The Vector Envelope can be set to cycle between Loop points and Sustain points. A loop's characteristics can be specified from the respective pull-down menu, and there are parameters for Loop Rate and Time-scaling, as well as smoothing at the start and end of the loop. If the Loop Mode is on and the Loop Count parameter is set to a value other than Infinity, the Loop will repeat for the set number of times and then play any points after the Loop. The Loop Rate can be set to either run freely or synchronise to the Song tempo, depending on the setting of the slider bar.
The Time Scaling parameter compresses or expands the length of the whole vector envelope, while the Fix Timing parameter rescales the envelope back to its original length.
There's a Solo Point button that disables any Vector mode settings, so you can check the raw sound of a patch without any Vector processing.
ES2 's release settings (the phase that occurs after a MIDI note-off message) can be altered using the Vector panel's Env Mode settings. These depend on the status of the Loop Mode, which can be set as follows:
- If Env Mode is set to Normal, and Loop Mode is off, the Sustain point will be played as long as you hold down a key. When the key is released, the release phase of Env 3 will activate.
- If Loop Mode is on and the Loop point is set before the Sustain point, the loop will play as long as you hold down a key. When the Loop point is set after the Sustain point, the loop will be played only after a key is released.
- If Env Mode is set to Finish and Loop Mode is off, the Sustain point is ignored completely and the vector envelope will play even if you release a key, but if Loop Mode is on in the same situation, the loop will play regardless of the position of the sustain point.
By using Vector mode only to control the OMF you can fade oscillators in and out, in a fashion similar to a Roland D50 or Kawai K1 synth. If you use the X-Y Square to step through the digital waveforms of the oscillators themselves, you can create complex wave-sequencing effects that can mimic Korg Wavestations and the Sequential Prophet VS.