 This initial Macro lets you quickly program any number of Transformer objects with your choice of scale. The position of the mod wheel is used to dictate which of two Meta messages the MIDI Note On messages are converted to. These messages then set the position and value fields in the final Transformer object.
Learn how you can quickly program Transformer objects to mimic Ableton Live 's useful 'user scales' feature, thus keeping transposed MIDI parts in key.
One problem with transposing melodies in Logic from the track Parameters box is that the result will often be out of key — the intervals of the resulting melody will land on notes that are not part of the overall key of the piece. A solution to this is to force the transposed melody back into the key by moving out-of-key notes to neighbouring in-key notes.
In programs like Ableton's Live, you can do this by creating a user scale to which any melody can be forced to conform, thus keeping everything in key. Alternatively, you could define unusual user scales to create variations on the same melodic line. And you don't need to be restricted to seven-note scales, as there are others, such as the pentatonic (five notes) or the whole-tone (six notes) scales. In general, though, user-defined scales are useful for modulating and transposing music, and also when improvising over chord progressions — using different scales over the same chord will change the mode (and mood) of the melody. For any further information please don't hesitate to take a music degree at your local university!
If you want to set up a user scale in Live it takes about ten seconds — all you need to do is assign the notes on a grid over a single octave and the scale will work across the full keyboard range. In Logic it involves setting up a Transformer object in the Environment and then inputting data into the Universal Map for all 127 notes individually, either by using the mouse on the map or by typing the values one by one. This might be OK once in a while, but if you want to build up a library of scales you will soon give up.
So I want to show you a simple Environment setup that allows you to write your scale from any master keyboard with a modulation wheel. I have tried to structure the article around screenshots since they explain a lot more than words — sorry about the grey look, but that's what the mighty corporation did to your favourite software!
Initial Setup: The Scale-builder Macro
 First of all, you need to create a small Environment setup to make programming the Transformer object easier — you can see this in the screenshot above. Essentially the signal flow goes from bottom to top and from left to right. The Keyboard object is wired into a Fader that generates MIDI Modulation messages limited in range to just values 126 and 127, and these are used to operate the Cable Switcher.
From there the signal goes into the first Monitor object, named Keyboard In to signify that this is the point at which the MIDI signal really enters the meaningful part of the Environment. The following Transformer, labelled Pitch 2 Control/Fix Midi, turns note information into MIDI Continuous Controller number seven messages and fixes the MIDI channel to number one. This controller information will later be used to set the value of the Destination/Source Note Faders, which in turn generate the Meta events which set up the final Transformer's Universal Map.
The Keyboard object is named Macro In so that Logic understands the signal flow when the ensemble is packed into the Macro. All the Monitors are there only for control purposes. I like working like that so that I can see the effect of a setting in a controller or Fader immediately — they are technically not required, but I find using them good practice. Here you can see the Parameters for the Fader objects in the Macro above.
Because MIDI Note Off events translate into a zero-value controller, every Note Off will set the Meta event Faders to zero. In order to avoid this we need to filter out values of zero at this point. This is achieved by using a Transformer object's Condition Splitter mode to route them onto a cable output that is left disconnected. The last Transformer in the chain fixes the modulation values from the input to either zero or 127 for all incoming values in order that the Cable Switcher only gets the two relevant values. The Transform Control Monitor is for checking that all the Transformer objects so far are behaving correctly.
Next in line is the Cable Switcher, which routes the incoming MIDI signal according to the position of the mod wheel. With the mod wheel up full the signal is routed to the bottom cable, otherwise it will go into the top cable. The switch is being triggered by MIDI Continuous Controller number one (modulation) and has a range of two (the values being zero and one). The two outputs of the Cable Switcher go into two Faders that take an input value from MIDI Continuous Controller number seven and output Meta events 122 and 123 — these select a position in the Transformer object's Universal Map and set its value.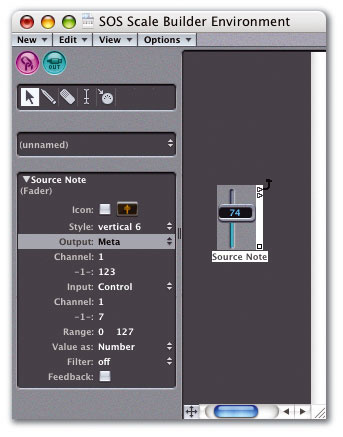
All that is left to do now is to sum the output of these two Faders so that they can be routed to a new Transformer object which will be the actual scaling Transformer. Again I use a Monitor for this purpose, which gives me the final data at a glance, as well as doubling up as my output port for the Macro.
For reasons of screen economy and safety of the ensemble it makes sense to compile it into a Macro. You do this by selecting all the elements in the chain, from the Macro In Keyboard object to the Macro Out Monitor object, and selecting Macro from the New menu. It is a good idea to name the Macro in the parameter box, activate the icon on it so that you can create a track on the arrange window for it, and connect a new Transformer to the output. Macros save screen space, because they can be re-sized like any other object in the Environment.
Logic Tips
- The Sample Editor uses a rectangle with a left- or right-pointing wedge to indicate the Start and End points of a region. The point where the wedge joins the rectangle is the exact location of the End point.
- The MIDI editors' Out buttons cause notes to be played when they are selected. However, when the MIDI sequence is on an Audio Instrument track, the track must be selected to hear the notes. Len Sasso
Using Your Macro To Create User Scales
Now that you have your Macro in place here's how to go about creating a library of user scales. You will need to create a track in the Arrange window that has as its instrument the scale-builder Macro object. When the modulation wheel is turned to its highest point (127) the position in the Universal Map is chosen. When the modulation wheel is at its lowest point (zero) the value at the selected Universal Map position is set.
 If you want to set up every octave of your user scale in the same way, just record yourself programming one octave manually, then copy and transpose that MIDI sequence to address all the other octaves.
So the sequence of events is this. Turn the modulation wheel up full and hit the first note on the keyboard, the first source note. Return the wheel to the zero position and hit the destination note to which you want to map the source note. Repeat these two steps 11 times, mapping all the notes of the octave onto their destinations. The result is a single octave of your desired scale.
In order to avoid having to go through this setup process for the complete range of the keyboard there is a simple and very effective trick. If you record the above sequence of events onto a MIDI track you can then copy the resulting object 10 times and transpose each one so that it will cover a different octave. Make sure you delete any notes above G8, since these will 'fold down' into the sequence and introduce errors. If you now run the resulting MIDI sequence back into the mapping Environment setup it will duplicate the mapping process for you across the full range. Disconnect the Transformer object from the mapping ensemble and name it appropriately. This sequence file shows the result of recording the MIDI from your controller keyboard while programming a user scale into a Transformer object via the Macro described in the article.
By storing these Transformers with your Autoload Song you will have a library of user scales at you disposal that you can expand as and when required.
User Scales In Practice
There are many different ways to use the scaling Transformers. You can insert them in between your physical and sequencer inputs so that every note you hit on your keyboard is automatically changed into a scale note, or you can insert them in between a MIDI track and the sound module that it is triggering, so that any pre-recorded sequence will sound in that scale. It can also be fun to assemble a few of these Transformer objects, programmed with different scales, in combination with a Cable Switcher object, so that you can dynamically switch scales as you play or run a sequence.