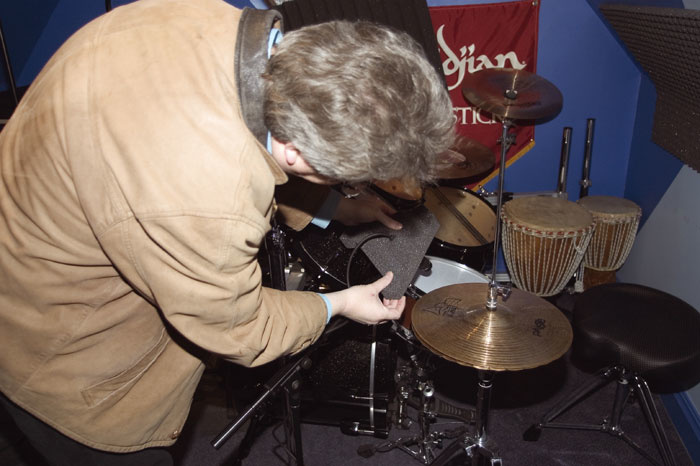
 The foam isolation pads underneath Tom's Mackie HR624 monitors had been positioned such that the monitors were pointing downwards, away from the monitoring position. To remedy this, Paul suggested turning the foam pads around so that the speakers pointed slightly upwards towards a listener seated at the desk. The shelf above the speakers was also causing high-frequency reflections, so Paul moved the monitors a few inches forward to minimise this problem.
The SOS team travel to an attic in Birmingham to help a drummer improve his recordings.
Tom Lindsey is a student at the Birmingham Conservatoire as well as being a drummer with a home studio. Tom's studio is based around Pro Tools LE and a Digidesign 002 interface/controller powered by a 3.2GHz Windows laptop computer. Although he has little in the way of additional equipment, he does have a nice pair of Mackie HR624 monitors and some carefully chosen microphones. His studio is located above a garage, which has resulted in a studio space with sloping walls and a narrow flat ceiling section just below the apex of the roof. At the time of our arrival there was no acoustic treatment in the room other than a settee, but Tom had bought three large Auralex foam panels in anticipation of our arrival.
Although we have had a lot of SOS visits recently that have centred on studio acoustics, Tom's problem was not monitoring, but rather getting a good drum sound in his relatively confined environment. The solution involved a mixture of acoustic treatment, microphone positioning, and signal processing. However, we did spend a few minutes optimising his monitoring before we got stuck into the main task. We also got stuck into his extra large packet of chocolate Hob Nobs before looking at his monitoring!
Getting To Grip With Gripps
Tom's studio setup has him working across the width of the room, which places the side-to-side reflective surfaces well away from him, but the wall behind him is relatively close. The settee behind his mixing seat absorbs some sound, but using the 'mirror' principle, it was evident that there was a strong reflection path where the sound from the monitors bounced off the sloping ceiling and back to his listening position. To tackle this reflection, we decided to fix one of the Auralex panels to the sloping ceiling behind him, but as he hadn't bought any adhesive with the Auralex foam we set off to the local Focus DIY shop to seek an alternative. A helpful young man directed us to the flooring section and showed us a spray adhesive called Gripps Spray, and though this was specifically designed to fix vinyl tiles he said it should be fine on foam. As it turned out, it was only partially successful — even when we applied it to both the walls and the back of the foam, it had a tendency to come unstuck after lulling us into a false sense of security for a few minutes! It would be best to use the proper Auralex adhesive or something like Liquid Nails applied using a mastic gun. The Gripps Spray also managed to fill the air with finely atomised glue, which was very unpleasant, not to say somewhat unnerving!
Tom had his monitors stood on high-density Auralex pads to help isolate the vibrations from the table they were resting on. However, as the speakers were standing on the desk rather than on tall stands, they were below the optimal listening height, and the angled pads made them point down towards the table top. To remedy this, we simply turned the pads around under the speakers so that they were facing slightly upwards, with the tweeters pointing towards the ears of a seated listener. We also moved the speakers forward by a few inches to avoid high-frequency reflections being created from an overhanging shelf. The Mackie monitors were set with their EQ controls flat and the environment-compensation switch in the 'half space' position. With these positional tweaks the imaging improved by a worthwhile amount.
Drum Recording
The drum kit, on the other hand, was to prove more of a challenge. Tom's nicely tuned Pearl drum kit was set up in one corner of the room facing across the width of the studio. An AKG D112 was used to mic the kick drum, a Shure SM57 the snare, and a Rode NT4 stereo mic was used to capture the overheads. Tom didn't have any decent tom mics, but said that he didn't use the toms much anyway, so there was no need to mic them separately. We listened to some of Tom's existing recordings and agreed with him that the room sound was rather too intrusive, exactly as he'd described when he called us. Given the number of flat, reflective surfaces surrounding the drum kit, that wasn't surprising. The recorded kit sound was also a little dull, especially when compared to the live sound.
We reasoned that our first priority was to cut down the amount of reflected sound reaching the overhead stereo mic, so we set out to suspend another of the Auralex panels from the ceiling. Running the length of the room, just a few inches below the centre of the ceiling, were a pair of wires from which the low-voltage lighting system was suspended, and it was a simple job to place a slab of foam on top of the wires where it would be suspended around four inches from the ceiling. The NT4 stereo mic was then set up towards the back of this piece of foam so that the foam would intercept reflections from the nearby ceiling.
 Foam was fitted around the snare mic to reduce spill, and more foam was used to isolate some of the mic stands from mechanical vibrations, as none of the mics used had proper shockmounts.
We noticed that Tom didn't have shockmounts for any of his mics, but he had bought one of the Auralex kits that comprise foam supports for mic-stand legs, as well as small foam baffles that can be clipped onto the backs of microphones to cut down on off-axis sensitivity at mid and high frequencies. We used the mic stand supports to provide some isolation for the overhead and snare mics, and then used the spare speaker-pad wedge sections (normally used for fine angle adjustments) to float the kick-drum mic stand. As usual, the kick-drum mic was set up inside the drum shell and offset a little to one side of the beater about halfway into the drum.
Overhead Miking Tweaks
A test recording made with this simple setup gave a good basic kick sound, although slightly lacking in 'click', a somewhat dull snare sound, and an overhead sound that was drier than before, but still not adequately tight sounding. If drums are being recorded in a great-sounding room, then the sound of the room contributes to the final result in a very positive way, but where the room sounds boxy or coloured, it's safer to exclude as much of it as possible, even if it means adding artificial reverb later.
To dry up the sound further, we glued another large Auralex panel to the sloping wall above the drum kit, as sound coming off the snare and toms was reflecting off the angled ceiling and heading off in the direction of the overhead mic. We'd also brought along a couple of large XXL AC01 self-adhesive foam panels contributed by Sonic 8, the UK distributors, so we stuck one of these to the sloping ceiling opposite the drum kit, and the other to the wall directly behind the kit.
We had a couple of 18-inch-square, four-inch-thick foam panels left over from a previous job, and Hugh had the idea of putting these on top of the lighting wires to release the larger Auralex panel from this role, relocating that panel to the end wall of the room adjacent to the drum kit, helping to kill reflections off that wall as well.
 As an attempt to dry up the sound further, Paul fixed more foam to the wall behind the drums.
With these panels in place, we repeated the test recording and found that the sound was much drier and noticeably less coloured, though the snare sound was still dull and the overheads lacked a little sparkle. Given that we'd done about as much as we could with acoustic treatment, we resorted to fine-tuning the mic positions. As they were available, we also placed the little Auralex foam baffles behind the overhead and snare mics to see if we could dry up the sound a little more. In order to dry up the overhead sound, Hugh suspended some acoustic foam from the ceiling and attached more foam to the back of the overhead mic.
The snare mic was set up in its usual position, about two inches above the drum head, just in from the rim and angled towards the centre of the drum. But as this was sounding dull, we raised it to four inches to reduce the proximity effect, which was contributing an unhelpful bass boost. This repositioning helped, but it still needed EQ to get it as snappy as we wanted it. As an alternative approach we also tried miking the snare side of the drum (and tried both settings of the channel phase-reverse switch), which gave a very snappy, but at the same time thinner, sound. When combined with the overhead mic, the combination added bite to the snare but made it sound somewhat brittle, and even though the sound was better with the mic output phase inverted, we decided that the top-miked position was still the best approach overall.
There was little we could do with the overhead stereo mic other than angle it down more so that it was aimed at the cymbals. Ideally it should have been higher and there should have been plenty of space between it and the ceiling, but in this room it simply wasn't possible. The foam would have the effect of raising the ceiling to a degree, but it was time to resort to processing. The most dramatic improvement was brought about by EQ'ing the two overhead mic tracks. A broad 5dB boost at 11kHz did wonders for the sparkle of the cymbals, while cutting below 64Hz by 6.5dB using Digidesign's low shelving filter thinned out the low end and clarified the sound. Adding the kick mic back in restored the necessary weight, but there was so much snare sound in the overheads that the close mic made less of a difference to the overall tonality than we would have hoped for.
To get a more contemporary bite from the kick sound, we boosted it by 9.5dB at 4.5kHz and used the Digidesign gate (set to its fastest attack) to clean up any ring. These EQ values may seem extreme, but the Digidesign EQ seems to be one of those plug-ins that has to be applied quite generously to make any significant difference.
To brighten up the close-miked snare sound, we added a whopping 10dB of boost at 6kHz, and though this sounded a little extreme in isolation, it was far more natural sounding when the overheads were brought back in. A gate was used to clean up the ring from the snare drum, and to put a little life back into the snare sound we added some Digidesign D-Verb reverb (medium plate). We had to add quite a lot to make the reverb audible once the overhead and snare mics were mixed, but it definitely opened up the sound and made it more believable. Ideally I'd have liked to try some more sophisticated ambience programs, but the D-Verb didn't seem to have anything particularly well suited.
A Good Compromise
Although the drum sound we ended up with was still something of a compromise, it actually sounded pretty good and was a vast improvement on the sound recorded in the untreated room. Tom still wasn't entirely happy with the snare sound, but conceded that what we were now getting sounded pretty much the way the drum really sounded. He'd recently experimented with different head types and felt that he might have to do further experimentation to get it sounding the way he wanted it. The simple foam absorbers killed most of the undesirable room coloration, while the EQ we applied to the overheads did the most to lift out the cymbals, add sparkle, and reduce low mid-range mush. Even the toms sounded pretty good on the final recording, even though they had no separate mics.
Tom happened to mention that he usually records vocals at the drum end of the room and that he felt the sound would be better now that there was more acoustic treatment on the walls. He had been intending to face the singer in towards the acoustic foam, but we explained that when using cardioid mics, it's invariably best to position the singer with the absorbent material behind them so as to cut down on reflections getting back into the mic. Furthermore, hanging an extra duvet behind and to the sides of the singer is worthwhile in smaller rooms, as there's nothing worse than spending good money on a decent microphone and then ending up with a boxy vocal sound. In this particular room, it should be easy to rig up a sturdy curtain rail from which to hang a duvet.
Our final observation was that, as the room was currently unheated when not in use, some form of low-level background heating might be useful to prevent the capacitor mics from getting too cold, as they are quite susceptible to condensation before they get up to room temperature. The other option would be to keep them in the house and bring them into the studio only when required.