At the heart of Digidesign's drive to turn Pro Tools into a serious tool for music creation are the MIDI and Score editors in Pro Tools 8. We explain how to get the best from these new heavyweights.
 or be docked within the main Edit window (below).") The MIDI editor can occupy its own window (top) or be docked within the main Edit window (below).
The MIDI editor can occupy its own window (top) or be docked within the main Edit window (below). 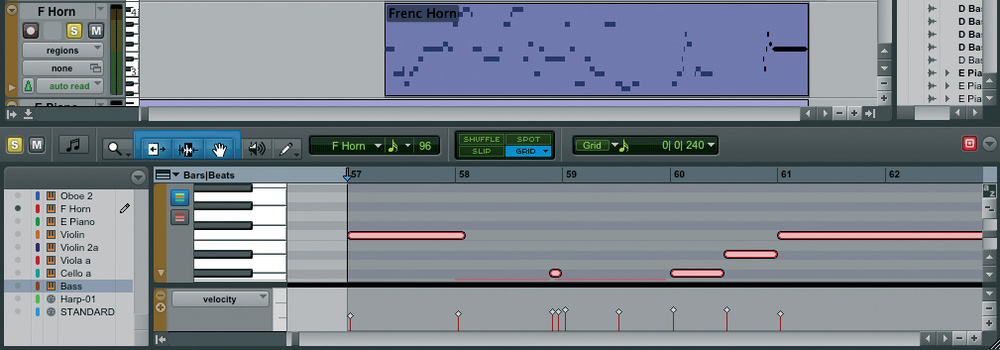
One of the biggest new features in Pro Tools 8 is the MIDI editor. This can be opened in two ways: as a separate window accessed from the Windows menu with the Control-= shortcut (Windows: Start-=) or as a docked window within the main Edit window, where it can be brought up from the Show drop‑down menu in the top right‑hand corner.
Either way, the default behaviour when you double‑click on a MIDI Region is to open it up in a MIDI editor window, although there is an option in the MIDI tab of Preferences that lets you change this behaviour so that Pro Tools opens the Score editor, MIDI Event List or Name dialogue instead. If you have made a selection within the Edit window, it will be maintained when the MIDI editor opens, unless you have ticked Remove Range Selection After Opening MIDI/Score Editor in Preferences.
Independent Editing
 MIDI notes change colour to indicate their velocity.
You will notice that the MIDI editor window has a similar set of features and buttons to the Edit window, and the great news is that they work independently. For example, you will notice the normal Trim, Selector and Grabber tools, together with a Smart tool option, which work purely on that MIDI editor window. When you have the Smart tool enabled on the MIDI editor window, creating and editing notes has got a whole load easier: double‑click on the piano roll and Pro Tools will create a note, or double‑click on an existing note to delete it. You can edit the length of the note with the Trim tool, and if you hold down the Alt key and drag, you can make a copy of the note. Then, just as the Smart tool lets you trim the volume of an audio track in the Edit window by holding down the Command (Mac) or the Control (Windows) key and dragging the mouse up or down, you can do the same with a MIDI note in the MIDI editor. You will also notice that the shade of the note changes with velocity, unless you disable MIDI Note Colour Shows Velocity in the Display Preferences tab. If you click on a note on the keyboard at the left of the MIDI editor, you select all instances of that note. This means you can trim the volume of those notes and not the rest, which is very useful when editing drum tracks, as it is now very easy to change the velocity of all the snare notes at the same time.![]() An easy way to select all instances of one note: click on that note in the keyboard at the left of the MIDI editor.
An easy way to select all instances of one note: click on that note in the keyboard at the left of the MIDI editor.
Another feature from the normal Edit window that works in the MIDI editor is the ability to snap notes to the play cursor or to other notes. When you click on a note, you will notice that the cursor moves to the start of that note. If you hold down Ctrl (Mac) or Start (Windows) and hover over another note, Pro Tools will display an icon to warn you that when you click on it, the start of that note will snap to the cursor. Similarly, using Command and Ctrl respectively will snap the end of the note to the cursor.‑click on another note to snap it to the same position.") Selecting a note moves the cursor to the start of that note; you can then Ctrl (Start)‑click on another note to snap it to the same position.
Selecting a note moves the cursor to the start of that note; you can then Ctrl (Start)‑click on another note to snap it to the same position. 
The MIDI editor has its own scrub button, so you can scrub the MIDI data being edited just as as you can audio in the main Edit window. The custom note duration and velocity settings are now separate from the pencil tool, and have their own display both in the MIDI editor and the main Edit window. These determine the length and velocity of any note you create using the Pencil tool or by double‑clicking with the Smart tool. You can also set the note length to follow the grid values, the benefit being that it is possible to change grid values with keyboard shortcuts. This provides a quick way to set the desired note duration by holding down Ctrl and Alt (Windows: Start and Alt) and '+' or '‑'.  The custom note display can be set to follow grid values, providing an easy way to use the keyboard to vary note lengths.
To the right of the custom note settings is a button that enables and disables the ability to hear MIDI notes as you edit them. You can also mute one or more notes within a MIDI track in either the Edit or MIDI editor window, using the normal Mute shortcut of Command-M (Mac) or Ctrl-M (Windows. What's more, if you later mute the whole region, when you come to unmute that region Pro Tools will remember which notes were muted.
The new mixed editing modes that are available on the main Edit window, such as the combined Shuffle and Grid mode, are available in the new MIDI editor window too, so you can, for example, make a selection using the grid and then shuffle edit the highlighted selection.
Tracks Together
It is possible to view multiple MIDI tracks in the MIDI editor. To do this, make sure the track list on the left‑hand end of the MIDI editor window is visible, either by double‑clicking to the left of the keyboard or by using the button on the bottom left‑hand corner of the MIDI editor window. Click on the button to the left of a track name in the list, and you will see that track become visible in the editor window. You can also use Alt-A to see everything.  you can display multiple tracks simultaneously. The pencil icon shows which track(s) new notes created with the Pencil tool will be added to.") By making selections within the MIDI editor's track list (left) you can display multiple tracks simultaneously. The pencil icon shows which track(s) new notes created with the Pencil tool will be added to.
By making selections within the MIDI editor's track list (left) you can display multiple tracks simultaneously. The pencil icon shows which track(s) new notes created with the Pencil tool will be added to.
There are two colour preset buttons in the MIDI editor window. The top one will give each track its own unique colour, while the bottom one gives each velocity its own shade of red.
If you are working with multiple tracks in the MIDI editor, you will need to know which track any new notes will be created on. This is set and displayed using a drop‑down option in the custom note section of the toolbar, and the selected track in the track list displays a pencil icon. It is possible to have the pencil icon set to a number of tracks by Command (Windows: Ctrl) or Shift‑clicking, which means you will create the same notes on multiple tracks simultaneously. This is stunning when you want to layer up multiple sounds across several tracks.
As well as displaying multiple tracks in one MIDI editor window, you can have multiple MIDI editor windows. If you create a MIDI editor and have it targeted with the red target icon lit, that window will follow the selection made on any MIDI track. When the red target indicator is active, the MIDI editor will follow whatever selection you make on MIDI tracks within the Edit window. If you un‑target a MIDI editor window, it won't follow selections made on the main Edit window. To get another MIDI editor, make a selection on a MIDI track in the main Edit window, right‑click on it, and choose Open In New MIDI Editor. Remember, each window can have its own settings and mode options, and to help manage all these windows you can use the new Arrange options from the Window menu.
To scroll vertically within the MIDI editor, hold down all three modifier keys and click and drag on the on‑screen keyboard. You can hold down Command and Shift (Windows: Ctrl and Shift) and the left and right square bracket keys to increase or decrease the note heights, and there is a dedicated button just under the keyboard focus button to do the same thing. If you have your keyboard focus enabled within the MIDI Editor, 'R' and 'T' will zoom in and out horizontally. The Zoom Toggle key ('E') will show or hide the controller lanes in the MIDI editor window.
You can add a controller lane by clicking on the '+' button and selecting the parameter you want to view from the pop‑up menu. To remove a lane, click the '-' button. When working in multiple track mode, you will see that the MIDI notes and velocity are overlaid, but the other parameters, such as MIDI volume or pitch‑bend, have separate lanes for each track. If you hold the Ctrl key (Windows: Start) with the Smart tool enabled you can use the mouse to draw controller data, and because each track has its own automation lane you don't need to worry about which one is enabled for note creation.
If you would prefer to continue using the conventional Pro Tools two‑window interface, you can: all the MIDI editing features still work on a normal MIDI track in the Edit window, so the Smart Tool lets you double‑click to create and delete notes, and trim length and velocity. Even the MIDI controller automation lanes are available by clicking on the triangle icon on the track. For additional lanes, click on the '+' icon; if you right‑click on the '+' icon, you can choose which parameter you want the new lane to display. When editing multiple tracks, all controllers except velocity are displayed using a separate lane for each track.
Top Score
Along with the MIDI editor comes the ability to edit MIDI notes as musical score, which will be very welcome to many users. To open the Score editor window, select Score Editor from the Window menu, use the keyboard shortcut Control-Alt-= (Windows: Start-Alt-=), or right‑click on a MIDI region and select Open in Score Editor.
Just like the MIDI editor windows, the Score editor has its own toolbar and settings. The Pencil tool can create notes based on the parameters set in the custom note section of the toolbar, and as in the MIDI editor, these can be linked to the grid so you can use keyboard shortcuts to change the note lengths. Like the MIDI editor, the Score editor has its own toolbar and settings that are independent of the main Edit window.
The Selector tool allows you to select across a group of notes, and the Grabber tool lets you pick up and move notes, or create new ones by double‑clicking. When you aren't close to a note, the grabber changes to the marquee tool, so you can make selections without having to change the tool. Clicking the Grabber tool away from any note allows you to lasso multiple notes. As in the MIDI editor, the Trim tool lets you change note lengths by clicking and dragging. When using the Grabber tool on the Score editor, to place the play cursor in the score remember to hold down the Command (Windows: Ctrl) key and click with the mouse.
There are several ways to zoom the score. You can select the Zoomer tool and click and drag the score to zoom in just as you would on an audio track. Alternatively, you can click with the Zoomer tool to zoom in and Alt‑click to zoom out. Finally, there is a Zoom menu on the bottom scroll bar with some standard settings to choose from.
To determine which tracks are displayed on your score, use the track list, just as when viewing multiple tracks in the MIDI editor. Holding down the Alt key and clicking in the view column of the track list will show the full score with all the tracks in your Session.
Score Settings
Digidesign have tried very hard to keep the Score editor as simple and clean as possible. There is a Score Setup window for score‑specific parameters, accessed from the track list pop‑up menu, or you can double‑click on anything you want to change. The most important parameters relating to your score are set from the Score Setup dialogue. For instance, if you double‑click on the title, you can change it and see those changes reflected on the score simultaneously. The Score Setup window lets you hide or display score elements such as track names, bar numbers and page numbers, adjust spacings, and set parameters such as page and staff size.
There are also score settings that are made on a track‑by‑track basis, either using Notation Display Track Settings from the track list pop‑up menu, or again, by double‑clicking on what you want to edit (the clef symbol on a track, for example). The Notation Display Track Settings dialogue allows you to determine how your score will be displayed, and whether individual tracks should follow global settings or not. Either way, the Notation Display Track Settings dialogue box will open, where you can set what type of clef is used on that track, and you can transpose just the score for a particular track. This won't change the MIDI notes, just how they are displayed on the page, and is great for producing brass scores.
In the bottom section, the Globals tab determines how the all the tracks will be quantised for the score. Again, this won't affect what you hear, only how the score looks on the page — a freely played MIDI part might contain minor timing variations that would otherwise show up as odd note lengths and so forth. If the shortest note you have is a semi‑quaver, for example, you can set the display quantisation to semi‑quavers and help to make the score cleaner to read. Individual tracks can be exempted from global settings, so if there is a track where a crochet is the shortest note you have, you could select this track from the track list at the top of the Notation Display Track Settings window and then click on the Attributes tab, unselect the Follow Globals option and change its display quantisation to Crochet.
You can now add chord symbols and charts to your song by appending a chords lane to the ruler section of the Edit window. Now, either place the cursor where you want the chord to be and then click on the '+' button on the chord ruler, or right‑click at the correct point on the chord ruler, and the Chord Change window will come up. From this window you can select the type and configuration of the chord, and even what note in the bass you want. If you now go back to the score, you will see that a chord diagram has been added at the appropriate point, and it is possible to move, edit or even delete it. From the Score Setup window you can determine whether just the chord symbols and/or the diagrams are displayed. As well as conventional notation, Pro Tools now has a Chord track where you can insert guitar chord boxes at points where the chords change.
Finally, the icing on the cake is that you can combine the two new editors and display score in the MIDI editor. This lets you do all the MIDI editing as before, but Pro Tools will display a score rather than a piano‑roll. For composers who think in score, this is an amazing feature!