We look at a different use for Live's celebrated time-stretching engine.
 The basic Clip view contains all the tools you need to alter the fundamentals of a sample — pitch, tempo and direction.
Think sound design and you might think Reaktor or MaxMSP, but when it comes to weird noises, Live can hold its own with the best of them. Setting aside the Ableton Software Instruments and suchlike, Live can be seen as a glorified and incredibly powerful sampler: a sampler with no end of tools to help you bend, mutate, manipulate and mutilate whatever sounds you feed into it.
So, this month we're going to look at how the most basic and everyday Live functions and built‑in effects can be used to transform and transfigure audio, and hopefully leave you with a better idea of Live's enormous potential for sheer sonic mayhem.
Clip, Clop, Clap, Clunk
The audio Clip has always been at the heart of Live, and it's here that we will start, because the audio Clip contains all the basic tools of any sampler: control over pitch, playback speed, direction (it's always worth checking to see whether samples sounds better backwards — you'd be surprised at how often they do) and envelope shape. If you'd wanted to do all that in 1982, you'd have needed an Emulator and an unsavoury fat man to work it for you.
But why ignore the built‑in Simpler sampler? Well, I would disregard it because it has no reverse function(!), but, more importantly, it is via the Clip View that you access the Warp function. Orginally conceived for the purpose of tempo matching, Live's time‑stretching algorithm can be misused for all sorts of other things, often with very pleasing results.
 To show you what I mean, let's take a simple two-bar drum beat (I got mine from a Future Sound Of London record) and double‑click it to open the Clip View. It's the Warp section we're interested in to start with, so if it's not on, switch it on by clicking the 'Warp' button. If there's more than one Warp Marker in the Clip, right‑click on the first one and select 'Warp From Here (Straight)' to get rid of the others.
There are two key areas to play with in the Warp section: the Original Tempo controls and Warp Mode. The former are always good fun — I suggest that you start by grabbing the numeric readout with your mouse and dragging it up to 999bpm and then right down to 5 (which seems to be the lowest setting) and seeing what happens. Confusingly, because this is the original tempo, 5bpm will play back your loop at the fastest speed and 999bpm at the slowest. Try selecting just a small part of your Clip with the Loop Brace and then play with the Transpose knob, and you should get some interesting (though perhaps slightly buzzy) noises straight away.
Moving on to the Warp Modes, you'll see that the default setting is 'Beats'. As we've started with a drum loop, this seems far too appropriate for our purposes. What else is there? Ah, 'Texture'. Well it's not a texture, so let's try that. Hmm, sounds different without even changing the tempo. Now let's see what the Grain Size and Flux controls do to it... Basically, what I'm trying to say here is: experiment. Try different Modes and mess around with the controls. And don't just experiment with drum loops, try it with anything you like. Anything fairly harmonically rich, such as complex synth patches, can often produce very musical results, but it can be just as interesting to see what a breaking window sounds like when it's been time‑stretched as far as it can be. And you can decrease the master tempo to as little as 20bpm to stretch sounds even further, and then export anything you like the sound of for use in projects with more normal tempos.
While abusing Ableton's lovely time‑stretching engine in this manner can lead to all sorts of extraordinary noises, a lot of them will be harsh, buzzing, frightening and unnatural. In fact, if you're in a Japanese noise band, you can stop reading here — there's nothing more for you. The rest of you, don't worry: this is just the raw material, the clay, and Live has plenty of tools we can use to mould our ugly sounds into beautiful ones.
Eccentric Effects
 The basic Clip view contains all the tools you need to alter the fundamentals of a sample — pitch, tempo and direction — and the Clip Envelope Editor provides a simple but useful way to further manipulate your raw samples.
When I left my drum loop, it had been pitched down by four octaves and was happily looping round a 16th of a bar, sounding like a computer in Doctor Who. Nice enough, but I seek yet further kicks. Clicking on the Envelopes section of the Clip View and selecting 'Clip' and then 'Transpose' from the drop‑down menu and then fiddling with the pitch envelope causes a pleasing 'blip', but it's not dramatically different. What we need now are effects...
Live's collection of built‑in effects has grown massively since version one, and is now capable of just about anything. As with the simple tools in the Clip View, the idea is to experiment with extremes.
Reverb's a good example, and it's just the thing to smooth out some of the harsher sounds we've created by abusing the Warp function. In fact, enough reverb can disguise just about anything, so I think I'll have two, and whack the Dry/Wet control up to 90 percent on both. That sounds a bit rumbly, so I'll bung in an EQ Eight afterwards to tame it a bit. And what about that circular Auto Pan thing I mentioned in the box above? Perhaps a compressor at the end of the chain to stop the reverbs clipping the output... This is the great thing about sound design — all of the rules that usually apply to using effects are void and the word 'subtle' doesn't even come into it. There's no reason why you shouldn't use settings that would sound far too extreme and artificial in a conventional mix. After all, artificial is the name of the game here. The drum loop, by the way, now sounds like a computer during a particularly tense moment in a Ridley Scott movie. Progress!
The Audio Effect Rack is a Godsend in these scenarios. Whereas in the past you would have had to save each part of your effects chain separately and laboriously load them in one by one to use the same chain in another project, now you can save the whole thing in one go.
Musique Trouvé
![]() This Effects Rack chain breaks no end of audio conventions — but it makes wonderful noises when fed the results of some heavy‑handed time‑stretching experiments.
This Effects Rack chain breaks no end of audio conventions — but it makes wonderful noises when fed the results of some heavy‑handed time‑stretching experiments.
Once you've got an interesting effects chain, it's always worth going back to the Clip View and fiddling with the original sample to see if it has any further possibilities. I discovered that by slowly increasing the pitch of my drum loop from ‑48 to +48 semitones I can make it sound as though Future Sound Of London are hurtling towards their certain deaths in a doomed spaceship. Not a bad result from a two‑bar drum loop.
This is also the time to delve into your sample folder and see what an eccentric series of effects and misapplied time‑stretching can do for the other sounds in your collection. For example, a cello part stretched to four times its original length, pitched down and fed through the effects chain shown below emerges as a sinister, growling layer of malevolent sound. A stretched sample of radio static with a fast tremolo Auto Pan, on the other hand, turns into one of those nasty metal octopus things from The Matrix.
It gets even more interesting when you feed in an entire song. Simon & Garfunkel's 'Scarborough Fair' playing backwards at a quarter of its original speed (but at the same pitch) comes out of the effects chain sounding remarkably like Sigur Ros. My Bloody Valentine sound pretty much the same whatever you do to them, but if you time‑stretch 'Only Shallow' and pitch the results up by an octave it sounds like the Chipmunk apocalypse in slow‑motion — which is a great deal more beautiful and moving than you might think.
As you can see, with just a little coaxing Live can be induced into creating the most peculiar and unusual sounds, and what I've described above is only one way of going about it. So go on — experiment and make weird noises!
Wonders Of The Auto Pan
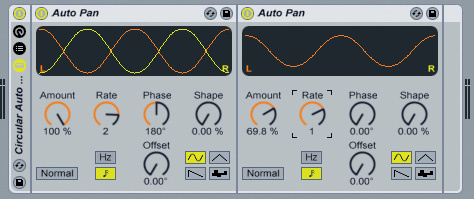
I admit to having been fairly underwhelmed when Ableton first added the Auto Pan device to Live, but there's a lot more to it than there at first seems to be. As well as moving sound from side to side automatically, which it does very well, you can also use it as a tremolo by setting the Phase control to either zero or 360 degrees. You can then set the depth of the tremolo using the Amount knob and the speed using the Rate knob (with its handy accompanying Sync button). The Shape control and the waveform buttons beneath can be used to determine the tremolo envelope.
The best thing about the Auto Pan device is that you can chain them together. There are simple things you can do, such as placing a panning Auto Pan before a tremolo one and synchronising the two to create a pleasing 'sound circling around your head' effect, but there's no reason why you can't build more complicated chains to give the effect of continuous and non‑repeating movement. And when you're happy with what you've got, you can drag all of the devices into an Effects Rack and save it.