The audio sequencing facilities we have at our disposal these days make it easier than ever before to produce world-class vocal recordings by taking the best parts from a series of takes and producing a composite from them. Here's how to do the job in Sonar 4.
Composite recording is the process of recording multiple takes — usually in quick succession — then editing the best sections together into a single, cohesive part. This is extremely common with singers, where, for example, the best version of the first verse might be in the fifth take, the best version of the second verse in the third take, and the best chorus in the first take. You determine where the best parts are and then edit them together into a single vocal track. Of course, this technique is not limited to vocalists (guitarists, for example, will also find it very worthwhile for assembling solos), but it's particularly applicable to vocals, because there are spaces between phrases that make it easy to split large parts into smaller sections.
In the days of tape recording (analogue or digital), the singer often recorded new takes on individual tracks. By a process of muting and soloing, the best sections would be isolated and then bounced down, in real time, to an empty track. The old tracks could then be erased to make space for additional instruments or takes. Where track counts were limited, punching-in came into the picture as well. Sections that were judged not good enough were punch-recorded and replaced, leaving the rest of the track untouched. However, with today's DAWs and their virtually unlimited track counts, it's now no problem to spread a vocal over just about as many tracks as you'd like.
Sonar has always been able to do composite recording, but version 4 adds several new tools that make the process far easier and quicker.
Composite Recording In Sonar
The first aspect of composite recording is loop recording, which is what allows you to put down take after take without having to stop recording.
 The Show Layers command, new to Sonar 4, is extremely useful with composite recording.
- Begin by defining the region you want to loop, using the right and left loop-locator points. Generally, you'll want to leave a measure or two before the part begins and a measure or two afterwards, to give the performer a bit of a chance to regroup after doing each take.
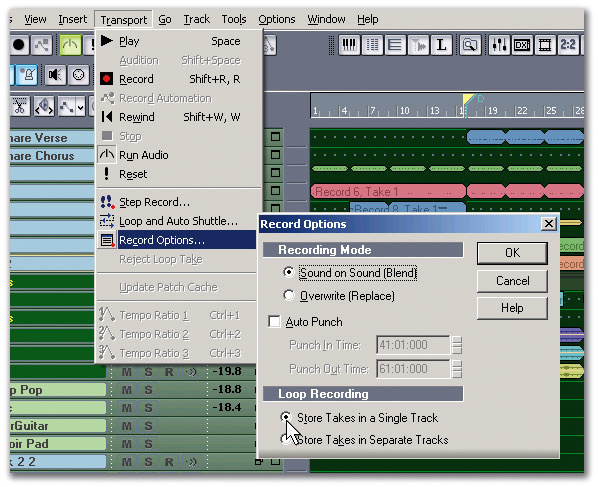
- Next, decide whether you want each take to go in its own track, or be layered with other takes in a single track. You can set the desired option by going Transport / Record Options, then selecting the one you want under Loop Recording (the Recording Mode setting doesn't matter). Prior to Sonar 4, I would have recommended storing takes in separate tracks, because takes stored in a single track had to be separated out into tracks manually anyway. But version 4 allows the track to be opened up so that each take is displayed as a separate layer (similar to how loop recording is handled in Cubase SX). This is very convenient for editing, so I'd advise ticking 'Store Takes in a Single Track' (see screen on the first page of this article).
- Record-enable the track, then click on the Transport's Record button. Recording will commence, and each pass will create a new layer within the track. However, you won't actually see the layers until you stop recording. While recording, it simply appears that you're recording into the track, and new takes wipe out any evidence of previous takes. (Incidentally, if you have an older or slower computer, or are starting to really push your CPU, you can turn off waveform drawing by going Options / Global / General and unticking 'Display Waveform Preview While Recording'. This takes a bit of the load off the CPU.)
 For editing composite takes, it's important to be able to mute over specific ranges of times rather than the entire clip.
I suggest doing no more than a half dozen takes at a time, for three reasons: first, you don't want to have to wade through a million takes when you're trying to locate and isolate the best sections; second, if you can't get a good performance in six or seven takes, you (or whoever is performing) may need to practice the part more; and third, you'll want to hear what you've done before committing to too many tracks. Otherwise you'll just be wasting your time if you do 20 takes and they turned out to be going in the wrong direction.
When you click Stop, the track automatically unfolds to reveal all the layers. Note that you can unfold and re-fold the layers anytime by right-clicking anywhere within the track, and respectively ticking or unticking 'Show Layers' (see screen above).
Editing Time
Before you begin editing, make sure Automatic Crossfading is turned off. You can do this with the Auto Crossfade button (located to the right of the Snap-To-Grid button in the Track View toolbar), or just use your computer keyboard's 'X' key as a shortcut. The reason why you must disable automatic crossfading is that Sonar has no way of differentiating between times when you want overlapping takes within a track to crossfade and times when you don't. If you're doing a composite recording, as described here, you'll have lots of overlapping takes, so if you attempt to move one Sonar will instantly want to create a crossfade with the other takes.
Now it's time to take advantage of Sonar 4 's Mute tool. Generally, I expand the track height to make it easy to see the waveforms of the various loop-recorded takes. The Mute tool has two options, selected via the drop-down menu to the right of the Mute tool icon: Mute Time Ranges, or Mute Entire Clips (see screen, left). For this application, Mute Time Range should be selected. The Mute tool is the only Sonar tool whose function changes depending on its position in relation to the height of the clip. Dragging over the lower half of the clip mutes the audio under the area over which you dragged. Dragging over the upper half unmutes any audio that was previously muted.
 Muted audio is outlined with a dashed line, while unmuted audio is a solid waveform. Although it was mostly the last take that had the best performance, phrases from two other tracks were used as well.
Now it's time to compare sections of each take to decide which you like best. Reset the loop points around the area being evaluated. Start with all the tracks muted, then unmute the area you want to listen to in one track. Keep muting and unmuting various sections until you isolate all the parts that sound good (see screen above).
Just Because We Can, Should We?
Before you get started on creating your composite recordings, I think it's valid to take a quick detour to explore its artistic ramifications. Of course, there are no rules in recording, and the following is personal opinion. Still, I hope you find these thoughts helpful as you work with composite tracks.
Composite recording used to be done with fairly large chunks of music — for example, whole verses or complete phrases. But nowadays I see engineers slave over piecing together vocals on an almost word-by-word basis. Vocalists come in for a session, sing a dozen takes or so, then let the engineers apply pitch correction and composite editing to create the 'perfect' vocal.
There's only one problem: vocals aren't necessarily meant to be perfect at the expense of expressiveness. Vocals should tell a story, and telling that story involves flow. A good vocal has expression that evolves over a period of time, with high points, and low points — not just in terms of dynamics, but in terms of emotional impact.
There's a story about when Barbra Streisand was recording vocals. While she was away, the engineers did some editing to remove the breath inhales. Streisand insisted they be put back in — and rightly so. She understood that breathing is an essential component of vocals. When there's a long, loud inhale, you know the singer is trapping a lot of air for what's going to be a long or loud statement. Breath sounds also add intimacy, giving the effect that the person is next to you, rather than being some disembodied 'voice machine' that creates vocals from behind a Wizard of Oz-type curtain.
We have technology that's very powerful, but it's important to use that power to serve the listener even more than the vocalist. A good producer recognises a great take, and knows when to leave well alone. You can't create a great take; you record a great take. Any editing is at its best when it gives something already wonderful the extra 10 percent needed to make it transcendent, rather than salvaging a vocal from a series of haphazard takes.
OK, rant over!
Clean-Up Time
Now let's tidy things up a bit. Click at the places where you want to cut the phrases, then type 'S' (for 'split'). I generally split at the beginning of an inhale. Now delete all the sections you don't want to keep. Note that if you delete a layer where all the audio is muted, the entire layer will disappear, thus making track height more compact.
At this point, if you untick 'Show Layers', the remaining regions will collapse into a single track. That's useful, but the splits will remain, so if you want to manipulate the clips (process them, move them, and so on), you have to make sure that you select them all. I find it most convenient to bounce all the pieces into a single clip, which is easier to manipulate. To do this, select all the clips by drawing a marquee around them, then go Edit / Bounce to Clip(s).
 The good bits have been isolated, with the unused material cut away. Now it's time to bounce all these into a single clip.
Additional Tips
By this point, you have a track that represents the pinnacle of musical expressiveness... or at least something worth hearing! But you may want to take the process just a bit further.
Quite a few vocalists double their parts (sing the same part twice), to create a thicker, more animated sound. Although this can be done electronically, 'real' singing sounds better to my ears. One advantage of composite recording is that you can easily find not only the best version of a vocal, but also whether any of the other takes work with the chosen take. If so, simply drag the take to another track and assemble a second track with the 'doubled' vocal.
However, because you don't hear previous takes as you sing new ones, it's by no means certain that the phrasing of takes sung at different times will be exactly the same. It's also possible that the reason why you chose a particular take as the best is because it stood out from the others for one reason or another, making it even more unlikely that there will be any other matches in the pool of takes. One technique that works for me is putting together the composite vocal, then listening to it and singing along until I've learned the 'new improved' part. At that point, I do a second composite vocal to create the doubled track.
Whatever method works for you, the important thing to remember is that you should always choose the phrases you want to combine based on musical continuity, not simply musical perfection. The technology should be there to serve you — not the other way around.