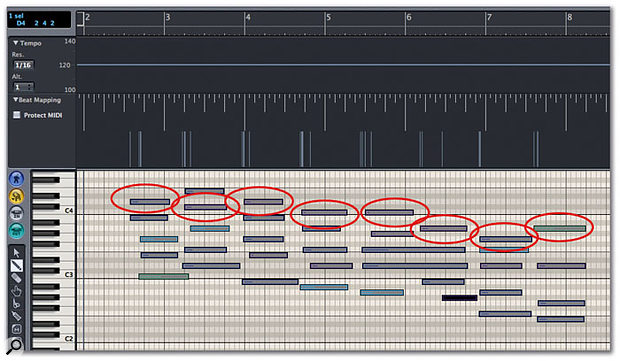
 Screen 1. A freely played MIDI keyboard part won't match your MIDI bars and beats grid, but you can get Logic to move the grid so that it fits the played part. The first thing you have to decide is which events you're going to drag the bar lines to match — for this example, it's the ones circled above.
Global Tracks let you manipulate the bars and beats of your Song to match freely-played MIDI or audio recordings.
There were several new features introduced in Logic 7, some of which were just different ways of performing functions that were available in earlier versions but were often difficult to use in practice. One of the main additions was Global Tracks, Logic 's version of a 'conductor track'. Global Tracks affect a Logic Song over the entire timeline, and allow you to graphically manipulate several important functions: Tempo, Markers, Chord Display, Transposition, Beat Mapping and Video Playback. Several of these Global Track functions are interrelated, and some of their features can also be found in other sections of Logic.
If you are a long-time Logic user, you may be used to performing anything tempo-related using the Tempo Operations window, or creating and manipulating markers directly in the Arrange page's Time Ruler. These operations are now much easier and more intuitive when using Global Tracks, so this series of techniques should be useful for both new and experienced users of Logic. You can work with and view Global Tracks using the View menu in most of Logic 's editor windows, and you can decide which, if any, type of Global Track is displayed. If you assign the Global Track Key Commands to your computer's keyboard, you can quickly switch them on and off if you are short of screen space.
Beat-Mapping Or Re-Clocking
I would bet good money that most users of sequencers record alongside a click or fixed tempo of some sort. However, if you play MIDI data or record audio into Logic freely without using a click, you may want to set Logic 's tempo 'after the event' so you can make it easy to line up copied and pasted data in the Arrange window or use the program's quantise functions. You've always been able to do this using the Tempo Interpreter, but it's pretty unintuitive and it is now much more easily done using the Beat Mapping Global Track.
 Screen 2.
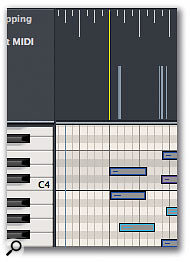
 Screen 3. To match a specific bar line to a given MIDI note, drag from the bar line to the note in the Beat Mapping Global Track (above). The bar line then snaps into place (right).I use this function all the time, as I often doodle around on a piano virtual instrument with Logic running and then use the Capture Last Take Key Command to produce a MIDI region. I then generate a tempo map from this MIDI data. I often find that playing without a click produces a much better performance (as does, incidentally, not having to actually press the Record button — roll on an audio version of Capture Last Take! Once a take is beat-mapped, the metronome will play in time with the recording, and Apple Loops will play at the correct tempo of your recording, following any tempo changes created by the mapping. It also helps with Logic 's interpretation feature if you're using the Score window as well.
Screen 1 shows a typical piano part in the Matrix Edit window alongside the Beat Mapping Global Track. You can see that Logic has actually displayed the position of the notes extracted from the MIDI region on the Global Track itself. To get Logic to set the correct tempo for this region, you'll need to map these notes to bar lines. This can take a bit of thought, as you'll have to decide exactly where the first notes of each bar lie in your performance. The ones I've chosen are circled in the screenshot.
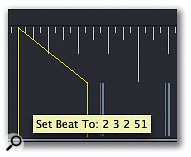
 Screen 4. The metric grid has now been adjusted to match the piano part, so you can now set up audio loops beside it or quantise other MIDI parts to match.The next step is to actually connect these notes to the bar markers in Logic. If you grab the bottom of a bar marker on the Global Track and drag the yellow line produced to the first note of the bar (Screen 2), you'll see that this note becomes aligned with the bar line on the Global Track when you release the mouse (Screen 3). If you repeat this with subsequent notes, Logic will align eac of these with bar markers and generate any required corresponding Tempo changes at the bar positions — you can view these on the Tempo Global Track if you make it visible.
Once you have the bars sorted out you can align beats in a similar fashion. Screen 4 shows the piano chords aligned to bars and beats and the corresponding tempo changes generated — pretty steady playing, if I say so myself! Logic now has a tempo map of your performance and will respond correctly to any tempo-related editing, such as quantising.
Logic News
Logic v7.2 has settled in with nary a comment on the various Internet forums, which isn't surprising seeing how similar to its predecessor it is. The few new features seem to be working well — I can report that Logic v7.2 can now use all the outputs from FXpansion's BFD drum plug-in. A few small reports of bug fixes are turning up on the Net too, which is no substitute for proper documentation from Apple, but at least nothing seems to have been broken in this update. Plenty of people using control surfaces are reporting improvements under v7.2, and I actually used a few of the sound effects loops on a new short film — but as I already had these from my iLife v6 install, I can't really claim that their addition was a major new feature! Many people are still unhappy with the pricing, though, especially as Apple have been inconsistent with the charges for updates of their other software packages. The Aperture Universal upgrade is free, while you can update your Soundtrack or old Final Cut versions to the complete Studio Pack for about £150 in the UK — which makes the v7.2 deal look even worse value for money.
The update's performance on the new Intel Macs is proving interesting. It looks as though users are getting similar performance figures to the mid-range dual-processor and dual-core G5s from their Mac Book Pros and Intel iMacs — which is pretty impressive, and a great leap up from G4 processor performance. It bodes well for the potential power of the G5 replacement desktop machines scheduled to arrive later in the year.
Logic v7.2 does not, however, have a fix for the under-utilisation of the software on the current top-of-the-range quad G5s. A lot of users of these high-end machines are feeling nervous that the full potential of their investment will never bear fruit — despite some indications from Apple to the contrary. Indeed, it would be shameful of Apple to leave them out in the cold — especially as Cubase can already access all four processor cores. However, there is a short-term fix available. If you run the Node program on the same computer as Logic and assign that computer as Node, you can then off-load Logic 's own plug-ins to the Node and thus use more of the quad's CPU potential. It isn't a perfect solution, though, because you can't use third-party plug-ins in this way, nor can you off-load the CPU hit of any of Logic 's own plug-ins when they are instanced on busses or auxes. Let's hope that Apple do sort this out soon.
Speaking of Nodes, the new Intel Mac Minis look like being a perfect and inexpensive powerful Node machine for use with Logic, assuming that Apple haven't messed about with the Node program and stopped PPC and Intel machines from communicating properly in this fashion.
After assuring everyone last month that the Hide Dock feature of Logic v7.1 wasn't the same as the one found in System Preferences, it turns out it's exactly that! It's really cheeky of Apple to announce a new Logic 'feature' which is already available in the OS itself. It'll also teach me that 'authoritative' sources can't always be relied on... I've fallen on my sword, but hope to be completely healed by next month!
Beat-Mapping Audio Recordings
Beat-mapping isn't restricted to MIDI (and thus virtual-instrument) data. If you have an audio recording, you can get Logic to recognise rhythmically significant parts of the recording and set bar and beat markers (and thus tempos) accordingly. You may want to use this to align Logic 's tempo to a pre-recorded drum loop or a recording of an acoustic instrument, for example. If you highlight the recording in the Arrange page and click on Analyse in the Beat Mapping Global Track, Logic will generate beat and bar markers on the Global Track similar to those created from MIDI data.
However, extracting position and tempo information is a lot more hit and miss with audio, so you may want to try adjusting the Detection Sensitivity parameter from the pull-down menu. A high Detection Sensitivity will detect more transients and give you more points to use for beat-mapping. This may or may not be a good thing, depending on the audio region — you may end up detecting transients that don't really exist in the audio. You can always try one of the three settings and if the results aren't suitable, use Undo and try again. It's probably a good idea if you start with a low detection sensitivity and increase the value until you get the results you require. Once you have detected the transients, you can beat-map the tempo in exactly the same way as for MIDI regions. If you now record MIDI data alongside this beat-mapped audio, it can be quantised correctly, and it's easier to cut and splice the audio for Recycle-style manipulation.
Tempo Changes
 In the latest versions of Logic Pro, audio parts will follow Global Track tempo changes as long as you tick the Follow box in the audio track's Parameters.As you can see, beat-mapping is intimately connected with tempo changes, and thus with the Tempo Global Track. You can also use the Tempo Track to muck about with tempo changes generally in Logic. It's basically a graphical interface to the old Tempo List Editor, which is still available and can be used in tandem with the Global Track if you need to edit data numerically.
One good use for this is creating accelerandos or ritardandos — in other words, gradually speeding up or slowing down the tempo. To do this, create a node on the Tempo Global Track using the Pencil tool, select the Pointer tool, drag one of the tempo lines up, and position the mouse over the lower node where the cursor turns into a finger icon. You can drag the finger to wherever you want to create the tempo curve. The number of tempo events you want to be generated per quarter note is set from the Tempo Resolution pull-down menu. If you hold down the Shift key and double-click on the Tempo Global Track, the Tempo List Editor window opens directly for more precise numerical input. If you want to experiment with several Tempo Global Tracks, you can create up to nine, selectable from the Tempo Alternative pull-down menu. You can easily duplicate these maps by holding down the Alt key and selecting a new tempo map. This makes it easy to compare how small tempo differences affect the feel of a song. Adding tempo changes can really improve the feel of a piece of music, adding interest and dynamics.
When real musicians play together, they intuitively change the tempo throughout a song. There may be a little slowdown just before a chorus, which is being played slightly faster than the verse. Things might speed up towards the end, with a more pronounced slowdown as the song comes to a halt. You can simulate these using Logic 's Tempo Global Track to add a little realism to your songs. You don't need to change the tempo much to get the effects described above — it's amazing what a few points here and there can do. As all audio recorded into Logic v7.1 can now follow Tempo changes (provided that the relevant Parameters tickbox is on), it's easier than ever to incorporate these small variations into a song.
 Two pull-down menus are available in the Tempo Global Track: the upper one sets the number of tempo data points generated when you draw in gradual tempo changes; and the lower one lets you switch between different Tempo Global Tracks for comparison purposes.
Large tempo changes can have a deleterious effect on any audio recordings, but small changes will be all but unnoticeable — and, of course, MIDI data is unaffected. If you've got audio which was recorded in earlier versions of Logic and are now using v7.1, you can bounce or export the old files using the File menu commands and re-import them back into Logic. The easiest way to do this is to drag them from the Finder back into the Arrange window onto a duplicate track placed directly under the original recording. This makes it easy to line up the re-imported audio. You can then mute or delete the original recordings.
The Beat Mapping and Tempo Global Tracks may bring few features that are actually new to Logic, but their improved ease of use makes them more accessible to the average user, which can't be a bad thing.
