
Ubiquitous though Roland's long-lived range of sound modules appear to be, not many users get the best out of the vast synthesis and processing potential they offer. So here's how to coax circus-pony tricks out of your studio workhorse.
Roland's popular S&S (sampling and synthesis) sound modules established themselves as 'industry standards' with the release of the JV1080 back in 1994. Since then, they have gone from strength to strength, with instruments such as the JV2080, the XP workstations, and the significantly enhanced XV series. Recent additions to the fold are the Fantom and Fantom S keyboards, both of which employ the XV synth engine. Yet how many of these instruments are really used to their full potential? And how many people really know their instrument well enough to troubleshoot the problems and niggles that so often get in the way of creativity?
The purpose of this masterclass is to encourage users of these synths to get to know some of their instrument's features and foibles. Many claims of 'I can't do this' and 'my XV won't do that' can be overcome with a little creative, sometimes lateral thinking, and you'd be amazed at what your synth can do with your help and interaction. I'm going to focus on what are probably the most widely used of these synths — the JV1080, JV2080, and XV5080. As the XV5080 has potentially more aspects to cover than the JVs, we'll start this small series with a look at some tips unique to that instrument.
Understanding The Three Patch Types
Before we get deep into the menus of the XV5080, it's important to understand the differences between the different types of patches. Patches exist in three varieties, and understanding their differences will help you to choose the best type to use in order to achieve certain objectives. The first type, used by all of the factory presets, and which is the basis of a 'normal' Patch, is the Four-tone Patch. This variety has the largest number of parameters, including six filter types, ten Tone structures, ring modulation, Tone delay, FXM, two LFOs, and a comprehensive modulation matrix. The four Tones operate as four independent synthesizers, which can be layered, split and velocity switched to form a composite sound.
The second type is the Multi-partial Patch — this is primarily designed for the performance of imported sample libraries (see 'Sample Format Compatibility' box for details on this). The structure of Multi-partial Patches is identical to that of the Roland S700-series samplers, and as such there are fewer 'exotic' parameters than for the Four-tone type — for example, there are only three filter types, one LFO, no FXM and a slightly simplified controller matrix. It is also worth noting that, whilst you can use internal ROM/expansion-board waves and imported samples in a Four-tone Patch, Multi-partial Patches can only use imported samples.
The third Patch type is the Rhythm Set. Rhythm Sets consist of independent tone generators for every key; each key can be assigned up to four samples, which can be layered or velocity switched. These samples can be from any source, be it ROM/expansion-board or imported sample files. Each key also has independent synth parameters and effect level settings, whilst each of the four samples has its own gain, pan, tuning and FXM parameters. Rhythm Sets have most of the same parameters as a Four-tone Patch, although they do not have the modulation matrix or any LFOs. It's worth bearing in mind that Rhythm Sets are not just confined to being used for the obvious percussion duties — they also provide an easy, flexible alternative to Multi-partial Patches when you want to assign many separate 'events' to individual keys, such as drum loops, phrase samples, layered sound effects and so on.
Layering Parts
 Even if you can only send to one XV5080 MIDI In, you can still put the other 16 Parts to use by layering them on the same MIDI channels.A powerful feature of the XV5080 is its 32-part multitimbrality, thanks to its having two MIDI inputs and two groups of 16 Parts. A typical 32-part application would be to have MIDI input one address Parts 1-16, while MIDI input two addresses Parts 17-32, but in fact the arrangement is totally flexible and either MIDI input can address any of the 32 Parts on any MIDI channel.
However, even if you only want to use the first 16 Parts and MIDI input one, it doesn't have to mean that Parts 17-32 are redundant. Most usefully, rather than having to sacrifice one of your precious 16 Parts in order to layer two sounds together, remember that Parts 17-32 are going spare, providing 16 opportunities for sound layering — all you have to do is match the Parts to be layered to the same MIDI channel, and off you go.
Part Volume Versus MIDI Volume
When the XV5080 is used multitimbrally in Performance mode, confusion can arise concerning the relationship between the Part volume setting and volume as controlled by MIDI Continuous Controller number seven (MIDI Volume) messages. On the older JV synths, Performance Part levels are completely independent of MIDI volume. This enables the Part levels to be used just like the faders on a mixing desk. However, on the XV5080 the Part levels are directly controlled by MIDI Volume messages, which can be a real pain if you are using MIDI Volume as a means of dynamic expression, as this negates the ability to make 'relative' Part level changes that are independent from the MIDI Volume dynamics. There are two ways to overcome this: firstly, by changing the actual Parts' Patch levels themselves. To do this, don't go into the regular Patch edit mode — instead, select the Part in question. Then simultaneously press the Performance and Patch buttons, (this enables editing the Patch from within the Performance) and select the Common tab. Adjust the Patch level from here.
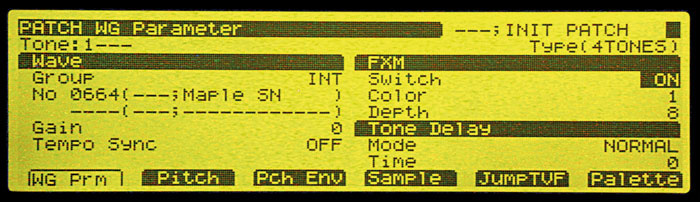
 Figure 1. If you want to avoid MIDI Continuous Controller number seven messages messing with your Part volume levels, you can switch off reception of these MIDI messages on a per-channel basis.This is fine for reducing level, but what if the Patch is already at maximum level and you need to go louder? In this case, it may be possible to coax a little more level out of it. Hold Performance and press Patch, then select the Palette tab followed by the WG tab. This screen shows you the wave parameters of all four Tones that make up the Patch. Look for the Wave Gain parameter — if this shows less than the maximum of +12 for the loudest of the active Tones (in other words, those that are actually being used) you're in luck. Simply select both active Tones for editing, then turn up the Wave Gain until the loudest Tone shows +12. In some cases this will give you a whole extra 12dB of gain to play with. Note that this workaround is only possible with a Four-tone Patch, as Multi-partial Patches have no Wave Gain parameter
However, while this method can work well, an altogether more elegant solution is not to use MIDI Continuous Controller number seven at all. Instead, use number 11 for all your dynamic level changes within Parts. This controller is specifically intended for the job, and is appropriately named as the MIDI Expression message. Now the Part levels can be freely adjusted like mixer faders, whilst still retaining all the Parts' dynamic level changes. In fact, it's a good idea to 'kill' the XV's reception of MIDI Volume altogether, to avoid accidental level changes: press Performance, followed by Part (making sure the Palette is turned off) and then choose the MIDI tab. The MIDI filter matrix appears — turn off volume reception for all 16 channels.
Roland XV and JV reviews In SOS
- JV80 & JV30 synth keyboards, SOS April 1992.
- JV880 synth module, SOS March 1993.
- JV1000 synth keyboard workstation, SOS July 1993.
- JV90 & JV50 synth keyboards, SOS March 1994.
- JV1080 synth module, SOS December 1994.
- XP50 synth keyboard workstation, SOS June 1995.
- XP80 synth keyboard workstation, SOS May 1996.
- JV2080 synth module, SOS April 1997.
- JV-series expansion boards, SOS November 1998: including the Pop, Orchestral, Piano, Vintage synth, World, Super Sound Set, keyboards Of The '60s & '70s, Session, Bass & Drums, Techno, and Hip Hop titles.
- JV-series Vocal Collection Expansion Board, SOS March 1999.
- JV1010 synth module, SOS June 1999.
- JV-series Asia expansion board, SOS July 1999.
- JV-series Orchestral II And Special FX Collection expansion boards, SOS August 1999.
- XP30 synth keyboard, SOS August 1999.
- XV3080 synth module, SOS July 2000.
- XV5080 sampling synth module, SOS November 2000.
- XV88 synth keyboard, SOS January 2001: includes reviews of SRX-format Dynamic Drum Kits and Piano expansion boards
- XV5050 synth module, SOS June 2002.
- XV2020 synth module, SOS November 2002.
- Fantom FA76 synth keyboard workstation, SOS February 2002.
- Fantom S & Fantom S88 sampling synth keyboard workstations, SOS October 2003.
FXM For Varying Drum Sounds
 Fed up with those repetitive drum samples that always sound the same? There is a way to randomly vary their sound that doesn't involve using filters or velocity switching — and it will work with a single sample, even if it plays at a constant velocity. To do this, initialise a Four-tone Patch to use as a starting point, rather than doing a lot of complex editing to an existing Patch. The reason we are using a Four-tone Patch as opposed to a Rhythm Set or Multi-partial Patch is because the modulation routing we need is not possible for Rhythm Set Patches, nor is it possible for Multi-partial Patches, as they have no FXM parameter. If we wanted, this Patch could contain up to four different samples that we wish to randomly vary (since there are four Tones.) To keep things simple, we'll just be using one sample, hence one Tone. The sample can be either a wave from the XV5080's internal ROM/expansion board, or a WAV file that you have imported — it doesn't matter, the process will work with any of these. You will also need to set the key range of the randomised Tone so that it plays from a single key, assuming of course that you wish to play this Tone as if it were an integral part of the main Rhythm Set. It therefore makes sense for this new Patch to be on the same MIDI channel as the main Rhythm Set Part, and so the corresponding key in that Rhythm Set should be 'blank'.
So, press Patch and select the WG tab, followed by the WG Prm tab. Assign the drum sample to Tone one. At the top right of this screen there is a section called FXM. This feature is often overlooked and misunderstood (bless it) and is in fact a form of wave modulation, a sort of relative to FM. When applied to sustained, pitched sounds, it is fairly unattractive and unwieldy — which probably accounts for its being so studiously overlooked. However, when applied to short sounds of less determinate pitch (like a lot of percussion) it starts to become much more interesting. Set the FXM switch to On, leave Color at a value of one, then move the cursor to Depth. Now, while repeatedly playing the drum sample, sweep the depth parameter back and forth across its entire range — you should hear the tonality of the drum sound change in subtle ways. Now do the same, experimenting with the four different Color values — the tonal change increases with higher values.
OK, so now we will make these changes occur automatically and randomly, using an LFO and the modulation matrix. Press Patch again, then select the tab for LFO & Ctl and head for the first Control Page. Repeatedly pressing the Control tab toggles between two pages of modulation matrix controls. Point the cursor at Source and spin the dial to select option 105, which is LFO 1. Now move the cursor down to Destination, and select FXM Depth. Move the cursor right to Sns (sensitivity) and set a value of +28. Move the cursor one more step to the right, to the first of the four little circles — these are the Tones' controller response on/off switches. Set the leftmost of these (Tone one) to be a circle.
This all means that Tone one's FXM depth will now be modulated by a value of +28, controlled by LFO 1. From here you can jump directly to the LFO 1 page — select the LFO 1 tab. We want our FXM modulation to be random, so select the RND wave, then set the Rate to a value of 73, making sure Key Sync is set to Off. Finally, set the Tone's key range appropriately — hit Patch, then select the Common tab followed by the K.Range tab.
Now, when you play your drum sound repeatedly, it will perform random tonal changes — experiment with the FXM Color and Depth parameters as you like — I found the best Depth setting to be six for this amount of modulation. For even further tonal variety, try controlling the Tone's filter cutoff with velocity — I find LPF 3 to be the most natural-sounding filter type for drum sounds. You can also set up the other three Tones to do the same for different samples — each can have its own key range, filter, FXM settings and modulation depth — LFO 2 could also be used for a different modulation rate and waveshape if you like.
Multiple Rhythm Parts
Most multitimbral synths offer a rhythm Part, and the XV is no exception. What is unusual on the XV in that you can have as many as you want — up to 32 if you're feeling totally outrageous. So you could have a drum kit on one Part, a latin percussion kit on another, orchestral percussion on another, and so on. This is a very liberating feature, as some multitimbral synths restrict Rhythm Set operation to Part 10 only, and sometimes MIDI channel 10 only. To make any Part a Rhythm Set, select it and press Performance then Part. Find the parameter at the top of the list called Patch/Rhythm and set it to Rhythm, then move the cursor down to the Group and Number parameters to select the Rhythm Set you want.
Using The TMT Matrix
 Figure 2. To set up a random FXM modulation effect, you first need to switch on FXM for the Tone concerned and adjust its Color and Depth parameters. Then you route one of the internal LFOs to the FXM Depth parameter in the modulation matrix. Finally, set the LFO in question to a random waveform and make sure that its Key Sync Switch is set to Off.
 Figure 3. These screens show how you can set up the TMT Matrix to allow crossfading between two different samples using MIDI Mod Wheel messages.Velocity switching and crossfading of Tones is a useful means of providing dynamic timbral changes to a Patch, and most Patches usually use, unsurprisingly, keyboard velocity to control this function. However, Tone switching and crossfading can be controlled in other ways, either in addition to, or instead of, velocity. This is where the TMT (Tone Mix Table) comes into play. TMT shares the same edit page as velocity range, so you press Patch, then go via the Common tab to the V.Range tab.
In the example shown in Figure 3 the two Tones — a vocal 'ooh' sample and a vocal 'aah' sample — have been set to crossfade from one to the other. Note that TMT Vel Control has been turned off — normally this would be set to On to allow key velocity to control the crossfade. Note too that TMT Matrix Control has been turned on — this means that the crossfade is now under the control of whichever modulation sources we choose. The amplifier and filter (if used) will still respond to velocity in the normal way, so you are not losing any keyboard dynamic control. I'm going to use the MIDI Mod Wheel controller (Continuous Controller number one) to crossfade from 'ooh' to 'aah'. First, press Patch, and then select the tab for LFO & Ctl, followed by that for Control. Set the first matrix control's source as CC01:Modulation (ie. MIDI Mod Wheel). Now set up Destination, Sns and Tone. It is important that the little circles in the Tone column are set up correctly, as we want to apply a negative modulation exclusively to Tone one, and a positive modulation exclusively to Tone two. Now, when you move the wheel upwards, Tone one's level decreases, while Tone two's level increases. A velocity range overlap is necessary to avoid a drop in volume at the modulation's mid-point, and you can see the one I've set in Figure 3.


 Figure 4. In order to get an LFO to cycle in time with your song's MIDI tempo, you need to set the LFO to follow the System Clock source, which is in turn set to synchronise to incoming MIDI tempo information. Once this is done, the LFO's Rate parameter needs to be set to a note value, and its Key Sync Switch must be set to Off.With a simple spin of the dial, you can change the matrix control source from Mod Wheel to either LFO 1 or LFO 2 — this will cause the two Tones to crossfade against each other cyclically, producing a pulsating timbral effect. If the XV5080 is set to respond to the external MIDI clock of your sequencer, the tonal crossfades can cycle in tempo with your song. However, to ensure that this works, the following things must be checked:
- Press Patch, go to the Common tab, and head for the second page of General settings. The Tempo Clock Source must be set to System.
- Press the System button, and in the first page of General settings the System Tempo Clock Source must be set to MIDI.
- In the Patch's relevant LFO settings, the rate must be set to a note value — you'll need to turn the data dial clockwise to find the note values. Also, you need to make sure that you've set the LFO Key Sync parameter as you want it. If it's set to Off then all the notes in a chord will cycle in sync, as if by a common LFO. If it's set to On, the LFO for each new note cycles independently — this is good for providing a complex, interweaving timbral movement when you are playing moving parts rather than block chords.
Try using other modulation sources, such as the TVF, TVA or pitch envelopes, aftertouch or pitch-bend wheel. With a little patience, complex 'morphing' sounds can be created in this way using four radically contrasting Tones that crossfade against each other through separate, yet overlapping ranges.
Phase Lock
If you have a number of samples that you wish to play simultaneously to produce a composite performance, you can layer several Parts together on the same MIDI channel, which means that a large number of samples can be triggered with a single key press. A typical application of this technique would be for using construction kitstyle sample libraries that are designed for the spontaneous arrangement of drum loops, instrument phrases, bass lines, and so forth. Ideally, the samples should all play together with phase accuracy — however, under ordinary circumstances the XV5080 'prioritises' the output of each part, so slight timing discrepancies occur that destroy the phase-accurate relationship between samples. Fortunately, the XV's Phase Lock switch (in the Performance mode's third MIDI Page) guarantees that all layered samples triggered from the same note number and on the same MIDI channel will be output with their start phases locked firmly together.
There is a cost attached to this — and that is a small amount of latency. But don't be unduly concerned by this; unless the polyphony of other Parts is running especially high at those particular moments, or there is an unusual density of controller data, you will probably find this latency to be negligible. Nevertheless, a problem arises on the XV5080 under these circumstances if the pitch of the layered sounds is modulated, perhaps by the pitch-bend wheel, a pitch envelope or even the innocent wobblings of an LFO: the phase relationship of the samples can slip out of alignment. This may correct itself when the pitch is returned to zero, but sometimes this is not the case. Therefore, use pitch modulation on phase-locked samples with caution!
Using The Create Patch Function
As described earlier, Multi-partial Patches are used to reproduce multisampled instruments, such as those you might load from a Roland S700 or Akai sample library. However, you can create multisample Patches from scratch on the XV5080. This is a fairly arcane process, so, to aid in this potentially brain-frying task, the XV5080 has a function called Create Patch. Firstly, you need to import the WAV or AIFF sample files you wish to use. These can either be from an external SCSI drive, or from a Smart Media card. If the samples are mono, the task of Patch creation is easiest — stereo files require an extra consideration which I'll discuss shortly.
 Figure 5. The Create Patch function can automatically set up multisample Patches, but it won't work with stereo samples, so you should only select one side of any stereo samples you want to include. Once the Patch has been set up, you can then add the other side in manually.The critical point to remember is that Multi-partial Patches echo the architecture of the S700 samplers, therefore no samples can be played in a Multi-partial Patch unless they reside within a Partial. A Partial is basically a container that houses up to four samples — it's the Partial itself that has all the parameters such as TVA, TVF and envelopes, which are applied globally to all four samples within the Partial. So, therefore, the necessary Partials need to be created before we can go any further. The only way to do this is with Create Patch.
What Create Patch does is to automatically create a new, Multi-partial Patch, along with all the necessary Partials based on the samples you've selected to use, complete with ready-made split points. The caveat here is that for the XV5080 to know where the split points should be, it has to know the original key of each sample. So this must be checked (and corrected if necessary) before continuing. Some imported samples may already have the original key information saved as part of the file — but in some cases they won't. In this instance, if you were to create the Patch without the correct original key info, the split points would appear to be arbitrary — and dead wrong!

To check the original keys, (assuming your samples are loaded) go to the Create Patch page (Patch / System / Utility / Menu 2 / Create.) This takes you to a list of all your imported samples. Alongside each sample name, you will see the original key shown in brackets, and if two or more show the same value (most likely C4, the default pitch for samples with no saved pitch info) then they will need to be changed — every sample must have a different original key for the split points to make sense. You can easily check what their correct pitches should be by highlighting each sample in turn with the cursor and pressing the XV's volume knob. This will audition that sample so that you can compare it with a known pitch source, such as another keyboard, and make a note of the correct pitches.
To change any sample's original key, press Patch and select the WG tab followed by the Sample tab. This displays a basic sample edit page showing the original key of the currently selected sample. At the top left of the screen, you can scroll through the list of imported samples (you can scroll in single units or hundreds) and adjust the original key if you need to. Note that you cannot audition the samples from this page — that is why you made notes earlier. Note also that stereo samples show up as separate left and right samples, which must both be set to the same original key!
Now you're ready to create the Patch. Return to the Create Patch page, then select those samples you want to use in your Patch, and hit Create. If everything has gone according to plan, you will have a Patch with all the split points in the correct places, and all the samples playing at their correct pitches. All Partials within the Patch will have the same default parameter settings, which you can adjust to taste. Don't forget to tick the Global option when editing these, if you wish all the Partials to be edited in the same way.
I mentioned the extra considerations about stereo samples earlier and, as ever, there is one of our cuddly caveats to deal with. Create Patch will place only one sample within each Partial it makes, which is clearly a problem if you want any Partials to use stereo samples — remember, the XV5080 treats these as separate left and right samples. On the Create Patch page, the solution is to select only one side of each stereo pair for inclusion in the new Patch. Once the Patch has been created, locate any Partials that should contain stereo pairs and add the missing right-channel samples. Set the pan positions for the samples to L32 and 32R respectively, and you're all done.
XV5080 Sample Format Compatibility
 Because the XV5080 supports the Roland S700-series sampler format, you can use Chicken Systems Translator to convert almost any sampler format into a usable form.The XV5080 is compatible with four sample library formats:
- The Roland S700 series of samplers, from the S770 through to the S760. These samplers enjoy a legacy of material dating back 14 years, notable examples being Roland's own Project Series of libraries, which are of a consistently high quality — although they are increasingly hard to source these days.
- Native XV5080 material that you have created and archived yourself. As far as I am aware, no native XV5080 commercial libraries exist at all.
- Akai-series sample libraries from the S1000 through to the S3000 series. The Akai format is almost certainly the most profligate, catered for by countless sample library producers. Although the Roland and Akai formats have some architectural similarities, an exact parameter for parameter translation is not necessarily guaranteed. Key splits and velocity switching parameters usually survive the translation, but other parameters such as filter and envelope settings may need some work. What better way to learn the XV5080 a little better?
- WAV/AIFF files: These can be imported singly or in batches, for use in your own Patch creations.
A potential fifth source of samples is the mushrooming software sampler library industry. Translation programs such as Chicken Systems Translator and CDXtract can make a fair bash at converting such material into Roland format — although the gargantuan file size of many modern software sampler libraries may render this a rather futile exercise unless translated programs do not exceed 128MB, and your XV's SIMM slots are fully loaded!
SysEx Dumps And Backing Up
You've been burning the midnight oil, fervently creating many killer Patches (you have, haven't you?), so you don't need me to tell you that backing up your XV's Patch data is vital. One established way to do this (as on many synths) is to do a bulk MIDI System Exclusive dump into a suitable host program on your computer, and save that dump to the hard drive. This is all fine and spiffy, but it has its disadvantages: firstly, a complete dump of all user Patches, Rhythm Sets and Performances takes a fair while — more than three minutes. Not only that, but to later restore it to user memory you have to reload the entire dump, subsequently overwriting whatever else happens to be in the user memory, even if you only need access to one particular Patch or Performance contained within the dump.
 Although you can back up Patches and Performances as MIDI SysEx dumps to your sequencer, it's slow and inflexible. Much better is to get yourself a Smart Media card, which allows you to access individual archived Patches directly. In addition, you can buy a card reader for your computer to back up the card data to a storage medium of your choice.So, my big recommendation is to buy a Smart Media card! In fact, why not throw your bonnet over the windmill and buy several? They are cheap, eminently recyclable and always handy for that digital camera/MP3 player you have knocking about in your gadgets box. One 64MB card can hold potentially 293 complete user memory dumps — which should keep you going for quite some time. If you have a Smart Media card reader for your computer, you can back up your precious data by simply copying the contents of the card to your hard drive, in a matter of seconds.
So what else makes Smart Media cards so great? For starters, a complete user dump to card takes around five seconds. Best of all, though, is that you can read every saved Patch, Rhythm Set and Performance that you've saved directly from the card. The card becomes an extension of the user memory, so you can build up an enormous library of sounds that are available on tap. The card registry function (in the Disk mode, follow the Tool tab then the Regstry tab) allows up to eight saved setups to be accessed at once — they appear in the XV's sound library as eight card banks, A-H. Of course, each setup can be named at the time of saving, so make sure you name them intelligibly so you can identify them later.
 Another backup option for the Xv5080 is Iomega Zip disk, connected via SCSI, although this is less flexible in practice than Smart Media cards.You can also back up the XV5080 to a SCSI-compatible drive, such as an Iomega Zip drive. This is also faster and more convenient than SysEx dumps, but, unlike dumps to Smart Media card, the saved data cannot be accessed direct from disk. Reloading this data will, like SysEx dumps, overwrite the XV's current internal memory. However, although you cannot read the Patches directly from the disk, you can load them, one at a time or as multiple selections, to the user memory. In the drive's root directory, simply highlight the dump in question and click the right cursor button. This will show three choices — Performance, Patch, Rhythm. Select Patch (if that is what you want to load) and right-click again. The entire Patch list for that dump is displayed — scroll down the list and mark the Patches you wish to load, press the Select tab, then Load. The XV will ask which Patches you wish to overwrite — multiple Patch selections will be loaded into numerically consecutive locations. Choose the lowest destination Patch number, and press OK. The loaded Patches will overwrite only the user memories that you specified — everything else remains undisturbed.
A final word on this subject — although MIDI SysEx bulk dumping has its limitations, it has other strengths which will be covered in the next part of this masterclass, as they apply to the entire XV/JV range of synths.
Precautions When Using MIDI Controller Data
If you're in the habit of using lots of controller data, it's worth knowing that the XV5080 has an Achilles heel. Despite the synth's 128-note polyphony, the Note On message timing can be compromised by heavy controller data. This data can get very dense, especially if you adopt the practice of meticulously drawing it in by hand using your sequencer's controller edit window (er, guilty m'lud!). If you notice the timing going astray on relatively simple (or few) parts, or if your controller curves sound inexplicably lumpy, then dense controller data is almost certainly to blame. Most sequencers provide a means to thin this data out, and removing every other event usually does the trick. Interestingly, the older JV models have a considerably higher tolerance to controller data, usually shrugging off that which the XV5080 can't handle.
Backward Compatibility
If you own a JV/XP synth as well as one of the XV range, it's worth knowing that XV synths are backward compatible with Patches from the rest of the JV/XP range. I frequently squirt JV1080/2080 Patches via SysEx into my XV5080 in order to take advantage of its enhanced features, such as doubled polyphony, more filter types, improved MFX effects and handling of stereo samples. The transfer of JV Patches to the XV can only be done using MIDI System Exclusive data — all you have to do is connect the MIDI Out of the JV to the MIDI In of the XV, make sure they both have the same device ID and then manually initiate the dump from the JV. You can dump either a single JV Patch or the entire user Patch memory, and the good news is that Performances and Rhythm Sets can also be transferred in this way.
.") If you're importing JV-series patches to an XV5080, and they rely on expansion-board samples, then you need not only to make sure that the same expansion boards are installed, but also that they are installed in exactly the same expansion slots — otherwise, you'll get a No Media message (inset).
If you're importing JV-series patches to an XV5080, and they rely on expansion-board samples, then you need not only to make sure that the same expansion boards are installed, but also that they are installed in exactly the same expansion slots — otherwise, you'll get a No Media message (inset).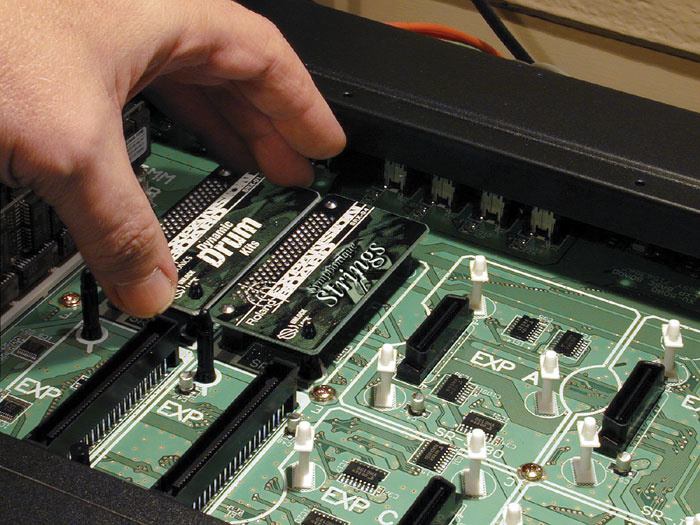 However, as they say in advertising, 'terms and conditions apply'. Compatibility is not always 100 percent, as there are feature and parameter differences between the two generations of synth. For example, although a number of the XV's MFX effects are the same as the JV's EFX effects, there are some variances. So if a JV Patch refers to an EFX algorithm which does not exist in the XV5080, the settings (and routing) are ignored. The XV shares the same basic reverb parameters as the JVs, so these should survive intact — but the chorus effect parameters of each machine are slightly different, so you might have to do some editing to get them exactly the same. Transferring Patches from JV to XV that solely use internal waves usually proves successful, as the XV's ROM wave list, although over twice as large as the JV, includes all the same waveforms. Problems arise when trying to transfer a JV Patch that uses expansion-board waves — unless the XV and JV both have the same expansion board installed, the XV's version of the Patch will be incorrect.
Even if the same board is installed in both machines, it must occupy the same relative expansion slot position — if it's in EXP A in the JV, it must be in EXP A in the XV, and so on. If the JV Patch waves are referencing the wrong board in the XV, all the wrong waves will be used — and you will have to correct them. If the JV Patch is referencing an empty EXP slot, the wave parameter on the WG Edit page will display No Media and you won't hear anything at all, or at best only any internal waves that are used.
That's all for Part 1, but tune in again for more XV tips, plus a generous jamboree of JV gems — same time, same MIDI channel...
Roland XV & JV Masterclass: Part 1 of 4
Roland XV & JV Masterclass: Part 2 of 4