 This month's Mix Rescuees are the Canadian roots reggae band Arise.
We've not had a reggae band in Mix Rescue before, so my ears immediately pricked up when SOS reader Paul Wagorn emailed Mix Rescue to ask for help with the mixing of his band's roots song 'Run Run Run'. Although they'd used quite a lot of decent-quality gear (including Universal Audio and Neumann hardware), the final mix they'd come up with in Cockos Reaper had been a disappointment, and they weren't sure how to go about improving it — in particular getting a modern and commercial-sounding result with big, but not overbearing, bass. As regular readers of this column will know, I'm a bit of a Reaper fan myself, so I offered to remix the track for them using a similar system, to see what might be at the root of their problems.
Along with his multitrack files, Paul supplied me with a good selection of reference recordings by favourite artists such as Don Carlos, Martin Campbell, Midnite, and both Bob and Stephen Marley. Although these tracks did give a definite sense of what the band were after, there was also a considerable amount of variation between them in terms of the sounds of individual instruments, the nature and level of effects, and the overall mix tonality, so I decided to try to nail down a slightly more concrete target against which to measure my in-progress mix. Paul had particularly singled out the sonics of Stephen Marley's 'Break Us Apart' as something he aspired to, and it was also one of the more modern releases, so I chose that as my primary reference track, although I still had my ear on the more ambient drum sound of Midnite's 'Love Right' (from their incredible straight-to-stereo Ras Mek Peace album) and the more powerful subs of Don Carlos's 'Time' as well.
Scouting out the multitracks with 'Break Us Apart' fresh in my mind, however, it was clear that the frequency balance and subjective tone was mostly a long way off target. The drum sound as a whole was very muffled, for a start, as were the organ and vocal parts, while the kick-drum and guitars felt too bright and scratchy by comparison. It was clear that some serious EQ was going to be on the cards.
From Coarse To Fine
 Fundamental to creating a more successful remix was homing in on the most appropriate reference tracks from a large selection provided by Paul and the band. In the end, albums by Stephen Marley, Midnite and Don Carlos ended up on the short list.
First off, I chucked together a quick two-minute balance of the vocal, bass, and drums — the core components of the track, to my mind — so that I could do some broad-brush tonal shaping with an instance of URS Console Strip Pro in the master channel of my Cockos Reaper-based mix system. This work comprised two very broad 6dB EQ boosts: a peak at 2.1kHz (Q=0.38) and a high shelf at 5.5kHz (Q=0.25), both using the plug-in's gentle-sounding Pultec-modelled filter algorithms. From that point, I began to home in on individual channels.
As a result of the master-buss EQ, I could use fairly moderate vocal processing, with a 50Hz high-pass filter and a 4dB low shelving cut at 190Hz (both from Cockos ReaEQ) reining in some unwanted low mid-range weight, before an instance of Universal Audio's Helios Type 69 EQ dipped out 3dB of 4.5kHz 'nasality' and added a couple of decibels of 10kHz sheen. I chose the Helios after a shootout against a couple of other EQs using similar settings, because I felt it gave a particular subtle, vintage quality that seemed to suit the genre and the singer.
The bass was, likewise, pretty straightforward, involving a 2dB cut with a low shelf at 60Hz to pull back some slightly over-enthusiastic subs, and a pair of small peaking-filter boosts to bring out the warmth of the lower harmonics even on small speaker systems: 1dB at 150Hz and 2dB at 830Hz. For these adjustments I used one of my favourite recent freeware discoveries: Sonimus SonEQ, a great little general-purpose EQ plug-in. The variable high-pass and low-pass filters deal very effectively with out-of-band rubbish; the low shelf does that 'weight without mud' thing that I always associate with the Pultec design it emulates; and the API-modelled mid-band peak and high shelf provide the characteristic 'a little goes a long way' tone-sculpting power that epitomises that design for me. The plug-in also incorporates a multi-stage, vintage-style saturation function to increase the harmonic density of sounds, particularly at the low end, but it's switched so that you can choose to apply it only when you need it. That meant that I could drive the saturation quite hard to fill out the mid-range of the bass sound, but then bypass it for the other SonEQ instances, to avoid over-thickening the rest of the mix.
Drumkit Phase & EQ Settings
 Although the bass had caused Paul difficulties in his original mix, it turned out that Mike only needed comparatively moderate processing on this part for the remix: a combination of tonal contouring and saturation from Sonimus SonEQ, 6dB of gentle compression from Universal Audio's LA2A plug-in, and a touch of heavily filtered chorusing from Togu Audio Line's Chorus-60.
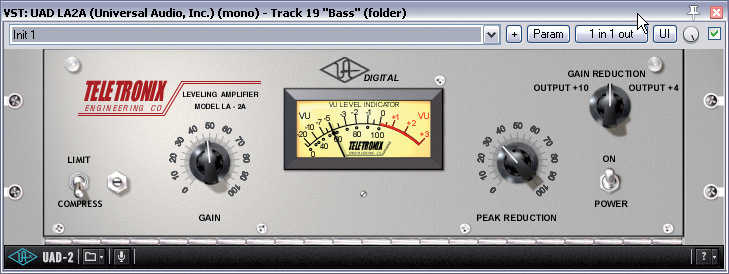


In refining the drumkit's tone, my first step, as always, was to experiment with the phase relationships between the mics. I discovered that comb filtering of the overheads in mono was dulling the hi-hat sound a little more than I was happy with, but a simple one-sided polarity flip was too blunt a tool to give a better result without destroying the rest of the kit balance. I tried Audiocation's Phase plug-in in one channel too, but again didn't make a great deal of headway, because any setting that brightened the hat also undermined the subjective appeal of the kick and snare ambience.
In the end, I decided to go for a more frequency-selective phase-adjustment device, in the form of one of ReaEQ's all-pass filters. Sweeping this around a bit in the right overhead channel, while listening to the combination of both mics in mono, allowed me to find a setting that made the hi-hat sound a little more natural — and, of course, because an all-pass filter doesn't alter frequency response, the overheads tone in stereo remained unchanged. On top of that, it turned out that the overheads combined best with the other mics in the kit with inverted polarity, and that an instance of Audiocation Phase was able to give the hi-hat close mic a clearer sound in context too.
Despite this processing, the tonality of the drums still wasn't anywhere near the ballpark of the Stephen Marley reference track. Routing the whole kit to a communal buss, I therefore applied my second instance of SonEQ, dialling in another big high-frequency shelving boost (7dB at 8kHz). This exacerbated the clickiness of the kick-drum's transient, so I applied a compensating 8dB high-shelving cut at 200Hz using ReaEQ on that channel alone. The snare rim was also now feeling very thin, but I was able to salvage a more woody timbre by applying a whacking 10dB SonEQ peak at 1kHz. The hi-hat, on the other hand, still lacked a bit of sizzle, so I pushed the 14kHz zone with an instance of Slim Slow Slider's Linear Phase Graphic EQ. Turning my attention to the lower end of the spectrum, I hacked out 8dB of rather murky-sounding low end from the overheads with a low shelf, and applied 4dB of peaking boost to the kick mic, to add some weight.
, 7dB HF boost from Sonimus SonEQ, and two further 6dB HF boosts from URS Console Strip Pro resulted in an enormous amount of high-frequency lift being applied overall.") Some pretty hefty EQ was required to move the drum sound into a zone that matched the CDs the band had referenced. In the case of the overheads, for example, a combination of 8dB LF cut from Cockos ReaEQ on the overheads channel (top), 7dB HF boost from Sonimus SonEQ, and two further 6dB HF boosts from URS Console Strip Pro resulted in an enormous amount of high-frequency lift being applied overall.
Some pretty hefty EQ was required to move the drum sound into a zone that matched the CDs the band had referenced. In the case of the overheads, for example, a combination of 8dB LF cut from Cockos ReaEQ on the overheads channel (top), 7dB HF boost from Sonimus SonEQ, and two further 6dB HF boosts from URS Console Strip Pro resulted in an enormous amount of high-frequency lift being applied overall.
 Following those changes, I adjusted the overall warmth of the kit using my drum-buss SonEQ. The first step was balancing the settings of the Low Boost and Atten controls. Although it seems odd to apply boost and cut simultaneously, because common sense might imply that they should just cancel each other out, it doesn't work like that with Pultec-style EQ designs, because the cut is actually applied a little higher up the spectrum than the boost. This means that combining the two controls creates a low mid-range 'bump' in the response curve. In this case, I ended up using a higher level of Boost than Atten, which balanced the general LF lift with a low mid-range cut 'bump' — frequently a handy curve where you want to fill out the lower octaves without creating woolliness. Another 3dB of 150Hz completed the picture.
If you're wondering why I ended up using three different EQ plug-ins here, let me explain my reasoning. I turned to SonEQ in the first instance because of its analogue-modelled nature, because I knew that I was looking for big tonal changes and such designs tend, in my experience, to excel in that role. Where SonEQ was unable to provide the kind of EQ curve I was looking for (as in the case of the kick-drum's 70Hz peak and 200Hz high shelf), I gravitated towards the more flexible and configurable ReaEQ engine, with its fully variable parametric design. However, both of these plug-ins have the potential to alter the phase relationships within the kit if applied to the individual mic signals in a multi-mic rig, which can sometimes have a negative impact on the final sound, especially if you're processing heavily. Indeed, I was careful to reassess the channel polarity settings in light of the EQ changes, just to double-check that I wasn't creating more problems than were being solved. The reason I used the linear-phase EQ for boosting the hi-hat close mic's extreme high frequencies, rather than ReaEQ, was simply that I'd spent some time finding my favourite setting for Audiocation's Phase plug-in on that channel and didn't want to upset it — so it saved me a little phase-related hassle, albeit at the expense of the higher CPU drain of the linear-phase processing.
Filling In The Balance
 Mike had carefully adjusted the phase of the hi-hat microphone to achieve the sound he wanted, so when it was time to add brightness to it he chose to use Slim Slow Slider's Linear Phase Graphic EQ, to avoid undermining his previous work.
The equalisation for the remaining tracks was aimed at trying to fit them around the vocals, bass and drums. The porky-sounding organ stabs were seriously trespassing over the bass guitar's territory, so were high-pass filtered around 150Hz and then shelved away several decibels further in the low mid-range. In my view, it was largely the organ part's overblown low-end energy that had made it so difficult for the band to achieve the bass sound they were looking for, so this part of my EQ settings was particularly critical in achieving my remix result.
A 12dB high-shelving cut from ReaEQ at 3.7kHz took the scratchiness out of the main rhythm guitar, while a 6.3kHz ReaEQ low-pass filter and another 4.5dB of peaking cut at 3kHz served a similar purpose for the solo guitar noodling. From a psychological perspective, the high cut also helped to push this part behind the brighter lead vocals (by mimicking the natural way in which the air itself tends to damp the high frequencies of sounds when they have travelled a long way), and this was also the thinking behind a similar 6kHz low-pass filter applied to the backing vocal part.
 The recorded organ part contained a lot of low end, which was muddying the mix as a whole, so EQ cuts to the organ part in this area made a big difference in clarifying the all-important bass sound.Finally, SonEQ instances on both the solo guitar and the piano part applied more moderate tonal tweaks to the low mid-range to balance that tricky region carefully against the bass guitar: you want enough energy there to give those instruments solidity, but not enough to bloat the overall mix timbre. Another reason I like something like SonEQ for this kind of polishing work is that its chunky +/-12dB gain controls subconsciously encourage me to use more conservative settings than the kind of small +/-20dB controls you find on, say, Universal Audio's Cambridge EQ or SSL's Duende Channel Strip. And there's no graphical EQ curve to distract you from what you're hearing, either!
Overall, it would be fair to say that this particular Mix Rescue project required some pretty drastic EQ processing, and while my standpoint is that the end justifies the means as far as mixing is concerned, I would say that this clearly indicates that the sounds weren't really captured appropriately at source during tracking — despite some stellar gear. Now, even the best-engineered multitrack will usually require a bit of EQ to fit everything into its final mix context, but if the sounds have been chosen and recorded to work well together in the first instance, such processing should mostly just be a question of some high-pass filtering with a few decibels of shelving and peaking here and there. Once you catch yourself regularly boosting or cutting beyond the 6dB mark, it's a clue that your instruments or acoustics need adjusting, or that your mics may be in the wrong place, even if you're working with budget-conscious recording gear.
 A chain of characterful analogue-modelled plug-ins was inserted on the lead-vocal channel to add to its appeal: Universal Audio's Helios 69 and LA2A, and IK Multimedia's T-Racks Model 670.
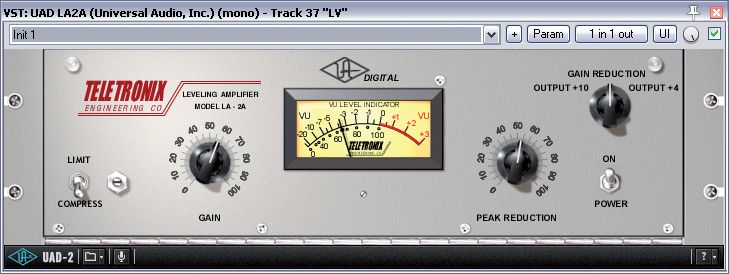
 Compared with the EQ, the dynamics processing on this mix was relatively simple. The only thing on the drums was some limiting from Tin Brooke Tales's Pocket Limiter to smooth out a rather spiky transient on the snare rim track; the bass had 6dB of gain reduction from Universal Audio's LA2A emulation; and I tried out the new one-knob EZCompressor plug-in I've just got from Tone Boosters, to squeeze the dynamic range of the guitar solo by 4dB. The strongest compression was 12dB of 3:1 soft-knee processing from Cockos ReaComp to nail the backing vocals into place, while the lead vocal had a chain of two compressors: around 6dB of compression from another Universal Audio LA2A, followed by 2-3dB of auto-release limiting from the IK Multimedia T-Racks Model 670 plug-in — both chosen as much for their flattering tonal qualities as for their dynamics control. Once I had the whole balance going, I compressed the master buss too, using Cytomic's The Glue, set to quite a relaxed response: around 3dB of gain reduction at a 4:1 ratio, with attack and release times of 30ms and 400ms respectively.
Effects
 The featured vintage-style delay and reverb effects in the remix came primarily from two Universal Audio plug-ins: an instance of EP34 providing an emulated Echoplex tape delay for the lead and background vocals, and an instance of Roland RE201's spring reverb as more of a global send effect.
The other big factor in this remix was the send effects, which is hardly surprising, given that audible effects treatments are very much part of reggae's signature sound. However, instead of the typical 'subtle enhancement' effects that would be typical of many pop and rock productions, here I deliberately headed for a selection of vintage-style plug-ins that felt more in keeping with the genre.
The main global reverb was generated by the emulated spring of Universal Audio's Roland RE201 plug-in (running in its Reverb Only mode), chained with an instance of Universal Audio's quirky Cooper Time Cube plug-in to generate a pseudo-stereo output using offset left- and right-channel delay times. This effect was fed from pretty much everything except the bass, and especially from the snare-rim and solo-guitar tracks, to give them more of an obvious metallic effect tail. The other vintage-style effects were more limited in their application, such as the two emulated tape-delay 'spins' you can hear on some of the sporadic snare fills — The Interruptor's single-tap Tape Delay and four-tap Echomania plug-ins respectively, the latter with a little additional low-pass filtering from ReaEQ.
Another lo-fi delay treatment can be heard on the lead and backing vocals throughout, courtesy of Universal Audio's EP34 emulation of the classic Echoplex tape delay unit, which was overdriven and then passed on to FxPointAudio's Spinner LE rotary-speaker emulation, to dull the tone and add extra stereo interest. The solo guitar already had delays recorded into it, so I didn't have to recreate those, but I did add in a touch of shaky 'down the end of a corridor' reverb from the 'Entombed!' preset of Tone Booster's unassuming Reverb plug-in, which helped to put it into its own unique environment and separate it psychologically from the rest of the arrangement, despite its background status.
Beyond these more 'foreground' effects, there were also a few more typical mix-style treatments lurking behind the scenes. Silverspike's freeware Room Machine 844 helped to supplement the overhead mics in giving the drums that touch of Midnite-style ambience, while Togu Audio Line's freeware Chorus-60 plug-in gave a little stereo spread to the bass sound, this latter effect being concentrated into the 200Hz region with bracketing filters from ReaEQ to keep it deep under cover. Although I initially used my main spring reverb for the vocal lines, the band felt that they wanted a smoother and less coloured reverb sound for those, so I ended up drafting in Universal Audio's dependable EMT140 plate plug-in instead, feeding it from both the dry vocal channels and the RE201 delay return. This reverb needed a good dose of high-pass filtering from ReaEQ to stop it swamping the mix, but once that was sorted out, it sank back into the mix in that beautiful way it always seems to, and without dragging the vocals themselves with it.
Horses For Courses
 Both main send effects were created by emulations of mono-output devices, Mike decided to spread them out over the stereo picture using further processing in their return channels: the Echoplex-style delay was passed on to FxPointAudio's SpinnerLE rotary-speaker emulator, while the RE201 spring reverb was routed through Universal audio's Cooper Time Cube.
Although many of my Mix Rescue remixes involve a lot of dynamics processing to carefully control balances within complex arrangements, the comparative sparseness of this month's arrangement meant that each instrument had much more room to breathe, so I hardly needed to do any compression to keep the instrument levels in their proper places. This underlines one of the most important principles in mixing: if a track sounds fine without processing, you probably don't need to process it at all. Or in the words of Macy Gray's producer, Darryl Swann: "Taste your food before you salt it.” The other side of the same coin, of course, is that sometimes drastic processing is unavoidable, as with my remix EQ processing this month. There's nothing wrong with this either, as long as you compare what you're doing with related commercial productions, to keep your sights firmly fixed on the desired target sonics.
In a similar vein, there's a lot to be said for having certain tried-and-true global effects available for use in every mix you do, if only to save time setting them up from scratch for every project. But it's also important to recognise that some effects will suit certain styles of music (and, indeed, certain arrangements within a given style) better than others, so there's a danger of misrepresenting the spirit of the music if you apply too much of a cookie-cutter approach, and fight shy of designing more specialised bespoke treatments where they're called for.
Audio Examples On The SOS Web Site
We've placed a number of 'before and after' audio files of this Mix Rescue on the Sound On Sound web site at /sos/nov11/articles/mixrescuemedia.htm. Feel free to download the files, and compare them in your own DAW: you'll learn much more than you could by reading this article alone!
Rescued This Month
 The control room of Paul Wagorn's studio, in which he recorded and mixed the original version of 'Run Run Run'.
This month's Mix Rescue track, 'Run Run Run', is by the Canadian roots reggae band 'Arise', comprising SOS reader Paul Wagorn (bass, keys), Tom Charles (drums), and Hayden Johnson (vocals). Although normally a five-piece group, they were a member short when this song was recorded, and their guitarist on this song, Jordie Edmonds, has also since left the line-up. Paul arranged, recorded, and mixed the whole production himself in his own impressively stocked home studio. Although they've faced a little bit of a struggle gaining respect, as a reggae band hailing from British Columbia, they're putting up a good fight...
Vocal EQ Rides
 Here you can see the vocal fade and EQ automation that was created to keep the lead vocal's tone and balance in the mix more consistent.
As with almost all my mixes, I spent a good chunk of time automating the lead-vocal fader to anchor it solidly in the balance, pulling up nice internal details where they arose, and ensuring that the lyrics remained clear. However, this wasn't the only automation I did on this mix, because I also automated the EQ. Although the rewards of doing this can be pretty small with a lot of vocals, certainly when weighed against the extra time it takes to implement the automation, there are some cases where it really comes into its own.
The most common scenario is where the singer has been moving about while recording. In the first instance, if they vary their distance from a typical cardioid vocal microphone, the directional pickup pattern's inherent proximity-effect bass boost will also vary. This is exactly what I suspect had happened here, because some sections of the song were significantly less full-sounding than others, even for very similar musical phrases. Fortunately, this was quite straightforward to sort out with a few decidels of gentle 300Hz low-frequency shelf EQ at the appropriate moments, because the singer seemed only to have changed his distance to the mic on a few isolated occasions.
The other frequency variations were much more short-term, however, and as a result required more detailed work. My guess is that the singer was turning and/or tilting his head quite a lot while singing, and this was causing a lot of variation in the amount of high end reaching the mic diaphragm; remember that high frequencies are pretty directional, and 'beam' forwards out of the mouth and nose, usually in a slightly downwards direction. This kind of thing is often exacerbated by over-close mic positioning as well. Whatever the cause of the problem, I didn't feel I could really get a decent balance for the vocal without trying to even this out in some way. My solution was to automate two EQ bands throughout the song, one a Q=1.2 peak at 4.2kHz and one a 6.3kHz high shelf. In the end, each of these covered a range of 12dB or so during the song's duration, so you can see that this processing formed a pretty big part of the final remixed vocal sound.
Reader Reactions
 [no caption]
Paul Wagorn: "My first reaction was shock because of how much better the remix sounded than our original version. We thought ours sounded pretty good... until we heard yours! The bass is now under control, the rhythm instruments 'gel' perfectly, and that magic is there in the vocals. I now know that I was being much too conservative with the vocal level, and I love how the backup vocals really add that certain something to the song. Although it's not something that sticks right out unless you listen, the vocal arrangement adds a huge level of professionalism to the sound.
"Most of all, this has been a very inspiring process for me. Mike's mix has definitely pointed me in a better direction, and it's wonderful to hear what someone who really knows his stuff can do. (He's definitely created a problem for himself, though — he's never going to hear the end of me trying to talk him into remixing the rest of our songs!) This has been a tremendous experience, and I cannot thank Mike and Sound On Sound enough!”