Whether you're programming electronic beats, or reinforcing rock drums, there's more to drum layering than meets the ear.

We engineers and producers have been layering all manner of sounds since the early days of levered mixers and analogue tape the width of a small estate car. Drums, vocals, guitar lines, synths, basses... the list goes on: they've all been placed under the 'layering hammer' over the years. While the basic concept may remain the same as ever, the techniques, and the quality of result that everyone expects to hear, have evolved considerably — it's no longer a simple matter of slapping one sound on top of another, because we've grown accustomed to good results and we can hear sloppiness.
"But why layer drum samples at all,” I hear you cry, "when I can easily find the sample I need?” I might be forgiven for agreeing with you. After all, what's the point of rolling your own when people like me pour years of experience and skill into creating sample libraries that do the job for you? Ready-made samples can be exactly what you want, but more often than not they merely come close — and why settle for close when you can achieve precisely what you desire? Even if you use commercial samples as a starting point, it's helpful to know how you can manipulate them to achieve your aims. In short, it's common practice to layer drum samples for these reasons:
- Adds width, depth and overall thickness to a main sound you've chosen.
- Allows for very detailed tonal sculpting.
- Layering frequencies enhances the perceived harmonic (or enharmonic) content of the result.
- Layering small elements from different samples avoids the frequency smearing that's so common with complete-waveform sample layering.
- Sensible layering techniques give you control over frequency mishaps such as summing, cancellation and clashing.
- New, unique tones can be created that otherwise would not be available in stock drum sample libraries.
In this article, I'll reveal the secrets of creating the tightest, most compelling of drum sounds, and whether you're into rock, pop, electro, metal, R'n'B, hip-hop or pan-galactic trance-core folk-garage, the same techniques will apply, and you can make the results as obvious or as subtle as you wish.
Four Letters, One Envelope
If you're not familiar with the letters ADSR acquaint yourself with them now, because they're the fundamental building blocks of sample-layering. Every sound has an 'amplitude envelope', the shape of which is defined by the sound's level mapped over time. You might find it referred to simply as the 'envelope', but note that you'll encounter envelopes elsewhere, such as those which dictate how a filter behaves, which is about frequency over time. We'll delve into frequency later on, but for now I want to focus specifically on manipulating the amplitude envelope.
 Figure 1: Separating out the attack, sustain, decay and release portions of your samples is essential for effective layering.Study Figure 1, below, and you'll see four different portions of the envelope: the section from where the waveform starts to its peak value is called the attack (the A of ADSR); from that peak until the level becomes more constant is the Decay (D); then comes the Sustain (S), which you might loosely describe as the 'body' of a sample, and which keeps playing until the note/sample is released; and that's where you'll find the Release (R), as the sound moves from the Sustain section to its end.
Having identified these stages, we can manipulate them to change a sound quite radically, either by level automation (which can totally reinvent the envelope), or using editing tools to separate out each stage of the envelope, so that their levels can be changed independently. They can even be separated out and combined with stages taken from entirely different samples.
This last technique gives you a huge degree of control over the final sound, and I'd suggest separating the ADSR elements out from samples as a matter of course if you intend to do a lot of drum layering. This inevitably means creating lots of different sample segments, and you'll need to figure out a good way to orgnaise them if they're to be of any use. I've discussed how best to approach this, along with examples, in the 'Doing The Legwork' box.
If you edit the ADSR components into separate regions, you might find that the audio file containing each component is unnecessarily long: if, say, the release element is the only bit you want, it's a waste leaving the entire file intact. This was more of an issue in the days of hardware samplers with limited memory, but it's still relevant. I tend to truncate the file as far as possible without encroaching into the start of the release. This also allows me to move the truncated sample freely, and allows for much more accurate alignment with the primary layer.
Toolkit
For editing your samples, any audio editor with an envelope tool will suffice. Alternatively, you can use the audio editor of your DAW — they all have equivalent tools that are up to the job. For the examples in this article, I've used Reaper and Sound Forge, simply because they're the tools I use every day.
 Figure 2: Reshaping the amplitude envelope of our kick sample, using Sound Forge's Envelope tools.In Figure 2, I've opened a 16-bit, 44.1kHz stereo kick sample in Sound Forge and have selected the amplitude Envelope tool from Reaper's Effects menu (the dark blue section is where I've highlighted in the waveform). Usually, I'll use the whole waveform to perform the reshaping process and will then truncate it to taste.
Reaper's Envelope tool allows you to create as many nodes as desired, which allows for hugely detailed and accurate reshaping if you wish, but just five nodes are sufficient to give us the control we need over the ADSR envelope: nodes 1 and 2 define the attack portion; 2 and 3 the decay; 3 and 4 the sustain; and nodes 4 and 5 the release stage.
Don't disregard any features provided with your DAW's envelope tools (or any editing and reshaping tools!), as it's helpful to customise how the tool operates to suit your needs.
The Fade In and Out parameters are important, as they determine how the element will blend with those on other layers. If the concept of fading is new to you, it's easy to get confused by the bewildering array of fade types, but I'm afraid I can't give you a specific recommendation as to which is best other than to use your ears, because it's not like a crossfade, where you're trying to minimise the impact of the edit. Rather, you need to make a subjective decision, but you should always aim for smooth transitions between elements, rather than abrupt 'cuts'.
Now for the fun bit: try moving the nodes to reshape the amplitude envelope. What you're doing is creating a new shape, and therefore a different sound and feel, for the kick samples. I've used all five nodes to reshape this kick, and in the examples that follow I'll separate out the individual envelope elements to store in my library.
Let's start by singling out the sustain from the kick, and archiving that for future use. Figure 3a: The source sample, plus envelope.
 Figure 3b: the same sample edited to leave only the sustain.
 Figure 3c: the finished kick sample, with unwanted 'dead area' removed. Look at Figures 3a-c. The original kick waveform is shown in the first screen, with the new envelope I created sitting over it. I've moved the nodes so that the attack is completely removed, the body (sustain) is now pronounced and, since the nodes act over the amplitude envelope, I've made the body louder (higher in level). Finally, note that the release is short but smooth.
Tops & Tails
The second screen (Figure 3b) displays the resulting waveform, which I saved as 'kick 1 sustain'. The blue area is dead space that needs removing — and by truncating the beginning and end of the waveform in this way, I'm left with only the sustain and nothing else. It might not sound like much on its own, but it will help me when it comes to aligning the elements from various samples into a single, coherent sample.
After truncating, we need to perform one more step, 'normalising'. The principal reason for normalising drum layers is that we need some degree of consistency of level across our samples, because having a mish-mash of loud and quiet clips in your library will slow you down when you need to use them. Having 'referenced' gain values also helps us when controlling sample-layer gains using faders or dynamics. Normalisation works by analysing the audio file to locate its highest peak. ('Level' can be measured in different ways, and which form of normalisation is best for you is down to taste, but I find that peak normalisation is the best bet for single-shot drum sounds.) If that peak is less than the user-specified maximum level (often, that level will be the 0dbFS 'ceiling' of digital audio, but it could be lower), the software applies gain or attenuation to the file, to bring the peak to the maximum level. The normalisation process will reveal any noise issues in your files, as it inevitably raises the noise floor along with everything else — and it's best to take care of any noise problems now, before you start piling samples on top of each other.
These truncation and normalisation processes are collectively referred to as 'topping and tailing' in the sound-design industry. I am sorry. The topped and tailed sound is shown in Figure 3b. (Audio Examples 01a to 01c illustrate these three stages.)
AUDIO: 01b-kick1sustain.wav
AUDIO: 01c-kick1sustaintandt.wav
To help this idea bed in, let's run through another example. This time we'll separate out the attack portion of a different kick sample. We need to repeat the steps from the previous example, but the envelope we create and the resulting file will look very different, as you can see in Figures 4a and 4b, and hear in Audio Examples 02a and 02b.  Figure 4a: The source file for our second kick drum example.
 Figure 4b: The topped and tailed attack element of kick 2.
Finally (Figures 5a and 5b, and Audio Examples 03a and 03b), let's pick a nice, long release element from another sample. Again, the process is the same, but the result is very different. Note that, when topping and tailing, it always helps to have a release element with a long enough 'tail' that it can be customised to fit over any primary layer.  Figures 5a and 5b: The waveform and release element envelope, and the resulting release element, after editing.
Layering All The Elements
When it comes to combining all three layers to create one composite sound, I suggest you use your DAW rather than a dedicated editor. This way, each layer can sit on its own channel, and each part can easily be moved to taste without the others getting in the way. It's good practice to keep the channel order as per the elements, with the attack on channel one, decay (if there is one) next, then sustain, and then release. Each element can also be subjected to its own dynamics processing, EQ or other treatments. Moreover, once the project is saved, you can return to it and exchange any element for another from a different sample, making this the simplest and most productive 'on the fly' method of layering drums. To align the sample elements, the best tool is your DAW's 'nudge' feature. Setting this to nudge by milliseconds will allow precise and detailed mapping of the different elements. (See Figure 6 and Audio Example 4.) Figure 6: Combining layers on your DAW's 'arrange' page, using the nudge tool for fine adjustments, is easier and more flexible than using a dedciated sample editor.
Frequency: Summing & Phase Cancellation
We don't need to stop there, though, or anywhere near there! The method I adopted for the Stretch That Note instruments, including DruMM, involves the creative use of phase cancellation and M/S (middle and sides) processing. These techniques yield fantastic results, and offer far greater definition than you can achieve with whole-waveform layering, and without presenting the same problems.
There's nothing inherently wrong with complete-waveform layering — if it works and gives you the results you want, then great — but I find that it doesn't do that most of the time, and that it often poses more questions than it provides answers. To understand why, and why my techniques give better results, one first needs to understand the subject of phase, and how sound behaves in terms of summing, masking, clashing and cancellation.
Summing takes place when two identical sounds are combined: the result is quite literally the sum of their amplitudes. Just as in maths, a sum can give you a positive or negative result, or nothing. If you're at all unsure about phase cancellation, try this simple sine-wave exercise. You'll soon understand what I mean, and you'll easily be able to follow the rest of this article:
1. Create a sine wave at -9dB, and then make a duplicate on another channel.
2. Mix the duplicate back in with the original. This will result in a 6dB rise in amplitude.
3. Now create a standard 440Hz dual-mono sine wave (Reaper's Synthesis Tool can do this). By default, the two channels are in phase.
4. Polarity-invert (or 'phase flip') one channel, and sum both channels to mono. The result should be complete silence, but if you mute one channel, you'll be able to hear the other.
What this demonstrates is something we all know: when you add +1 to -1 you get a nice, round zero. In terms of audio waveforms, the peaks cancel the troughs and vice versa, so the result is silence. This is called total phase cancellation. If you boost or attenuate one channel, the degree of reinforcement or cancellation will change, giving you a louder or quieter signal accordingly, due to partial phase cancellation.
Phase In The Real World
It's our job to master this concept, and learn to harness its power to create great-sounding samples! In the real world, though, we're usually dealing with far more complex sources than these simple sine-wave examples, and when combining them the reinforcement and cancellation will be correspondingly more complex — so if you're slap-dash about how you combine your sounds, the results will be unpredictable, to say the least. Sure, you'll get some nice results, but you won't have control over them, and you'll get many sub-standard ones too...
Sometimes, two sounds just don't seem to 'sit' together — something we call clashing — and it can happen for a number of reasons: enharmonic content meeting harmonic content; resonance influencing frequency content; side-banding from sum and difference processing; and so on. I don't want to get into an epic dissertation here, but suffice it to say that if it doesn't sound 'right', then it isn't — and often, phase relationships are the culprit.
However, there are some other complex psychoacoustic phenomena at work, too. Masking takes place when two identical or similar frequencies meet and the amplitude of one is higher than that of the other: the louder frequency hides or masks the quieter one. I'm sure you've encountered this on many occasions when a sound or frequency 'disappears' in the mix. Well, the same thing happens with alarming regularity when you're layering drum samples, simply because you're dealing with so many different frequencies at different amplitudes.
Creative Phase Cancellation
Our ability to control phase relationships means that we can manipulate them not only to correct problems, but to weave our sounds together creatively. I can explain this best via another example.  & 7b (right): Duplicating the secondary layer and inverting its polarity creates a powerful tool for phase manipulation, particularly when combined with your DAW's nudge tool.") Figures 7a (left) & 7b (right): Duplicating the secondary layer and inverting its polarity creates a powerful tool for phase manipulation, particularly when combined with your DAW's nudge tool.
Figures 7a (left) & 7b (right): Duplicating the secondary layer and inverting its polarity creates a powerful tool for phase manipulation, particularly when combined with your DAW's nudge tool.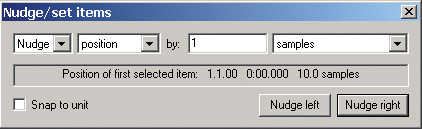
Take a look at figure 7a. Using Reaper again, I've lined up two drum samples on different channels. I'll call them the primary and secondary layers. The primary layer forms the basis for the sound, and we're going to use the secondary layer for creative phase cancelling. I've also made a copy of the secondary layer and placed it on channel three. For this channel, I've inverted the polarity ('flipped the phase', to use the inaccurate common parlance) using the Phase function in Reaper. If channel one is muted and we play channels two and three together, you'll 'hear' silence, as they're in total phase cancellation.
Moving on to the next screen (Figure 7b), I've selected the inverted/flipped channel and moved the drum sample to the right, causing the phase reinforcement and cancellation between the two layers to change. You can start placing this by drag-and-drop but you'll need to make fine adjustments and, again, it's best to use the Nudge tool. This time, though, instead of milliseconds you'll want to set the nudge tool to move in 'samples', as you need to be able to move the clip along in tiny increments.
It's then a case of trial and error, bumping the clip along by a sample or a few samples at a time to find out what results. I can't possibly illustrate all the variations and outcomes, but I have created several audio examples that should give you an idea of the sort of changes you can effect in this way. Nonetheless, I implore you to try this for yourself so you can hear what happens as you make the changes.
Explore the endless possibilities of nudging inverted samples, as you'll get plenty of timbral mileage out of it, but once again you can take things further. For example, try phase-cancellation while applying EQ/filtering — because that way, you can be more selective about which frequencies you want to affect with phase-cancellation and reinforcement, and you'll thus discover yet more new sonic textures.
To do this, insert an EQ (I've used Reaper's bundled ReaEQ) on the inverted channel, while muting the primary-layer channel. You can use this to filter the phased frequencies. Now bring in the primary-layer channel and adjust the EQ on the inverted channel to taste, while nudging the sample. Finally, why not try going heavy and distorted with more radical options? Audio examples 05a-05f are the results of the little exercise I've described above, and show you the different sort of effects this approach can produce.
Bear in mind that there's no point nudging for perfect phase alignment just to lose it all when you add further processing. In short, then, it's a good idea either to introduce effects to your sample layers before you start trying to combine them to taste, or only to add processors and effects to the whole sound that results from combining the layers. See the boxes 'Plug-ins: EQ' and and 'Plug-ins: Compression' for more on this.
Width & M/S
 By adding an EQ into the mix, we're able to define precisely which frequencies are subject to phase-cancellation or reinforcement, and which will emerge from the processing unscathed.
It doesn't take a huge leap of imagination to realise that you can make effective use not only of the frequency spectrum but also of the stereo panorama when combining layers, and there are several ways to do this: using ambience and delay effects on different layers or adding movement and interest via modulation, for example, or using M/S widening techniques.
For my Stretch That Note products, I've made extensive use of the last technique, as it allows me to 'encase' the central primary layer (which remains intact and unaltered) in a wider spread of frequencies from the flipped layers. Consequently, the listener is left with an impression of both solidity and width. I can't give away all my secrets — the calculations involved are quite technical, and involve Audio Jedi manoeuvres — but I can point you in the right direction...
M/S processing allows a stereo sound to be widened or narrowed while leaving the central channel intact, and there are countless plug-ins that allow you to change the M/S balance. If you take things too far, though, the central channel will sound hollowed out, because the middle signal is so low in comparison with the sides. Also, while M/S processing on the flipped channel and secondary layers can have a huge impact on the perception of frequency placement, it can also negate what you've achieved using cancellation techniques — so make sure you experiment until you have the desired balance of all processes. In particular, make sure you listen out for how M/S processing can interact with the nudged offsets I discussed earlier, and can change the phase relationships of flipped samples. If you want to hear what sort of effects can be achieved in this way, there are lots of examples on my Stretch That Note web site, the address of which is in the 'About The Author' box.
One Step Beyond
 Figure 09: Your filtering need not be limited to simple shelves and high/low-pass filters. Try targetting both the fundamental of a sample and the harmonics — using tools such as TB HumRemover, shown here.
If you've followed all the pointers in this article, you should now have a systematic way of selecting and organising your samples; you should know how to manipulate the amplitude envelope, and to extract the various stages from each sound; and how to use and abuse phase cancellation and M/S processing to fashion the sounds you want when combining different sample layers. With these tools and techniques, you can learn to choose and combine the perfect sounds for your track at speed — and I guarantee that the results are going to be a hundred times more impressive than simply laying one sample over another and aligning them.
Believe it or not, you can take things yet further — much further, in fact, as long as you're prepared to roll up your sleeves and put time and effort into experimenting with different techniques. I don't have the space to explain this in great detail, so I'll leave you with another example: if you want to be more precise with the phase relationship between the layers you're combining, you can use the fundamental frequency of the secondary layer and filter out its harmonics. This can yield great results. Of course, this applies to the primary layer too, as pitch, even if buried under noise, is important when using phase cancellation and filtering. Working out precisely which harmonics are affected whilst phase cancelling by degrees, and how the filters affect these harmonics, involves some detailed maths and physics. I've tried to stay away from anything too deep in this respect, as this article is about enjoying the layering process and not flying an F15!
To summarise, then, the creative angle of any form of processing in music technology requires two things: technical knowledge of the processes involved and the instinctive use of your ears/brain to be experimental and creative. Drum layering has its technical directives, but it really comes down to your ears and perception of what you want and can achieve. I hope this brief insight into a few of my production methods has been helpful. Now, go forth and experiment: trust me, you'll enjoy yourself so much and learn a heap in the process.
Mono Or Stereo?
One question that often arises is whether the composite sample you're creating should be saved as a mono or a stereo file. The answer, of course, is "it depends...” Personally, I tend to work in stereo right until the end of the process, as this allows me to use whatever processing I want without the worry of compatibility. Only when I've finished sculpting the sound will I decide whether to keep the result as a stereo or mono file, or both.
There's usually no problem bouncing in stereo, but mono samples might suffer from phase cancellation, particularly where you've used certain stereo widening processes. On the other hand, mono samples take up half the space, which can eventually be beneficial in a vast library; and there's nothing to be gained bouncing to stereo if all the layers and processing are mono. (You can, of course, add stereo interest to such samples in the mix, with send effects or mono-to-stereo insert effects.)
Plug-ins: EQ & Phase
In the main text, I suggest using your DAW to balance, nudge and combine different sample layers to create your new sound, because it's such an easy way to work. But you need to be aware that inserting plug-ins on any individual layer can result in phase carnage! EQ, by its very nature, uses filters, which can be shaped to taste within the limits of the equaliser. Whether boosting or cutting, you need to be wary of phase shifts. For this reason, I recommend using linear-phase EQs, which impart no phase shifts when boosting or cutting. Start with the usual players: low-pass, high-pass and band-pass filters, and a gentle slope of 6dB/octave, and go from there. Try to avoid using very narrow Q settings, as these can lead to harsh resonance, which will wreak havoc in this context. Play it safe and start with a Q factor of one or less. This means you have a wider bandwidth control when cutting or boosting. At the end of the day we're trying to hear, and utilise, the results of the phase-cancelled content, and any form of frequency altering tools will have a distinct impact on the sound. But this doesn't mean you have to be timid. Far from it: start meekly to avoid mistakes, and work from there — once you have control, you can take it as far as you want.
Doing The Legwork: Organising Your Sample Library
 A typical folder structure example from the author's sample library.
Drum layering means searching through vast libraries of samples to find your raw materials, and you'll want to do that quickly — so the sooner you realise the need for some form of structure in your library, the easier and more productive your life will become. At first, it may seem that there's no need for any specific format or directory listings, as the sample count is small and will fit into a 'drums' directory, but I guarantee that as time moves on your library will expand, so you need to plan ahead.
Folder Structures: Creating folders for the key drum elements is a good and obvious start: give kicks, hi-hats and snares their own folders, and at the very least you'll have the basis to develop a hierarchy of folders with more specific categories. Your 'kicks' folder might have subfolders called 'Acoustic Kicks', 'Synthetic Kicks', 'Sampled Kicks' and so on. The same approach can be applied to all drum elements. When dealing with drum layering projects, you need to take this methodology much further, categorising the sounds by various different characteristics.
One of the most important things in shaping a composite drum sound is your ability to control its dynamic envelope, by tweaking the Attack, Decay, Sustain and Release of individual layers. These parameters can be used to refine the structure of your library. For my own work, I tend to have subfolders that house each of these elements (A,D,S and R), and it really does make for much easier mixing and matching of sounds. You can see what I mean from the screen in this box.
Creating similar parallel folders with their own subfolders is a great way to build on this. For instance, I have a folder called 'Effected Drums', which houses drum sounds that I've run through processors and effects. This allows me to keep the dry sounds away from the wet sounds, again giving me speedy access to what I want. In that folder, I'll have subfolders for different effects and sounds. You can add as many subfolders as you want: I'll keep adding and adding, without placing restrictions on myself.
Label-conscious: Your library will expand quickly in this way, and you need to think hard about the names you use for both your folders and your samples. At the very least, it helps to keep the terminology simple and accurate, but after a while, it can become incredibly hard to think up appropriate names without being repetitive (which can be a really soul-destroying feeling!). You need a system.
You could start names with a prefix, based on the sample source: if the sample was taken from recorded material this might be the artist name, and/or the track name; or if a drum sound was from a specific kit or drum machine, you could name it accordingly (for example, 808 bass drum tone). Continuing with the last example, you could name further 808 drum sounds based on their duration, frequency, key location and so on. You'll probably end up with hundreds of names starting with '808 Bass drum tone', but this approach of creating directories with prefixes for genre, type, duration and so on is the method I always adopt nowadays, because it makes the whole layering process more manageable.
Listen & Learn
I've mentioned a number of audio examples throughout this article, and while the article does work on its own, you really need to listen to them to make the most of what you read. You can find them on the SOS web site at the address shown below.
About The Author
Eddie Bazil has enjoyed a long and illustrious career in production and programming, and is the brains behind sample-library/software instrument manufacturers Samplecraze and Stretch That Note. The latter's speciality is multi-layer sample-based instruments, such as DruMM, which employs many of the techniques described in this article (and only a few trade secrets that he's kept under wraps!).
Plug-ins: Compression & Phase
If you're after 'slamming' loudness from your new sample, use a limiter or compressor on the master bus or the channel group, much as you might use a mix-bus compressor, as this will allow all the layers to be processed simultaneously. This is also often done when trying to 'glue' sounds together. However, make sure that you do this from the outset, so that the phase relationships between layers remain consistent. If you want to shape the sound of individual layers, instead use dynamics on individual channels instead — but do be wary of the effect this will have on the phase values of the layer, and thus the way it combines with the other layers.