The new Region groups feature in Pro Tools 7 enables us to work with multiple Regions as though they were a single object. In this month's workshop we also take a look at two new training resources from Digidesign.
A Region group is a collection of any combination of audio and MIDI Regions that looks and acts like a single Region. Region groups can be created on single or multiple adjacent audio, MIDI and Instrument tracks. They can be thought of as 'containers' for Regions, which can be manipulated just like any 'normal' Region. Some edits will affect all the Regions in a group, whereas others, such as Trim, only apply to the boundaries of a Region group.
Region groups are very useful for temporarily 'consolidating' a bunch of Regions that might have been created by the use of Beat Detective, or grouping parts or sections together — for instance, if you have a brass section and want to copy it from one chorus to the next. You could use Consolidate Selection, but the benefits of Region Grouping are that you can ungroup to get back to the individual Regions, and that it works across multiple tracks.
Creating A Region Group
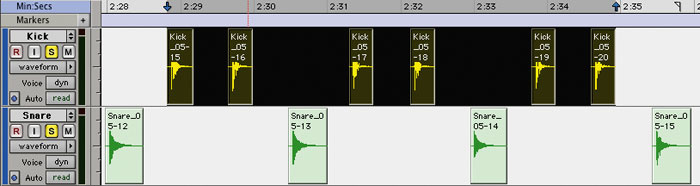
To create a Region group, select a number of Regions — the screen below shows a typical example, where I have used Strip Silence to separate some drum parts into individual hits. The selection can include free space as well, even at the start or end, but remember, whatever the selection, that will become the boundary of the completed Region group.
 A group of Regions becomes a Region group...Select Group from the Region menu in Pro Tools 7 or use the shortcut (Mac: Command+Alt+G, Windows Ctrl+Alt+G). You will see that the selected Regions have now become one Region, with a Region group icon in the bottom left-hand corner of the group. Region groups also appear separately in the Region List, ready to pull out and be reused elsewhere. You can edit a Region group just as you would a normal Region, but be aware that any Regions affected by the edit will remain affected after ungrouping. To ungroup a Region group, select Ungroup from the Region menu or use the shortcut (Mac Command+Alt+U, Windows Ctrl+Alt+U).
Region groups can also be used across multiple tracks as well — in the example opposite, to group together a brass stab. You can also rename Region groups just as you would a normal Region, by double-clicking the Region group with the Grabber tool and changing the name in the dialogue box. What's more, multitrack Region groups can contain any type or combinations of types of Region, including audio, MIDI and Instrument.
Pro Tools Method One DVD
For a while now, Digidesign have been offering a range of official Pro Tools courses delivered through approved training partners. They have now added two options for 'self-paced' training, in the shape of a book and DVD. They have done this by releasing an updated version of the textbook from the official Pro Tools 101 course; the changes make it suitable for stand-alone study, and it includes a DVD-ROM which contains tutorial files and videos, plug-in installers and Pro Tools Sessions. In addition, they offer the Method One DVD, which is available separately, and is also currently included with the Pro Tools Ignition Pack that currently comes with every Pro Tools HD and LE system. I thought I'd take a look at both, so here are my thoughts on the DVD; see the other box in this article for more on the book.
 First, be aware that the DVD is only available in NTSC Region 0 format. I had some difficulty to get my G4 system to play it, but our Panasonic DVD recorder played it fine and our office eMac played it fine too. The contents see composer Eddie Heidenreich, who is a Digidesign-certified Pro Tools Expert Instructor and former Digidesign Product Specialist, offer an overview of core Pro Tools software concepts and techniques covering everything from basic system setup to recording, editing and mixing both audio and MIDI. The DVD shows the keyboard shortcuts for both Windows and Mac systems and has just been updated to cover the Pro Tools 7 software.
After a useful Getting Started section, the course proper includes 22 separate chapters, most with sub-chapters, all of which are directly accessible from the Method One section menu, making it very easy to go and get a refresher on a particular topic. I found Eddie's delivery very easy to follow and the quality of the screen capture is excellent, with carefully created zooms to show specific details when appropriate. He starts from Session Basics like creating tracks and Session setups, all the way through track laying, mixing and mastering and beyond to backup strategies. Eddie goes into enough detail to be clear but not too much so that non-techy folk would lose the plot! He also breaks away from Pro Tools when necessary to talk about more generic issues such as adjusting record levels, turning down the monitor level when plugging in mics and only turning the phantom power on once the mic is plugged in. These are all good working practices that it is well worth getting in the habit of doing from day one.
The DVD as a whole is an excellent introduction to best working practices in a Pro Tools world, and I would recommend it to anyone who hasn't got an Ignition Pack. As someone who has been training Pro Tools users professionally since long before the training and education programme was set up, I am very impressed with the DVD and will consider using parts of it in my training programmes, as it gives a useful introduction and overview in a succinct and non-boring way.
Regrouping Regions
The Regroup menu command enables you undo the last ungroup command, and so regroups the individual Regions back into their previous group. Nothing particularly clever about that, until you realise that this enables you to ungroup a group of Regions, make some changes and then regroup them again and carry on. Even better, if the group is used elsewhere in the Session, when you come to regroup a group of Regions Pro Tools will present you with two choices. The changes you have made can modify all the instances of that Region group in the Session, or make a copy of the Region group and only change that copy.

 Region groups can extend across multiple tracks.Let's take that brass stab group again. First, I'll ungroup it using the Ungroup command from the Region menu. Then I can make the changes to the original individual Regions; in this case, I want to make the note on the second 'Flugel' track the correct length. Originally I faded it early because there was a glitch on that take, but I have now decided to copy another note from another take and paste it in. When I select Regroup from the Region menu or use the shortcut (Mac Command+Alt+R, Windows Ctrl+Alt+R), a dialogue box appears offering two options. Modify will implement the changes to all the instances of that Region group in the Session, while the default option of Copy will make a copy of that Region group and only make the changes to that copy, leaving all the other instances unmodified.
It is possible to make changes to your Session that result in a Region group getting broken or separated. This can happen, for example, if you delete or even hide a track that has Regions on it that contribute to a Region group. A separated Region group has a different icon in the bottom left-hand corner to warn you it is no longer complete. A 'separated' Region group still functions as a single group, but the icon warns that it is somehow incomplete.
Making Changes To Region Groups
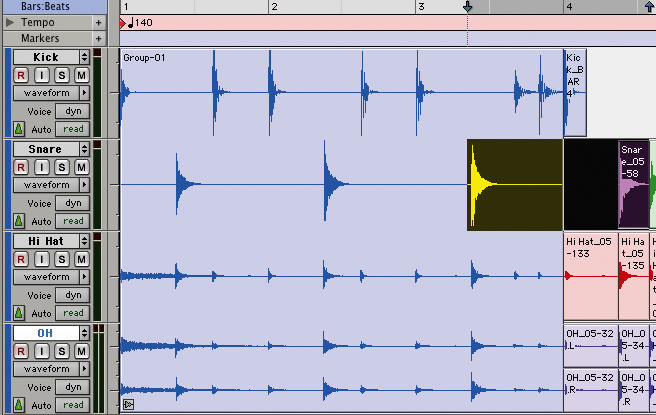
Region groups really do enable all the individual Regions within them to be modified in very detailed ways, without having to ungroup them. For instance, if you have a group of Regions on tick-based tracks and then change the Session tempo, Pro Tools moves all the individual Regions within the group to their correct places, all without you having to ungroup the Region group. Let's take as an example a four-bar drum loop with a tempo of 120bpm, as shown in the screen on the next page. When I change the tempo to 140bpm, notice how all the individual elements in the loop move in time to remain at their correct positions in the loop.

 Individual Regions within a group still respond to changes in tempo.As you can see you can edit a Region group just as you would any other Region using commands such as Copy, Paste, Trim, Mute, Lock and so on. However, there are some differences you should be aware of when working with Region groups. Audiosuite processing, consolidation, recording new audio or using the pencil tool to redraw the waveforms all result in a new Region being created over the Region group. The screens below show a selection on a snare track that includes some of a Region group, before and after I consolidate the selection. The new, consolidated Region has been created fine, but the Snare track has been split out of the Region group; the other areas now have separated Region group icons, but they still function as a Region group! If you don't want this to happen, ungroup the Region group, make the changes and then use the Regroup function.
Just as with normal Regions, you can have crossfades and fades between Region groups, or between a Region group and other normal Regions. Crossfades and fades are implemented only on audio tracks, so if a Region group includes a MIDI track, that track will not be affected by any crossfades or fades. If the Region group is ungrouped, any fades or crossfades with it will be removed, though they will be restored on regrouping the Region group.
Importing & Exporting Region Groups
It is possible to import and export Region groups to and from Sessions, so enabling complex packages of audio and MIDI data to be transferred from Session to Session. Digidesign have created a special file format for Region groups to enable this, with the '.rgrp' extension. Region group 'rgrp' files include the references to all audio files within the Region group, Region names and relative locations in the tracks, fades and crossfades, Region group names and format, all MIDI data present within the Region group, and track names. The group files do not include audio files, automation, plug-ins, track routing, tempo and meter mapping or Region List information.
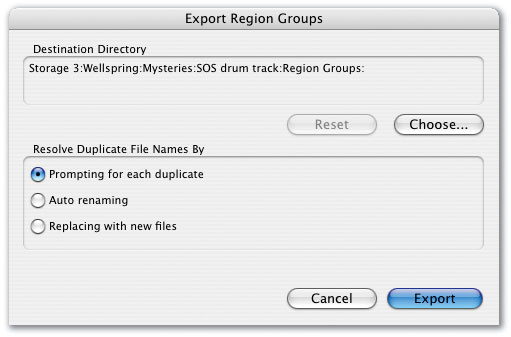
 Consolidating the Snare track within this Region group causes it to be split out of the group.To export a Region group, select it from within the Region List, then from the Region List pop-up menu select Export Region Groups. The Export Region Groups dialogue box then opens. In the top section, you can set where the 'rgrp' file will be saved. Pro Tools defaults to using the Region Group folder in the current Session, but you can place it in a location of your choice anywhere on your system. The bottom section is similar to the 'Export Selected as Files' dialogue box in that it enables you to decide what happens if this process will create duplicate file names. Once you are happy with the settings, click OK and the Region group will be exported to the location of your choice.
Remember, this will export a Region group without any of its associated audio files, just references to their locations. If you want to export a Region group to another drive so you can take the project elsewhere, make sure you have the 'Automatically Copy Files on Import' preference enabled from Operation tab of your Pro Tools preferences.
The best way to import a Region group into your current Session is by dragging and dropping. You can do this by dragging from the Digibase browser, Windows Explorer, or Mac Finder direct to the timeline, track, track list or Region List of your current Session. Exactly what happens next depends on where you drop it.
 Dropping a Region group file onto the timeline or Track List will make Pro Tools create new tracks to take the imported Region group. Dropping onto the Region List will put the Region group in the Region List ready for use when you need it, just like importing audio into the Region List. Dropping onto a track will make Pro Tools check to see if the Region group will 'fit' by checking the track formats of the selected track or tracks and the Region group. If they match, the Region group will be imported and placed at the point you selected. If they don't the import won't happen — as when you try to drag a mono Region onto a stereo track, Pro Tools won't let you!
All in all, the Region group feature is a really powerful concept that will find many uses in both music and post-production applications. Go and enjoy.
Pro Tools 101 Official Courseware
This book is a serious training guide, coming in at just under 400 pages, and provides a comprehensive approach to learning the fundamentals of Pro Tools HD, LE and M-Powered systems. Through the course, students can learn to build Sessions that include multitrack recordings of live instruments, MIDI sequences, software synthesizers and samplers, and audio looping with REX or Acid files. Using hands-on tutorials, students can develop essential techniques for recording, editing and mixing. This is the third edition of the book, which has recently been updated to cover Pro Tools 7, but it is the first time it has been made available separately from taking the 101 course at an approved training centre.
 The book lists a reasonable number of prerequisites for the course, such as having a basic understanding of operating a computer and recording skills like mic placement and MIDI sequencing. The course is laid out in four parts. The first handles background information relevant to Pro Tools and audio production before moving on to concepts like the basics of digital audio, Pro Tools hardware configurations, Session file formats and the user interface. Part two looks at working with Sessions, covering the techniques needed to accomplish the common audio production tasks such as creating Sessions, making and navigating through audio and MIDI recordings, editing and mixing. Part three revisits the same areas but in a much more hands-on style, using two projects that are on the DVD-ROM as tutorials. Part three has been designed to enable users to work through it without having first completed part two, using hands-on experience to learn but with part two available as reference.
The two project tutorial Sessions are excellent. There is a music project, which is a song that comes with 18 tracks in rough form. To complete this project you have to add audio and instrument tracks, add drums using Digidesign's new free Xpand! plug-in, import lead vocals, and add loops and effects to finish the mix. The second tutorial Session is a 'post' project which consists of a 45-second commercial that comes with 20 tracks in rough form. To complete this project you have to create and record a voiceover track, import a Quicktime movie, additional music and sound effects, replace the music bed and improve the quality of some Regions before adding effects to complete the mix.
Part four handles the course completion and can only be completed when the course is undertaken in an official Pro Tools training centre. Students would be given the opportunity to work on additional projects using different Pro Tools hardware. They then move on to an exam, and if successful, receive a completion certificate. So, in the stand-alone book, part four simply makes reference to this and no more. However, if you would like to test your knowledge, there is a 101 on-line quiz you can take if you have worked through this course on your own.
This is definitely a proper textbook, and goes into much more technical detail than the Method One DVD. However, it seems to me that the course would be much more effective if you used the DVD in conjunction with the 101 course rather than as a precursor to it, as the DVD shows how things operate visually together with commentary — a picture paints a thousand words, and all that.
For me, the centrepieces of this course are the two tutorial Sessions, which have been very cleverly designed to take you through a wide range of scenarios and problems and walk you through possible solutions. Add to that the comprehensive theory section and you have an excellent course you can work through at your own pace. You can, of course, use this course and the textbook as a reference to turn to when you are not sure how to do a particular task, but for me, you get the most out of the course if you work your way through it as it is laid out in the book. The obvious disadvantages of using this book on its own compared to attending a course are that you don't get an instructor to guide you through and you can't get the course certificate at the end, but at £29.99 it is excellent value for money.
For more information on the Digidesign Training & Education Programme go to http://training.digidesign.com.