Digital Performer has retained the same basic look and feel from its introduction right up to version 5.13 - but no more. The new DP6 looks almost like a different application, and conforms much more to OS X standards, so this month we bring you the first-look guide to what's new.
 Ever since I started using Digital Performer, back in the days of version 2.6, which ran in OS 9 on my old bright-blue 450MHz Power Mac G3 (long since departed), I've taken for granted its non-standard features — the strange buttons for closing and expanding windows, the idiosyncratic title-bar functions and mini-menus, and the way similar functions could be presented in quite different ways in different editing windows. And let's not forget that grey look, punctuated with various bright colours here and there.
So on booting up DP6 for the first time last week, and even though I'd already seen screenshots and demos, I was probably as surprised as anyone by exactly how much had happened to my sequencer. It was bound to happen, though. The old look was outdated, and presented quite a learning curve to anyone who'd begun their Mac experience in the squeaky-clean, standards-based world of OS X. But what's great is that DP6 has absolutely not reinvented the wheel — it's nothing like the transition from Cubase VST to SX, for example — and once you've learned how old functions have been transferred to the new scheme it'll be business as usual. Except that everything now feels that much slicker! We'll be bringing you a DP6 review very soon, but in the meantime, DP users can get an upgrade head-start by reading on...
Plus Ça change...
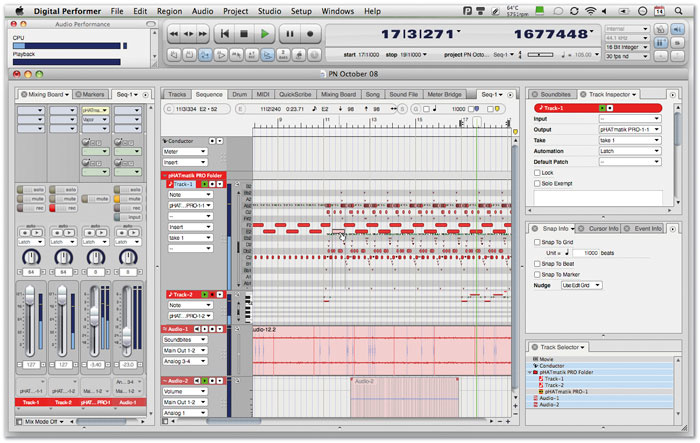
As this month's header graphic shows, there are very noticeable cosmetic changes in DP6, some of which are more than skin deep. Look at the title bar of the consolidated window, for example; there's the familiar OS X 'traffic lights', but none of DP5's non-standard stuff. The Control Panel is very different, too, with a new layout and none of the collapsible 'drawers' of versions past, and no buttons to open different editing windows. But it does bring back permanent confirmation of sample rate and bit depth — hooray!
What else? Windows appearing in the Consolidated Window's two side-bars have 'tab' tops, and more than one can appear in each side-bar cell. Also check out the Track Selector at bottom right. Whereas this was previously always attached to the sides of editing windows or the Mixing Board, now it can appear in its own side-bar cell, or even be popped out into its own window.
Then there are specific cosmetic changes. In the Sequence Editor and other editing windows, cigar-shaped areas near the top, labelled C, E, S and G, present the information that previously appeared in the so-called 'event info bar', relating to Cursor position, Event data, Selection and editing Grid snap. The Tracks Overview window now has vertical zoom buttons at its bottom right and its tracks can now be resized (although not individually, sadly), and in the Tools palette there's a new Comp tool. (See the 'Comp' section for an introduction to this great new feature.)
Just as important are the behind-the-scenes changes. Open up the Preferences window (by hitting Apple-comma), select Audio Options, and you'll see that you're not obliged to record audio in mono or split Sound Designer II format, although you can if you want to. Interleaved Broadcast WAV (BWF) is now the default, with AIFF as a further option, and BWF files can be stamped with author, copyright and organisation code information. Moving to the Audio Plug-ins preference pane, you can configure plug-in sets and choose how and when DP6 uses its virtual instrument and audio plug-in pre-rendering capabilities, in the 'Plug-in real-time preference' section. Audio Units plug-ins are now hosted better in DP6 and support ramp automation for the first time, and Access Virus TI synths are compatible at last.
Having covered the bulk of the changes, let's dive right in to DP6 for an 'updater's guide'. We'll assume that Consolidated Window Editing — which allows editors and other information windows to appear as cells in one über-window — is enabled. This should be the case by default, but it can be enabled in the Consolidated Windows pane of DP's Preferences. You get to those via the Digital Performer menu, or the Apple-comma keyboard shortcut.
Basics
![]() The DP5 Close, Collapse Into Dock and Resize Window title-bar buttons (right) have been replaced with OS x standard 'traffic light' buttons.
The DP5 Close, Collapse Into Dock and Resize Window title-bar buttons (right) have been replaced with OS x standard 'traffic light' buttons. DP5's Audible Mode, Solo Mode and Auto Scroll buttons from the title-bar have been moved into the Control Panel of DP6.This should be intuitive enough, but the old DP's Close (window), Collapse Into Dock (minimise) and Resize Window (expand) title-bar buttons are replaced with OS X's 'traffic lights'. The decidedly non-standard 'Push Window to Back' has gone for ever, with no replacement.
Three more title-bar buttons with specific features have gone, with their functionality moved elsewhere. Both the Audible Mode and Solo Mode toggles are now at the far right of the Control Panel, along with the Auto Scroll button, which appeared in several editing windows.
Meanwhile, the Automatic Conversion toggle, which very few people needed such prominent access to, has rightly been moved into the Automatic Conversions pane in DP's Preferences window. Other title-bar buttons of note that have inevitably disappeared include Automation Snapshot (a little camera icon, which has been replaced with a Region menu command) and Insert (the capital letter 'l' that appeared in the Sequence Editor, Event List and Soundbites windows). I'll take a look at the new arrangements for these functions in future months.
News In Brief
- Audioease (www.audioease.com) have posted a few updates of their popular convolution reverb, Altiverb, in recent months, providing bug fixes and ongoing OS 10.5 compatibility. Meanwhile, their latest version of VST Wrapper is not fully compatible with DP6, and is still Power PC-only, but watch for an update in the coming months. There's one in the pipeline, apparently.
- Ohmforce have also updated their entire line of plug-ins, with improved stability and lower CPU use in DP the result. Log into your user area at www.ohmforce.com to grab the new versions.
- The UVI Workstation virtual instrument I mentioned a couple of months back continues to develop as a public beta. The interest here is that it's developed by the same company that is behind all of MOTU's virtual instruments, and seems to have the makings of a great software ROMpler. It's bundled with DP6, and is perhaps destined to become DP's equivalent of Logic Studio's EXSP24. Grab the installer and 415MB demo soundbank at www.uvisoundsource.com.
Consolidated Window
The Consolidated Window title bar in DP5 had even more of those little buttons. These have also gone, and there are various new techniques for managing the layout of the window and the behaviour of cells within it.

 Double-clicking in an empty part of the tab bar, to the right of a cell's 'tab top', pops the cell out of the Consolidated Window
 Click the space right of the tab to 'pop' the cell out.First off, the Consolidated Window mini-menu has gone, and the window-related commands it contained are now mostly in DP6's main Windows menu. There's also no further need for the left- and right-positioned Show/Hide Sidebar toggles, because in DP6 you either just drag the left or right sidebar handles (which are shown by the presence of a little dot at half height) or simply double-click them. This is one of the less obvious new techniques, but when you get used to it it's hard to imagine how it ever could have been different!
If you want a new cell in the main central section of the Consolidated Window (and the sidebars too, incidentally), you now drag a divider handle up from the bottom, whereas in DP5 you had to drag down from the top, which is rather subtle! Less subtle, though — even downright drastic — are the changes to the way you pop windows in and out of the Consolidated Window. DP5's confusing title-bar arrow buttons are now a thing of the past, and instead you've got three choices: a command from the main Window menu, its associated keyboard shortcut, or a mouse double-click in the appropriate place. Let's look at a common situation:
1. You're working on your sequence and you call up the Mixing Board, hitting the shift-M shortcut, but it opens in a sidebar. You actually need to pop it out of the Consolidated Window so you can resize it to full size and drop it behind other windows when necessary.
2. Make sure the Mixing Board has 'focus' inside the Consolidated Window: click on it and that should be confirmed by the area just above the main part of the window (the 'tab bar') having a darker gradient fill.
3. Now do any of the following: choose Windows menu / Pop Out of Consolidated Window, hit the Ctrl-1 keyboard shortcut, or (quickest of all) double-click the empty area of the tab bar to the right of the Mixing Board's 'tab-top'. If there are other tabs to the right of it, click the empty tab-bar space (which is sometimes very small) to the right of them.
4. With the Mixing Board popped out, just click its green 'traffic-light' button to resize, or drag its lower-right drag handle as usual.
Popping windows back into the Consolidated Window is also easy. In the case of our recently popped-out Mixing Board, we'd either choose 'Pop Into Consolidated Window' from the Windows menu, use the Ctrl-1 shortcut again, or just double-click in the same place — on an empty bit of that gradient fill. It's worth noting that popped-out windows can be made to take up less room on the screen by clicking their title-bar Expand/Collapse button. When you do this, their tabs disappear. If you want them back, just click the button once more.
More About Tabs
The whole tabs thing is completely new in DP6, and it not only complements and enhances the 'feel' of the Consolidated Window, but manages to retain the mini-menu and so-called 'window target' functionality of previous DP versions. We've already seen how to pop windows in and out by double-clicking in their tab bars, but here's a guide to the other essentials.
![]() Often a 'Window Target' menu lurks next to a mini-menu pop-up in a separate tab, next to the main editing window tabs.Let's start by looking at the main, central section of the Consolidated Window. Here the window choices are pre-set, and what were buttons in DP5 that switched between Tracks Overview, Sequence Editor, Drum Editor and so on in are now tabs in DP6 that fulfill exactly the same role (see top screen overleaf). No problem. But there's an extra tab too, at far right. In several editing windows this has a dual function. The main bit of it is the 'Window Target menu' that lets you switch between sequences in your project, and the little circled triangle is the mini-menu that in DP5 was in the cell's title bar. It's slightly different in other editors (for example, in the MIDI Graphic Editor you choose MIDI tracks instead of sequences), but it always makes sense in context.
Often a 'Window Target' menu lurks next to a mini-menu pop-up in a separate tab, next to the main editing window tabs.Let's start by looking at the main, central section of the Consolidated Window. Here the window choices are pre-set, and what were buttons in DP5 that switched between Tracks Overview, Sequence Editor, Drum Editor and so on in are now tabs in DP6 that fulfill exactly the same role (see top screen overleaf). No problem. But there's an extra tab too, at far right. In several editing windows this has a dual function. The main bit of it is the 'Window Target menu' that lets you switch between sequences in your project, and the little circled triangle is the mini-menu that in DP5 was in the cell's title bar. It's slightly different in other editors (for example, in the MIDI Graphic Editor you choose MIDI tracks instead of sequences), but it always makes sense in context.
 You decide how many windows are open in sidebar cells, and switch between them with tabs. A double-chevron tab allows access to windows when not all their tabs fit into the space available.In sidebar cells the tabs are not preset, and now clicking on a tab gives you a pop-up menu via which you can choose from all the available editing windows — it's called the Window Selector. There's also an 'Add Tab' command at the top of the pop-up list, and if you choose it you'll launch a new tab (and window) in the same Consolidated Window cell. You then switch between tabs by clicking on them, and grey 'close' icons to the left of the tab names allow you to close them. And just as in the main, central area cells, there's always a far-right mini-menu tab. If there are so many windows open in a cell that their tabs can't be displayed, DP instead shows you a tab with a double chevron. Click on that and you gain access to the hidden tabs.
Selectors
 if you wish. The old DP5 'three rectangle' button shown here is found elsewhere.") In DP6 you can open one Track Selector for all edit windows in a side-bar cell, from where it can be popped out (as here) if you wish. The old DP5 'three rectangle' button shown here is found elsewhere.Drawing to a close this first look at DP6's new environment, I felt I had to mention the revised behaviour of the Track Selector. In DP5 you'd open it using a little title-bar button resembling three abutting rectangles, but this has, of course, disappeared in DP6. Instead, it's now a side-bar cell option, which you can choose from a Window Selector pop-up menu. The great thing about this is that you can now just keep one open for your entire project, and it'll update as you switch between editing windows. If you like, it can be popped out, too, and perhaps put on a second monitor or tucked away in the corner of your screen somewhere. However, the old behaviour, whereby individual track selectors would attach to some editing windows, the Mixing Board, and so on, is still available — just look for the same 'three rectangles' button, which can now always be found in the bottom left of the window or cell of the editor you're working in. A new option in the 'Edit Windows' pane of DP's Preferences controls the circumstances in which you end up with a separate or 'attached' Track Selector in different editing situations.
In DP6 you can open one Track Selector for all edit windows in a side-bar cell, from where it can be popped out (as here) if you wish. The old DP5 'three rectangle' button shown here is found elsewhere.Drawing to a close this first look at DP6's new environment, I felt I had to mention the revised behaviour of the Track Selector. In DP5 you'd open it using a little title-bar button resembling three abutting rectangles, but this has, of course, disappeared in DP6. Instead, it's now a side-bar cell option, which you can choose from a Window Selector pop-up menu. The great thing about this is that you can now just keep one open for your entire project, and it'll update as you switch between editing windows. If you like, it can be popped out, too, and perhaps put on a second monitor or tucked away in the corner of your screen somewhere. However, the old behaviour, whereby individual track selectors would attach to some editing windows, the Mixing Board, and so on, is still available — just look for the same 'three rectangles' button, which can now always be found in the bottom left of the window or cell of the editor you're working in. A new option in the 'Edit Windows' pane of DP's Preferences controls the circumstances in which you end up with a separate or 'attached' Track Selector in different editing situations.
Carry On Comping
 Two of the most exciting additions in DP6 are the Comp Tool and the new track Take features. The way this has been implemented is very deep, and very flexible, but more often than not we just need to be able to see (and hear) all the alternative takes that have just been laid down for a section of a track, and then produce a quick comp of the best bits. It's very easy to do.
1. Working in the Sequence Editor, first of all gather your alternative takes for a track. You could do this manually, by recording as normal, choosing New Take from the track's Take menu, then rewinding and recording again, repeating as many times as needed. You could also use Memory Cycle or POLAR to do it for you, as I described in last month's Performer workshop.
2. With the takes in place, choose Show Takes, again from the Takes pop-up menu. This fans out all the takes beneath your track, and replaces the main track lane with audio from whatever take was last selected, renaming that as take 'Comp 1'.
3. Now have a listen to your takes, with a view to finding the best bits of each. Try clicking their little 'S' (Solo) buttons (which aren't solos in the conventional sense, but temporarily place the individual take into the Comp track so it can be auditioned), to isolate them one at a time during playback.
4. With the decision about the best bits roughly made, disengage any 'S' buttons, and make sure the Tools palette is open. Hit shift-O to open it if not. Select the last tool, the Comp tool.
5. With the Comp tool, drag over individual regions of takes that you'd like to form the final comp. Feel free to experiment, drag left to right or right to left, making as many regions as you like — you can't go wrong. As you do this you'll see the new Comp assembling itself in the main track lane, as in the screen above. You can audition it at any time, even as you work.
6. When you're happy, that's it — job done! If you like, you can now choose Hide Takes from the comp track's Take menu. But at any time you can Show Takes once more, to do more comping.
As I mentioned, there's a lot more to the new Takes features and Comp tool, and I'll be revisiting this topic in the coming months.