Get into the groove with the new tools in Live 8.
, and the Groove Pool (bottom left).") Groove files in the Library (top left), and the Groove Pool (bottom left).
Groove files in the Library (top left), and the Groove Pool (bottom left).
Prior to version 8, Live had rather limited groove-quantisation abilities: you could simply choose a groove for each Clip from a short list of presets, and set a global groove amount. Live 8 has remedied this situation, adding much more powerful and comprehensive groove features, all accessed in an elegant and typically Abletonesque fashion.
Finding The Groove
 In addition to drag‑and‑drop, grooves can be added or removed in the Clip View.
Grooves can either be chosen from Live's Library or extracted from MIDI or audio Clips in your set. In the screen on the right, Live's file browser is pointing at the Grooves folder in the Library. The quickest way to navigate to this directory is to click the pop‑up menu at the top of the Browser and choose Library, then open Grooves from the list. Grooves are stored as files with the extension .AGR. The Library has a large range of presets, including all the usual suspects extracted from other gear, and some genre‑based original material.
To apply one of the library grooves, simply drag it straight from the browser onto a Clip. The characteristics of the groove will immediately be heard on any MIDI Clip, or any audio Clip that has Warp enabled. Grooves that are active in the set are listed in the Groove Pool (shown below the Browser in the screen). Any groove in the pool can also be applied to a Clip via the Clip Information section at the left of the Clip View (as in the screen below). Although not as immediate as dragging and dropping, this approach is handy for applying a groove to multiple Clips at once. To do this, drag a groove to the Groove Pool, then select all the Clips you wish to apply it to and choose the groove in the Clip View.
 A MIDI drum loop played with some groove, which can be extracted.The Groove Pool is also where you adjust the parameters associated with a groove. The Base setting determines the grid against which the groove is referenced, so a 16th‑based groove measures timing variations from straight 16th notes, and quantises accordingly. The Quantise setting is not the amount of groove quantise, it's actually a grid pre‑quantise, which reduces timing variations in a Clip before applying the timing of the groove according to the amount set in the Timing field.
The Random percentage allows you to introduce random variation into the timing of a Clip. This is applied differently to each Clip that uses the groove, allowing you generally to 'loosen up' the feel of a song. The Velocity amount changes the dynamics of the performance, if any velocity variation is contained in the groove file. Finally, there is a separate Amount field at the top of the Groove Pool that adjusts all grooves at once, and is equivalent to the old global groove depth control.
Capturing The Feel
 A hi‑hat audio loop, before and after committing a groove.
Using groove presets is only half the picture. Live 8 also allows you to extract the groove (both in terms of timing variation and dynamics) of recorded/imported MIDI and audio Clips, so that you can apply it to other Clips. This is especially powerful if you mix sampled loops together, as you can conform them all to a common musical feel. Once again, it's charmingly simple to achieve: simply drag any MIDI or audio Clip to the Groove Pool. A new groove will appear, bearing the name of the Clip. This captured groove can then be applied to other Clips by dragging and dropping from the Pool, or by selection in the Clip View.
Let's look at an example. The MIDI Clip in the screen above is a drum loop I played in (the Clip called Drum Loop in the first screen), which is triggering a Drum Rack. The loop is deliberately played with some swing in the hats, and snare hits that fall behind the beat. I've then added an audio loop from my library, consisting of a hi‑hat playing a bar of straight 16th notes (the topmost of the two screens to the right). The two don't gel, so I've dragged the MIDI Clip to the Groove Pool, then dragged the new groove to the hi‑hat Clip. Instantly, the hi‑hats lock in with my original loop's timing and dynamics.
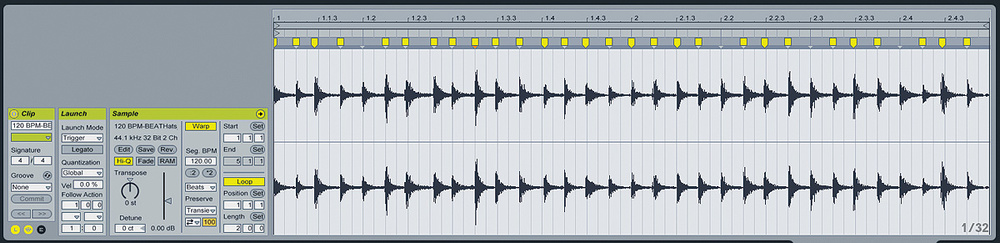 Note in the picture that Live hasn't added Warp Markers at this point or moved the audio waveform; it's just changing the timing in real‑time. However, Warp does have to be enabled for audio Clips to be affected by groove. All Clips now have a Commit button in their Clip View, which allows you to write the effects of any groove quantising to the Clip. This yields the same results as using the regular Quantise function: for MIDI Clips, the notes are moved, while for audio Clips, Warp Markers are generated and the waveform is stretched around, as you can see in the lower of the two screenshots below.
One slightly awkward consequence of the way in which the Groove Pool works is that there's no straightforward way to adjust quantisation parameters separately on different tracks or Clips. One might expect additional controls in the Clip View to allow for varying the amount of quantisation to be applied. If you need to have the same groove applied to two Clips, but with differing intensities, the trick is to create a new copy of the groove in the Pool. To do this, right‑click on the groove and choose Duplicate, then drag the new copy of the groove to the Clip(s) that will use it. You can now change the parameters in the copied groove without affecting the clips that use the original.
Real‑time Grid Quantise
 A classic MPC swing template, as viewed in a MIDI track.
As well as adding groove or 'feel' to Clips, the new Groove feature offers a highly useful alternative way to apply standard grid quantisation to Clips. Live's traditional workflow for tightening a performance (as opposed to adding groove) is to select notes or audio, then invoke the Quantise command. This operates destructively on MIDI Clips by moving the notes, and by adding Warp markers to audio Clips. The Groove Pool offers a more refined solution. The Groove library contains a folder called Quantise, which stores a number of groove files representing straight notes on a grid. They are groove files with no groove. Applying one of these to a Clip will quantise the notes towards the grid. This has two advantages over using the Edit > Quantise command. Firstly, it's non‑destructive, because it can be removed or adjusted at any time, Secondly, you can adjust the amount of quantisation in real time while listening to the results — a much more Live way of working.
What's In A Groove?
Most of the time, the results of a groove speak for themselves. However, it can be interesting and useful to see what makes up a groove template (for example, to check whether a groove has any velocity information), and there may even be times when you want to edit a groove. The data in a groove file is basically the same as a MIDI clip. To view a groove, you can just drag its .AGR file onto a MIDI track. You will see a series of notes at C1. The positions of these notes relative to the groove's base grid, and their velocities, determine the timing and dynamics of the groove.
The screen below is part of the MPC16 Swing‑67 groove file on a MIDI track. This Clip does a good job of showing what is actually meant by 'swing'. Every second 16th note (this is a 16th-based swing) is pushed late. The amount of swing is determined by how late these notes are. The '67 percent' groove is interesting because it's the point where the swung notes give a straight triplet feel; if you change the grid view to triplets you'll see that all the notes are on the grid.