Handheld shots can look great, but too much camera shake can give the viewer a headache! We take a look at three budget rigs for keeping shots steady, and find out whether electronic image stabilisation can help.
There are a variety of ways to mount a video camera when filming. Of course, the easiest filming technique involves mounting the camera on a tripod, setting up the focus and exposure and letting it run! The problem with this shooting method is that it isn't easy to transport and requires a fair bit of space, which might not be available at a gig in a small pub, or a sports event. If space and mobility are important, the best option is to go handheld.
In addition to practical considerations, certain types of material just look more interesting when there's some camera movement. Handheld shooting just tends to add a bit of life to the subject matter! But you need to avoid excessive amounts of camera movement, which will immediately make the viewer feel they're watching an amateur video filmed on a home video camera. No problem with that if you're going for the Blair Witch Project effect, but otherwise it can be annoying.
If your camera of choice happens to be fairly big, you've got a significant advantage, as you'll be able to balance it on your shoulder or hold it using the top handle (with cameras such as the Canon XHG1). For those of us that shoot with DSLRs (for example, the Nikon D300s or Canon 7D) or smaller, more compact video cameras (such as the Canon HV30), it will be much more difficult to keep a steady picture, due to the small form‑factor. DSLRs are the most difficult to work with, as the DSLR shape doesn't lend itself well at all to handheld filming, and too much movement can enhance the unpleasant 'jello' effect caused by the rolling shutter. But since, at the time of writing, they're the only way to achieve 'cinematic' footage on a budget, it can be worth persisting.
With all this in mind, let's consider some of the budget handheld setups and rigs that can help, as well as covering image stabilistation methods built into the camera or lens. Although my focus is on DSLR cinematography, many of the techniques and products discussed can be used with other camera types.
Shoulder Mount
A good shoulder mount is one of the most useful accessories for anyone shooting with small video cameras and DSLRs. The shape and size of smaller cameras doesn't lend itself well to stable handheld shooting, as they are much too small to be easily balanced on the shoulder or cradled against the body, unlike many of the larger pro or semi‑pro cameras. Also, most use CMOS sensors, which can suffer from the 'jello' effect caused by a rolling shutter, which I mentioned earlier. CMOS sensors record images by scanning across the frame from top to bottom at high speed, rather than capturing each frame as a single snapshot, as does a CCD sensor. This can cause problems when filming fast‑moving objects, or if the camera is subject to significant vibration or movement, which will make the picture judder in an unnatural way.
Shoulder-mount solutions add additional points of contact with the camera and allow the user to maintain better stability. They range in price from budget options costing around £50$80 to those costing several thousand. I'm going to limit my discussion to three affordable options that represent different approaches to the problem, are easy to use and require minimal setup and configuration. These are just three possible options, and there are lots of others on the market, with more appearing on a weekly basis. It pays to do plenty of online research before making a purchase!
Option One: Hague
One of the cheapest and simplest options I've found is the Hague Cam-Shoulder Mount, which costs only £49. It's a very basic design that certainly isn't going to win any awards for innovation or looks! It's comprised of two sections: a vertical piece with handle and camera mounting plate, and a horizontal and curved section that goes over the shoulder. The two pieces can be separated, and the kit is small enough to fit in a medium-sized backpack. The vertical bar can be moved up and down and closer or further away from the user, making it possible to use with a DSLR whether or not you're using an LCD viewfinder (see 'LCD Viewfinders' box).
It's well made and there really isn't much that can go wrong with a design like this, plus it's very easy to use and takes about 30 seconds to set up. There are two limitations: there's no option for mounting additional accessories, and it doesn't have a counterbalance weight at the back, making it tiring to use for long periods of time. The lack of options for mounting accessories isn't a major negative in this price range, as this device is not really designed to take a significant amount of extra weight anyway. To make it more comfortable to use for long periods of time I'd recommend the addition of a counterbalance weight, which will help it rest on the shoulder without having to be pulled constantly. The Cam Shoulder Mount isn't an elegant solution but it's small and makes handheld shooting a lot easier. Head to http://www.cameragrip.co.uk for more details and to purchase.
Option Two: Gorillapod
 The Hague Cam‑Shoulder Mount is one of their least expensive options, but still provides extra stability.The second budget mounting option is based on the Gorillapod, a popular, very flexible mini tripod. The Gorillapod mini tripods are made entirely of ball and socket joints, making the legs very flexible, and they can be attached to poles, trees, cars — just about anything, really! It's the flexibility that makes them good for improvised shoulder mounts with the addition of a tripod 'ball head'. For best results, I'd recommend the Gorillapod Focus version (£109), which can support up to 5kg of equipment. If your budget is limited, the SLR Zoom (£46) does also work, but only supports 3kg, and the legs aren't quite as rigid. You will also need to budget for a 'ball head' (an articulating top section) which will cost in the region of £30 to £60, depending on brand and model.
There are two ways to use the Gorillapod: either as a shotgun-style mount pressed against the shoulder, or with one leg either side of the neck and the third used as a handle. Either way works well and ads an extra point of contact, but it can be a bit difficult to position correctly for use with a viewfinder in either position.
For the total price, you get both a mini flexible tripod and a simple but effective shoulder mount that will easily fit into a small backpack and is lightweight and discreet. I've used mine quite often as a backup option, as it fits neatly into my camera backpack.
Option Three: Indisystem
 By using a Gorillapod and a ball‑head, a simple and lightweight stabiliser can be created.The third budget mounting solution I've used is the most expensive of the three, but the design is similar to larger, professional-style rigs sold by companies such as Zacuto and Redrock. These systems are quite big, feature rails for mounting accessories, and can also host counterbalance weights on the shoulder section. They tend to be pricey and are aimed at the top end of the market, but there are some more reasonably priced options from smaller online companies.
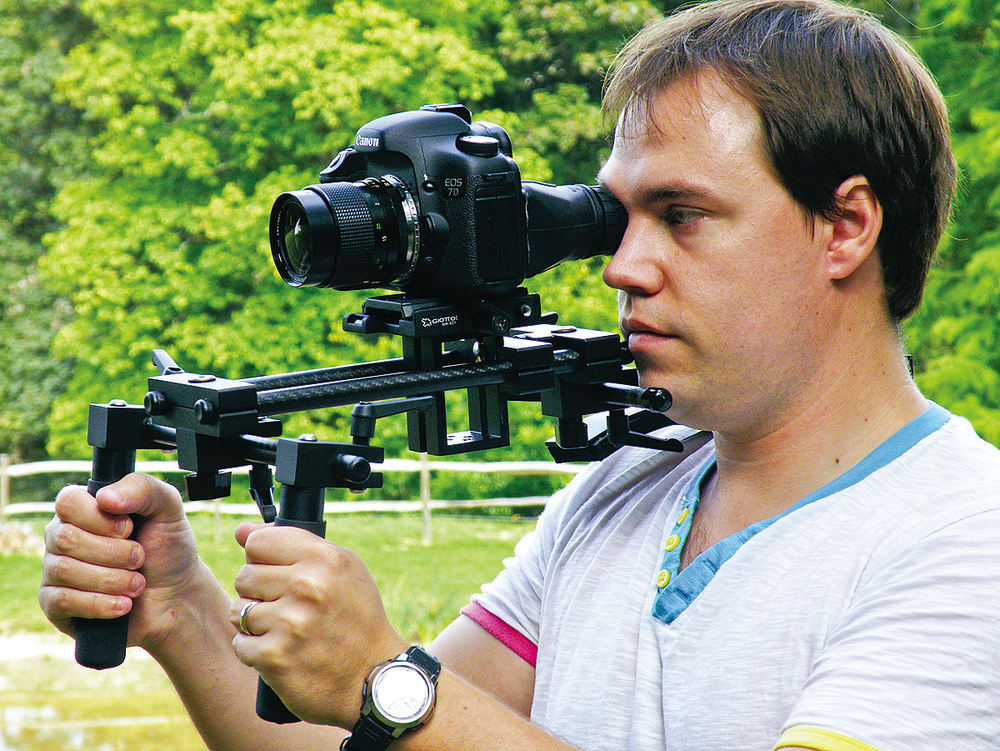
The US based Indisystem make a variety of products including shoulder-mount systems for different camera types. Perhaps the best thing about their shoulder mounts is that they are all based around carbon-fibre rails that can be removed and mounted on a tripod. The rail length differs depending on the particular shoulder mount, but the rails are perfect for mounting a follow focus or matte box.
The test model sent to me was the Ultracompact DI, which is designed with the DSLR shooter in mind and is sold for $399 (around £259) from their web site. It isn't their cheapest option, so if your budget is limited they sell systems for as little as $269 (around £175). At this time they don't have a UK/EU distributor, so purchasing from the US is the only option, but this is likely to change. The Ultracompact DI is based around a set of 12‑inch rails onto which the camera can be mounted. The mounting can be raised and lowered and its position on the rails moved forwards or backwards to suit your requirements.
At the front of the rails, a cross bar is mounted at right angles, and to that two handles are attached. At the back of the rails, two rods are attached with a curved shoulder pad, a weight and a mounting plate, which can be used to attach various accessories, such as an audio recorder. Of course, you would need an assistant or friend to stand behind you in order to operate anything mounted to this plate! Every component that is attached to another can be adjusted, and the whole thing folds down into a fairly neat and compact square. It's a heavy rig, weighing just under eight pounds, but it's well balanced and easy to use. The shoulder pad is very comfortable, and the counterbalance weight helps to ensure that the shoulder‑pad stays firmly placed where it should, on the shoulder.
It's very easy to shoot nice, stable video with this rig, due to its size and weight. I love the flexibility of the system, and being able to remove the rail section for tripod mounting is an excellent idea. This means that you can attach a follow focus and matte box and not have to remove them from the rails when changing from shoulder to tripod shooting.
There are a couple of negative points with this less‑expensive full rig, though. I found that the black finish rubs off quite easily from the metal rods (but not the carbon fibre rails), so you'll need to be fairly careful when making adjustments to avoid this happening. Secondly, focusing small prime lenses is difficult, as the rails can get in the way. There's not much can be done about this except using a follow-focus (Indisystem have two versions on offer, but there are many to choose from on the market). Finally, it's not at all discreet! You're guaranteed to get lots of strange looks if you choose to film in a public place with a rig like this.
Which Is Right For Me?
So which rig would I recommend for budget shooters? They all have their strengths and weaknesses. If you plan on filming organised projects such as music videos or short films, I'd recommend a rail‑based system, such as the Indisystem Ultracompact DI. It's the ideal size and shape, plus it's designed to work with a follow focus and matte box. If you prefer to shoot pub gigs or candid footage, I think something a bit more discreet and portable might better suit your needs!
Image Stabilisation
Image stabilisation (IS) is a feature that has been built into video cameras and lenses for quite some time now. It's found on most compact video cameras and comes in two forms: optical and digital. Digital stabilisation is usually only found on budget cameras, and works by electronically shifting each frame of video to counteract any motion. It does this by sacrificing pixels at the extreme edges of the frame, leading to a drop in picture resolution. It's usually better than no image stabilisation at all, but I've found its effectiveness to be fairly limited.
There are two kinds of optical IS: lens correction and sensor correction. Lens‑based correction works by using a floating lens element that is shifted using electromagnets, based on data collected from gyroscopic sensors. It will only correct for pitch and yaw rotation and not camera roll, and is the system adopted by Canon and Nikon DSLRs and most third‑party lens manufacturers.
Lens‑based IS is very useful for video even though it was originally introduced to help with shooting still images at long focal lengths, especially in low light. When shooting video, the benefit is to the stability of the image and reduction of what I like to call 'micro jitter' or 'the shakes', more commonly known as the 'jello' effect.
 The Indisystems Ultracompact DI is a full‑size rig for a good price. The rig is reasonably heavy, but this keeps it very stable, too.Optical lens stabilisation used to be found only in telephoto lenses, as it was users of these lenses that would benefit the most from the extra stability. It's now found on a wide range of lenses, including some of the kit lenses (lenses included with the body), and on some video cameras, such as the Canon XHG1.
Sensor shift IS is found in cameras from Sony, Pentax and Olympus (and some others) and works by using gyroscopic information to move the camera sensor. It's an excellent system for still-image stabilisation, but at the moment it doesn't work when recording video! There's always a chance, of course, that this might change in the near future.
Should you always use IS when shooting video? Well, the simple answer is no, because it can have odd side-effects, but there are two specific situations during which I'll always makes sure IS is active.
The first is when shooting with my DSLR at focal lengths beyond about 60‑70mm. Using even the most basic support system for a camera will allow you to shoot fairly stable footage anywhere up to a focal length of about 60mm with the cropped-frame sensors such as the Canon 550d, Canon 7d or Nikon D90 and D300s. These cameras have a smaller sensor than found on full‑frame (35mm sized) cameras, so a 60mm lens is actually equivalent to a 96mm lens on the Canon 550d and 7d.
The Canon 5d MKII has a full‑frame sensor that will allow you to shoot stable footage at about a 90mm‑100mm focal length. Zoom in any more than that and everything starts to become shaky, getting progressively worse at longer focal lengths, where the jello effect can be a shot killer. With IS switched on, the range from 60mm to about 200mm becomes quite usable, provided you keep the camera stable and avoid breathing too deeply! With the Canon 5d MKII, a rig and IS, you should be able to shoot handheld at up to 300mm zoom! Your footage won't always be perfect, but the improvement is quite significant. If you happen to own a zoom lens or camera with optical IS, try shooting some footage at the longest possible focal length, with the IS both on and off. You'll notice a significant difference between the two, and a massive reduction of the jello effect.
The second situation in which I leave IS switched on is when shooting at any focal length without a shoulder mount or tripod. If you don't own a shoulder mount or wish to film without drawing attention to yourself, IS is very useful. I've filmed some respectable sports footage using a viewfinder, two hands on the camera and IS switched on. This provides three points of contact, plus the assistance of the IS, and will help to reduce the jello effect and micro jitter, which may occur even at shorter focal lengths when shooting without a shoulder mount.
Unfortunately there are two fairly major problems with lens-based optical image stabilisation. Firstly, the lenses require a fair amount of power and will significantly reduce your battery life, so backup batteries are a must. Secondly, the optical stabilisation can cause a jumping movement to occur while filming. You probably won't see this happen if you hold the camera very still, but as soon as you move or attempt to pan, the image may appear to jump. It's annoying, but to be expected, as the lens is doing its best to keep everything nice and stable, so moving the camera and lens is bound to upset it! If your lens has customisable stabilisation settings, it's worth experimenting with them to see what works best for handheld video shooting.
Some lenses allow you to select a mode that corrects only for vertical shake, while many of the newer lenses are supposed to be able to auto-detect deliberate panning. Despite the occasional annoying image jump, it's possible to shoot some excellent footage using IS, and it can be a life-saver if you don't happen to have a shoulder mount with you, or wish to film at longer focal lengths.
Conclusion
 This rather expensive 70‑200MM f2.8 USM IS lens from Canon uses optical image stabilisation, adjusting the glass elements of the lens to counteract camera shake. It's expensive, but works wonderfully.
Handheld shooting can be difficult with just about any camera, especially smaller models. When it comes to the popular DSLRs, not only are they small and difficult to hold steady, but they also suffer from rolling-shutter effects. I'm often asked: "Why take the time and trouble to shoot with cameras that aren't designed for video?”. I respond that it's impossible to get such great image quality and shallow depth of field, especially in low light, using any other camera type in the DSLR price range! While a shoulder mount might be an extra expense, in my opinion it's well worth it, as even using a cheap solution will help you get the very best footage from any small video camera or DSLR.
LCD Viewfinders For Stability
 When shooting handheld with my Canon 7D DSLR, I almost always use a viewfinder or loupe attached to the rear LCD screen of the camera. I find it helps by allowing me to view the screen much closer to my eye, making focusing easier, and it also provides an extra point of contact to further reduce camera shake. There are now quite a number of options on the market, ranging from around £50$70 to over £300$450. One of the first on the scene, and perhaps most popular, is the Zacuto Z‑finder, pictured here.