This month, how to use software synths and samplers effectively in your DP projects.
In the last two Digital Performer workshop columns, I've been looking at Digital Performer's MIDI capabilities: how the application integrates with OS X's Core MIDI architecture and various kinds of MIDI hardware, the ins and outs of MIDI tracks, and key editing techniques. However, for many people, using MIDI in a Digital Audio Workstation like DP these days is much more about virtual instruments than connected hardware synths or samplers — and quite understandably: they frequently sound much better and are easier to use, their settings are saved with your project, and modern computer processors have little trouble handling the concurrent use of lots of them.
Individual Instruments
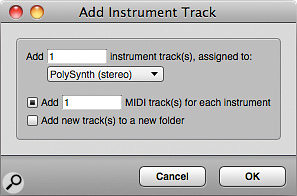
If you've never used virtual instruments in DP before, it's dead easy. With a project open, choose Add Track > Add Instruments, from the Project menu, or use the Shift‑Alt‑Command‑I shortcut. In the dialogue box that appears, choose an instrument from the pop‑up menu, click OK, and you're away.
As you'll see in the screenshots, for the sake of illustration I chose the bundled PolySynth, and went with the default option to 'Add 1 MIDI track' for it. What I end up with is two tracks: the Instrument Track, and a MIDI Track to drive it. DP conveniently record‑enables the MIDI track and sets the appropriate MIDI Output destination, 'PolySynth‑1‑in'. The Add Instruments dialogue box in DP is by far the most convenient way to instantiate virtual instruments and create MIDI tracks to drive them.
As you've no doubt figured out by now, if you're instantiating a virtual instrument that's multitimbral, and supports multiple parts that can be driven by separate MIDI tracks (as is the case with samplers like MachFive or Kontakt), the Add Instruments… dialogue box can save you time and effort by creating the instrument and multiple MIDI tracks in one fell swoop.  Add Instruments can automatically create a multitimbral instrument, together with all the tracks you need to drive it, each set to a different MIDI channel. What's more, the whole lot can be put in a track folder if you like.
Now that you've instantiated an instrument, it should be playable from your MIDI controller device. If there's a deafening silence, check out the 'Troubleshooting' box to help you figure out what could be amiss. Even if it does work, as it mostly will, there are few basics of DP's operation, and virtual instrument hosting in general, that you should be aware of.
Latency
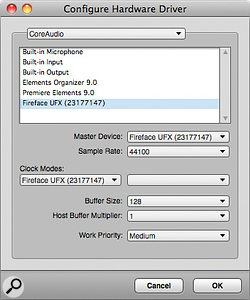
 Switching buffer size is an absolutely fundamental technique in DP (and other DAWs) for controlling virtual instrument and monitoring latency, and CPU use.
First of all, the crispness of the instrument's response — determined by DP's audio system 'latency' — is something you can control. Go into the Setup menu > Configure Audio System > Configure Hardware Driver, and in the dialogue box that appears, note the current Buffer Size setting. Put in simplistic terms, this controls the size of the audio chunks that DP is constantly chewing through as it processes audio. Higher numbers, such as 512 and upwards, allow DP to process audio very efficiently, relieving the stress on your Mac's processor, but they result in a sluggish response from virtual instruments. A setting of 128 or 256 will often be required to make a virtual instrument feel as 'quick' as a hardware counterpart, and shouldn't pose any problems on recent Macs unless you're building up a really complex arrangement. Still, after you've finished recording all your instrument tracks, it's good practice to increase the Buffer Size once again, to ensure that you're not driving your Mac unnecessarily hard and depriving yourself of useful processing power for other tasks.
Pre‑gen
Second, since version 6, DP has offered instrument pre‑rendering, or 'pre‑gen'. This is a processing scheme that runs away in the background, doing the maths in advance that's associated with playing back previously recorded virtual synths and sampler tracks. The result, when you hit the play button, should be vastly reduced processor usage compared to what might be seen if DP was having to do the same number‑crunching in real time, letting you squeeze more out of a mix than might otherwise be possible.
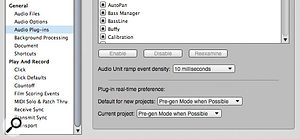
To enjoy the benefits of pre‑gen, you have to turn it on. In DP7's Preferences (accessed from the Digital Performer menu), choose the Audio Plug‑ins page, where you'll find pop‑up menus for enabling it in (future) new projects and in the current project. Only one setting ensures that virtual instruments are invited to the party, and that's 'Pre‑gen Mode when Possible'. Even when that's set, you have to remember that pre‑gen can only happen when you close an instrument's window, and when no MIDI tracks driving it are record‑enabled — otherwise all its processing will happen in real time. Controls for DP's CPU‑saving pre‑gen system reside in the Audio Plug‑ins page of Preferences.
While pre‑gen is a minor miracle, some instruments don't play nice with it. If you encounter the playback timing errors and stuck notes that are typical of pre‑gen incompatibility, you can disable it for the offending instrument: click the mini‑menu triangle at the top right of its window to access a 'Run This Instance in Real‑time' command. You can also select the 'Default to Real‑time' command to ensure that the same instrument will always run in real time from now on.
Divide & Conquer
 Some instruments work better when pre‑gen is turned off. You can do that on an individual instrument basis by choosing the Real‑time option in the instrument's mini‑menu.
While we're on the subject of pre‑gen, it's worth pondering what the best approach is to using extremely multitimbral instruments. Take recent versions of the Mach Five or Kontakt samplers, for example. Both can support dozens, if not hundreds, of instrumental parts, each addressed on separate MIDI channels. They have internal mixers too, to support exactly this way of working. But quite honestly, to put all your eggs in one basket in that way is not all that smart. The problem is that while you're recording the MIDI for that 53rd kazoo part (or whatever), the 52 you've already laid down get to benefit from pre‑gen — but it only takes one record‑enabled MIDI track driving the instrument to force the whole thing to run in real time, regardless of whether its window is open or not. So a much better approach is to run multiple instances of the same instrument, perhaps organised by instrument group or some other meaningful division. For film‑style orchestral scoring, for example, you might have separate Mach Fives dedicated to strings, wind, brass, percussion, piano and choir. Each might have 5‑10 instrumental parts, thereby ensuring that's the maximum number that DP will ever have to run in real time, while you work on one particular orchestral section. Just remember to keep the windows closed for the instruments you're not currently using.
Track Freezing
When all's said and done, Track Freezing is still the most bomb‑proof option for reclaiming CPU power. It works great for all virtual instruments, although in the case of multitimbral instruments it only makes sense to freeze them after you've finished recording all the parts you intend to. Here's a quick step‑by‑step guide:
1. Begin by making a time‑range selection that encompasses every MIDI event associated with the instrument you want to freeze; dragging across MIDI phrases in the Tracks window is good for this. Command‑click the track name of the instrument track too, because including it in the selection is crucial for a successful freeze.
2. In the Audio menu, choose Freeze Selected Tracks, or use the Control‑Command‑F keystroke. DP carries out the bounce in real time, creating a new audio track in the process, but surprisingly does not do anything to disable the instrument nor the MIDI track just rendered. That's easy to do manually: simply click the instrument's blue blob in the 'ENA' (enable) column of the Tracks Window to take it offline.
3. Should you need to 'unfreeze' and do some editing of your instrument track, just re‑enable the instrument, and disable or mute the freeze track.
Troubleshooting
If your freshly created instrument track doesn't work, you need to plod methodically through the possible causes.
• Open up the MIDI Monitor window (from the Setup menu). Activity in the indicators there, when you play your MIDI controller device, confirms that MIDI messages are at least reaching DP.
• Confirm that your MIDI track is record‑enabled and its output set to drive the instrument you want to work with. If you work with Multi‑Record turned on, also check that you've selected the correct MIDI Input device. The track's play‑enable status doesn't make any difference, but its MIDI volume fader in the Mixing Board definitely does. If that's pulled down, you won't hear anything.
• Also watch out for MIDI tracks with italicised Output names, or for situations in which your instrument is not even available to choose as an output. Both indicate that the instrument isn't really 'online', and most often that's because the audio output of the Instrument track is invalid. In the Tracks Window, click in the Output column for the instrument and choose your main output audio bundle. Now both the instrument itself and the MIDI track output should spring into life.

