 Clicking on a plug-in parameter with the Ctrl Command keys held enables automation for that parameter.
You'd be surprised at the things you can do without opening a menu in Pro Tools. And if there's no shortcut for the command you need, why not create your own?
It's another keyboard shortcut-fest this month in our regular guide to getting more from Pro Tools. Following our look at the Keyboard Focus, I think it's time to introduce some of the more obscure shortcuts. Most of these are available on both Mac and Windows versions of Pro Tools, but some aren't documented at all, so they might be new to many readers.
Automation
I am sure many of us automate plug-in settings by clicking on the Auto button in the plug-in window, selecting the parameter, adding it to the list and clicking OK, then selecting the correct parameter on the audio track, missing it in the list by mistake and having to try again! For us, there is a really useful shortcut. It turns automation on for your chosen plug-in parameter and switches to the automation data display on the track in two very quick and easy steps...
- To turn automation on, Ctrl+Option+Command-click (PC: Ctrl+Start+Alt-click) on the plug-in parameter.
- To switch that track to display automation data for a given parameter, Ctrl+Command-click (Ctrl+Start-click) on the plug-in parameter.
That's it! Now you are ready to edit the automation graphically.
Using The Trim Tool To Fill
Have you ever wanted to trim out a region precisely to a preceding one? Well you can: by holding down the Ctrl (PC: Start) key whilst trimming, Pro Tools will stop at the preceding region's edge. This works with the Trim tool in TC/E mode, too, thus enabling you to precisely fill or stretch to fit a gap. Neat!
To add breakpoints (or anchors) in any graphical automation you can click with with the Grabber tool, but there are alternatives. On the Mac, you can use Option+'/', which is really nice, as there is a '/' key above the right-hand Option key on most keyboards. On the PC, you simply right-click.
To access graphical automation data more easily, you can use Ctrl+Command-click (PC: Ctrl+Start-click) in the Edit or Mix window to change the display as follows:
- Ctrl+Command-click on the track name changes display to waveform.
- Ctrl+Command-click on the text 'vol' in the I/O view changes display to volume automation.
- Ctrl+Command-click on the text 'pan' changes display to pan automation.
- Ctrl+Command-click on the mute button changes display to mute automation.
On the Mac, adding the Option key to any of the above will make the change to all tracks. These shortcuts work on both the Mix Window and the I/O section of the Edit window. Clicking on the meters with all three modifiers held switches them to 'fat' mode.
Navigation & Zooming
Here's a handy shortcut which allows you to navigate quickly without having to dive down to the bottom of the Edit window to click on the scroll bars. Using Option+Page Down (PC: Alt+Page Down) will scroll the Edit or Mix window one 'screen' to the right, while Option+Page Up will scroll the Edit or Mix window one 'screen' to the left.
To make the selected track larger or smaller you can use Ctrl plus the up or down arrow keys (this seems to be a Mac-only shortcut). Adding the Option key into this shortcut does it to all tracks — on the PC, you can use Start+Alt plus the up or down arrow keys.
You can also adjust the nudge and grid values from the keyboard. To adjust the nudge size, hold down Command+Option (PC: Ctrl+Alt) and use the '+' or '' keys on the numeric keypad to adjust the nudge size up or down. Similarly, holding down Ctrl+Alt (PC: Start+Alt) and using the '+' or '' keys will adjust the grid size up or down.
Another handy navigation shortcut is to Ctrl-click (PC: Start-click) on any track in the Edit window, which will force the Mix window to scroll along so that that track appears as first visible track on the far left of the Mix window (or as far left as possible). This also works the other way, so Ctrl-clicking on a track name in the Mix window will put the selected track at the top of the Edit window (or as high as possible). This is great for large sessions on two-screen systems where you have the Edit window on one screen and the Mix window on the other.
Miscellaneous But Useful Shortcuts
- Command+Alt+Ctrl-click (PC: Ctrl+Start+Alt-click) on a meter in the Edit or Mix window to toggle between 'fat' and normal meters on all tracks.
 Regions can be duplicated ahead of, as well as behind, the source region.
- We all know how to duplicate a region so it repeats after itself, but here is a way of getting it to repeat a region before itself. To copy backwards, Ctrl+Alt+Command-click (PC: Ctrl+Start+Alt-click) the region: hey presto, a duplicate will appear butted up before the original.
- When you're in the Name Tracks dialogue, you can use Command+right arrow (Ctrl+right arrow) to select additional tracks to be named without leaving the window. Alternatively, having named the first track, instead of hitting the Enter key, which is the natural thing to do, use Command+Enter (Ctrl+Enter) and you get the next track ready to rename. This one falls very nicely under the fingers.
- When you create a new track using Shift+Command+N (PC: Shift+Ctrl+N), the New Track window will open. In that window, you can use Command (PC: Ctrl) plus left or right arrow to choose Stereo or Mono, and Command+up or down arrow to select from Audio, Aux, Master or MIDI tracks. Finally use Command+Option (PC: Ctrl+Alt) plus up or down arrow keys to select Samples or Ticks.
- Have you ever wanted add or remove a track from a group, and ended up creating a new group and then deleting the old one in order to do so? What a pain! Well, it is possible to edit a group. To do this, select all the tracks you now want to be in that group in the normal way (which is so much easier with the new multiple selection options in Pro Tools 6.9!) and use Command+G (PC: Ctrl+G) as if to create a new group. Now change the group ID to match the group you want to edit. Finally, click OK and that group will contain the new selection of tracks.
- TDM users now have a separate Input Monitor button on each track, but Pro Tools LE now incorporates the Alt+K (PC: Ctrl+K) shortcut, which will toggle between Input Only and Auto Input modes.
 You can replace an existing group by setting a new group to have the same ID letter.


Mac Users: Create Your Own Shortcuts
For Mac OS 9 Pro Tools users, it was possible to add shortcuts to commands that didn't have one by default using a third-party application like Quick Keys. Now, however, you don't have to, because there is a feature in the Mac OS X preferences that enables you to create some of them there. Here's how to do it.
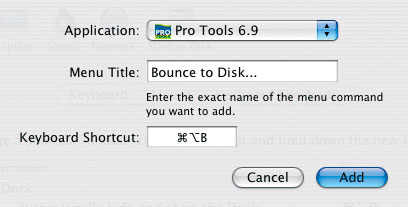
First, quit Pro Tools if it's running. Now open the System Preferences window and then launch the Keyboard & Mouse preference pane. Select Keyboard Shortcuts and click the little '+' sign in the bottom left corner of the window. From the pull-down menu, choose Pro Tools from the 'other' item. (It won't come up in the main list, so you will need to navigate to the Pro Tools application in your Digidesign folder, which should be in the Applications folder on your hard drive.)
Now type in the exact menu option that you want to add a shortcut for. In this example, I wanted to have a shortcut for the Bounce to Disk command. I found it helpful to make a screenshot of the menu so I got the exact spelling and punctuation correct, as you must type it exactly how it appears in the drop-down menu. Make sure your upper and lower-case characters are right as well as any full stops. Now press the key combination you want to use (in this case
Alt+Command+B) and you will see it appear in the field. You should make sure that you are not using a shortcut already assigned from the standard menus, remembering the not-so-obvious ones too. You can set up your own keyboard shortcuts for any non-Classic Mac OS X application in System Preferences.
Quit System Preferences and launch Pro Tools again, and all being well, you should see your newly added shortcut in the menu. If a particular shortcut has already been allocated for that particular application, your new one won't 'take', and you won't see it appear in the menu against the appropriate item.
As you will see from the screenshots, I have already set up the following...
- Bounce To Disk: Alt+Command+B. In my opinion it's easier than the Ctrl+Option+Command+B shortcut that some folk use. Holding down three operator keys and then adding another one is so difficult that it defeats the object of having a shortcut!
- Save Session As... Alt+Command+S.
- Save Session Copy In... Ctrl+Command+S.
- Delete Selected Tracks... Ctrl+Command+D.
- Import Session Data... Alt+Command+I.
If you are thinking of trying this feature out, here are a few words of warning! If your chosen menu item has three full stops at the end, as is the case with 'Delete Selected Tracks...', then including the Alt key in the shortcut will bypass any warning message that comes up — in this case, for instance, where there are regions on the track you are trying to delete. This is a Mac OS X convention — for example, Alt+Empty Trash will empty the bin without asking if you are sure. This is why my Delete Tracks shortcut doesn't have Alt in it.
Some shortcuts also do other things. For example, my Delete Selected Tracks... shortcut will do a Region Duplicate if there is a region or regions highlighted — in this case, the system seems to ignore the Ctrl key and responds to Command+D!
To Journal Or Not To Journal
There has been some confusion as whether you should use Journalling when formatting audio drives with Mac OS X and Disk Utility. Hopefully I can clear up this simply: Digidesign recommend the use of Journalling for Pro Tools versions from v6.9 and above, whether you are running Panther (10.3.x) or Tiger (10.4.x). However, if you are still running v6.7 or lower, you should leave Journalling off.