Making the most of your virtual instruments in Logic can involve some complex Environment trickery, but the results are rewarding.
 Using multi-channel and multitimbral plug-ins in Logic can often lead to confusion. As ever with DAW software, there are several solutions to the problems encountered, some of which are more effective than others. The sonic palette offered by Apple and third-party developers is huge, but to make the best of our tools, we need to get our heads round the technicalities.
Multi Meaning
First, we must be sure that we understand what these two terms mean. A multitimbral synthesizer, such as the Roland JV1080 of old, is one that can play more than one sound at the same time and each sound can be addressed on a separate MIDI channel. This is like having, say, 16 separate synths in one box. The number of different sounds available simultaneously is often described as the number of parts, so we can say that the JV1080 is a 16-part multitimbral synth. Logic Pro includes two multitimbral instruments: the EVB3 organ and the EXS24 sampler.
Logic also has what are (rather confusingly) called multi-channel synths: namely EXS24 and Ultrabeat. Logic-speak aside, it's probably best to consider them as 'multiple-output plug-ins'. In practice, when you use these plug-ins you can route sounds of your choice to separate outputs, enabling you to, for example, add external effects to a subgroup of sounds, or simply mix a group more easily. 
When you're using separate MIDI channels to control EVB3's pedals and upper and lower manuals, it's important that Multi is selected as the keyboard mode.  A multi instrument can be used to control the different parts of an instrument. The numbered buttons on its simple GUI correspond to MIDI channels, so if your plug-in is three-part multitimbral (such as EVB3), you must de-select buttons 1-3.
We've mentioned the multitude (excuse the pun) of third-party plug-ins already, and of course some of these are multi-channel, while some are multitimbral, and others feature multitimbrality on multiple outputs. In this article we'll be referring to various third-party instruments, including Spectrasonics' Stylus RMX, but the principles involved will be the same regardless of the specific plug-in.
Multitimbral Plug-ins
There are various benefits of using multitimbral plug-ins, such as neater Track Mixer layouts (due to fewer instance counts) and the associated workflow improvements. But perhaps the most important benefit is the ability to access multiple (and sometimes semi-hidden) parts of a virtual instrument. Take EVB3 as an example. It can be set up so that the upper and lower manuals are controlled by MIDI channels 1 and 2 respectively, with the pedals on channel 3, effectively allowing you to recreate a Hammond organ in your studio, providing you have the necessary MIDI controllers. However, Logic 's handling of multitimbral plug-ins is far from straightforward, as it involves some fairly in-depth (and time-consuming) Environment tinkery. Here's a quick guide to setting up EVB3 for multitimbral operation.
Insert the plug-in on an Instrument track, and make sure that the keyboard mode is set to Multi, using the topmost green strip on the bottom of the screen. Next, open the Environment window on the audio layer and create a new multi-instrument object. Name it 'EVB Multi' and cable it to the audio-instrument channel you used for the plug-in. At this point, a dialogue box appears. Just click 'remove' to continue, then enable channels 1, 2 and 3 in the multi-instrument object by un-ticking the relevant boxes.
By default, Logic Instrument channels only 'listen' to MIDI channel 1, so we need the Instrument channel to receive on all MIDI channels. This can be set using the channel field in the left-hand Object parameter box. Finally, in the Arrange window, create three tracks, one for each of the sub-channels, using the newly created 'EVB Multi' sub-menu, then try recording separate parts on each of these tracks.
Are We Missing Something?
Another month passes and the tumbleweeds continue to blow across the desert of Logic update news. The Universal Binary version of the program was introduced in early 2006 and it didn't really set the world alight, as its main purpose was to make the software available to users of the new Intel-based Macintosh computers. Though the features introduced in this version were significant if you wanted to use the Apogee Ensemble or Serato's Pitch 'n Time plug-in, for most users it was more of a 'muh?' moment and there was little that was new since the 7.1 upgrade of April 2005.
As it's now over two years since the last significant Logic update, it's not surprising that the speculation emanating from the user base is now in overdrive. One of the reasons for this is that when Emagic ran things, updates were frequent, usually packed with new features and often free. Apple's tight-lipped nature has, as usual, invited speculation, which has ranged from rumours of the company sequestering Logic 's programmers for the new iPhone project to a major re-write of the program which will give it the look and feel of Garageband, Soundtrack Pro or Microsoft Vista. I think I may have misread that last one, though!
Those who, like me, read Sound On Sound from the back pages to the front may have noticed that a few months ago Apple advertised for a Technical Writer, which may (or may not: this is Apple after all) indicate that the new version of Logic is ready for imminent release. Not only does reading the magazine back-to-front like this make sure you don't miss this kind of information, it also means that Sounding Off is effectively the magazine's Leader article and Paul White's musings become the feature with the extreme controversial opinions. It's good to have your expectations turned on their heads from time to time.
Speaking of Apogee's Logic Pro-integrated Ensemble Firewire interface, I recently got to use one of said interfaces with the latest alpha release of the drivers. The Internet is littered with reports of problems that people have had with the original beta versions, but the latest driver was extremely stable on both Intel and G5 machines. I'm still unconvinced that having the interface's control panel as part of Logic is any real advantage, but the features and quality of sound of the interface are everything you'd expect from Apogee, and its very existence means that Apple are still serious about pro audio on the Mac, which can only be a good thing. Stephen Bennett
Multi-channel Plug-ins
In Logic, the separate audio outputs of multi-channel plug-ins can be accessed using Aux channels in the Environment, allowing for some very flexible processing. Depending on the functionality of the instrument in question, you can process single samples, sample layers or grouped sounds, directly from the Environment or Track Mixer.  Once a multi-instrument is created, new options become available in the Arrange window's track list menu.
The routing options available in EXS24 are extremely powerful, considering each group can be directed to one of 16 different outputs. Of course, effects can be added to each output, giving you full control over every aspect of the sound.
Let's explore this using Ultrabeat, with which you can, for example, send the kick and snare to separate Aux tracks for adding dedicated effects from your favourite Audio Units plug-ins (which you can't do within the instrument itself). In the channel strip I/O box, call up a multi-channel instance of Ultrabeat and load up a kit. By running a pattern in the step sequencer, you'll notice that all the sounds are sent to the main outputs on the Instrument channel strip. In the Ultrabeat window mixer area, find the kick drum, select output 3/4, then set the snare to output 5/6. Next, find the two Aux objects in your Environment and, in their I/O boxes, select Ultrabeat 3/4 and 5/6. Now, using standard inserts and sends, you can add any effects on your system to each Ultrabeat output.
If you think the potential for processing Ultrabeat 's sounds is great, think of the processing possibilities of EXS24. Each sample zone or group can be set to one of 16 different outputs, by simply changing the output from the field in the EXS Instrument Editor window and calling up the corresponding output on an Aux channel in the Environment. So with a multisampled string patch, for example, you could add a custom reverb to the highest velocity layer, or send all notes between E-flat and F-sharp through some distortion!
Multitimbral & Multi-channel
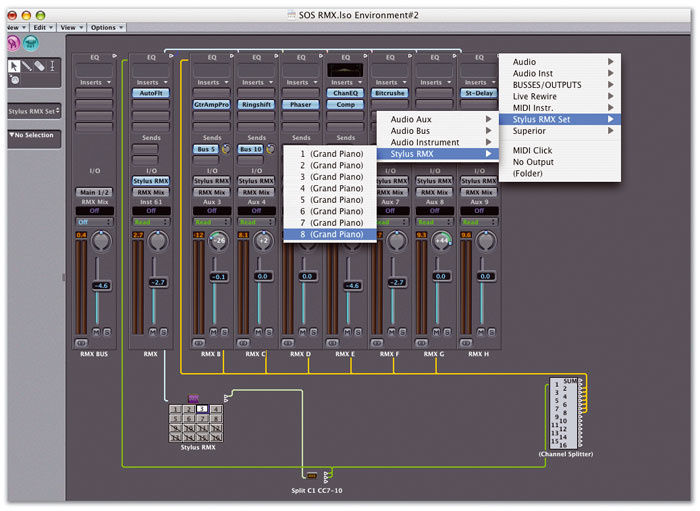
Using Stylus RMX as an example, let's now consider how to achieve the 'ultimate' setup: one that's multitimbral and multi-channel. It's worth studying the main picture on page 190 while using the following guide; this truly is a case of a picture saying a thousand words!
Stylus RMX is eight-part multitimbral, so we need to set up a multi-instrument (as outlined earlier with the EVB3 example), but this time with eight channels enabled in the multi-instrument object, and a multi-channel instance of the plug-in on the audio instrument I/O box. In addition to the default output, which we can simply call RMX, we need seven stereo Aux objects (labelled RMX A-H) with each I/O assigned to the appropriate multi output of Stylus RMX . Within the mixer window of the plug-in, assign the parts to outputs A-H as required. The audio will now be coming up the Aux channels in Logic. Once again, you may find it helpful to sub-group the Instrument and all these Auxes to a bus, or group them, to help with the mix process.
More Aux Channels?
Logic 's default song only has two Aux objects, so we may need to make some more. In the Environment, select New Audio Object. In the object parameter box, choose the Aux channel and name the object. Make plenty of these!
Track-based Automation
At some stage, you're probably going to want to automate the outputs of your multi-channel and multitimbral instrument separately. However, having just set up multi objects and tracks for each part, you'll find that the sub-tracks only allow for 'MIDI' automation parameters. Whether this works correctly depends on what has been implemented for your particular plug-in. As a rule, volume and pan messages (CC7 and CC10 respectively) are grabbed by the Instrument channel strip in Logic, so you'll need to filter these out, as they will affect the entire plug-in, not the individual parts.
The extra outputs of multi-channel plug-ins (including EXS24, shown here) can be routed to the main mix using Aux channels. 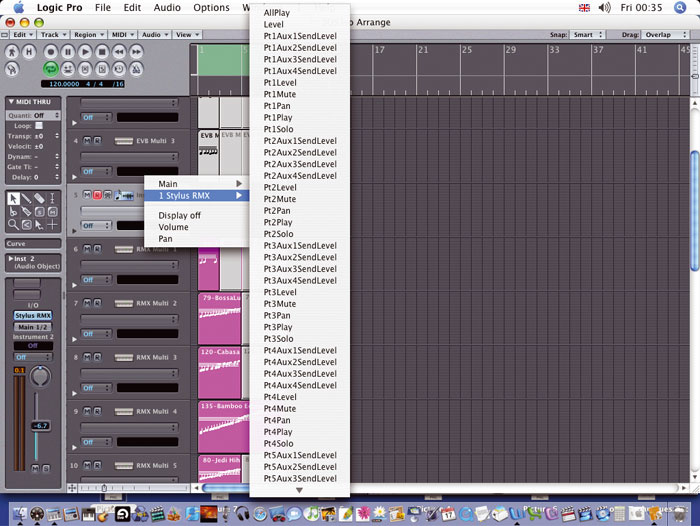 Some plug-ins are better implemented than others when it comes to automation parameters. Stylus RMX has well thought-out assignments as standard.
 Unsurprisingly, the most elegant solution for automating separate parts involves some Environment editing. First, you need to separate the volume and pan data from the other parameters. Make a new Transformer object (found under the Environment's New menu) and set it as a condition splitter, using the parameters shown in the screenshot, below. Any Controller information arriving at this splitter will be separated between the top two cable outputs. MIDI data that is not channel 1 (as data on that channel applies to the main Instrument), and is between CC7 (volume) and CC10 (pan), will be sent out of the top cable. Everything else will come out of the bottom one.
Connect the output cable from the Stylus RMX multi object to the Transformer. Create a new Channel Splitter object and connect the top cable from the Transformer to this Splitter. All MIDI CC7-CC10 data except channel 1 will arrive here. Connect the second cable from the Transformer to the main RMX Instrument channel. All other MIDI data will go straight to the main plug-in channel.
Having got all CC7-CC10 data for the other seven MIDI channels to the Channel Splitter object, we must now separately cable the output channels from the Channel Splitter to the Aux objects: channel 2 to RMX B, channel 3 to RMX C, and so on, until all seven are connected. If you now set the automation mode of the Instrument channel and the seven Aux channels to 'read', track-based automation data on the RMX MIDI tracks will now work the appropriate Aux channels (at least for volume and pan!).
The final piece of the jigsaw is to cable each of the Instrument and Aux channels back to the correct part of the RMX multi-instrument object. This will enable us to automate using either the MIDI tracks or the Aux tracks, with both sets of automation correctly reflected in both types of channel in the Track Mixer.
To do this, we have to connect the cable from the top of the Instrument and seven Aux objects, and route each one to the correct MIDI channel of the RMX multi-instrument object. This must be done by Alt-clicking on the cable and selecting the part from the pop-up list (Instrument to part 1, RMX B Aux to part 2, and so on). In the Track Mixer, set each of the RMX MIDI tracks' automation mode to 'read', and you're good to go!
Organise Your Environment
Having discussed some of the options regarding the use of multitimbral and multi-channel instrument plug-ins in Logic, I recommend that you experiment to find out which way works best for your situation. One thing is for sure: when you've decided the way for you, it would be smart to make a template, so that you don't have to create all these Environment objects every time you want to use a multi plug-in!