Used correctly, VCA groups can make a big difference when you're faced with a complex mix and lots of automation.
One of the major additions in Pro Tools HD version 7.2, which appeared two years ago, was the addition of VCA grouping. In a large–format analogue mixer, a VCA, or Voltage Controlled Amplifier, is a channel gain control that can be adjusted by varying a DC voltage on the control input. This makes it possible to 'move' a raft of faders together, maintaining any offsets within them, by moving a single control fader.
The invention of VCA automation was a major step in the development of mixing technology, but you might be wondering why Digidesign saw fit to include it in Pro Tools, which already has a very sophisticated automation system. After all, if you want to adjust and automate the levels of multiple channels simultaneously, why not just create a group and use the group fader to achieve the same result?
Well, for one thing, the existing system can cause problems with post–fade effects. If you are adding reverb to individual tracks from a post–fade send, and use a conventional group channel and fader to bring down the level of all those tracks, you will end up with a wetter signal, because the gain has been reduced in the dry path but the wet path has stayed the same. If, however, you use a VCA group, the group fader is changing the gain of each channel, so the amount of signal fed to the post–fade send also reduces by the same amount and the dry/wet balance is maintained. Another advantage of VCA groups is that you can 'group' channels that are routed to different outputs, which would be impossible using conventional grouping and group faders.
For both of these reasons, I always try to specify a VCA group–capable desk when handling larger, more complex live sound jobs, and configure the desk so that I end up managing most of the show on the VCA faders.
Grouping Options
, which are in turn routed to a single 'strings sub' group controlling the level of the entire string part.") This mixer screen shows a typical Session where grouping is used. Three passes of the string section were recorded, each containing four tracks. These are routed to three subgroubs ('Strings3sb' and so on), which are in turn routed to a single 'strings sub' group controlling the level of the entire string part.The screenshot above shows the strings section from a recording session, where three passes from the same section of around 13 players, with a mic per instrument grouping, were used to create a 'bigger' sound. I have created subgroup faders for each section, which means that I can easily set the internal balance in each section with the track faders, then control the balance between passes with the subgroup faders. Finally, I have an overall strings group fader at the end so I can manage the balance of strings in the complete mix. Each pass has its own bus path, and there is a bus path for the complete strings group. This configuration will, of course, suffer from the post–fade effects wet/dry problem outlined above.
This mixer screen shows a typical Session where grouping is used. Three passes of the string section were recorded, each containing four tracks. These are routed to three subgroubs ('Strings3sb' and so on), which are in turn routed to a single 'strings sub' group controlling the level of the entire string part.The screenshot above shows the strings section from a recording session, where three passes from the same section of around 13 players, with a mic per instrument grouping, were used to create a 'bigger' sound. I have created subgroup faders for each section, which means that I can easily set the internal balance in each section with the track faders, then control the balance between passes with the subgroup faders. Finally, I have an overall strings group fader at the end so I can manage the balance of strings in the complete mix. Each pass has its own bus path, and there is a bus path for the complete strings group. This configuration will, of course, suffer from the post–fade effects wet/dry problem outlined above.
 for each set of four tracks.") Rather than using group channels, an alternative approach is to create a mix group (in this case 'f') for each set of four tracks. The next screen shows the alternative before v7.2 HD, which is still the only other approach for LE users. This is to create mix groups for each of the tracks within a pass, so that all the faders within that group move together when the group is enabled. Clicking on a solo button will engage the solo buttons on all the mix group's tracks, and the same applies to mutes, but input monitor and record enable buttons still have to be switched individually. (To adjust the internal balance within a mix group it is necessary to suspend the group or remember to hold the Ctrl key (Windows: Alt) down whilst moving the appropriate fader. I don't know about you, but I constantly forget!)
Rather than using group channels, an alternative approach is to create a mix group (in this case 'f') for each set of four tracks. The next screen shows the alternative before v7.2 HD, which is still the only other approach for LE users. This is to create mix groups for each of the tracks within a pass, so that all the faders within that group move together when the group is enabled. Clicking on a solo button will engage the solo buttons on all the mix group's tracks, and the same applies to mutes, but input monitor and record enable buttons still have to be switched individually. (To adjust the internal balance within a mix group it is necessary to suspend the group or remember to hold the Ctrl key (Windows: Alt) down whilst moving the appropriate fader. I don't know about you, but I constantly forget!)
This example avoids the wet/dry balance issue, and also the need to add an extra Group channel for each pass, but there are still reasons why VCA–style grouping is preferable. In particular, mix grouping will 'fight' against any automation on the individual tracks.
The VCA Alternative
 The new way: in Pro Tools HD 7.3 and later, you can create VCA Master tracks.So let's see if the VCA Groups feature can help to make life easier. To use it, you first need to call up the New Track dialogue and create a VCA Master track, which has no further options except to be sample or tick–based. Make your selection, and after hitting Create you will have an unassigned VCA Master track in your mixer. When you click on the 'no group' button you get the options of picking up any pre–existing mix groups. If none are suitable, you will need to create a new mix group (see the 'Creating Groups' box for more details). In this case, I already have groups created for each of the Strings passes, so I just need to select the appropriate group. At this point two things will happen: one is that the VCA Master fader will now display the group letter indicator near the top of the fader. The other is that the group is identified as a VCA group in the Group List in the bottom left–hand corner of the Edit and Mix windows. VCA Master tracks have a level meter, but this doesn't show the sum of the slave tracks: rather, it shows the level of the loudest track in the group.
Using a VCA Master and group to adjust the relative balance between string passes, all I need to do is use each pass's VCA Master fader, which of course can be automated. To adjust the balance within sections, I can simply adjust the appropriate fader; there is no need to hold down the Ctrl key or suspend the group to do this; it just works.
However, the same cannot be said about the automation. With the faders moving independently, I expected that I would be able to write automation separately, but when I went into the Volume graph on the tracks and attempted to create some automation, it was all repeated on all the tracks within the group, just like a conventional group. It is possible to move an individual track's fader, and even to write automation on an individual track by moving the fader, but it's impossible to create it manually by editing the volume graph directly, or to edit fader moves after recording automation. As soon as you attempt to edit the automation, anchors get placed on the other tracks within the group. This inconsistency is very disappointing, and is a significant let down for what is otherwise a very useful feature.
There is better news with other channel controls such as solo, mute, input monitor and record enable buttons. Clicking on a VCA slave track's solo button will put just that track into solo — unlike conventional mix groups, where all the grouped tracks will go into solo. If you want to put all the slave tracks into solo together, Alt–clicking the VCA Master track's solo button will do the trick. The display is slightly confusing, though. When you select the VCA Master solo button it changes to yellow, as you would expect, but the slave tracks' solo buttons don't. Slightly less confusing is the way the buttons display when you solo a slave track. Here the appropriate track's solo button goes yellow, as you would expect, all the other tracks, including the other slave tracks in the VCA group, are muted, and the solo and mute buttons on the VCA Master don't change.
Hitting the mute button on the VCA Master mutes all the slave tracks, and their mute buttons are greyed out, just as they would be if something else was soloed. Hitting a mute button on a slave track does exactly what you would expect: it mutes that track.
On a VCA group, clicking the appropriate button on any slave track puts that track into input monitor or record enable mode, and the VCA Master buttons mirror that. Now comes the clever bit: if you Alt–click the appropriate button on the VCA Master, it puts all the slave tracks into input monitor or record enable — normally in Pro Tools, Alt–clicking on a button would apply it to all tracks in the Session.
Logical Choices
It is possible, if you want to, to turn off these different group functions and make a VCA group function like a normal group. In the Mixing tab of the Pro Tools Preferences window there is an option called 'Standard VCA Logic for Group Attributes'. Deselecting this option means that VCA groups function more like conventional groups; so, for example, hitting a slave track's solo button makes the solo buttons on all the slave tracks come on.
It is also possible for slave tracks to be members of more than one VCA group, in which case the contributions from all the VCA Master faders that are connected to them are summed together. Mute, solo, input monitor and record enable all follow the normal rules, and VCA Masters can even be nested inside another VCA group.
Automating VCA Masters
VCA Masters have limited options for automation. Only three parameters can be automated: Volume, Volume Trim, and Mute, all of which function identically to all other forms of automation in Pro Tools. It is possible to record automation on both the slaves and VCA Master tracks, and Pro Tools displays the composite volume graph as a blue line on each of the slave tracks.


 applies that automation to all slave tracks within the group, freeing up the Master track's automation curve for future use (bottom right).") 'Coalescing' the automation on the VCA Master track (left and bottom) applies that automation to all slave tracks within the group, freeing up the Master track's automation curve for future use (bottom right). The composite volume graph is purely for display, and can't be edited, but it is possible to 'coalesce' the slave and Master tracks' automation data onto a single editable graph. Having used the VCA Master to write automation for the whole VCA group, you can impose that automation data on to the slaved tracks, clearing the VCA Master's own automation graph for a fresh go. First, select the VCA Master track you want to coalesce. Then either choose 'Coalesce VCA Master Automation' from the Track menu or right–click the VCA Master's track name. The Volume and Mute automations are coalesced onto each of the slave tracks, the VCA Master volume is set to zero and the automation on the VCA Master is cleared. This operation can be undone, and it is also possible to coalesce automation just for a highlighted selection of the timeline.
'Coalescing' the automation on the VCA Master track (left and bottom) applies that automation to all slave tracks within the group, freeing up the Master track's automation curve for future use (bottom right). The composite volume graph is purely for display, and can't be edited, but it is possible to 'coalesce' the slave and Master tracks' automation data onto a single editable graph. Having used the VCA Master to write automation for the whole VCA group, you can impose that automation data on to the slaved tracks, clearing the VCA Master's own automation graph for a fresh go. First, select the VCA Master track you want to coalesce. Then either choose 'Coalesce VCA Master Automation' from the Track menu or right–click the VCA Master's track name. The Volume and Mute automations are coalesced onto each of the slave tracks, the VCA Master volume is set to zero and the automation on the VCA Master is cleared. This operation can be undone, and it is also possible to coalesce automation just for a highlighted selection of the timeline.
When you go to delete a VCA Master track, Pro Tools also offers you the option to coalesce its automation data. If you select Yes, Pro Tools coalesces the data and deletes the VCA Master — an operation which cannot be undone! This feature is very important if the Session is going to be opened on a pre–v7.2 or LE system, as they do not support VCA groups. If you use 'Save Session Copy as v6', the coalescing process happens automatically.
Another benefit of VCA groups is that they use no mixer plug–in resources, and so keep the DSP usage down when you're building complex mixers within Pro Tools. All in all, there is no doubt that the VCA grouping feature is a welcome addition to the options for managing tracks and mixing, although it is let down by the inconsistency in the way the faders function and the automation is handled.
The Modify Groups Window

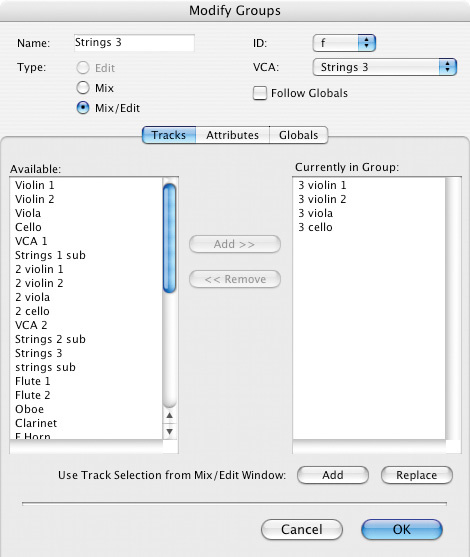
 The Modify Groups window is now divided into three panes: Attributes, Tracks and Globals.From version 7.3, it is possible to have up to 104 groups arranged in banks of 26 group IDs, in Pro Tools LE as well as HD. With so many new group–related features appearing in recent versions of Pro Tools, the Modify Groups window has changed out of all recognition, in both LE and HD. It used to be a small window where you could name the group and determine if was an edit, mix or edit and mix group, and that was it!
The window now has three pages. Tracks allows you to add tracks to and subtract them from a group easily, similarly to how you'd choose whether plug–in parameters should be automatable. Before v7.2, you had to reselect tracks and overwrite the group.
Attributes is where you can determine which parameters (attributes) the grouping will apply to, and as you can see from the list, the options are very extensive, even extending to plug–in controls and plug–in bypass! This means you can, for example, now have a set of EQs across the slave tracks in a group, and when you change the parameters on one plug–in, they will all change. As with the faders, you can apply an offset on just one of these by holding down the Ctrl key and changing a plug–in setting. You can also link all the send level controls, as well as pans and LFE levels.
Six presets along the bottom can be used to store your favourite combinations of grouped attributes, to make it quick and easy to configure other groups, while the Globals page allows you to configure a 'master preset', from which any group can be made to take up attributes if you click on the 'Follow Globals' tick box.