Small and affordable it may be, but Digidesign’s Command 8 is also a surprisingly versatile and powerful tool for controlling Pro Tools.
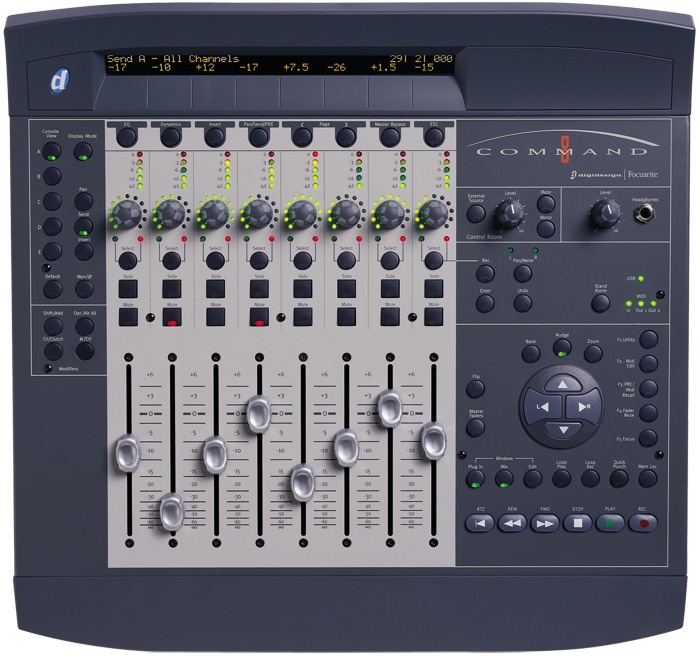 I am sure most of those in need of a cost–effective, moving–fader control surface for Pro Tools would immediately think of Digidesign’s Command 8 (around £900). This is certainly what I did: I have one beside me now, and most of the time the faders are what I use it for, either when I want to ‘feel’ a mix or when I need to move more than one fader at a time. It is an approved, supported control surface that won’t break the bank. However, since I got it I’ve discovered that the Command 8 can do much more than merely control channel levels in Pro Tools, so this month we’ll be looking at the additional functionality and features that this control surface implements.
A Control Surface With A View
To start with, there are three view modes that can be selected on your Command 8. Home View is the default mode, and is what you will see once you have opened a Session in Pro Tools. In Home View, the track names are displayed on the bottom row of the display and the rotary encoders are set to the Pan settings, which is indicated by the ‘Pan L’ display on the top row.
When you hit one of the Console View Selectors on the left–hand side of the Command 8, the unit goes into Console View. This lets you see pan position, send assignments and plug–in assignments for all the channels the control surface has access to. When you adjust either the fader or the rotary encoder on a channel, the name is temporarily replaced in the display by the appropriate data value — for instance, the dB setting for the fader or the relative position of the pan controller.
With Pan selected, all the rotary encoders will display and control the pan settings for all the tracks viewed on the Command 8; this is the default setting in Console View. For stereo tracks this mode will display Pan L, and if you want to access the Pan R setting you will need to press the Pan/Meter button, which is just under the Control monitor section. Note also that pressing a track’s Select button in this mode will select the corresponding track in the Edit and Mix windows, making it easy to do multiple track selection.
 Console View displays a single parameter, such as Send A, for each of the eight channels currently in focus.
 If you have the sends in Pro Tools’ Mix window set up to display the level and pan sliders, pressing a Command 8 Send button in Console View will switch to the appropriate send in the Mix window. When you press the Send button, the Command 8’s rotary encoders display the last send selected on each track. Using the Console View buttons A to E enables you to select and view the respective send assignments; to access sends F to J, you need to hold down the Shift button. Then by pressing button A you access send F, and so on. The top row of the display shows ‘Send x — All channels’ and the bottom row displays the send label. In this mode, the channel’s Select button toggles the track’s send between pre–fade and post–fade. Note also that if you have your Send View in the Mix window set to show the fader and routing for a particular send, as you press the Console View buttons, the Mix window will display the corresponding send view. However, this doesn’t work if your Mix window is showing Assignments.
Pressing the Insert button sets the Console View A to E buttons to enable you to view the appropriate insert on the display. If a track has a plug–in on that insert, the name is shown on the bottom row of the display and the track’s Select button lights. When you press the Select button, the display shows the controls for that plug–in; if there are more than eight controls, the Command 8 displays them in pages. I dislike rotary controls on plug–in windows, as they’re hard to use with mice, so it’s great to have physical rotary controls to adjust the virtual ones. Also, as with the faders, you can control more than one thing at the same time.
When you press the Display Mode button, all the text names on the Command 8 screen are temporarily replaced by the settings values. This works for faders in Home View, send levels in Console View Sends mode, and control settings in Insert mode. There’s also a Mon/ button, which enables you to toggle globally between Auto Input and Input Only on record–enabled tracks.
Channel View
The third Command 8 View mode focuses all the unit’s display and controls on one single track, showing all the plug–in, pan, send and insert parameters horizontally across the display. To access the various sections of Channel View you use the eight buttons immediately under the display.
When you press the EQ button, the Command 8 will identify any track with an EQ plug–in (in other words, any plug–in that ends up in the EQ section of the plug–in menu) by flashing the track title in the display and lighting up the respective track’s Select button. If a track doesn’t have an EQ plug–in assigned to it, the display is left blank and the Select button stays unlit. When you press a lit Select button, the controls for the first EQ plug–in on that track will be assigned to the rotary encoders and shown in the display. The relevant Channel Select buttons control any switched functions, such as Master Bypass. Likewise, the Dynamics button prompts the Command 8 to show any tracks that have compressors, limiters, gates and so on inserted.
Pressing the Inserts button will identify any track that has a plug–in or hardware insert assigned to it. Pressing a lit track Select button will show the names of all the inserts on that track. Now for each of the insert points containing plug–ins the appropriate Select button will light. Pressing one of those Select button will display the first page of that plug–in’s settings and assign the rotary encoders accordingly. Remember that any hardware insert won’t display settings, because it hasn’t got any!
The Pan/Send/Pre button identifies any tracks that have sends assigned to them. When you press the desired Select button the first rotary encoder displays the pan control for that track. Encoder 2 is unused, for some reason. I assumed that on a stereo track it would be the right channel’s pan control, but annoyingly, this is not the case — you need to press the Pan/Meter button to set encoder 1 to right instead of left. Why leave encoder 2 idle when they could have made it possible to adjust both pan controls on a stereo track simultaneously? Encoders 3 to 7, meanwhile, are assigned to Sends A to E; switching to the second page changes their focus to Sends F to J. In this mode the Select buttons again serve as pre/post switches.
 Most Pro Tools plug–ins are set up to assign their eight most commonly used parameters to the first page of Command 8 controls. The Page left and right arrow buttons enable you to scroll through the plug–in parameters, using as many pages as required to cover all the parameters for that plug–in. As you scroll through the pages, the plug–in window shows which controls are assigned to the encoders; you will see that they don’t always follow in their on–screen order. The first page is usually carefully selected to offer the most commonly used parameters.
 Access’s Virus Indigo plug–in: although there are 40 pages of controls, it’s still straightforward to navigate from the Command 8.The Access Virus Indigo plug–in provides an excellent example of how well plug–in adjustment works from the Command 8. When you load it up, you’re presented with 40 pages of parameters to go at, but the first page gives you the eight most commonly used from the plug–in’s Easy page. In the screenshot opposite you can see that the controllers assigned to the Command 8 encoders are identified by the light-blue background in the text field. Now the great thing is that if you have the plug–in window open as you navigate around the pages on the Command 8, the different pages of the plug–in window open and show which parameters are assigned; for example, page 12 of 40 on the Command 8 opens the Filter/Env page on the plug–in, and you can see the parameters that are currently assigned. If you then use the Command 8’s Flip function, you bring the plug–in parameters down onto the touch–sensitive faders, and once you have enabled automation on the plug–in (don’t forget the neat shortcut of holding down all three modifier keys and clicking on a parameter to automate that parameter, without having to open the plug–in’s automation window), you can now easily record the automation changes of any of your chosen parameters.
The Master Bypass button will put the selected plug–in into bypass if you are viewing an individual plug–in. However, if you are displaying multiple plug–ins, as you are when you have pressed Insert in Channel View, then using the Master Bypass button will put all that track’s plug–ins into Bypass. That is a neat trick you can’t do from the QWERTY keyboard. Likewise, because you can open any plug–in from the Command 8, you can control a plug–in that isn’t targeted on screen — you don’t even need to have its window open. Again, this is something you can’t do from the mouse and keyboard; you have to target the plug–in you want to adjust and then make the adjustments.
What You See Is What You Get
One of the neat features of the Command 8 is the way you can control what appears on the Pro Tools screen. For example, the three buttons grouped together above the Transport section enable you to switch between the Edit, Mix and Plug–in windows. The Plug–in button is especially useful: for example, once you have selected a plug–in via Console or Channel View, pressing the Plug–in Window button will open the window for that plug–in on the screen, which is helpful as you navigate through the different parameters. The four multi–function arrow buttons in the navigation section also help you get around the Pro Tools interface. When the Zoom button is enabled, the left and right arrows zoom the Edit window timeline in and out, and the up and down buttons increase and decrease the track waveform height. In Bank and Nudge modes, by contrast, the up and down buttons mirror those on the keyboard, so they can be used to mark in and out points on the fly.
Functional Stuff
The five Function keys at the right–hand side of the Navigation and Zoom section are oft–neglected, but can be useful. The first of them puts the Command 8 into Utility mode, where you have access to a range of information and test procedures. The first press displays the Command 8’s firmware version, which should read v02.01.12. If you suffer from over–sensitive faders, or faders that sit there and move very slightly on their own, make sure you have this version of firmware installed.
F2 lets you edit and name custom MIDI maps when using your Command 8 in ‘stand–alone’ mode, F3 provides control over an attached Digidesign Pre mic preamp, and F4 temporarily stops the moving faders from moving. If you are working in an environment where the mechanical noise of the faders moving is a problem, this can be a life–saver. Finally, F5 is called the Focus button, and toggles the LCD display between the current plug–in view and the previous Command 8 Console or Channel View, which is very useful when moving around the ‘mixer’ on the Command 8.
Troubleshooting & Testing
I include this advice to help anyone with troublesome moving faders. Most of it will apply to any moving–fader control surface, not just the Command 8. If you are experiencing ‘sticky’ faders that fight you or don’t react correctly to your touch, but respond to automation within Pro Tools, try working through the following.
Touch–sensitive faders rely on the capacitance of the human body relative to ground. Human capacitance is different between individuals, and can be changed by our immediate environment. For example, a touch–sensitive fader may react differently to a person with dry hands than one with moist hands, since the moisture will conduct better during the process of attaching you to the circuit. Heavy carpets, socks and soft–soled shoes can further isolate the operator from earth, affecting the ability of the circuit to effectively sense your capacitance to ground. Try using the controller while standing, as a comfortable chair may also be isolating you from ground.
Sometimes the metal paint coating under the fader cap which makes contact with the glide on the fader can peel, causing intermittent contact. Consider checking the underside of the fader cap for missing paint. You can get replacement caps from Digidesign dealers or via the DigiStore on–line.
Dust can also affect the responsiveness of the faders; try blowing out the fader track with an aerosol canister of compressed air.
The utility functions available by hitting F1 include various fader tests which may help to narrow down problems. Triangle, Sine, Step and Cycle tests will move the faders in the selected pattern up and down the fader throw, while the Group test allows you to move all faders together by only touching one. In these tests, the display will report which step–bit the fader is currently on. There are a total of 1024 steps (0–1023), as the faders have a 10–bit resolution. If you have faders that don’t seem to travel the entire throw, or seem as though their range is limited, you should recalibrate the faders by running the Fader Cal test.
Getting back to fader caps, the Touch test will show you the current capacitance of the fader itself, when idle and when touched. Because the grounding in the environment and the capacitance of the operator vary, the absolute value displayed is not crucial: the thing to look for is whether or not the ‘touch’ is registered.
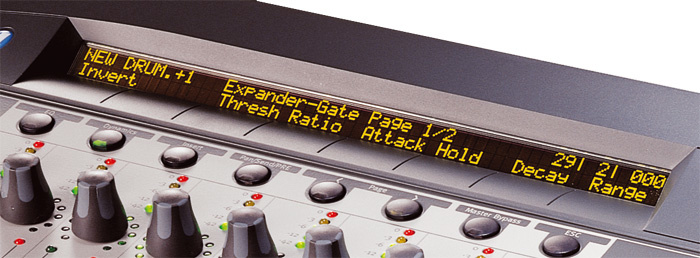
Command 8 Display Conventions
The Command 8 display is limited to six characters per channel, so Pro Tools makes an ‘intelligent’ truncation of the track, send and insert names, but these can be confusing. For example, as I record a lot using an M+S pair, I often have a Waves S1 Imager to decode the M+S pair, However, the Command 8 displays that as ‘s1im=2’ which isn’t the most obvious abbreviation! Others are clearer — Waves Renaissance Compressor comes out as ‘rcmprs’ — but the problem isn’t limited to Waves plug–ins. Digidesign’s Revibe comes out as ‘revb=2’ and their Reverb One as ‘rvro=2’.
If you’re puzzled by the ‘=2’, it indicates that a plug–in is stereo — a 5.1 Revibe is displayed as ‘revb=5’. Personally, I would rather Digi used those two characters to make the abbreviated name clearer. There also seems to be no logic to the use of upper and lower–case characters for the control and plug–in names: some plug–ins use only lower case, some only capitals and others some of both.