
This month, we untangle the intricacies of the XV file system, as well as tracking down some useful software utilities and web sites for Roland synth users.
In Part 1, I discussed how to back up synth-based XV5080 Patch data. In this second installment of XV & JV Tips, I'm going to look in more detail at the process of backing up and organising XV Performances and Patches that use samples.
Storing Samples On SCSI Drives & Smart Media Cards
MIDI SysEx dumps are only appropriate for purely synth Patches, because sample data cannot be saved this way. Sample data must be saved either to a SCSI drive (such as an Iomega Zip or Jaz drive) or a Smart Media card, and can only be saved along with a complete set of XV archive data. For the purposes of this article, I'm going to use the term Setup to refer to the entire contents of the XV5080, which includes all its Patches, Performances and samples.
There is one principal difference between Smart Media cards and SCSI drives, which becomes especially relevant when saving sample-based XV Setups. The XV will allow the creation of multiple folders on a SCSI drive, but not on a Smart Media card; therefore, when saving to a SCSI drive, each Setup can be saved into its own folder, within which a separate folder named Sample is automatically created, containing all the samples relevant to that Setup. If you subsequently save another Setup which uses different samples, that too can go into its own folder, together with its own samples folder. Thus, when you reload a particular Setup, it loads only those samples that are relevant to it.
If two or more Setups (saved into their own folders) happen to use any samples that are common to both Setups, then each Setup's Sample folder will contain duplicates of those samples. The only way to avoid this rather cavalier wastage of disk space is to save both Setups to the same drive directory level (at the root level, for example, or within the same folder) so the samples of both Setups are saved into one common Sample folder. This may seem like a cracking idea, but it can be fraught with doom and disaster unless you are aware of the XV's internal sample organisation, and particularly its arguably draconian disk/card archiving procedures. So at this point it's worth looking at a series of hypothetical situations which illustrate how best to avoid unpleasant surprises. These examples will assume you are saving to a SCSI drive unless stated.
Saving A Synth-only Setup
The easiest scenario to deal with is if you have no sample-based Patches to save. In Disk mode, press Save then Drive (note that these are both on-screen menu tabs accessed through the hardware function keys below the LCD, but let's pretend they're normal buttons to keep the descriptions simple). Select your drive, and hit OK. Now specify the file name and press OK again to save your Setup as an SVD file to the root directory of the drive.
You can save as many Setups as you like to the drive's root directory, disk space permitting. There is no need to worry about placing them inside folders, as there are no dependent samples to take into account. As explained last month, you can easily reload individual Patches from these Setups into user memory directly from disk.
Saving Setups In Individual Folders
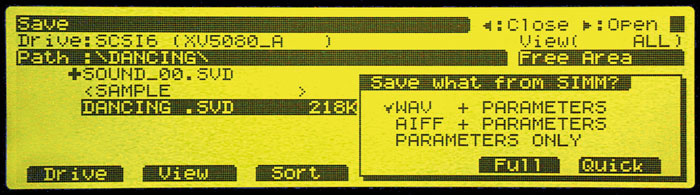 If your setup includes a number of sample-based Patches, then things start to get more tricky. Let's assume you are using a fresh, formatted disk for the moment. You have two options, the first of which is the infinitely preferable 'separate folder' method. In Disk mode, select your drive as before, and then create a new folder by pressing New, naming it appropriately before pressing OK. Now highlight your new folder and click the right cursor button to open it up. Now finish saving the Setup as before. A 'Save What From SIMM?' prompt will come up, where you choose exactly what will be saved. There are three choices: WAV + Parameters, AIFF + Parameters, or Parameters Only. You will want to save everything, as this is the first time you have saved the file, so select one of the first two options, depending on the audio file format you prefer.
The final choice to make is Full or Quick. What's the difference? Well, Full saves all the XV's samples, overwriting any samples that may already be in the Sample folder. 'Quick' will save only the samples that are new since the last save, skipping (in other words, not overwriting) any that already exist on disk. Since our fresh disk has no samples already saved, either Full or Quick will suffice in this instance. When the save is complete, you end up with a folder containing an SVD file (the Setup itself) and a Sample folder containing all the relevant samples, together with an additional file called SMPL_PRM.SVP, of which more in a moment. If at a later date you wish to save a brand-new Setup (that uses completely different samples) to the same disk, simply repeat the above procedure, making sure to create a new folder for the Setup, within which a unique folder is automatically created for the new samples.
 Figure 1. Saving each XV Setup in its own folder ensures that only the necessary samples are loaded with each Setup, but it may mean that disk space is wasted by duplicating samples, for example 0005.WAV here.As you use any given Setup, and make changes to it, you'll probably find yourself wanting to resave an updated version. Here's how best to do it. With the edited Setup loaded into the machine, enter Disk mode and select the drive you want to save to. Now locate and highlight the Setup you wish to overwrite and press Save. Ignore the naming box that appears (because we want to overwrite the Setup) and click OK. At the 'Save What From SIMM?' prompt, select WAV/AIFF + Parameters, and then Quick. The XV should now save the Setup, deleting from the Sample folder any samples you've deleted from RAM, skipping over all existing samples rather than re-saving them (which makes saving much quicker), and saving any new samples. Job done!
Of course, you might want to save your new Setup under a different name, so you can go back to your older version later if necessary. However, if you do this, you must make absolutely sure not to delete any of the samples from RAM unless you are convinced that they're redundant to both Setups, otherwise they will be deleted from the Sample folder on disk and your old Setup will become useless.
XV5080 Editor
 For those who prefer a more visual approach to programming the XV5080, the XV5080 Editor application is available free from the Roland US web site. This PC & Mac (OS 9) program is a fairly hefty download at 37.2MB for the Mac version and 12.1MB for PC, although this will present no problem for you hot-rodded Broadbanders out there.
The download includes options to install three different versions — one that works with the XV5080, XV3080 and XV88, and separate ones for the XV5050 and XV2020. Also bundled is XV Librarian, a useful means of archiving XV Patches to your computer. Although it is an alternative to saving SVD files to card or disk, remember that this SysEx-based form of storage does not transfer samples to the PC, nor does it include any sample-management facilities.
Saving Setups To The Root Directory
When saving more than one Setup to a disk, I would personally not recommend saving Setups to the drive's root directory and sharing a single Sample folder between them, despite the space-saving advantages. This is because all samples in that folder which are not used in any subsequent Setup you save will be deleted — they'll be as gone as a gone thing! And if a new Setup contains none of the samples already in the folder, then all those existing samples will be automatically deleted before saving the new Setup!
 Figure 2. Saving each XV Setup to the drive's root directory means that all Setups will use a common sample folder, avoiding duplications. However, loading any Setup will load the entire contents of the Sample folder. Although efficient in terms of disk space, this method of saving Setups can lead to a number of operational problems.To avoid such a catastrophe, you have to make sure that you first load your previously saved Setup (and thereby all its samples) and only then import any new samples. Once that's done, you can create Patches and Performances with the new samples or load Roland-format sample-based Patches and Performances, or whatever. All the samples are appended to the existing samples in RAM (up to the maximum capacity of your XV's SIMM). When you're ready to save the Setup, make sure that you choose Quick, not Full, as the method. As long as the Setup is given a unique name, it will be saved as a new SVD file, and the new samples will be added to the sample 'pool' in the Sample folder. The existing samples will be skipped over, and the SMPL_PRM.SVP file will be updated. Now, when you load either of the saved Setups, the XV5080 is forced to load the entire contents of the Sample folder — even if the Setup you load only uses one or two of those samples. It should now be clear that saving more than one Setup to the root directory is not such a cracking idea if you value your sanity.
If you really must follow this foolhardy thread, the major caution to observe is that you should never delete any of the existing samples from RAM, even if your the current Setup uses only a few samples. If you do, any other Setups previously saved to the root directory will almost certainly become useless. Plus, when you do save your updated Setup, always select the 'Quick' option, otherwise you will be sitting around for a week waiting for the entire Sample folder to be resaved!
On-line Resources
- 5080 Land
 This unofficial XV5080 site has been created by a fan of the synth, and provides lots of XV5080 information and links, as well as a user forum.
- Egroups' XV Forum
An active web-based user forum for XV-series synth users.
www.egroups.com/group/Roland-XV
- Lakewood Studios
Another collection of XV5080 news, information and links.
www.lakewoodstudios.com/XV-5080
- Roland US
Downloads on offer include the latest v1.30 OS, SMF updater utilities, and the XV Editor & Librarian software. Also on show are the excellent LCDX sample libraries, repackaged from the Roland Project Series, but these are only shipped in the US, so you'll have to get an American friend to buy them for you if you want them!
- Synthzone
A must-visit general synthesis resource site which carries links to samples, patches and utilities for all makes of synth — go there!
Updating Parameters In A Previously Saved Setup
The following method applies whether you have saved a Setup to its own folder, to the root directory, or to a Smart Media card. In this scenario, you have already saved a Setup to disk, but have made subsequent changes since then, and you now want to update the saved version. The difference this time is that you have only made changes to Patch or Performance parameters — for example, changing envelope settings, effects, filter settings, sample key splits. You have not altered the actual sample data in any way by adding, deleting or replacing any samples.
From Disk mode, select the destination drive as before, then locate and highlight the Setup you wish to overwrite and press Save. Ignore the naming box that appears (because you want to overwrite the Setup) and click OK. At the 'Save What From SIMM?' prompt, select Parameters Only, and then Quick. The XV will now overwrite only the Setup's SVD file — it will not make any changes to the Sample folder. This is the fastest of the saving routines, and takes only a few seconds to complete.
Saving Setups To Smart Media Cards
If you wish to save to a card, it is best to use a high-capacity Smart Media card. The maximum compatible size for the XV5080 is 128MB, which makes sense, as the maximum RAM size is also 128MB. Smaller-size cards work fine, but bear in mind that all your sample data may not fit.
The XV does not allow for the creation of folders on Smart Media cards — so you will always be saving to the card's root directory. For the reasons described above, it is therefore not recommended that you archive more than one sample-based Setup on a card. The archiving of multiple Setups is definitely best done using a SCSI drive and the 'separate folder' method.
However, Smart Media cards have other very practical applications. One way I like to use them is as instant-access sample libraries; for example, I have one dedicated 128MB card stuffed full of my favourite drum samples — no Setups, just the samples themselves, copied via a card reader straight out of my PC. I can import what I need in seconds and pop it into a Rhythm set or a Patch, without having to rummage through CDs or disks. (What a shame that the XV cannot stream samples directly from the card!)
Alternatively, you can make use of the XV's Auto Load facility (available as a tab in the main Disk mode screen). When this feature is activated, a user-specified Setup is automatically loaded when you power up. In this way, you could dedicate a Smart Media card to your favourite sample-based 'songwriting kit', which will be ready to rock from the word 'go'.
S/PDIF Output Gain
 If you are using the XV's S/PDIF digital output, don't forget that you can vary its output gain over a ±12dB range from the first Outp&EQ page in System mode. The 0dB output setting does not provide unity gain — and for very good reasons...
Let's say you've imported a sample of a sine wave which has been normalised to 0dB. Now you create a Patch using this wave, with the WG (wave gain) set to zero, and the S/PDIF output gain set to 0dB. If you play a single note at maximum key velocity, the actual output level is -24dBFS. If it were output at 0dBFS, the level would accumulate if more than one note were played and you would get severe distortion. Since the XV is designed for 128-note polyphony and multitimbral performances, this would clearly not be of much use! Therefore, some additional headroom is needed to provide a sensible total output level for multitimbral performance. Nevertheless, you may still find the total S/PDIF output is averaging too low at the 0dB gain setting — I find that +6dB is often needed to bring the XV in line with all my soft synths and sequencer audio.
Assignment Of Samples In RAM
The Vulcans would no doubt love the logical way the XV5080 organises its internal samples, but for us spontaneity-driven Terrans it can impose some frustrating limitations. Basically, imported samples are assigned to numerical slots in the order in which they are loaded. So, assuming the XV's SIMM starts off empty, importing a single snare sample puts it into the first slot. If you then load, say, a Roland S700-format guitar Patch consisting of five samples, they will be placed into slots two to six. Loading a further ten-sample Patch will place those samples into slots seven to 16 — and so on. A quick examination of the sample list will show all sixteen samples in the order in which they were loaded, each bearing its original file name. All perfectly sensible so far...
Let's say we now save that Setup to disk. If you then navigate to the disk's samples folder, you will see a list of the saved samples, but none of the samples bear their original names — instead, they have been renamed numerically as 0001, 0002, 0003, and so forth. This of course does not help to identify which sample is which — although you can always highlight each sample in turn and press the front-panel Preview button to audition it from the disk. Do not be tempted to rename these samples! If you do, the XV will not be able to reload the Setup correctly. The whole system is hinged around matching specific samples to specific numerical slots, and the XV achieves this by renaming the samples after the slots in which they originally resided. If you alter a saved sample's numerical file name it instantly becomes orphaned as far as the Setup you have saved is concerned. In other words, if a Patch's samples were in slots two to five when a Setup was saved, they must go back into slots two to five when the Setup is reloaded. So where do the samples' correct file names go? They are stored as part of the SMPL_PRM.SVD file which lives in the Sample folder, and when the Setup is reloaded it allows the samples' correct names to be restored.
This numerical allocation system has further knock-on effects — say you were to delete some samples from RAM. You might expect that the sample list would reshuffle itself so that the remaining samples would be moved up the list to close the gap. Not so on the XV. All remaining samples retain the numerical positions they had when first loaded, so you get blank slots in the list where samples have been deleted. Even if you were to load further samples, they would be appended to the bottom of the list. The blank slots remain blank, in order to preserve the samples' original numerical hierarchy.
Maximum Sample Size
Even though the XV5080 can have 128MB of memory installed, the maximum size for a single sample is still restricted to 64MB, which translates into a stereo sampling time of three minutes and 10 seconds at 44.1kHz. If you want to trigger longer events than this, you could double that time by working with mono samples, or if that is unacceptable reduce their sampling rate before you import them.
Alternatively you could divide a very long sample into two or more manageable chunks, and trigger them sequentially from a keyboard or sequencer. Obviously, very long samples are best dealt with using the audio side of a sequencer package, so if you really want to do it on the XV, be prepared to compromise.
Reloading Saved Patches
Last month, I discussed saving XV Setups of purely synth-based Patches and Performances, and also how to extract Patches and Performances from disk on an individual basis. So, can sample-based Patches be individually extracted from a saved Setup in the same way? If we follow the procedure for loading individual synth Patches, it appears to be possible — the XV certainly makes no attempt to stop you trying! However, the samples' numerical hierarchy presents some problems.
 Figure 3. Here is an example of the limitations encountered when attempting to load individual sample-based Patches from previously saved Setups. Although the first two Patches here load fine, the third fails to load correctly, because the samples are loaded into different slots than they originally occupied.
First of all, the XV's sample RAM must start off empty. For reasons explained below, loading any Patch individually when the RAM is already occupied will fail. Have a look at the example shown in Figure 3. If you begin by loading Patch one from Setup one, this will load successfully, because its samples reload back into the same numerical slots from whence they were originally saved. If loaded next, Patch two from Setup one will also succeed, its samples appended to those of Patch one and thus back into their original numerical slots.
Patch three from Setup one, however, will never load on its own correctly under any circumstances, because sample 0009 was deleted. Its samples will be appended to whatever is in the RAM — in this example, sample 0010 will end up in slot nine — and the numerical hierarchy will be disrupted. As a result, the Patch's partials will contain the wrong samples. And, of course, by the same token, if you loaded these patches out of order, they would all fail. If any of them were appended to samples already in RAM, they would all fail. You would not pass Go, and £200 would definitely be out of the question...
Regarding the extraction of individual sample-based Performances from a saved Setup, I have rarely had much luck when attempting to do this. The loading progress is usually interrupted by an Illegal File Format message, normally just before the end — I have never discovered what causes this. However, the only reason you'd need to extract a single Performance would be if you wished to append that Performance to the existing contents of the XV. But, as we've just discovered, if the XV already has any samples in RAM, the appended Performance would fail anyway due to the inevitable disruption of its samples' numerical hierarchy.
Deleting Patches From RAM
 In the course of creating a Setup, it is quite probable that you will load more samples than you eventually need, particularly if you are loading complete Roland-format Patches from your sample library. You might, for instance, have loaded three different flute Patches in order to choose the right one. It would waste disk space saving the unwanted flutes, so you'll want to delete them before you save. The older Roland SP700 and S760 samplers had a neat tool for this called Listen Delete which, when you played your song sequence into the sampler, simply marked any samples for deletion that had not been played. Unfortunately this feature is not present on the XV5080, so deletion must be accomplished manually. In System mode, press Utility then Delete. Select Patch as the Type and then scroll down the list using the Mark button to tick the Patches you want to dispose of. Pressing Delete and then OK completes the job. The Patches, and their associated partials and samples, should have gone.
 Deleting Patches doesn't necessarily delete the samples they contain. If you want to remove any such stragglers, an easy way to do this it to go through the list of samples in the deletion screen, using the Volume control's preview function to identify them.But have they? For reasons that are not at all clear, the XV sometimes fails to clear all of the samples, and occasionally leaves behind some partials too. To check that nothing unwanted remains, stay on the Delete page and select Partial in the Type field. Scroll down the list (which may be quite long) and check for any partials that you know should have been deleted. This may be a tricky task if the partial names are unfathomably cryptic... if you are unsure, don't delete anything. Partials in themselves take up negligible disk space — they are only parameters. Nice as it is to keep things neat by removing redundant items, it's better to be safe than sorry.
Next, change Type to Sample. Scroll down this list to check for 'rogues' that should not be there — this is much easier than with partials, because you can highlight and audition them using the front-panel Preview button. Mark the rogues, if any, and delete them.
Performing OS Updates
It's always worth keeping your XV's operating system up to date. Although Roland do not specify exactly what changes each new version of the OS brings, the latest system seems very stable compared to some earlier versions which occasionally caused the XV to 'freeze' for no apparent reason. The OS is now at version 1.30, which can be downloaded from the Roland US web site (see 'Web Resources' box for more details), and comes either in SMF (Standard MIDI File) or Smart Media form.
 The SMF update download consists of 32 MIDI files of System Exclusive data and a Readme file of instructions. After priming the XV to receive an update, the MIDI files must be loaded into a sequencer and played into the XV one after the other, and in numerical file name order. If the sequencer is set to play at 120bpm, the whole process takes about 40 minutes. Using this method, I've never had any problems, although numerous cries for help on Internet XV forums suggest that other people have. This may have been down to any number of reasons — the files may have been too large for the sequencer (extremely unlikely these days) or perhaps MIDI Clock transmission was inadvertently left switched on.
Happily, a more attractive and reliable method of updating with SMFs can be found in the Support section of the Roland US site. Two very useful free utilities are available — a PC utility called UpdSMFJ and a Mac utility called QMIDI. Both of these are purpose-built SMF players designed to remove some of the drudgery from this form of OS updating. I could not test QMIDI (being a PC user), but the PC updater is simplicity itself. Just make sure the 32 MIDI files are isolated from other MIDI files in their own folder, point the utility at the folder, set the MIDI output port and click the Send button. The program plays all 32 files to the XV in order, without you having to interact at all. These utilities should also come in handy for updating the OS of any other kind of synth that uses the SMF method, on the condition that they can cope with the fixed speed of data transfer — some synths need it slow!
The Smart Media update is a single-file download that you copy via a card reader onto an XV-formatted Smart Media card of at least 4MB capacity. All you do is insert the card into the XV and power up while holding the Dec and 'C' buttons, pressing the Inc button when prompted to start the update. The great advantage of this method is that it takes well under a minute to complete, and is extremely reliable.
Archiving Setups To CD
Sooner or later we all learn the hard way that computer data of any kind cannot be considered 'real' unless it exists in at least two places. Since Zip disks are relatively expensive, archiving your XV Setups to CD is a much cheaper and more practical means of long-term data storage. Fortunately, the XV reads and writes to standard PC-formatted disks that can be accessed by either a PC or a Mac — hence the option to save samples as WAVs or AIFFs. You could simply whack a full Zip disk into your PC and burn it directly to CD, but of course that might be considered rather wasteful, as you can store around seven completely filled 100MB Zip disks' worth on a CD. However, CD-R disks are cheap as chips, so how much data you want to burn to CD is entirely up to you. I have recently adopted the practice of making two identical CD backups, and storing them in those cute slimline dual-capacity jewel cases. These occupy no more shelf space than a normal single CD case. I mark one of the disks as 'archive' and never use it — it's my backup copy in case the other disk kicks the bucket!
Transferring your Zip disk contents to PC naturally requires that your computer has the same type of drive attached to it. If you don't have a Zip drive on your computer, an alternative solution would be to save each Setup in turn to a Smart Media card, and transfer that to your PC via a card reader. I have a USB 250MB Zip drive attached to my PC, so it's a simple matter of drag-copying the Zip's files onto my hard drive. I do this anyway, even if I'm not in the mood to burn a CD, as it's yet another form of backup in itself. Using a CD-burning utility, you can then compile as many XV Setups as the CD can hold before burning the disk. If your XV has a CD-ROM drive attached, you can simply reload Setups straight from the CD. Alternatively, you could copy selected Setups from the CD back onto a Zip disk. If you do reload the XV directly from a CD, bear in mind that it takes the XV longer to register the presence of one of these disks than it does a Roland-format CD or a Zip disk, so be patient with it.
XV Expert
There has been a lot to cover with the XV5080, and hopefully these first two parts will have helped you to get more from this fine instrument, as well as clarifying some of its idiosyncrasies. In Part 3, we will turn the spotlight on the older JV1080 and JV2080 modules, with another selection of tips and workarounds.
Roland XV & JV Masterclass: Part 1 of 4
Roland XV & JV Masterclass: Part 2 of 4