This month, we hunt out the devils in the detail of a metal mix!
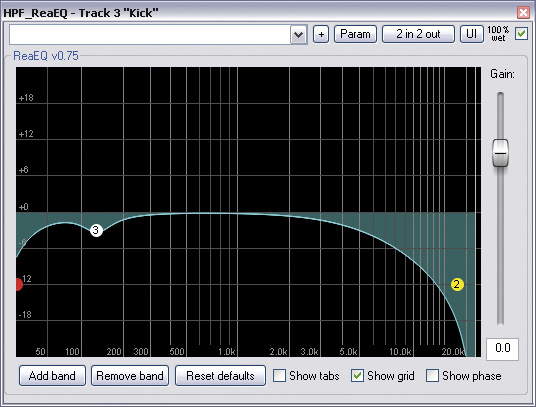
 and bass guitar (red trace). To clear room in the mix for the bass guitar's main frequency peak, Mike cut this region from the kick drum using EQ (below).") In the spectrum analyser display you can see the relationship between the frequency ranges of the kick drum (yellow trace) and bass guitar (red trace). To clear room in the mix for the bass guitar's main frequency peak, Mike cut this region from the kick drum using EQ (below).Although he was keen to pick up tips regarding all aspects of the production, his priority was to find out how to achieve an appropriate lead‑vocal sound. This had been a long‑time source of frustration, and he'd already been right round the houses experimenting with all sorts of different processors and effects. No matter what he tried, though, he struggled to make his voice sit in the mix without it sounding thin, and he was even wondering if he might need to re‑record the vocals differently. The low end of the mix was also a concern, because he'd found that the bass guitar became overbearing and rumbly well before the bass part was really audible enough in the balance.
In the spectrum analyser display you can see the relationship between the frequency ranges of the kick drum (yellow trace) and bass guitar (red trace). To clear room in the mix for the bass guitar's main frequency peak, Mike cut this region from the kick drum using EQ (below).Although he was keen to pick up tips regarding all aspects of the production, his priority was to find out how to achieve an appropriate lead‑vocal sound. This had been a long‑time source of frustration, and he'd already been right round the houses experimenting with all sorts of different processors and effects. No matter what he tried, though, he struggled to make his voice sit in the mix without it sounding thin, and he was even wondering if he might need to re‑record the vocals differently. The low end of the mix was also a concern, because he'd found that the bass guitar became overbearing and rumbly well before the bass part was really audible enough in the balance.
Although the likes of Judas Priest, Iron Maiden, and Saxon don't trouble the charts as often as they used to in their '80s heyday, there are, nonetheless, many musicians who still relish their classic heavy metal sounds — amongst them SOS reader Johnny Lokke, whose track 'Promises & Lies' is the subject of this month's column. Listening to Johnny's own mix of the song, it was immediately apparent that he was not only an enormously accomplished singer, but was also well aware of his chosen genre's musical and arrangement conventions. Despite this, he'd been unable to get his production sonics to a state where they bore comparison with those in his record collection, so he turned to Mix Rescue for advice.
Mix Rescue | January 2011 by Sound On Sound
The Secret To Bass: Everything But The Bass!
I asked Johnny to send his raw, unprocessed multitrack audio files, so that I could import them into my own Cockos Reaper‑based mix system. As expected, it was these areas of the mix that demanded the lion's share of the mixing time. The simpler of the two tasks was sorting out the low end. As usual, I applied 20Hz high‑pass filtering pretty much across the board, to avoid subsonic sludge, although this was only a precaution, as none of the tracks had serious problems in that department. After a trawl through some reference mixes that Johnny had sent, it was clear that extreme low frequencies played little part in the style, so I also high‑pass filtered the kick and bass (again at 20Hz) to keep them from impinging unduly on the overall mix headroom.
Interestingly, the frequency‑balance of the supposedly problematic bass part was fine, and survived through to my final remix without any further EQ. So why had Johnny experienced difficulties with it? The answer is that the problems came not from the bass part, but from various other tracks that were interacting with it in the context of the full mix — chiefly, the drum tracks.
; and ducking of the bass triggered via a side‑chain feed from the kick drum (lower screen).") Some dynamics tweaks also helped tighten up the combined bass kick sound: light gating of the kick drum to reduce its LF ringing (upper screen); and ducking of the bass triggered via a side‑chain feed from the kick drum (lower screen).Because the drums had been created using Steven Slate's excellent sample collection, and because the choice and tuning of the raw sounds had been well chosen to suit the song, it wasn't actually too tough to achieve a suitable drum sound — but I did need to put in some additional work to avoid unbalancing the bass‑guitar line. For example, there was a persistent pitched kick‑drum resonance coming through the room mics at 74Hz, which reduced the bass‑note definition, and cutting that out with a notch filter tightened the low end noticeably. A bit of gating on the kick also wrought an improvement, not substantially changing the envelope of the hits, just preventing some excessive low‑end resonance from clouding the picture in that frequency range. When you're dealing with kick‑drum patterns as fast and detailed as those in up‑tempo metal, your sample can't afford to ring on very long, or the whole low end just dissolves into a muddy mess.
Some dynamics tweaks also helped tighten up the combined bass kick sound: light gating of the kick drum to reduce its LF ringing (upper screen); and ducking of the bass triggered via a side‑chain feed from the kick drum (lower screen).Because the drums had been created using Steven Slate's excellent sample collection, and because the choice and tuning of the raw sounds had been well chosen to suit the song, it wasn't actually too tough to achieve a suitable drum sound — but I did need to put in some additional work to avoid unbalancing the bass‑guitar line. For example, there was a persistent pitched kick‑drum resonance coming through the room mics at 74Hz, which reduced the bass‑note definition, and cutting that out with a notch filter tightened the low end noticeably. A bit of gating on the kick also wrought an improvement, not substantially changing the envelope of the hits, just preventing some excessive low‑end resonance from clouding the picture in that frequency range. When you're dealing with kick‑drum patterns as fast and detailed as those in up‑tempo metal, your sample can't afford to ring on very long, or the whole low end just dissolves into a muddy mess.
Low‑frequency Build‑up
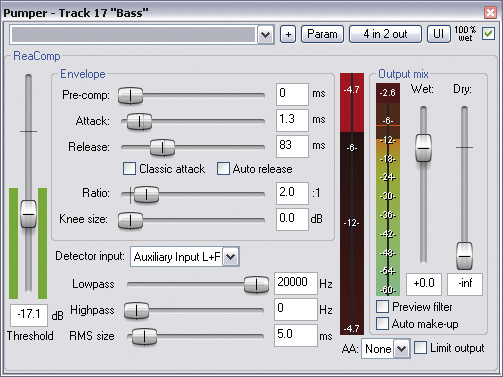
In spite of these measures, the combination of kick and bass was causing an undesirable frequency build‑up at around 130Hz, where the bass had its strongest spectral energy. Somewhat counter-intuitively, this gave the subjective impression that the bass line wasn't very consistent, even though soloing the bass track revealed it to be quite evenly played — especially after I'd levelled it further with 4‑5dB of soft‑knee, 5:1 compression. My strategy, therefore, involved first using a 3dB dose of peaking cut at 130Hz on the kick‑drum mic to create a slot for the bass guitar's characteristic spectral region to pop through more dependably; and then applying ducking to the bass guitar mic, triggered from the kick‑drum. I used the new ducking mode in Reaper's ReaGate for the latter (I've used a compressor to get similar results in other mixes), and the basic idea is that you set it up so that it momentarily reduces the bass‑guitar level whenever the kick‑drum hits, thereby counteracting the level build‑up from the two instruments playing at once.
That lot almost provided me with the final remix bass sound, but there was one last niggle I noticed at the last moment, while checking out the track on some secondary speaker systems: whenever the chorus section kicked in (with the lyric 'Stepping out...'), an over‑prominent pitched resonance would appear at 146Hz, unbalancing the mix and making it feel bloated. Initially, I thought I might tackle this simply with a narrow EQ notch across the mix outputs, but I didn't like what this did to other parts, so I gritted my teeth and went on the hunt for the source of the malaise. Muting the bass part didn't remedy the situation, so I moved on to the guitars — and having discovered the resonance lurking there, it was simplicity itself to tame it with a narrow EQ notch.
The Battle For Vocal Presence
, the main electric guitar subgroup (middle), and the solo guitar's delay return (right).") EQ cuts in the 3‑5kHz 'presence' region were used on a number of instruments to allow the lead vocals to come through the mix more clearly. For example, here you can see the EQ plots for the snare close mic (left), the main electric guitar subgroup (middle), and the solo guitar's delay return (right).
EQ cuts in the 3‑5kHz 'presence' region were used on a number of instruments to allow the lead vocals to come through the mix more clearly. For example, here you can see the EQ plots for the snare close mic (left), the main electric guitar subgroup (middle), and the solo guitar's delay return (right).
As far as EQ was concerned, dealing with the lead vocal involved the same kind of approach I'd used with the bass: cutting away frequency regions in other parts that conflicted with the vocal's characteristic frequencies. Of particular importance for vocals in any rock style is the 3‑5kHz region of the spectrum (often called the 'presence' region), which is the range that typically helps them sound clear, upfront, and aggressive. The challenge is to optimise the cut‑through of the vocal's presence region, despite competition from all the hard‑edged snare, cymbal, and guitar sounds, which will try their best to mask the singer's presence frequencies, dulling the vocal tone. Although many people will just whack on a whopping great 4kHz vocal EQ boost to try to keep the vocal clear when a mix gets busy, the problem is that this usually pushes the overall tonality of the mix out of kilter, producing a harsh and fatiguing final mixdown. It's therefore much better, if possible, to aim subtractive EQ at tracks that are competing with the vocal.
The drums were the worst offenders in terms of masking the vocal presence, so they required a certain amount of remedial work. The biggest change was a 4dB peaking cut at 4.6kHz on the snare‑drum track, but I also took 4.5dB of high end off the higher crash cymbal above 4kHz, and reduced the HF emphasis of the kick, hat, ride and room mics slightly. The main rhythm guitars were also trespassing a little on the vocals, so I carved 3.5dB out of them at 3.8kHz too. However, although these measures went some way towards keeping the vocal clear, there were other, more important factors that played their part in delivering the final vocal sound.
Evening Out The Vocal Tone

The biggest problem by far with the vocal was that its tone was extremely uneven: super‑hard and cutting one moment; round and fuzzy the next. To be fair on Johnny, this is partly an inevitable practical side‑effect of this kind of super‑powerful vocal delivery — it's just not feasible to keep a very consistent frequency balance when your vocal cords are teetering on the edge of overdrive! However, I suspect that his use of a Shure SM7 during tracking may also have been to blame. Don't get me wrong: the SM7 is a first‑class vocal mic, but it sounded as if he'd moved around a lot while performing, thereby falling foul of its less‑than‑natural off‑axis frequency response and strong proximity‑effect bass boost. (That said, one has to bear in mind that emotion is everything as far as vocals are concerned, so I'd only try to remedy this while recording if that didn't interfere unduly with obtaining the most committed performance.)
It has to be said that I had also made a rod for my own back in this respect by tightening the vocal tuning. While I felt that this was essential to achieve a proper blend between the vocal and the backing track, Melodyne struggled to deal with such an edgy‑sounding vocal timbre, dulling the tone of some notes during the corrective process. The formant‑correction tool within Melodyne can sometimes help compensate for these kinds of processing side‑effects, but in this instance its improvements were fairly modest.
 The biggest give‑away that a vocal has this kind of tonal unevenness problem is when you can't find a reasonable balance for it in the mix even when it's compressed to kingdom come — which, as it happened, was exactly what I was doing! You don't get a whole lot of leeway in heavy metal as far as vocal levels are concerned, so you have little choice but to restrict the singer's dynamic range quite severely if you want to hear the lyrics and performance details. I'd taken the opportunity to experiment with a variety of emulated classic compressors in search of analogue‑style tonal enhancements while I was at it, but even once I had three compressors in series, registering a total of 20dB gain reduction, the vocal was still ducking and diving in the mix to a disappointing degree.
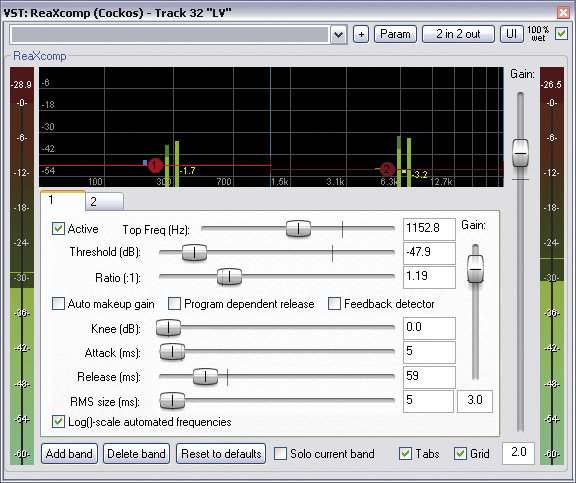
After wrestling with my vocal fader for a few minutes, I finally accepted the fact that I needed to draw on more powerful dynamics tools, so fired up Reaper's multi‑band compressor, ReaXcomp, and split the vocal signal into two bands, either side of a 1.15kHz crossover point (smack in the centre of the mid-range). My idea was to apply a gentle overall dynamic‑range reduction to both spectral regions, and in line with this, I stuck to low ratios (1.19:1 and 1.27:1) and low thresholds (acting on the top 30dB of the vocal signal). Although ReaXcomp defaults to attack and release times of 15ms and 150ms respectively, I decided to shorten those, so that the gain reduction tracked level changes much more closely, and reduced them by factors of around three and six for the low and high bands respectively.
While I did manage to make a significant improvement by these means, it was a bit of a juggling act to get the processing working effectively. I had to aim for a balance between achieving enough gain reduction in each band to even out some of the timbral irregularities while also adjusting the overall gain of each band to preserve an appropriate tone. It's tempting to increase the compression ratio in this kind of situation, to achieve firmer control, but this actually tends to be self‑defeating, in my experience, because it introduces independent pumping artifacts into each band, which start to sound just as unnatural as the unprocessed signal's inherent tonal variations.
I'd be the first to admit that this fix was by no means a complete one, and although it was enough to allow me to achieve a fairly respectable final vocal balance (with the aid of the usual blizzard of level automation data!), you can still clearly hear some variation in the vocal tone. However, given that the only remaining remedy for the problem would have been to automate several bands of parametric EQ throughout the track — a truly hideous task that only Mutt Lange gets paid enough for! — I decided to file any further vocal‑sound improvements firmly under 'diminishing returns'.
Rock Reverb

When your production is as jam‑packed full of instrument energy as this one, you've got to tread very carefully when it comes to adding send effects, or you'll just wash out the mix. So you might be surprised to learn that there were actually nine different send treatments in this month's remix. However, the reason why they didn't make the mix into a stodgy mess was that each had its own, very restricted remit.
Let's consider the three reverbs, for example. The main one was a short stereo plate reverb from the UAD2 platform's celebrated EMT 140 plug‑in, which I selected deliberately to warm the sustain of the vocal and solo guitar parts, as well as adding some subtle stereo width. Some high and low shelving EQ cut kept this treatment well in the background of the mix and out of the way of the bass instruments. In addition to this patch, I used a fairly bright, modified Medium Drum Room preset from Stillwell Audio's Verbiage algorithmic reverb to add stereo width to the drum and guitar images, but sucked 8dB out of the centre of the effects return, using Voxengo's MSED to minimise the impact of this in mono. The widening effect of this reverb meant that I could keep the spread of the dry tracks slightly narrower in stereo, which helped with the mono compatibility of the production as a whole (remember that anything panned to the stereo extremes will lose roughly 3dB relative to central sounds when listening in mono).

A final reverb treatment came courtesy of Lexicon's Pantheon II plug‑in, and was a simple short ambience effect to blend the vocal and tom tracks into the mix. To keep this from drawing attention to itself, I reduced the reverb time to its minimum and damped the high end within the plug‑in, and I was also careful to apply a pre-delay of 15ms to reduce comb‑filtering of the dry sound by the effect. (For a full explanation of this subject, check out the 'Phase Demystified' article back in SOS April 2008.)
Dedicated Delays
 Despite extensive full‑band compression, the lead vocals still struggled to find their place in the mix, because of their fluctuating frequency response — probably as a result of Johnny moving around with relation to his Shure SM7 microphone during recording. Mike's solution involved gentle two‑band compression using Reaper's ReaXcomp.
Bar my usual stereo, pitch‑shifted, widening patch on the lead vocal, all the remaining send effects were delays. A simple, one‑tap, eight‑note delay provided some simple sustain to the vocal parts, and I used Reaper's routing facilities to ensure that the delay repeats returned to the mix with the same stereo positioning as the dry tracks, to avoid narrowing the placement and crowding the centre of the field. A further quarter‑note delay was used to provide the odd audible delay 'spin' from time to time on the vocal and solo guitar parts, with the sends to this effect controlled using the DAW's automation system. If you just leave an effect like this running all the time, you'll quickly drown in delay repeats! In fact, I was so cagey about this that I didn't actually use the normal feedback approach for creating the repeating echo tail, preferring instead to fake the effect using a two‑tap setup — in other words, discrete, zero‑feedback delays of quarter‑note and half‑note durations respectively. The advantage of this is that it gives the subjective impression of a long feedback delay patch within a busy mix context, but doesn't clog up the texture with endless lower‑level repeats that won't be clearly heard anyway. In fact, the only feedback delay I did use was a 3/16‑note ping‑pong patch that I have loaded up in my projects by default, which just gave a bit of sustain smoothness and stereo interest to the opening high‑pitched vocal scream.
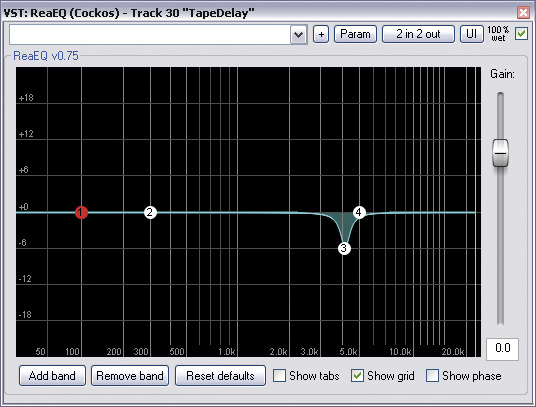
 The solo guitar had its own dedicated delay patch, which I applied not for specific technical reasons, but rather to set the solos apart from the rhythm playing, by giving them their own distinct character. I therefore opted for a more coloured, tape‑style delay, rather than just using the workhorse ReaDelay plug‑in I normally turn to. The plug‑in in question is one of my favourites, the little freeware Tape Delay from developer Daniel Bosshard (aka The Interruptor: www.interruptor.ch). My initial thought had been to use a slap-back delay patch (with a time of roughly 70‑120ms), but I found that this had two unwanted side‑effects: it blended the solo a bit too well, pushing it back into the mix; and it made itself too obvious, because it wasn't sync'ed to tempo. So instead I divided 60,000 by the song's tempo (165bpm) to get the length in milliseconds of a quarter‑note delay, and tried that instead. (Tape Delay has no automatic tempo‑sync, so you have to work things out the old‑fashioned way!) A quarter‑note felt too sluggish, though, so I halved it, and that seemed to work a lot better. I then used the plug‑in's own high- and low‑pass filtering to band‑limit the delay sound, and sent from its return channel to my plate reverb and stereo widener patches. A final touch was to notch out some 4kHz in the delay return, which kept the delay effect fairly understated and clear of the vocal presence region.
Using Haas Delays
 The final stage in the vocal mixing was detailed fader automation, not only of the vocal level itself, but also of its most audible delay send effect.
The last send effect I used was what is often referred to as a Haas delay: a single‑tap delay that arrives after about 30ms, and therefore combines perceptually with the dry signal, rather than being heard as a separate echo. While this might not seem to be a particularly thrilling effect in principle, it becomes useful when you pan the delay return to a different position in the stereo picture than the dry sound, whereupon it creates a very distinctive widening sound that can be very effective on heavy, multi‑layered guitar parts. As with any stereo widener, however, you need to ensure that the treatment doesn't make a mess of your mix when summed to mono — because combining a very short delay with its dry signal can cause phase cancellation, resulting in potentially ruinous comb‑filtering of the sound's frequency response. I therefore took a number of steps to avoid problems.
Firstly, I applied the widening effect to only two of the four rhythm‑guitar layers, and used these guitars only at quite a low level compared with the other two parts (which formed the bulk of the guitar sound). This immediately limited the extent to which comb‑filtering could affect the entire mono guitar sound. I also decided to pan the secondary guitar pair fairly close to the centre of the stereo image, while their Haas delay returns occupied the stereo extremes. That way, the extreme‑panned effect returns lost a couple of decibels compared with the direct sounds, further reducing frequency cancellation. Finally, I chose a fairly long 25ms delay time — where the effect was almost on the verge of separating into a discrete echo — because that also tends to reduce the subjective severity of any frequency‑response undulations.
 Universal Audio's EMT 140 plug‑in, running on their UAD DSP platform, added a subtle sense of sustain to the vocal and guitar parts. However, Mike took care to use a short reverb time and some judicious high‑ and low‑frequency shelving EQ to avoid undue mix clutter.As you can see, all the send effects in this mix were quite specialised, and nothing was applied across the board, so the combined contribution was fairly subtle — with the exception of those delays that were used as a feature in themselves. I try to make a point of double‑checking all my send‑effect return channels at a late stage of the mixing process by flexing their mute and solo buttons, because that can really help give a sense of perspective when lots of effects are on the go at once. Indeed, in this particular mix I discovered that I could afford to pull down all the reverb returns by a couple of decibels without the mix falling apart, a simple adjustment that improved the clarity of the final mixdown appreciably. It's also worth mentioning that I spent a good 20 minutes just refining the lead vocal's effects sends, trying to strike just the right balance between the blend, sustain, tonal change and stereo width characteristics of the different send effects I'd set up. You can't afford to hurry this kind of work if you're going to get the vocal sitting successfully in the mix.
It's What You Take Out That Matters
 The simple one‑tap 'Haas delay' patch that was used to add stereo width to the overall guitar sound. Note the sub‑30ms delay time and absence of feedback.
Many small-studio mix difficulties stem from arrangement problems, so I tend to spend a lot of time in Mix Rescue adding things — but from a pure mixing perspective, what you take out is usually every bit as important as what you put in, and in this mix you can see that principle in action: the bass needed very little processing once a space had been cleared for it; carving away competing presence frequencies allowed the vocal to punch through the mix without dwarfing the rhythm section; and with precision send‑effects I could enhance and 'cohere' the final mix without excessive clutter and loss of mix detail. If you can work out how to pare down each element of your own productions in similar ways, you should find yourself with clearer and more powerful mixes to show for it, whatever the genre.
Rescued This Month
This month's track is by SOS reader Johnny Lokke, who caught the heavy‑metal bug at a Judas Priest gig aged 14 and has since released five albums of his own material inspired by the sound and ethos of the classic metal acts. For this particular song, 'Promises & Lies', Johnny provided the vocals, guitars, and bass himself, while Glen Lyons helped out with drums and Carlos Arcay Fernandez contributed suitably blistering guitar solos!
Remix Reactions
 Mix Rescuee Johnny Lokke is a devotee of classic heavy metal and needed a bit of help to nail exactly the right sound for the genre.Johnny Lokke: "When I heard the remixed version, the first thing I noticed was how well everything gels together, while at the same time you can hear every instrument clearly, which is what I could never achieve! The song has a couple of little bass riffs in it, and in my version they were either over‑the‑top loud, or they were missing entirely. In the new version, they really tie in nicely with the guitars, and mesh together, instead of competing with one another. Another thing I really like is the way Mike's changed the chorus vocal arrangement, taking it from simple harmonies to a 'call and response' type of thing — it's made it much more interesting for sure. I only wish I had thought of it, so that I could get the credit!
"Finally, I love the vocals. In the style of music I produce, they're the key to setting the tone and mood, and they have to be just right to bring the listener into the song. They're now really strong and clear, while maintaining a bit of roundness to them instead of being brittle. I've always loved that about singers like Rob Halford, Bruce Dickinson and Biff Byford, and now hopefully I'll be able to duplicate this in the future — as well as everything else I've learned from this Mix Rescue. I can't wait to get started!”
Audio Examples Online
We've placed a number of audio examples from this mix on the SOS web site at /sos/jan11/articles/mixrescueaudio.htm, so that you can hear for yourself what Mike is writing about. You can also download the full Reaper remix session from the same page.