Comping multitrack audio needn't be a headache with new features in Digital Performer 6.
 Here, a guitar solo has been recorded with a number of different mics simultaneously, on four tracks. Three takes are being assembled into one 'master' comp.
One of Digital Performer 6's most lauded new features — and rightly so — is its Comp Tool. After you've recorded multiple alternative takes on a track, the tool (in conjunction with some new take‑related features) allows you to quickly make a single 'composite' of those multiple takes. The idea is that you end up with a patchwork of the best bits of each take, all done with the greatest of ease, and in itself easily editable from then on. I covered the basic functionality in a workshop a few months back, in the October 2008 issue (/sos/oct08/articles/dpworkshop_1008.htm).
For the typical vocal or guitar recording that occupies just one track, the Comp Tool is very easy to use. There are many situations, though, in which you might want to comp multitrack audio, such as a multi‑miked guitar amp or a drum kit consisting of overheads, individual drum mics, and room mics too. For these, you need your comps and other edits to take place on all tracks as you work on just one, and that's a job that's ideally suited to DP's Track Groups feature. As an example, we'll take the recording and comping of a typical multi‑miked guitar part.
1. After creating and naming your guitar tracks, and checking sound quality and levels as normal, select them all by Command‑clicking their names in the Tracks Overview or Sequence Editor. This prepares them for being grouped.
2. In the Project menu, choose Modify Track Groups / New Track Group, or use the key command Shift‑Command‑G.
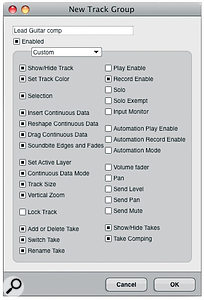
The dialogue box that appears controls exactly what features and attributes of your guitar tracks are going to be grouped. As well as presets optimised for editing and mixing, the pop‑up menu offers a Custom option that allows you to choose exactly what you require. That's what's needed right now, to tie the tracks together ready for comping and other editing.
3. Choose Edit, then Custom (see screen above). In addition to what's already there, tick all the options relating to takes (in DP 6.02 that's the lowest five). For good measure, you might as well tick Record Enable too, as this will be useful in a moment. Use the text field to give the group a descriptive name, such as 'Lead Guitar comp', and click OK.
4. Now to record your takes. Because of what you did in step three, record‑enabling any track in the group enables all the rest — handy. After the first take is done, choosing New Take on any track creates a new take on all tracks ready for your next recording pass — very handy! Keep creating and recording new takes until you're done.
5. Now for the comp itself. In the Sequence editor, make sure all the tracks you're working with are visible, for clarity. Choose Show Takes for one of them, from the Take pop‑up menu (see screen above right). If that's hidden, find it in the Take submenu, Track Settings pop‑up.
6. Open the Tools palette with Shift‑O and click the Comp Tool to select it. (Power‑users can omit this step and just work with the 'B' key held down, which temporarily selects the Comp Tool). Then it's normal comp procedure: drag over sections of individual takes to choose them, option‑click to create dividers (essentially edit points), and click to choose take sections between dividers.
As well as comping, you can edge‑edit or nudge soundbites, drag fades and perform many other editing actions, safe in the knowledge that these things are taking place on all your grouped tracks simultaneously. Just watch out when using the scissors tool: sometimes you need to select a soundbite first (to select all its counterparts across the track group) for a cut to take place on all tracks simultaneously.
And that's about the size of it. When you've finished the perfect comp, you can choose Hide Takes from one of the grouped tracks, and carry on working.
Going Further
As we've seen, it's dead easy to get started with Track Groups. Knowing a few extra tricks will help, though, whether you're using groups for comping or for other tasks. Deleting a track group is straightforward: select all the tracks involved, then choose Ungroup Tracks (Control‑Command‑G) from Project / Modify Track Groups. That submenu also has a command that temporarily disables all groups: Suspend Track Grouping (Control‑Alt‑Command‑G). Beyond this, for more in‑depth control you'll need the Track Groups window. Open it by choosing Project / Track Groups or with Shift‑Alt‑G. This corner of the Project menu contains a lot of group‑related commands.
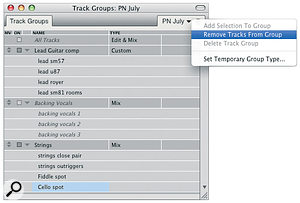
The Track Groups window maintains a list of all groups in the current project, and they can be enabled and disabled individually using the tick boxes in the 'On' column. Mini‑menu options allow tracks to be added to and deleted from the groups, and to tweak the details of the grouping you can just click in the Type column to switch between presets or change a Custom selection. Whole track groups can be deleted here too, by selecting the group name and then choosing Delete Track Group from the mini‑menu. Finally, by simply double‑clicking a group's name you can rename it. The Track Groups window is the nerve centre for all the groups in your project, and allows you to enable, disable, rename and edit them. Here the Backing Vocals group has been disabled, by un‑ticking its 'on' box, and the Cello Spot track is about to be removed from the Strings group using a mini‑menu command.
Track Group Heaven
The real trick with Track Groups, after grasping what they can offer you, is to use them as often as you need without getting hung up on any potential complexity. Need to set the colour of a bunch of tracks in one swoop? Select them, hit Shift‑Command‑G, choose Custom, then Alt‑click Set Track Color to select only that attribute. Click OK, change one track's colour, and voila. Similarly, if you're doing orchestral scoring, consider making a group for each instrumental section and enabling only Play Enable and Solo, so you can really quickly mute and solo sections en masse. You might notice, too, that the Tracks Group window has an 'All Tracks' group pre‑configured as standard, but not enabled. Perhaps you want to do something like setting the vertical size of all Sequence editor tracks simultaneously — in which case enable the All Tracks group, make the change, then disable it.
If you do want to get complex with track groups, the possibilities are there for multitrack editing, fiendish automation data entry, aux send level control and more. The concepts are just the same, and it's all very easy to set up and dismantle.
DP News
• BPM: There's been another update to MOTU's newest virtual instrument, BPM. Version 1.02 adds yet more refinement, including sequencer editing improvements, better handling of sliced loops and 'one‑shot' samples, MIDI modulation, and niceties like metronome volume. Download it from www.motu.com.
• Speakerphone: Those clever and cool guys at Audioease have released the Speakerphone 2 plug‑in they showed at this year's NAMM show. It combines Altiverb‑derived convolution for tone and acoustic treatment with many other highly specific types of processing, and a huge library of sound‑effect type samples, all slanted towards placing your audio in various virtual environments or making it sound like it's passing through some transmission medium, like a telephone or record player. Incredible, inspiring results were capable with version 1, but where that felt like a sound editor's tool Speakerphone 2 will appeal more to musicians, producers and remixers too. A prodigious range of guitar amp and cabinet impulse responses have been added, along with modules including dedicated microphone impulses, 'cover' (for placing your sound inside virtual boxes and under virtual blankets), and a brilliant on‑board modulation system. The plug‑in is fabulously easy to use, thanks to some great user interface tweaks, and yet has phenomenal depth. It's not cheap, at €470, but is well worth the money. More details and some informative videos at www.audioease.com.
• Virus TI: There's some promising news for owners of Access Virus TI synths. Access's new TI 3.0 software brings full TI compatibility with DP 6.02 a step closer, with solid timing accuracy even when using multiple arpeggiator patches. Sadly, DP no longer appears to compensate for latency properly, but you can work around this by using the Virus's hardware (rather than USB) outputs. Here's the really interesting thing, though: check out Access's software 'change log' and you'll see that Virus Control version 3.0.2 received a specific fix to make it instantiate reliably in DP6. So whilst DP might not yet have 'approved host' status, it seems it's back on Access's radar, which is great news.
